Important Information on Online Correction
All type of corrections like “Personal information , Deductee details and Challan correction” can be made using Online correction functionality available from FY.2007-08 onwards depending upon the type of correction

This feature is extremely useful as it is :
Free of Cost :TRACES does not charge any fee for doing online correction
Time saving: No need to request for Conso file and wait for file availability. Just raise a request and you can select the type of correction you wish to proceed with. Correction gets processed in 24hrs
Effort saving: No need of any software/ CD/PEN drive , just login and file the correction
Enhance efficiency: Error specific correction is possible
Note: For paper return online correction cannot be done
Most Common Error While filing Online Correction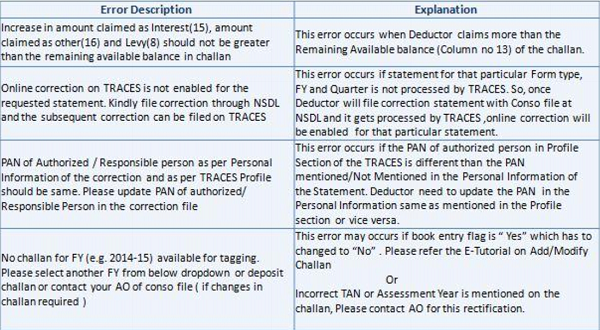
Most Common Error While filing Online Correction (Contd.)

Brief Steps for Add Challan to Statement
This feature enables deductor to Add challan in the already filed statement , Add challan functionality is disabled through offline correction. In case statement is not processed by TRACES, please file C1 ( Personal Information ) through Conso file then you will be able to proceed with online correction on TRACES
- Step 1: Login to TRACES website
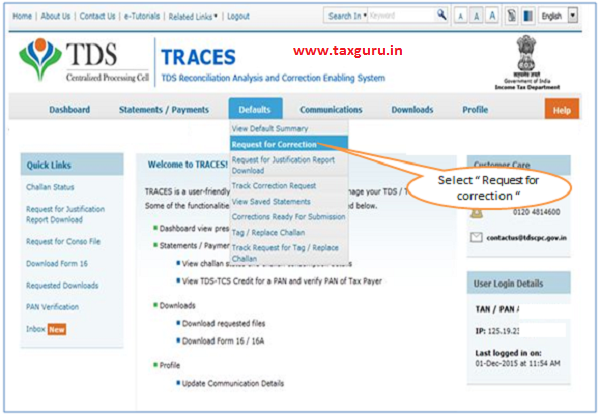
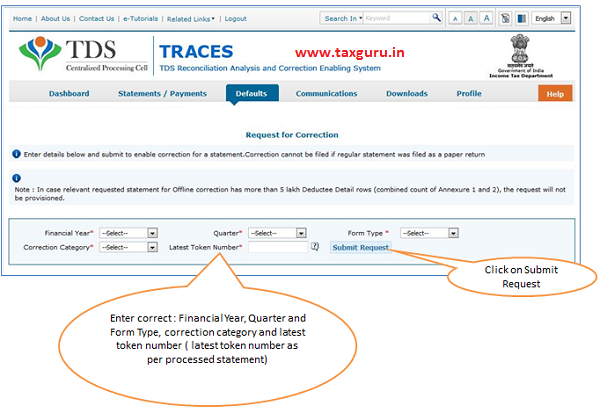
- Step 2: Go to “Request for correction” under “ Defaults“ by entering relevant Quarter, Financial Year, Form Type , Latest Accepted Token number
- Correction category should be “Online”
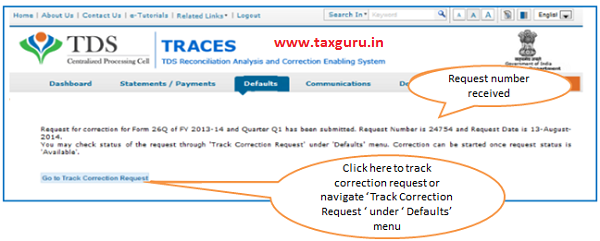
- Request number will be generated
- Step 3: Request will be available under “ Track Correction Request”
- When request status become “Available” click on Available / In progress status to proceed with the correction
- Provide information of Valid KYC
- Step 4: Select the type of correction category from the drop down as “Add Challan”
- Step 5 : Make the required corrections in the selected file
- Step 6 : Click on “Submit for Processing” to submit your taxguru.in correction (Only Available to Admin User)
- Step 7 : 15 digits token number will be generated and mailed to Registered e-mail ID
Status of Online Correction Requests:
- Requested-When user submits request for correction.
- Initiated-Request is being processed by TDS CPC
- Available-Request for correction is accepted and statement is made available for correction. User can start correction on the statement. Clicking on the hyperlink will take user to validation screen. Once user clicks on request with ‘Available’ status, status of request / statement will change to ‘In Progress’
- Failed-Request cannot be made available due to technical error. User can re-submit request for same details
- In Progress-User is working on a statement. Clicking on the hyperlink will take user to validation screen
- Submitted to Admin User-Sub-user / Admin User has submitted correction statement to Admin User
- Submitted to ITD-Admin User has submitted correction statement to ITD for processing
- Processed -Statement has been processed by TDS CPC (either for Form 26AS or for defaults)
- Rejected- Statement has been rejected by TDS CPC taxguru.in after processing. Rejection reasons will be displayed in ‘Remarks’ column
Steps for Online Correction-Add Challan to the statement (Pictorial Presentation)
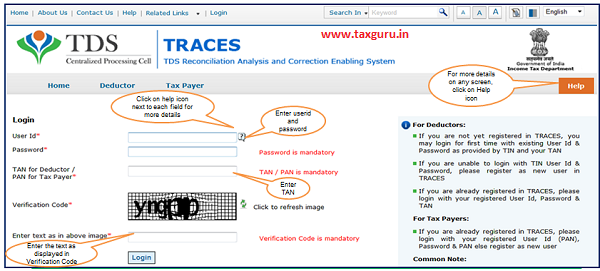
Login to TRACES
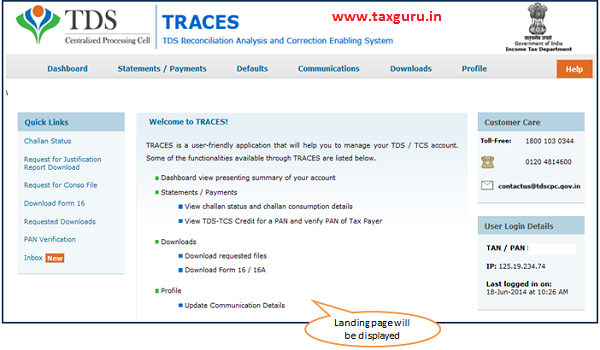
Welcome Page
Online Correction Request Flow
– –
–
Online Correction Request Flow-View submitted request
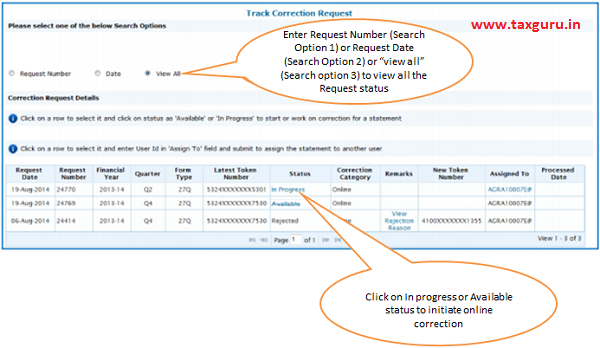
Available Status -Request for correction is accepted and statement is made available for correction. User can start correction on the statement. Clicking on the hyperlink will take user to validation screen. Once user clicks on request with ‘Available’ status, status of request / statement will change to ‘In Progress‘
In Progress Status-User is working on a statement. Clicking on the hyperlink will take user to validation screen
Digital Signature supported KYC Validation contd. (Step 1)
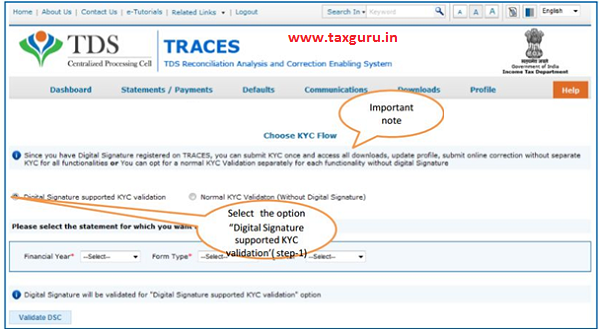
- Digital Signature Support KYC validation screen will appear only if Digital Signature is registered. Deductor can register/re register their Digital Signature in Profile. Please refer –Digital Signature Certificate Registration e-Tutorial for more information.
- Normal KYC Validation (without Digital Signature) –User can opt a normal KYC validation separately for each functionality without digital signature.
Digital Signature supported KYC Validation contd. (Step 2 & Step 3)
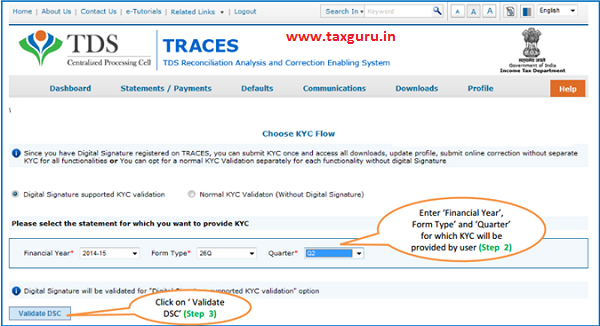
After validating the DSC, one time KYC page will be displayed for the FY+Qtr+From type combination which has been selected by the user.
Digital Signature supported KYC Validation contd. (Step 4 & Step 5)
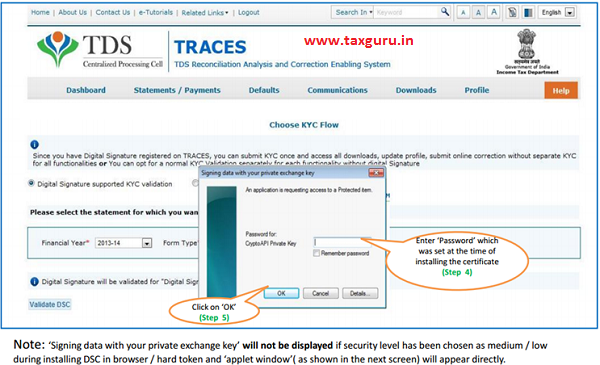
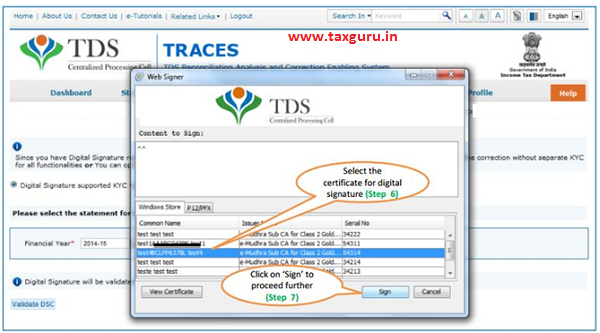
Digital Signature supported KYC Validation contd. (Step 6 & Step 7)
Digital Signature supported KYC Validation contd. (Step 8)- KYC of the FY+Quarter+From type selection in stop 2 will be displayed
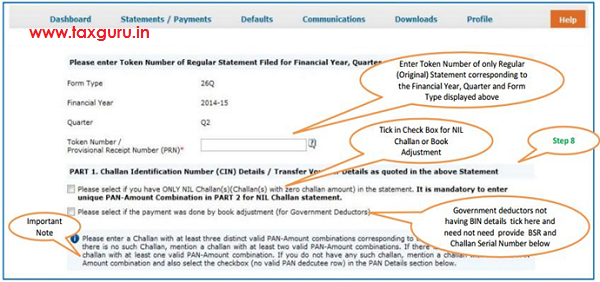
- Authentication Code will not appear on the screen in case DSC Supported KYC
- In one session this manual KYC page ( On the basis of input selected by the user ) will be displayed only once
Token Number Details (Contd.)
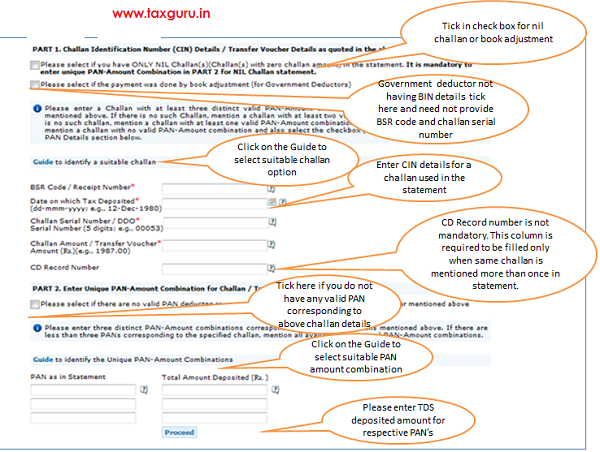
Notes for Validation Screen:
- Authentication code is generated after KYC information details validation, which remains valid for the same calendar day for same form type, financial year and quarter
- Token Number must be of the regular statement of the FY, Quarter and Form Type displayed on the screen
- CIN/BIN details must be entered for the challan/book entry mentioned in the statement corresponding to the FY, Quarter and Form Type mentioned above
- Government deductor can enter only Date of Deposit and Transfer Voucher amount mentioned in the relevant Statement
- Amount should be entered in two decimal places (e.g., 1234.56)
- Only Valid PAN(s) reported in the TDS/TCS statement corresponding to the CIN/BIN details in Part1 must be entered in Part 2 of the KYC. Guide available on the screen can be referred for valid combinations.
- Maximum of 3 distinct valid PANs and corresponding amount must be entered
- If there are less than three such combinations in the challan, user must enter all (either two or one)
- CD Record no. is mandatory only in case of challan is mentioned more than once in the statement
Authentication Code Screen
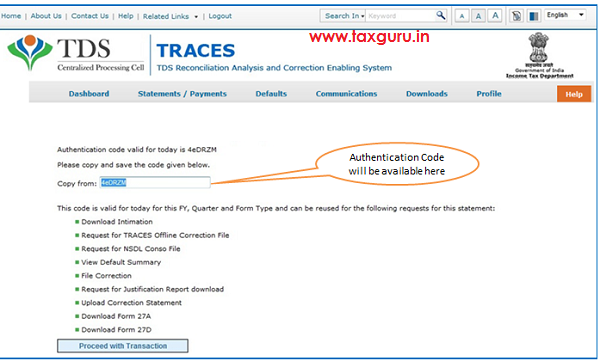
Select Add Challan To Statement from the drop down

List of Challans with available balance in the statement would be shown to Pay Interest/Levy
Non -Govt Deductors – Add New Challan to Statement
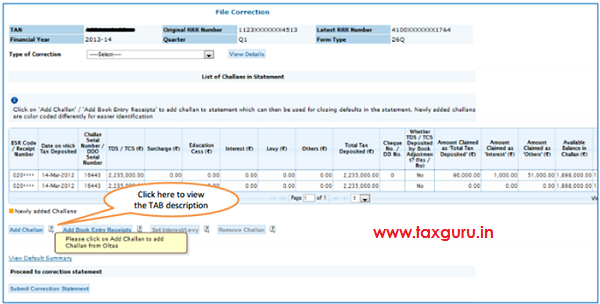
Govt Deductors – Add New Book Entry Receipt to Statement
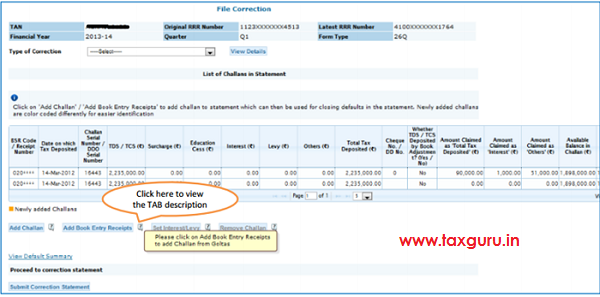
Select Add Challan To Statement from the drop down
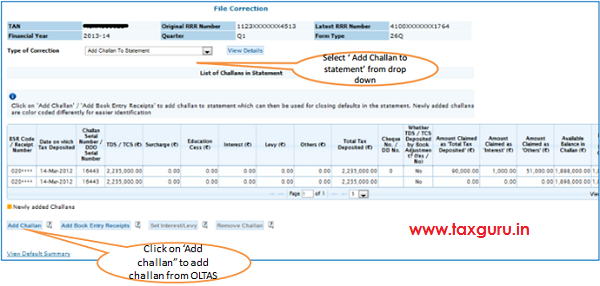
Steps to Add challan to the Statement
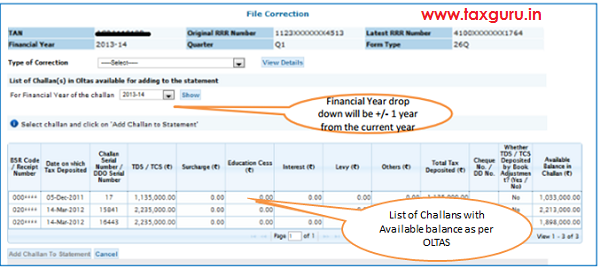
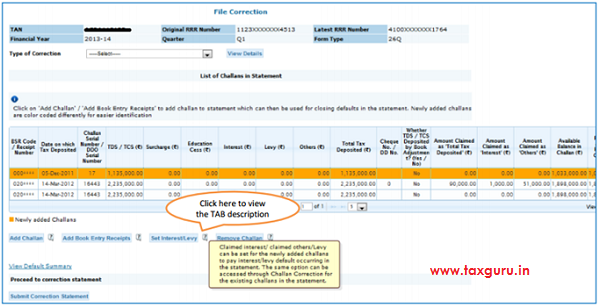
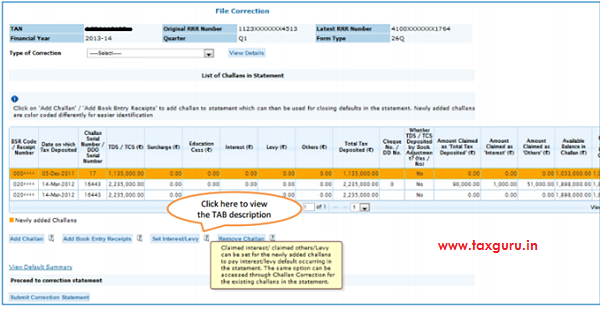
- Add Challan from OLTAS/GOLTAS’ screen, list of challan with available balance would be dispalyed to add in the statements
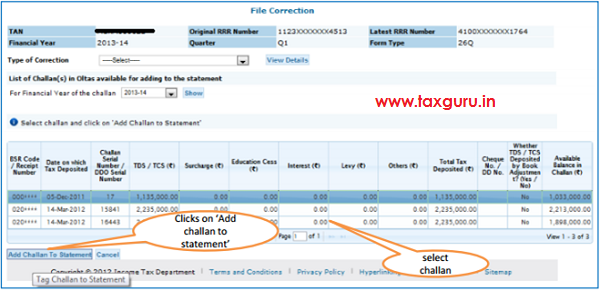
–
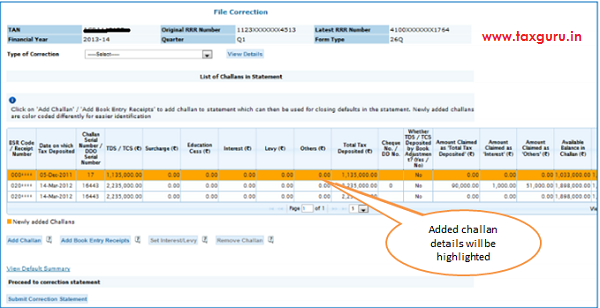
–
–
–
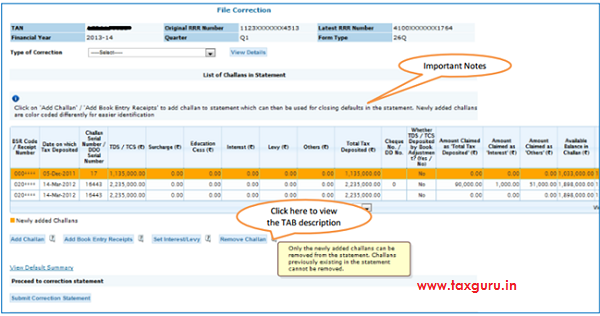
Only the newly added challan can be removed from the statement. Challans previously existing in the statement cannot be removed.
Steps to Add challan to the Statement (Contd.)
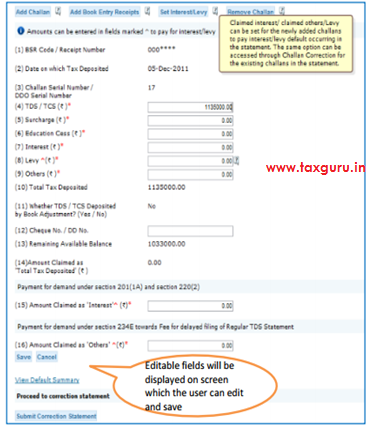
Important Notes:
1. BSR Code should be of the challan which has available balance.
2. Date on which challan with available balance was deposited in bank .
3. Surcharge amount of challan / BIN from the statement filed by deductor with regards to the statement selected for filing correction .Amount should not be editable for BINs.
4. Education Cess amount of challan / BIN from the statement filed by deductor with regards to the statement selected for filing correction. Amount should not be editable for BINs.
5. Interest amount in the challan / BIN from the statement filed by deductor with regards to the statement selected for filing correction. Amount should not be editable for BINs.
6. Other amount in the challan / BIN from the statement filed by deductor with regards to the statement selected for filing correction. Amount should not be editable for BINs.
7. Section code under which tax was deducted for the PAN. From FY 2013-14 onwards, this field will not be there.
8. Amount of interest to be claimed from this challan / BIN. User cannot edit this field by tagging a challan. User must directly change value in the field. Amount should not be editable for BINs.
9. Amount to be claimed as ‘Others’ from this challan / BIN . User cannot edit this field by tagging a challan. User must directly change value in the field. Amount should not be editable for BINs.
10. Save the edited detail.
Steps to Add challan to the Statement (Contd.)
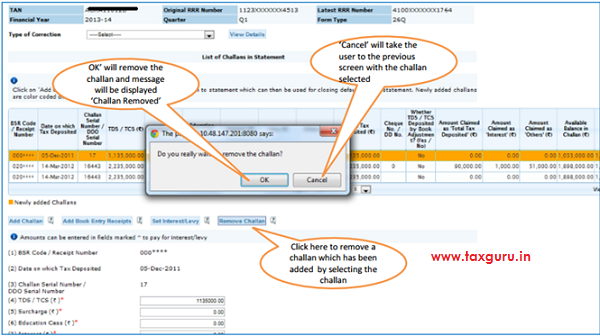
Action Summary
Action Summary –Submit to Admin User
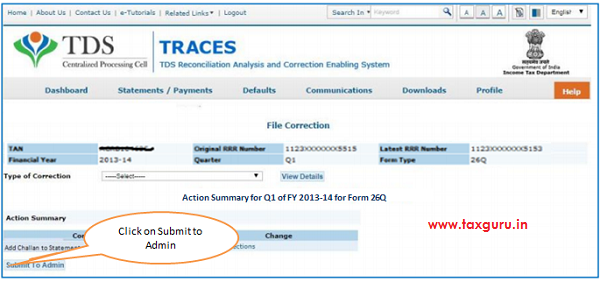
Above Screen will be appeared in case correction submitted by Sub-user
Action Summary

Request will be submitted to Admin user . Sub-user cannot submit the correction from ‘correction Ready for submisssion’.
Sub- user should only be able to view statements saved by them.
Action Summary- Admin User Login
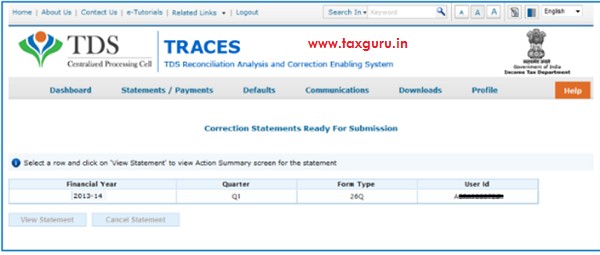
–
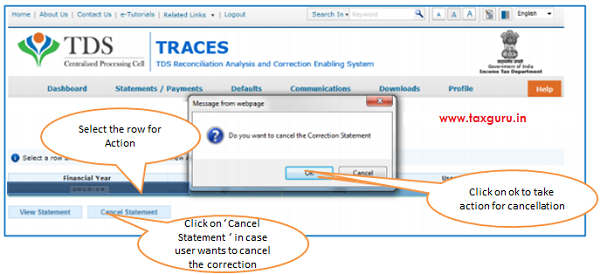
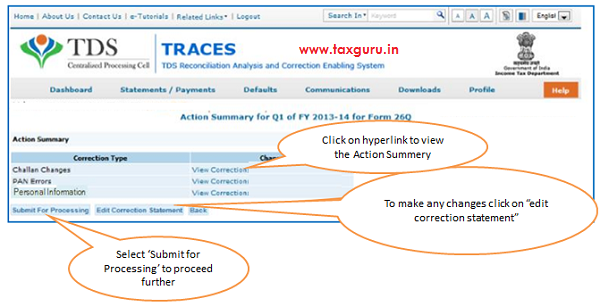
Action Summary- Admin User
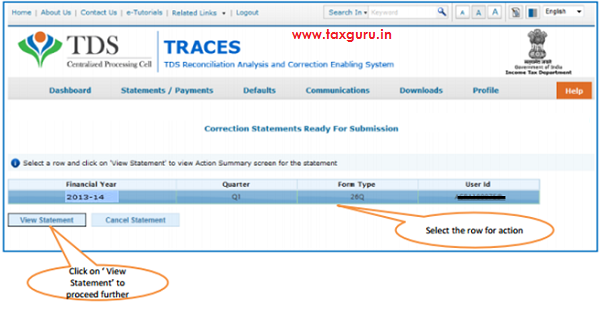
Action Summary- Submit For Processing
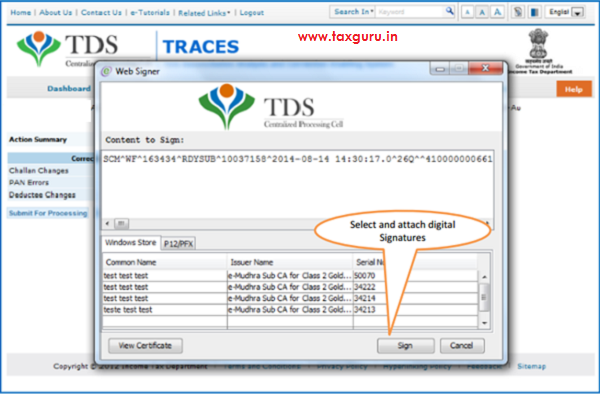
Action summary- Attach Digital Signature
Action Summary –Token Number Generated
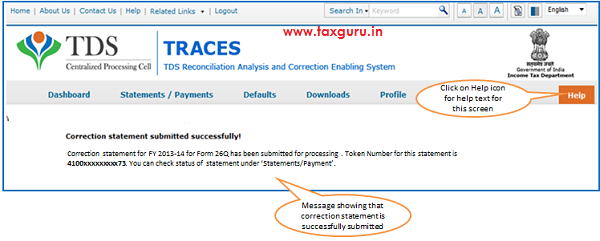 Note: Note down the Token Number for future reference
Source- https://contents.tdscpc.gov.in


I have got more solution from your side, hope will get many more solution. Thanks.