Directorate of Income Tax (Systems)
User Guide for Submitting Response to Notices and Letters Received under e-Verification Scheme, 2021 – Version 1.0 (May 2023)
Document Version Control
1. About this Document
1.1. Purpose
The purpose of this document is to provide a comprehensive understanding on how to submit responses to notices and letters received under e-Verification Scheme, 2021. The taxpayers will be able to:
- View/ download the relevant communication (notice u/s 133(6) of Income Tax Act, 1961 letter etc.) and submit their response/ explanation on portal.
- View already submitted responses/ explanations.
Disclaimer: For a complete understanding of taxability of any head of income, the assessee is advised to refer to the Income Tax Act, 1961. This document is for the purpose of guiding the taxpayer on how to submit response to notices and letters received under e-Verification Scheme, 2021.
Also Read: Response to Notices & Letters Received under e-Verification Scheme, 2021- FAQs
1.2. Document Conventions
This user guide uses the following conventions:
1. Menu items, Options, Dialog boxes and Functions are mentioned in ‘Bold and quotes’
2. Error messages are displayed in Italics
3. Angle brackets (>) indicate the progression of menu choices the user should select in a graphical user interface (GUI)
4. Note provides additional information
2. Intended Audience
The intended audience is person/ entity who have received the communication (notice u/s 133(6) of Income Tax Act, 1961, letter etc.) from the Income Tax Department under e-Verification Scheme, 2021. Taxpayers will be able to access AIS/ Compliance Portal through e-filing portal (www.incometax.gov.in) to view the relevant communication and submit their response/ explanation online.
3. Overview
3.1. About Project Insight
Income Tax Department initiated Project Insight to focus on three goals namely (i) to promote voluntary compliance and deter non-compliance; (ii) to impart confidence that all eligible persons pay appropriate tax; and (iii) to promote fair and judicious tax administration. Under this project, an integrated data warehousing and analytical platform has been rolled out. The project also operationalizes two centers namely Income Tax Transaction Analysis Centre (INTRAC) and Compliance Management Centralized Processing Centre (CMCPC).
3.2. About Compliance Portal
Compliance portal is a dedicated portal to enable Annual Information Statement (AIS) to provide comprehensive view of information for a taxpayer, e-Campaign for capturing of feedback & response on information and specific compliance related issues, e-Verification for view and response on communications received from the Income Tax Department under e-Verification Scheme, 2021. The Compliance portal enables a seamless, secured two-way structured communication to enhance the transparency and functional efficiency of the department.
3.3. About e-Verification Scheme, 2021
The Central Board of Direct Taxes (CBDT), vide notification No. 137 /2021, dated 13-12-2021, notified the e-Verification Scheme, 2021. The Scheme aims to share and verify such financial transaction information with the taxpayer, which appears to be either unreported or underreported in the taxpayer’s Income-tax Return (ITR). Under this scheme, the Income Tax Department may issue notice u/s 133(6)/ letter to person/ entity whose case/ connected case has been selected under the e-Verification Scheme, 2021.
3.4. Accessing ‘e-Verification’ Section through e-filing portal
Taxpayer can access e-Verification section through following steps:
Step 1: Visit the Income Tax e-filing Website by using the URL https://www.incometax.gov.in/.
Step 2: On top-right of the homepage, click on ‘Login’ button.
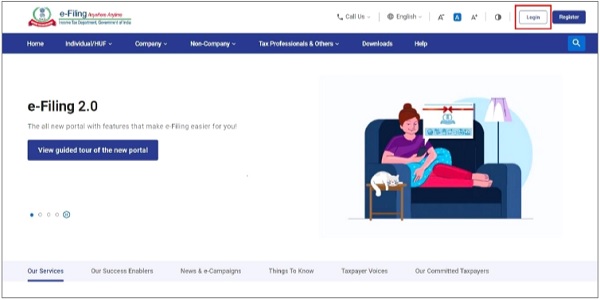
Figure 1 e-Filing homepage
Step 3: Enter user ID and click on Continue
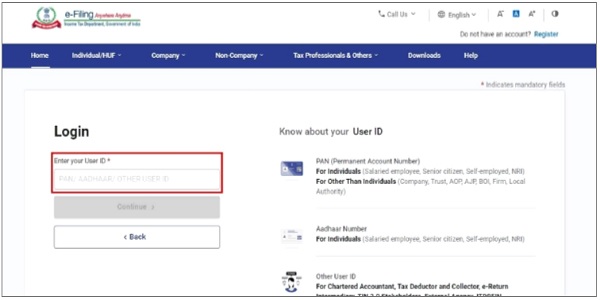
Figure 2 e-filing portal login page
Step 4: Fill in the password and click on ‘’Continue’‘ to navigate to e-Filing portal homepage.
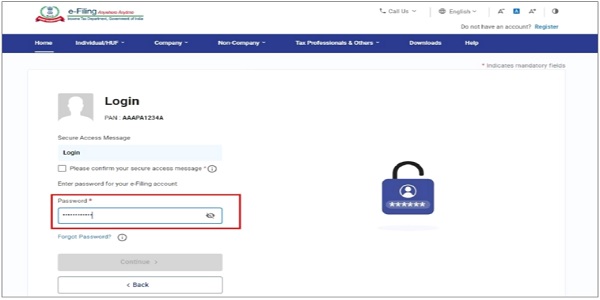
Figure 3 e-filing portal login page
Note: If the user is not already registered, then registration must be completed first by clicking on the Register button available on e-filing portal and then providing relevant details. After successful registration, login step can be performed on the e-filing portal.
Step 5: Once logged into e-Filing portal, go to Services tab, and click on Annual Information Statement (AIS). This will redirect the user to the ‘Compliance Portal’. On Compliance Portal, navigate to ‘e-Verification’ tab.
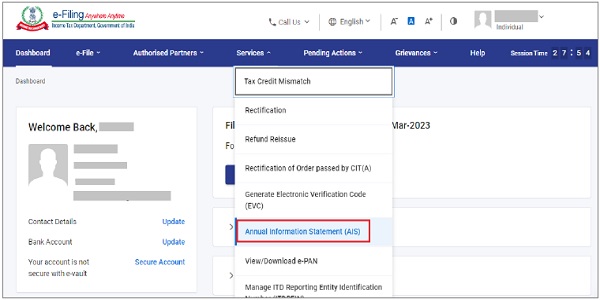
Figure 4 Link for Annual Information Statement (AIS)
Step 6: After redirecting from the e-Filing portal, click on the e-Verification tab.
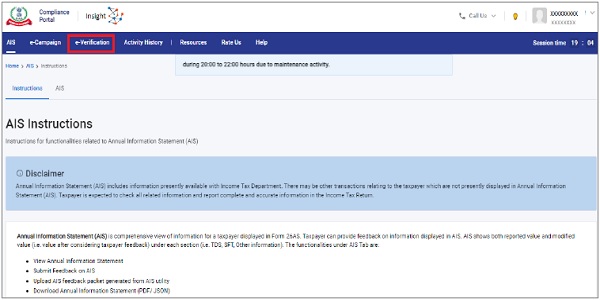
Figure 5 ‘e-Verification’ tab at Compliance Portal Homepage
4. e-Verification Tab
The e-Verification functionality available at Compliance Portal of the Income-tax Department enables a person to:
- View/ download the relevant communication (notices u/s 133(6), letters etc.) and submit their response/ explanation on portal.
- View already submitted responses/ explanations.
4.1. Viewing e-Verification Tab
Under the e-Verification tab, year wise summary view of notices/ letters will be displayed.

Figure 6 e-Verification tab – A.Y. wise summary view
By clicking on specific Assessment Year, list of notices/ letters pertaining to that assessment year will be displayed on next screen (as shown below).

Figure 7 List of Notices/ Letters for the selected year
4.1.1. General Information
It displays general information pertaining to the person including PAN, Masked Aadhaar Number, Name of the Assessee, Date of Birth/ Incorporation/ Formation, mobile number, e-Mail address and address of the Taxpayer.

Figure 8 General Information under e-Verification
4.1.2. e-Verification – List View for Notices/ Letters for Selected Year
Under this section, a list of all the notices/ letters generated for the taxpayer is displayed. Following information is displayed for each row under list view:
- DIN – Document identification number for the notices/ letters.
- Type – Notice, Letter etc.
- Attachments – Supporting documents attached by ITD officer along with notice/ letter
- Description – Description of notice/ letter (e.g. Notice u/s 133(6))
- Issued On – Date of notice/ letter
- Response Due Date – Response due date for the notice
- Overall Status – Overall status for response on notice/ letter. Overall status are as follows:
- Pending – When person has NOT submitted response on letter/ any of the question of notice.
- Partially Submitted – When taxpayer has submitted response on some of the questions of the notice.
- Submitted – When taxpayer has submitted response on letter/ ALL of the questions of notice.
- Bell icon – On click of bell icon, reminder notification details issued for that notice/ letter can be viewed.
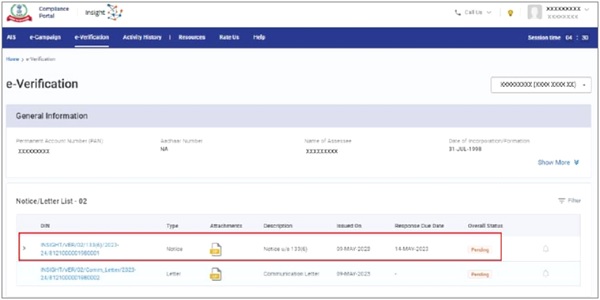
Figure 9 e-Verification List View
Clicking on the row will open the expanded view (as shown below)
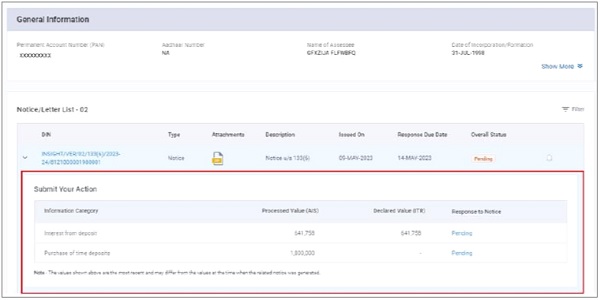
Figure 10 e-Verification Expanded View
4.1.3. Filters
Relevant filters are available on e-Verification list view which will help the user to filter the list. The e-Verification list view can be filtered using filter options (i.e., Type, Issued On, Overall Status).

Figure 11 Filter Options for e-Verification List
4.2. Provide/View Response
4.2.1. Provide Response to Notice
To provide response to notice, follow below mentioned steps:
Step 1: Navigate to e-Verification screen (Refer Section 4.1)
Step 2: Click on a row displayed under e-Verification list, where response is to be provided. On expanded view, click on ‘Pending’ button’.
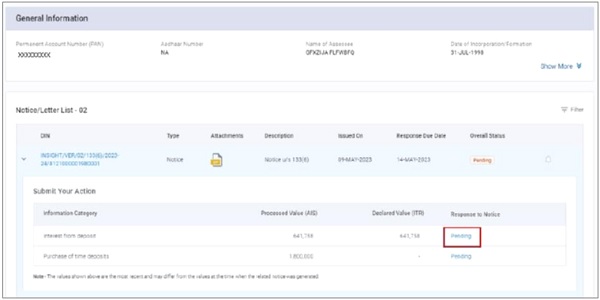
Figure 12 e-Verification Expanded View
Step 3: Upon clicking ‘Pending’ button, user will be navigated to ‘Response to Notice’ screen.
Step 4: Provide the response against each displayed question.
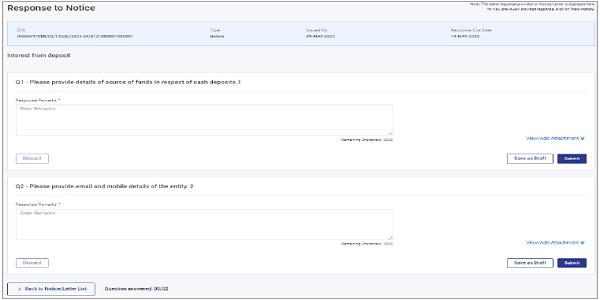
Figure 13 Response to Notice Screen
Step 5: To submit a response against a question, enter the remarks in the Response/ Remarks text box, add supporting document (if any) through View/ Add Attachment option and click Submit button.
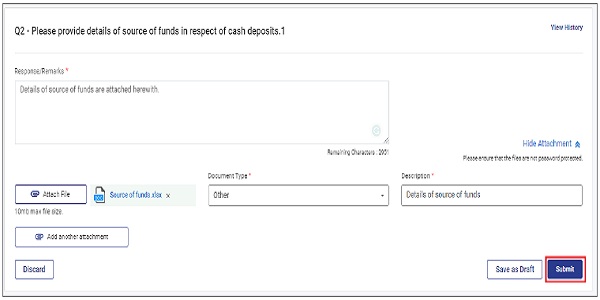
Figure 14 Notice Response Submit screen
Step 6: On clicking the Submit button, success message will be displayed:
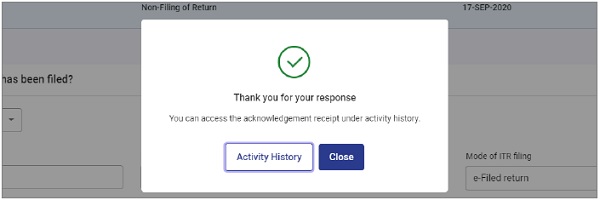
Figure 15 Success message screen
Step 7: Acknowledgement receipt for the submitted response can be downloaded from ‘Activity History’ section.
Step 8: Repeat the above steps to provide responses to all the questions.
Step 9: If required, updated response can be submitted by clicking Add Response button.

Figure 16 Add Response Link
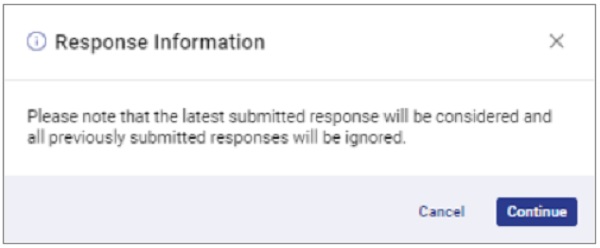
Figure 17 Alert

Figure 18 Adding Updated Response
Step 10: Submitted response(s) can be viewed by clicking View History link.

Figure 19 View History Link
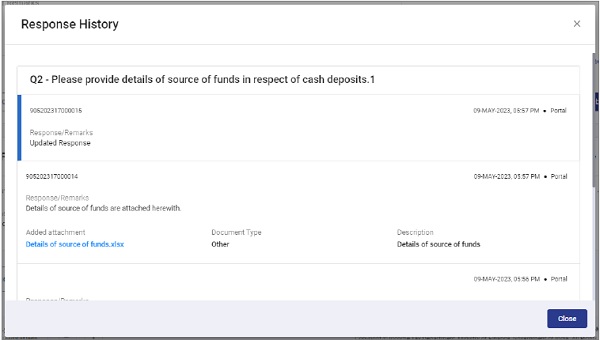
Figure 20 Response History
4.2.2. Provide Response to Letter
To provide response to letter, follow below mentioned steps:
Step 1: Navigate to e-Verification screen (Refer Section 4.1)
Step 2: Click on Pending button on the row where response to be submitted.
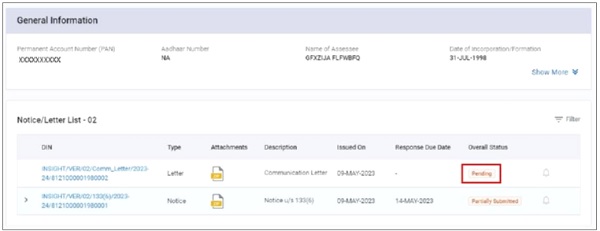
Figure 21 Pending button for Letter
Step 3: Upon clicking ‘Pending’ button, user will be navigated to ‘Response to Letter’ screen.
Step 4: To submit a response, enter the remarks in the Response/ Remarks text box, add supporting document (if any) through View/ Add Attachment option and click Submit button.

Figure 22 Letter Response Submit screen
Step 5: On clicking the Submit button, success message will be displayed:
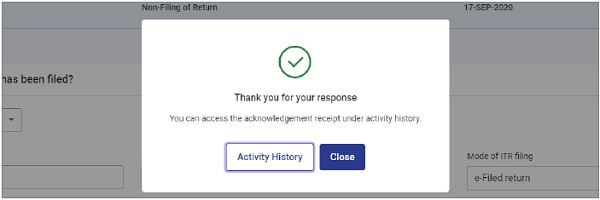
Figure 23 Success message screen
Step 6: Acknowledgement receipt for the submitted response can be downloaded from ‘Activity History’ section.
Step 7: If required, updated response can be submitted by clicking Add Response button.
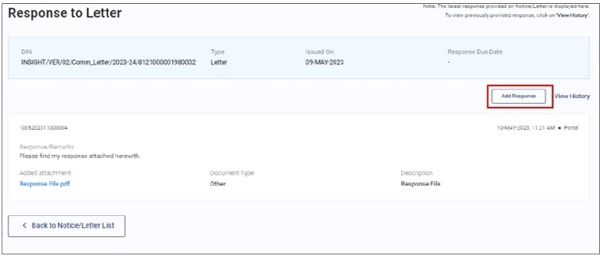
Figure 24 Add Response Link
Step 8: Submitted response(s) can be viewed by clicking View History link.

Figure 25 View History Link
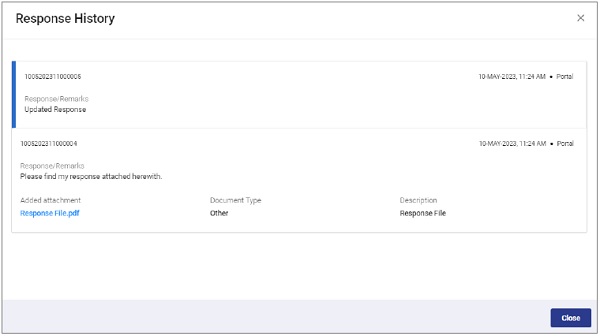
Figure 26 Response History
4.2.3. View Submitted Notice Responses
For each notice, information category wise statuses are maintained which are as follows:
- Pending – Response is not submitted for all the questions related to that category.
- Partially Submitted – Response is submitted for some of the questions related to that category.
- Submitted – Response is submitted for all the questions related to that category.
If response status is Partially Submitted or Submitted, submitted response(s) can be viewed by clicking these statuses (as shown below):

Figure 27 View Submitted Response
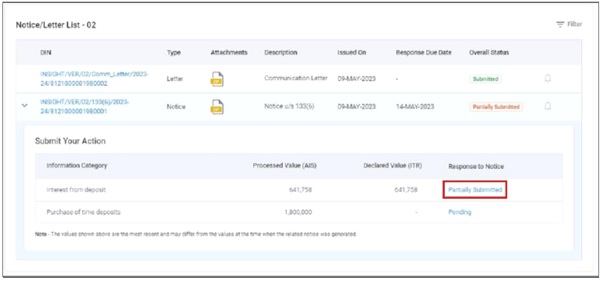
Figure 28 Category wise Response Status – Partially Submitted
On click of ‘Partially Submitted/ Submitted’ button, submitted response(s) will be displayed.
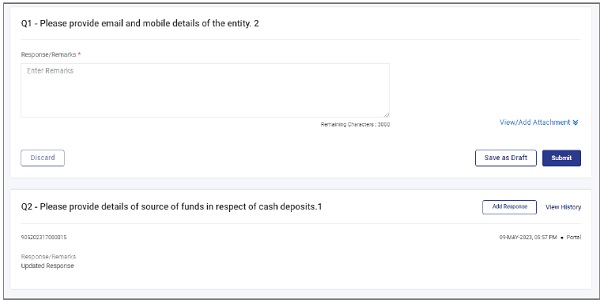
Figure 29 View Submitted Response(s)
4.2.4. View Submitted Letter Responses
If response status is Submitted, submitted response(s) can be viewed by clicking the Submitted button.

Figure 30 View Submitted Response
On click of ‘Submitted’ button, submitted response will be displayed.
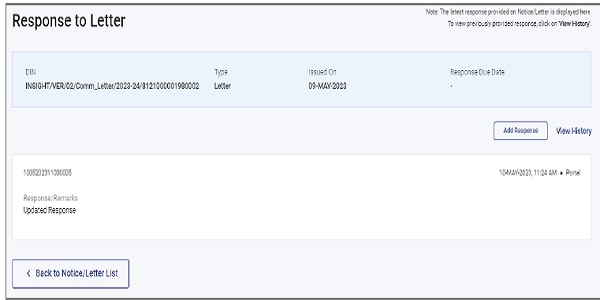
Figure 31 View Submitted Response
4.2.5. Download Response Acknowledgement PDF
After submitting Response, user can download Response Acknowledgement PDF after navigating to ‘Activity History’ screen.
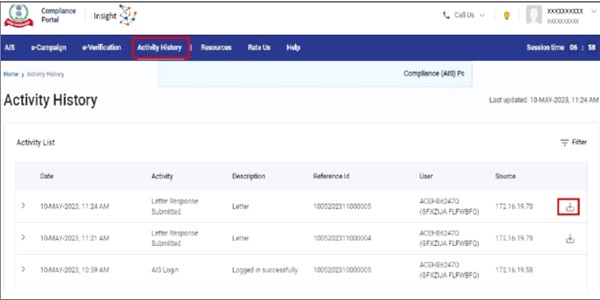
Figure 32 Activity History Screen
5. Activity History
All the response submission carried out by the user are viewable under Activity History tab. User will be able to download PDFs for all the responses under this tab.
5.1. View Activity History
User can view the Activities performed by him upon clicking on Activity History tab. To access Activity History page, click on ‘Activity History’ tab from the top bar (as shown below). System generated Id (Activity ID) will be created for each performed activity, Activity date, Activity description and detail will be displayed under this tab.
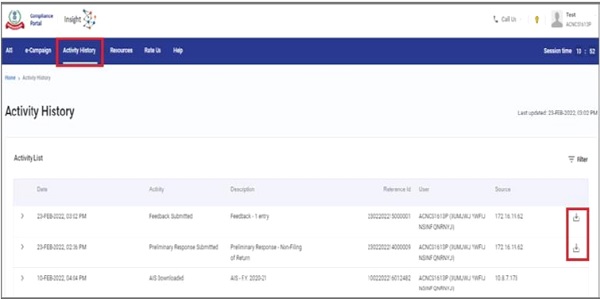
Figure 33 Activity History Screen
6. Resources, Rate Us, Help, Chatbot
These sections are meant to help the users with the easy access to the portal and feedback.
6.1. Resources
For the ease of the users to understand e-Campaign, AIS and the related functionalities, various resources have been created which are mentioned below:
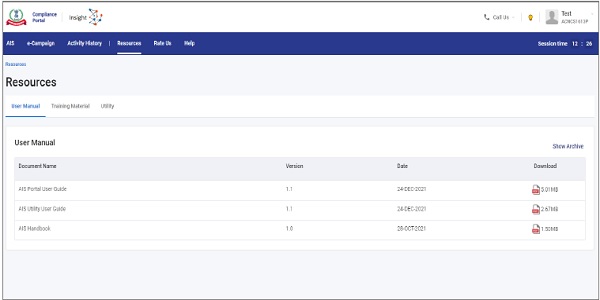
Figure 34 Resources
6.1.1. User Manual
The User Manual tab contains user guides, which are intended to give step by step assistance to users in using the e-Campaign functionality on Compliance Portal. It can be referred for detailed information on how to accomplish a task on the Compliance Portal. It can be accessed from Resources section by clicking on the User Manual tab.
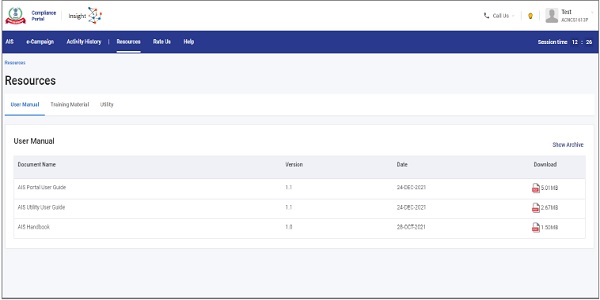
Figure 35 User Manual
6.1.2. Training Material
Training Material contains multiple documents intended to give assistance to taxpayer/tax professionals in using the Compliance Portal.
In the Homepage, navigate to the Resources tab and click on Training Material.
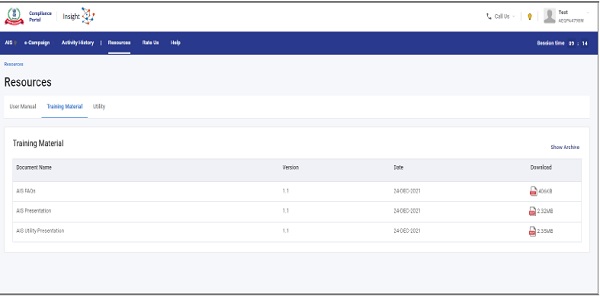
Figure 36 Training Material
6.1.3. Frequently Asked Questions (FAQ’s)
Frequently Asked Questions (FAQ’s) are intended to give assistance to the taxpayer in clearing the common doubts likely to be raised by the taxpayers. It can be accessed from ‘Resources’ section by clicking on the ‘Training Material’ tab. They are also available in Help section on Compliance Portal.
6.2. Rate Us
Users can provide their views and suggestions based on their experience with the Portal.
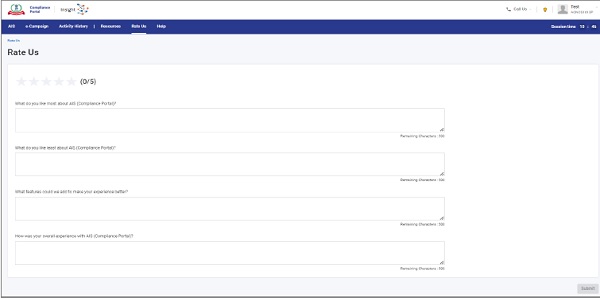
Figure 37 Rate Us
6.3. Help
Users can click on the Help Tab to access common FAQ’s, Contact Us – or Raise/View Ticket Status in case of any issue/escalations.
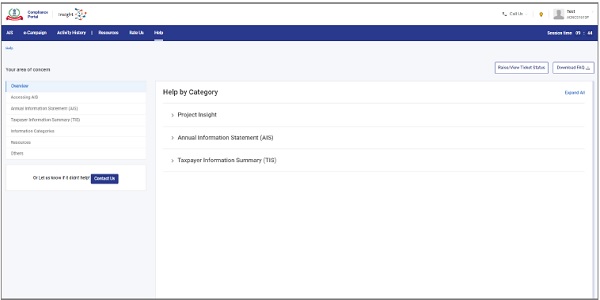
Figure 38 Help
To get the detailed information on a specific help topic, user can further click on the subcategory.
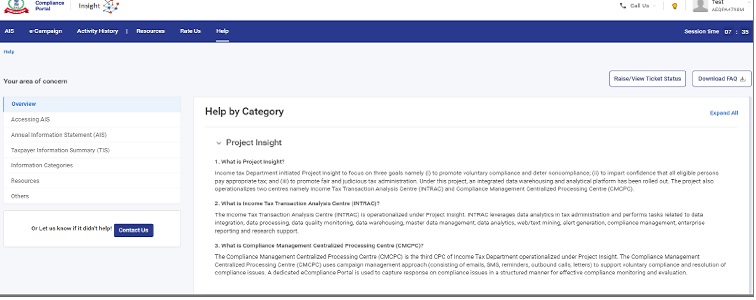
Figure 39 Detailed Help
If the query is not resolved even after that, the user can then user can raise a ticket for the same using the steps mentioned below:
Step 1: Click on Raise/View Ticket Status button given in the Help section.
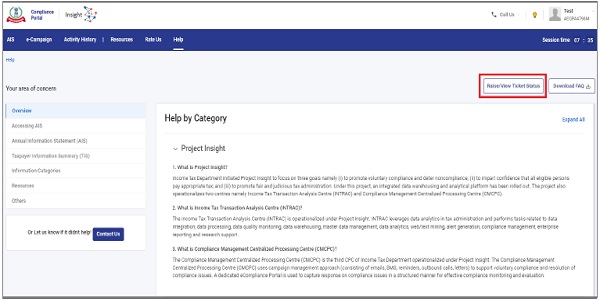
Figure 40 Raise a Ticket
Step 2: Choose the category of your area of concern.
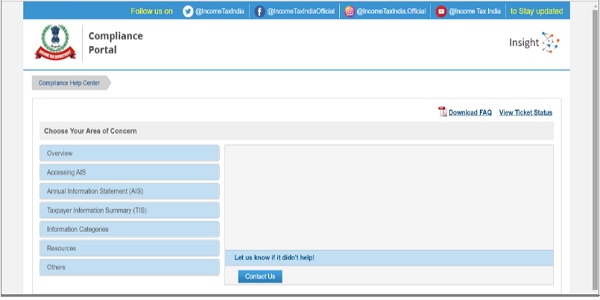
Figure 41 Choose ticket category
Step 3: Choose the sub-category of your area of concern and click on Contact Us.
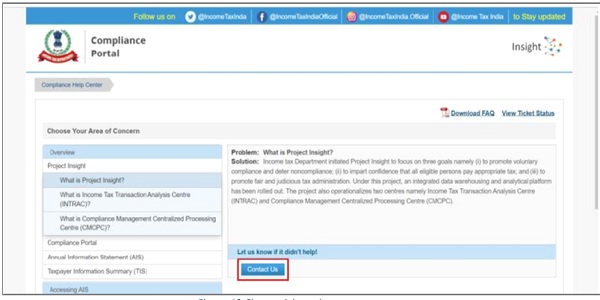
Figure 42 Choose ticket sub-category
Step 4: You can change your issue if you wish to, by clicking on the change button. Write the issue description and attach relevant documents, if any. Click on Submit your Query button.
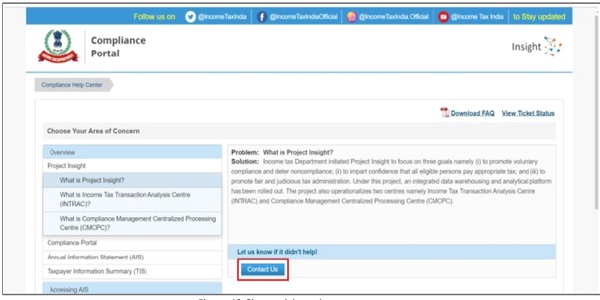
Figure 43 Submit Query
Step 5: You can also request a call back from the Helpdesk team by clicking on the Get a call back button.
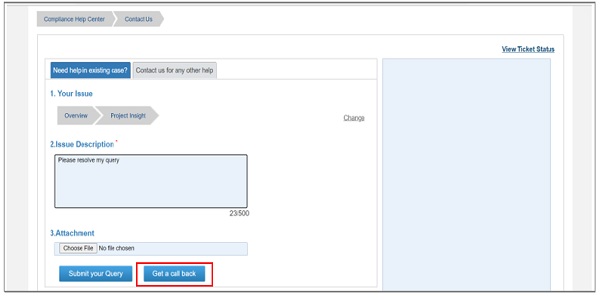
Figure 44 Get a Call Back
Step 6: Once a ticket is logged by the user, you will receive your Ticket id, and a relevant notification regarding the same.
Also, by clicking on Raise/ View Ticket Status user can check the status of an existing ticket.
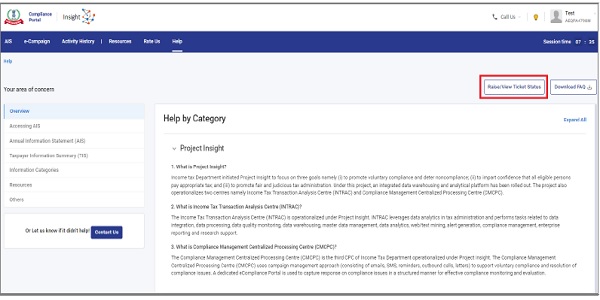
Figure 45 Check Ticket Status
If your query still unsolved, you can connect with the Helpdesk team by calling on the toll-free number (1800 103 4215).
6.4. Chatbot
A chatbot is an artificial intelligence (AI)-aided software that can simulate a conversation (or a chat) with a user in natural language. The user can post the query on the chatbot and can get instant replies/ resolution based on the frequently asked questions and machine learning. The same is implemented on Compliance Portal to enable quick help to the users.
6.4.1. Accessing Chatbot
The chatbot can be accessed through mentioned steps:
Step 1: Navigate to Compliance Por through U RL https://compliance.insight.gov.in/
Step 2: Click on the chatbot icon provided on lower right corner of the screen.
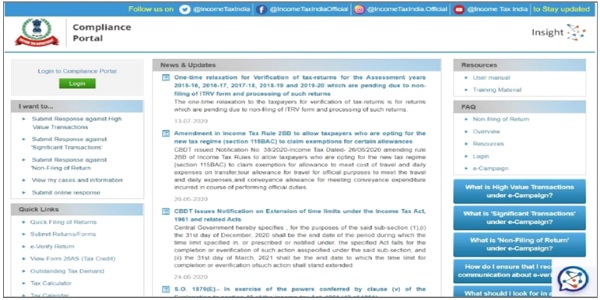
Figure 46 Pre-login page Chatbot
Step 3: The chatbot window opens, navigate through the categories mentioned or type your query in Ask me area.
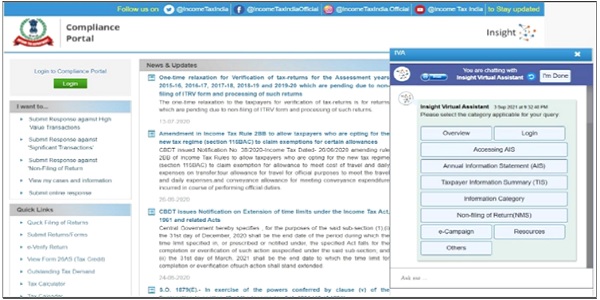
Figure 47 Pre-login page Chatbot


