A. FAQs on Filing for Registration by provider of OIDAR (Online Information and Data Base Access or Retrieval Services) / FAQ’s and Manual on Non-Resident Online Services Provider
Q.1 What are OIDAR Services?
Ans: Online information and database access or retrieval services means services provided by the means of Information Technology, over internet or electronic network, such as advertising on internet, cloud services, e-books, downloading movies, software, online supplies of digital content (movies, t.v shows, music, data storage, gaming), etc.
Q.2 Who all are required to be registered as OIDAR Service Providers?
Ans: Every person supplying online information and database access or retrieval services from a place outside India to a person in India, other than the registered person (herein after referred to as Non-Resident Online Services Provider), is required to register in GST as a provider of OIDAR Services. So, for the provision of OIDAR Services by such foreign services providers to the unregistered persons in India, obtaining Registration by such foreign service providers is mandatory.
Q.3 Should I apply for Registration in each State/UT in which I as Non Resident Online Services Provider is providing Services or there is provision of single centralized Registration in my case?
Ans: In case of Non Resident Online Service Providers, Single Registration will be valid for whole of India. For all such persons, the processing of registration and subsequent action will be done centrally at the Office of Principal Commissioner of Central Tax, Bengaluru West.
Q.4 What are the pre-requisites for registration in respect of such Non-Resident Online Services Providers?
Ans: Such Non Resident Online Service Providers need to appoint an Authorised Signatory (Indian) in India possessing a valid PAN. That authorised person shall apply for registration at GST portal on behalf of such Non-Resident Online Service Providers.
Q.5 How can I view my existing registrations mapped to same PAN of the business/ entity on the GST Portal while applying for registration?
Ans: After filling all the details in Part A of the application, when you click on Proceed button, GST Portal displays all the GSTINs / Provisional ID’s / UINs / GSTP IDs mapped to the same PAN across India.
Q.6 After Registration, how the authorized signatory of Non-Resident Online Services Provider login to the GST Portal for the first time?
Ans: After approval of Registration, the GSTIN and temporary password are sent to the primary authorised signatory through e-mail after which the below steps need to be followed:
- Step-1: Login to the GST Portal through first-time login facility.
- Step-2: Enter the provided GSTIN (username) and temporary password in the corresponding fields.
- Step-3: Change the temporary password and create a username for future use.
After creating the username and password, the Taxpayer will be able to access their dashboard on the GST Portal. For subsequent logins, the Taxpayer will have to use the normal login functionality.
Q.7 From which date does the Registration of Non-Resident Online Services Provider become valid?
Ans: Effective date of registration of all Non-Resident Online Services Provider on approval shall be:
i. Date of commencement of online services in India: If difference between ‘Date of commencement of online services in India’ and “Date of ARN for application for registration” is less than or equal to 30 days or
ii. Date of issue of Registration Certificate: If the difference exceeds 30 days from the date of issue of Certificate of Registration.
iii. In case the applicant is already providing online services in India prior to or as on Appointed Date, effective date of registration will be the ‘Date of commencement of online services in India’ specified in the form OR the appointed Date, whichever is later.
Q.8 How does GSTIN communicated after Registration of Non-Resident Online Services Providers?
Ans: The intimation of GSTIN, along with system-generated username and temporary password is sent to the primary authorized signatory of respective Non-Resident Online Services Provider business entity via e-mail.
No attachment (Registration Certificate / Rejection Order) will be sent to applicant on e-mail. All the certificates/Orders/Notices will be made available on taxpayer’s dashboard.
Q.9 Are there any preconditions before I can apply for Registration as a Non-Resident Online Services Provider?
Ans: A Non-Resident Online Services Provider must fulfill following conditions so that they can register on the GST Portal:
1. Their Authorized Signatory may have a valid Permanent Account Number (PAN)
3. Applicant has valid email address and mobile number
4. Applicant has the prescribed documents and information on all mandatory fields as required for registration.
Q.10 What are the documents the needs to be uploaded while applying for Registration as a Non-Resident Online Services Provider?
Ans:
| Document Name | Document Type | Document Size |
|
Proof of Appointment of Authorised Signatory |
||
| Photo of the Authorised Signatory | JPG | 100 KB |
| Letter of Authorisation | JPG, PDF | 100 KB |
| Copy of Resolution passed by BoD/ Managing Committee and Acceptance letter | JPG, PDF | 100 KB |
|
Proof of Details of Bank Accounts |
||
| First page of Pass Book | JPG, PDF | 100 KB |
| Cancelled Cheque | JPG, PDF | 100 KB |
| Bank Statement | JPG, PDF | 100 KB |
|
Proof of Non-Resident Online Service Provider |
||
| Clearance certificate issued by Government of India | JPG, PDF | 100 KB |
| Certificate of Incorporation if the Company is registered outside India or in India | JPG, PDF | 100 KB |
| License if issued by origin country | JPG, PDF | 100 KB |
Q.11 I started to fill the Registration Application for Non-Resident Online Services Provider but was not able to complete it. Can I save my Registration Application?
Ans: Yes, you can save your Registration Application up to 15 days, from the day TRN was generated by you, upon successful submission of PART- A of the Registration Application.
Q.12 What do I do after submitting my Registration Application?
Ans: Please note that the Registration Application submitted by you will be processed by Tax Officer of the office of the Principal Commissioner, Central GST, Bengaluru West.
In case, clarifications/queries are raised by the Tax Official, you need to respond to these clarifications within 7 working days otherwise application may be rejected.
Once your Registration Application is approved by the concerned Tax Official, temporary password for first-time login and the same will be communicated to your registered e-mail address. ARN status will also be changed to ‘Approved’. Registration Certificate will be available at the Dashboard for view, print and download.
In case of rejection, Rejection Order will get generated and communicated to you. ARN status will be changed to ‘Rejected’. Rejection Order will be available at the Dashboard for view, print and download
Q.13 What are the modes of signing the document?
Ans: You can sign the Registration Application using EVC mode only.
Q.14 Do I need an Indian mobile number to obtain a registration as a Non-Resident Online Services Provider?
Ans: No, it is not mandatory to have Indian mobile number to obtain registration as a Non-Resident Online Services Provider but the primary authorized signatory should have an India mobile number.
Q.15 Do I need a PAN of the authorised signatory to obtain registration as a Non-Resident Online Services Provider?
Ans: It is not mandatory to have PAN of the authorised signatory to obtain registration as a Non-Resident Online Services Provider.
Q.16 Do I need to provide the URL of the website through which taxable services are provided?
Ans: Yes, you need to provide the URL of the website through which taxable services are provided.
Q.17 Where can I add Bank Account details?
Ans: Details entered in the Bank Accounts tab has been made optional and non-mandatory w.e.f. 27th Dec 2018. You can now enter the bank account details by filing an Amendment application only. Post grant of GSTIN, when you login for the first time on the GST Portal, you will be prompted to file a non-core amendment application to enter Bank Accounts details.
Although details of Bank accounts are not mandatory for OIDAR applicants (Non-Resident Online Service providers), the same is required to be added, in case of nomination of an Indian Authorised representative.
Q.18 If a Non-Resident Online Service Provider has appointed a representative in India, which details are required to be filled for registration?
Ans: If a Non-Resident Online Service Provider has appointed a representative in India, it is mandatory to fill the representative’s name, PAN, mobile number and email address in the registration form.
Q.19 By when the Part B of the registration form needs to be completed after submitting Part A?
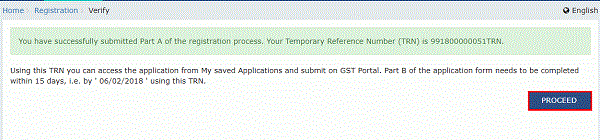
Ans: The Part B of the registration form needs to be completed within 15 days using the TRN generated on successfully submitting Part A.
Q.20 During registration, which documents can be uploaded as Proof of details of Authorized Signatory?
Ans: The documents that can be uploaded as Proof of details of authorized signatory are:
- Letter of Authorisation
- Copy of resolution passed by BoD (Board of Directors) / Managing Committee
Q.21 I have received notification seeking clarification by tax official on the GST portal. What do I need to do?
Ans: If the tax official is not satisfied with the information provided by you in the application or the document attached, the tax official can seek for clarification. To know how to file clarification, click the link: https://tutorial.gst.gov.in/userguide/registration/index.htm#t=Application_for_Filing_Clarification.htm
B. Manual on Applying for Registration as a Non-Resident Online Services Provider (OIDAR)
What are the steps involved in applying for Registration as a Non-Resident Online Services Provider on the GST Portal?
For registering yourself as a Non-Resident Online Services Provider on the GST Portal, perform the following steps:
1. Access the https://www.gst.gov.in/ URL. The GST Home page is displayed.
2. Click Services > Registration > New Registration option.

The Application form is divided into two parts as:
Part A
Part B
PART A:
3. The New Registration page is displayed. Select the New Registration option.
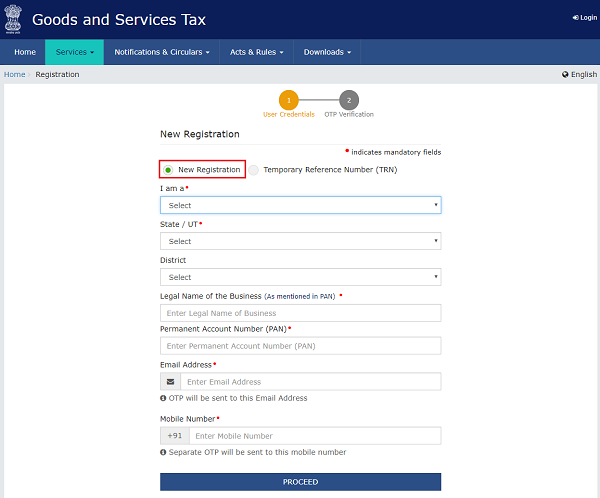
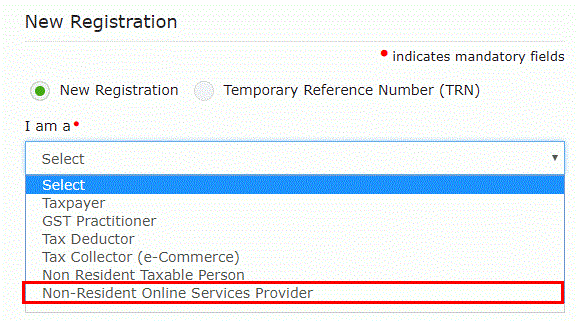
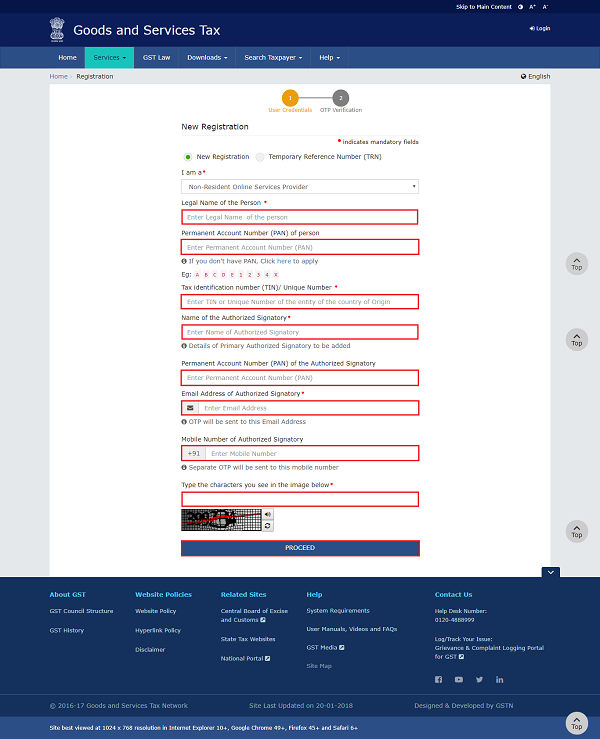
4. From I am a drop down list, select the Non-Resident Online Services Provider as the type of taxpayer to be registered.
5. In the Legal Name of the Person field, enter the legal name of person as mentioned in PAN database.
6. In the Permanent Account Number(PAN) of Person field, enter your Permanent Account Number.
Note: In case you don’t have PAN, you can apply for PAN. To do so, click the here link.
7. In Tax identification number (TIN) / Unique Number field, enter Tax Identification Number or Unique number field of the country of Origin.
8. In Name of the Authorized Signatory field, enter the name of your Authorized Signatory who belongs to India as per the PAN Database.
9. In Permanent Account Number of the Authorized Signatory, enter the PAN of the Authorized Signatory who belongs to India.
10. In the E-mail Address of Authorized Signatory field, enter the e-mail address of the Primary Authorized Signatory.
11. In the Mobile Number of Authorized Signatory field, enter the valid Indian mobile number of the Primary Authorized Signatory.
Note: Mobile Number of Authorized Signatory is optional to be mentioned here.
12. In the Type the characters you see in the image below field, enter the captcha text.
13. Click the PROCEED button.
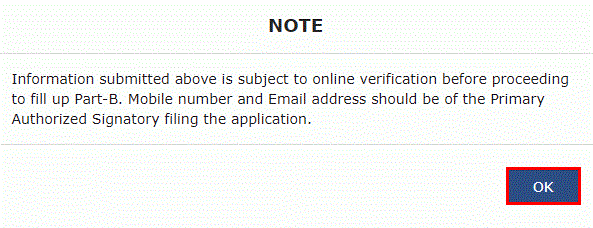
Note: On click of “Proceed” button, if the OTP’s are validated, the registration form is displayed and “Temporary Reference Number (TRN)” would be generated and same will be communicated to the applicant through e-mail and SMS (if mobile number is entered). Same will also be communicated through a Pop-Up message.
Since mobile number is optional, so if the Mobile number of the Primary Authorized Signatory is entered, then only SMS will be sent.
14. A note is displayed. Click the OK button.
After successful validation, you will be directed to the OTP Verification page.
15. In the Mobile OTP field, enter the OTP you received on your mobile number. OTP is valid only for 10 minutes. You will receive Mobile OTP only in case you have provided mobile number in the previous screen.
16. In the Email OTP field, enter the OTP you received on your email address. OTP is valid only for 10 minutes.
Note:
- OTP sent to mobile number and email address are separate. In case OTP is invalid, try again by clicking the Need OTP to be resent? Click here the OTP link. You will receive the OTP on your registered email ID again.
17. Click the PROCEED button.

The system generated 15-digit Temporary Reference Number (TRN) is displayed.
Note: Once TRN is generated, You will receive the TRN information on your e-mail address as well as your mobile number. Note that below the TRN, the expiry date of the TRN will also be mentioned.
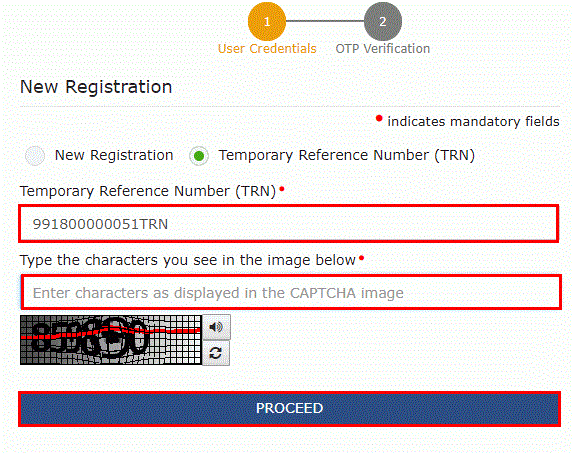
18. Click the PROCEED button. Alternatively, you can also click Services > Registration > New Registration option and select the Temporary Reference Number (TRN) radio button to login using the TRN .
Part B:
19. In the Temporary Reference Number (TRN) field, enter the TRN generated.
20. In the Type the characters you see in the image below field, enter the captcha text.
21. Click the PROCEED button. The Verify OTP page is displayed. You will receive same Mobile OTP and E-mail OTP. These OTPs are different from the OTPs you received in previous step.
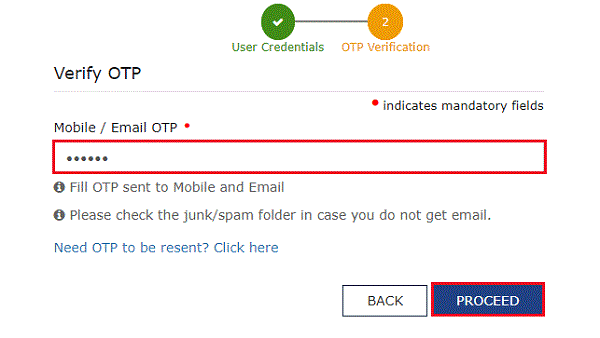
22. In the Mobile/E-mail OTP field, enter the OTP you received on your mobile number and e-mail address. OTP is valid only for 10 minutes.
Note: OTP sent to mobile number and e-mail address are same.
In case OTP is invalid, try again by clicking the Click here to resend the OTP link. You will receive the OTP on your registered mobile number or e-mail ID again. Enter the newly received OTP again.
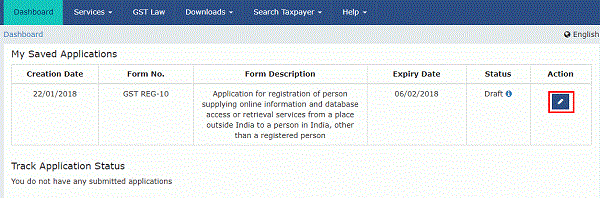
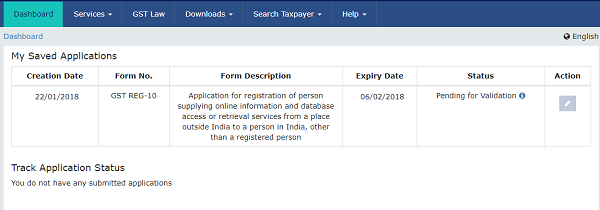
23. The My Saved Application page is displayed. Under the Action column, click the Edit icon (icon in blue square with white pen).
Note:
- Notice the expiry date shown below in the screenshot. If the applicant doesn’t submit the application within 15 days, TRN and the entire information filled against that TRN will be purged after 15 days.
- The status of the registration application is ‘Draft’ unless the application is submitted.
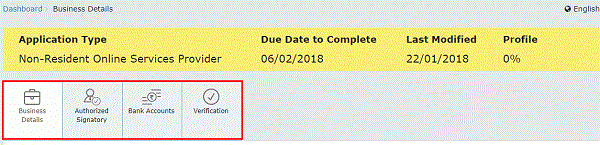
The Registration Application form with various tabs is displayed. On the top of the page, there are Four tabs as Business Details, Authorized Signatory, Bank Accounts and Verification. Click each tab to enter the details.
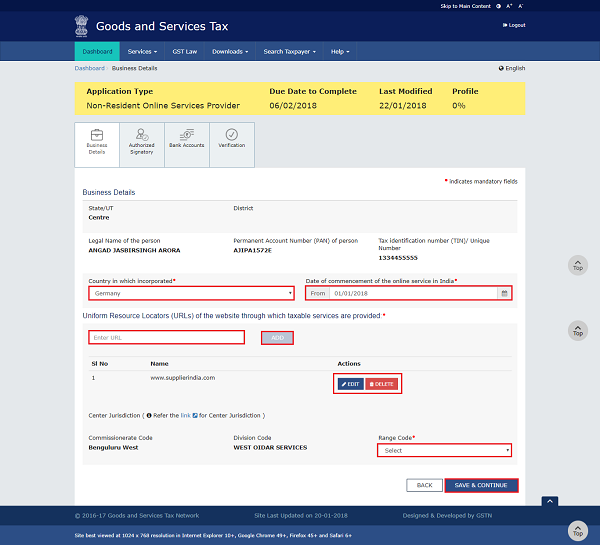
Business Details tab:
The Business Details tab is selected by default. This tab displays the information to be filled for the business details required for registration.
Note: Legal Name of the Person, Permanent Account Number and Tax Identification Number or unique number are auto-populated.
a) In the Country in which incorporated drop-down list,select the country from which business is incorporated.
b) Select the Date of Commencement of the online service in India using the calendar.
c) Enter the Uniform Resource Locators (URLs) of the website through which taxable services are provided and click the ADD button
Note: You can click the EDIT or DELETE button to add or delete the URL provided.
d) Select the Range of Code from the drop-down list.
e) Click the SAVE & CONTINUE You will notice a blue tick on the Business Details section indicating the completion of the tab information and notice the Profile indicating the percentage completion of the application form.
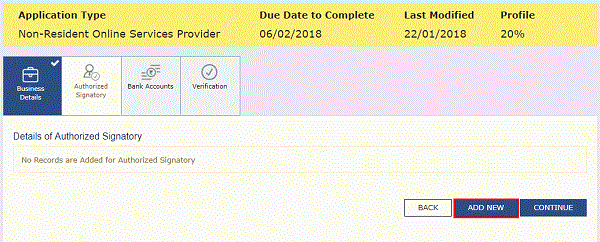
Authorized Signatory tab:
This tab page displays the details to be entered for Authorized signatory. Click the ADD NEW button.
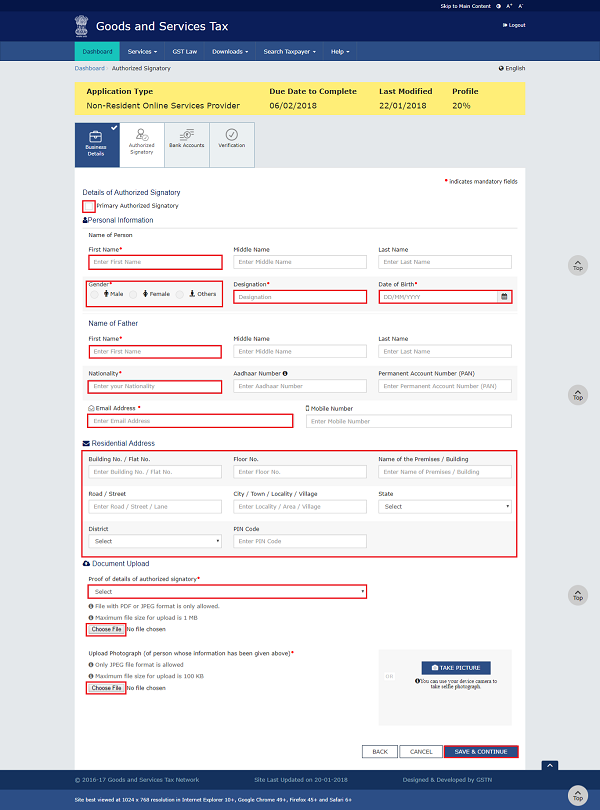
Note: Authorized Signatory must be a resident of India with a valid PAN Card. Also, the details of Authorized signatory such as Name, Mobile Number (If entered in Part A of the Registration Form), E-mail address and PAN are auto-populated on this tab based on the details provided in Part A of the application form.
a) In Primary Authorized Signatory, select the check box for Primary Authorized Signatory.
b) In the Personal Information section, enter the personal details of the authorized signatory’s Name, gender, designation and date of birth.
b) Enter the personal details of the authorized signatory’s Name of Father, nationality, Mobile number, E-mail address.
d) In the Address of the Authorized Signatory section, enter the address details of the authorized signatory. Based on the State selected, select the district and enter the corresponding pin code.
e) In the Document Upload section, upload document for Proof of details of Authorized Signatory and Photograph of the Authorized Signatory.
Note: Document to be uploaded as Proof of Authorized Signatory can be:
- Letter of Authorization
- Copy of Resolution passed by BoD (Board of Directors) / Managing Committee and Acceptance Letter
f) Click the SAVE & CONTINUE button and you will be directed to the next section.
Note:
- For photographs, format should be JPEG and file size must not exceed 100 KB.
- For Proof of details of Authorized Signatory, format should be PDF or JPEG and file size must not exceed 100 KB.
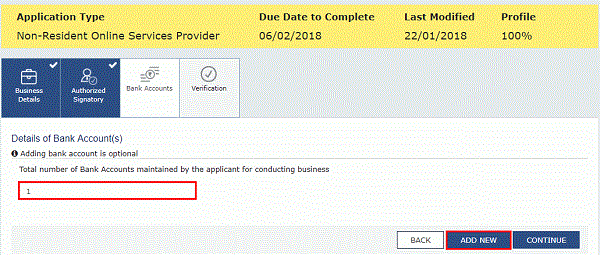
Bank Accounts tab:
This tab page displays the details of the bank account maintained for conducting business. It is not mandatory to provide the bank details.
a) In Total number of Bank Accounts maintained field, enter the number of accounts that you have and click the ADD NEW button.
Note: Total number of Bank Accounts Maintained should be equal to Total number bank account added. In case of mismatch, you will not be able to submit the form.
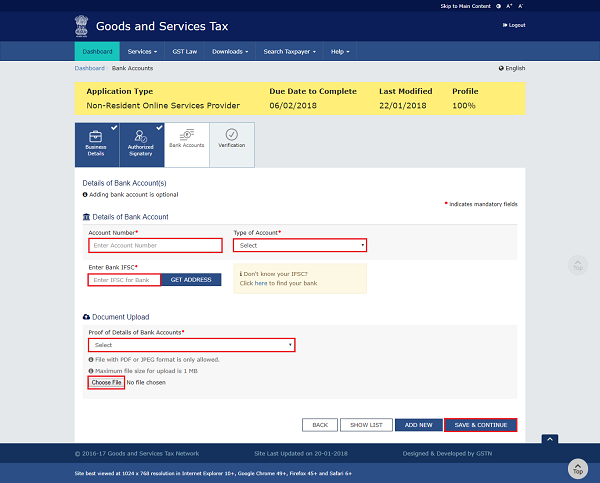
b) In the Account Number field, enter the account number of the Bank.
c) In the Type of Account drop-down list, select the type of account.
d) In the Enter Bank IFSC field, enter the IFSC code of the Bank.
Note:
- In case you don’t know the IFSC code, click the here Link to know the IFSC code.
- Alternatively, you can also find the IFSC code in the cheque book or the cheque leaflet of your Bank.
e) In the Document Upload section, click the Choose file Navigate and select the document.
Note:
- You can upload PDF or JPEG files with maximum file size for upload of as 100 KB.
- You can upload below documents as proof of Details of Bank Account:
- First Page of Bank Passbook
- Bank Statement
- Cancelled cheque
f) Click the SAVE & CONTINUE button.
Note: In case you want to add details of more Bank accounts, click the ADD NEW button.
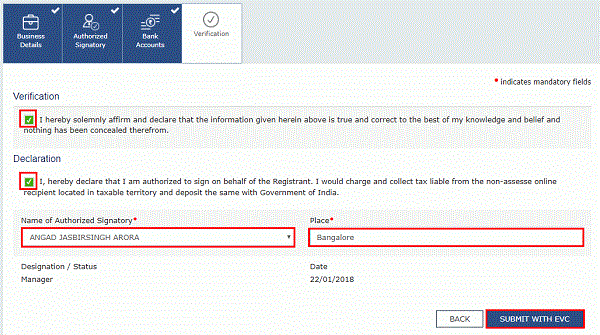
Verification tab:
This tab page displays the details of the verification for authentication of the details submitted in the form.
a. Select the Verification and Declaration checkbox.
b. In the Name of Authorized Signatory drop-down list, select the name of authorized signatory.
c. In the Place field, enter the place where the form is filed.
d. Click the SUBMIT WITH EVC button.
e. Enter the OTP sent to email address of the Authorized Signatory registered at the GST Portal and click the VALIDATE OTP button.
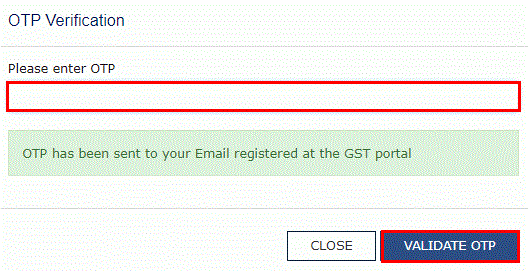
The success message is displayed. You will receive the acknowledgement in next 15 minutes on your registered e-mail address and mobile phone number. Application Reference Number (ARN) receipt is sent on your e-mail address and mobile phone number.
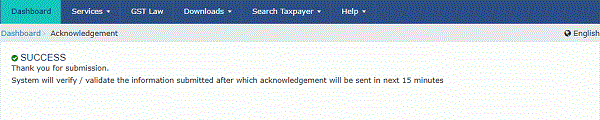
Once the form is submitted until the ARN is generated, the status would be ‘Pending for Validation’. On successful validation of application form, ARN would be generated and status changes to ‘Pending for Processing’. In case the validations fails, the status would be updated as ‘Validation Error’.
In case the application gets Validation Error, then you need to click the Edit button and submit the form again.
(Republished with amendments)
****
Disclaimer: The contents of this article are for information purposes only and does not constitute an advice or a legal opinion and are personal views of the author. It is based upon relevant law and/or facts available at that point of time and prepared with due accuracy & reliability. Readers are requested to check and refer relevant provisions of statute, latest judicial pronouncements, circulars, clarifications etc before acting on the basis of the above write up. The possibility of other views on the subject matter cannot be ruled out. By the use of the said information, you agree that Author / TaxGuru is not responsible or liable in any manner for the authenticity, accuracy, completeness, errors or any kind of omissions in this piece of information for any action taken thereof. This is not any kind of advertisement or solicitation of work by a professional.


Can you explain what kind of clearance certificate is required and what could be the procedure? I couldn’t find this information anywhere.