Article contains FAQs on Grant of UINs Under GST Regime, Manual on Applying for Registration as a UN Body, Manual on Applying for Registration as an Embassy and Manual on Applying for Registration as Other Notified Person.
Page Contents
A. FAQs on Grant of UINs Under GST Regime
Q.1 What does UIN stand for?
Ans: UIN stands for Unique Identity Number, granted to UN Bodies and Embassies on the basis of letter issued by the Ministry of External Affairs (MEA). UIN can also be granted to any other Notified Persons (as may be notified by the Commissioner) on the basis of request received from the respective notified organization.
Q.2 What is the relevance of UIN and how is it used?
Ans: UIN enables the UN Bodies, Embassies and Other Notified Persons to get the supplies of taxable goods /services from the registered persons. The relevance of UIN is that it needs to be mentioned on purchase invoices, so that the UIN holder could claim refund of GST paid on such transactions on the basis of Form RFD -10, which is generated after their filing Statement of such inward supplies in Form GSTR-11.
Q.3 How does UN Bodies/ Embassies/Other Notified Person can apply for allotment of UIN?
Ans: You can apply for registration as UN Bodies/ Embassies/Other Notified Person for allotment of UIN directly on the GST Portal. Navigate to Services > Registration > New Registration option.
Select the New Registration option and United Nation Body/ Consulate or Embassy of Foreign Country/ Other Notified Person from I am a drop down list.
Q.4 From which date does the UIN Registration become valid?
Ans: Effective date of registration would be the date of allotment and generation of UIN.
Q.5 How allotment of UIN is communicated?
Ans: The intimation of UIN and temporary password will be sent to the primary authorized signatory of the respective UN Bodies, Embassy or Other Notified Person (as applicable) via e-mail and SMS.
Q.6 Are there any preconditions before UN Bodies/ Embassies/Other Notified Person can apply for allotment of UIN?
Ans: UN Bodies/ Embassies/Other Notified Person must fulfill following conditions so that they can file an application for allotment of UIN on the GST Portal:
1.Applicant is not already registered in the State i.e. he does not have UIN for this entity in that State.
Note: UN Bodies/ Embassies are not required to take state-wise registration but one single registration is enough for them for whole of India. Other Notified Person are required to take state wise registration.
2. Applicant has a valid Indian mobile number
3. Applicant has valid E-mail Address
4. Applicant has the prescribed documents and information on all mandatory fields as required for registration
5. Applicant has authorized signatory with valid details.
Q.7 Do I need a PAN for allotment of UIN?
Ans: No, PAN is not mandatory for allotment of UIN except Other Notified Person.
Q.8 How can I view my existing registrations mapped to same PAN of the business/ entity on the GST Portal while applying for registration?
Ans: After filling all the details in Part A of the application, when you click on Proceed button, GST Portal displays all the GSTINs / Provisional ID’s / UINs / GSTP IDs mapped to the same PAN across India.
Q.9 Can I use same e-mail address, mobile number and PAN combination for taking multiple registrations on GST Portal?
Ans: Yes, you can use same e-mail address, mobile number and PAN combination for taking multiple registrations on GST Portal.
Q.10 What is the difference in registration process as UN Bodies/ Embassies/Other Notified Person for allotment of UIN?
Ans: Below provided are the differences in registration process as UN Bodies/ Embassies/Other Notified Person for allotment of UIN:
1. For UN Bodies/ Embassies – Ministry of External affairs (MEA) issues a letter to the entity with the details like MEA number and Date which can be used to obtain registration on the GST Portal. Such an application if filed through the GST Portal or the initiated by the Tax Authority at the Back Office, would have Centre as its source authority. They are not required to take state wise registration but one single registration is enough for them for whole of India.
2. For Other Notified Person – Applicant has to select the Source authority (Centre/ State) who has issued notification for registration, Notification Number and Notification Date in the Application for allotment of UIN. The authority hence selected becomes the source authority for them. They are required to take state wise registration.
Q.11 What are the documents the needs to be uploaded while applying for Registration for allotment of UIN?
Ans:
| Document Name | Document Type | Document Size |
|
Proof of Appointment of Authorized Signatory |
||
| Photo of the Authorized Signatory | JPG | 100 KB |
| Letter of Authorization | JPG, PDF | 1 MB |
| Copy of Resolution passed by BoD/ Managing Committee and Acceptance letter | JPG, PDF | 1 MB |
|
Proof of Details of Bank Accounts |
||
| First page of Pass Book | JPG, PDF | 1 MB |
| Cancelled Cheque | JPG, PDF | 1 MB |
| Bank Statement | JPG, PDF | 1 MB |
Q.12 What happens once the application form is submitted for allotment of UIN at the GST Portal?
Ans: Applications filed for allotment of UIN by Embassies and UN Bodies is assigned to Centre for Processing. The application can be submitted at the GST Portal.
Applications filed for allotment of UIN by Other Notified Persons is assigned to either State / Centre Tax Authority based on the selection made by the applicant in the Registration form.
Q.13 What are the steps of logging-in to the GST Portal for the first time using a UIN?
Ans: Once the primary authorized signatory of the UIN holder receives the UIN and temporary password, the UIN holder needs to follow the below steps:
- Step-1: Login to the GST Portal through first-time login.
- Step-2: Enter the provided UIN (username) and temporary password in corresponding fields.
- Step-3: Change the temporary password and create username.
- Step-4: The user is navigated to the Taxpayer Login page.
- Step-5: Enter the credentials in Login page with new user id and password created.
- Step-6: The UIN holder will see the dashboard screen.
UIN holder will now be able to access, view, download and print the Registration Certificate from the dashboard. For subsequent logins, the UIN holder will have to use the normal login functionality.
B. Manual on Applying for Registration as a UN Body
What are the steps involved in applying for Registration as a UN Body on the GST Portal?
For registering yourself as a UN Body on the GST Portal, perform the following steps:
1. Access the https://www.gst.gov.in/ URL. The GST Home page is displayed.
2. Click Services > Registration > New Registration option.

The Application form is divided into two parts as:
Part A
Part B
PART A:
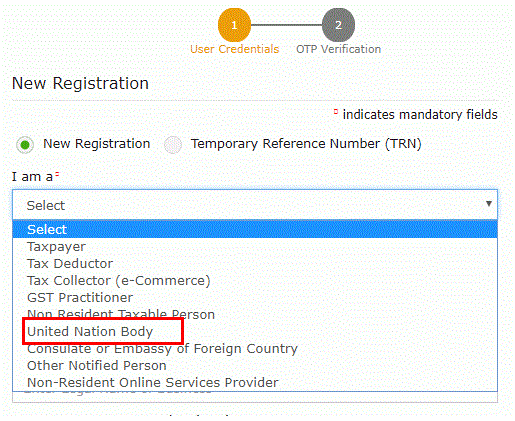
3. The New Registration page is displayed. Select the New Registration option and United Nation Body from I am a drop down list.
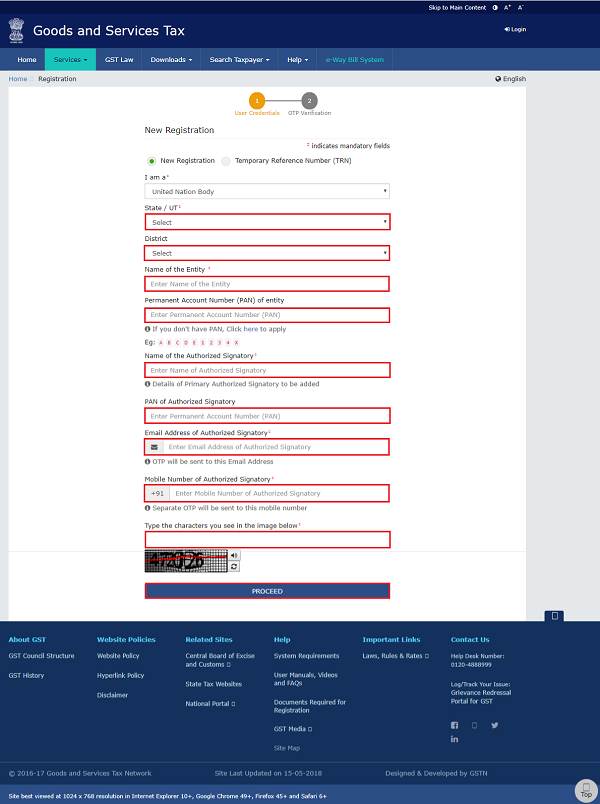
4. In the State/UT and District drop down list, select the state for which registration is required and district.
5. In the Name of the Entity field, enter the legal name of your UN body.
6. In Permanent Account Number (PAN) of entity field, enter the PAN of the entity.
7. In Name of the Authorized Signatory field, enter the name of your Authorized Signatory.
8. In PAN of Authorized Signatory, enter the PAN number of the Authorized Signatory.
9. In the E-mail Address of Authorized Signatory field, enter the e-mail address of the Primary Authorized Signatory.
10. In the Mobile Number of Authorized Signatory field, enter the valid Indian mobile number of the Primary Authorized Signatory.
Note: Different One Time Password (OTP) will be sent on your e-mail address and mobile number you just mentioned for authentication.
11. Once the validation is done, all further communications will be sent to above mentioned e-mail address and mobile number.
12. In the Type the characters you see in the image below field, enter the captcha text.
Click the PROCEED button
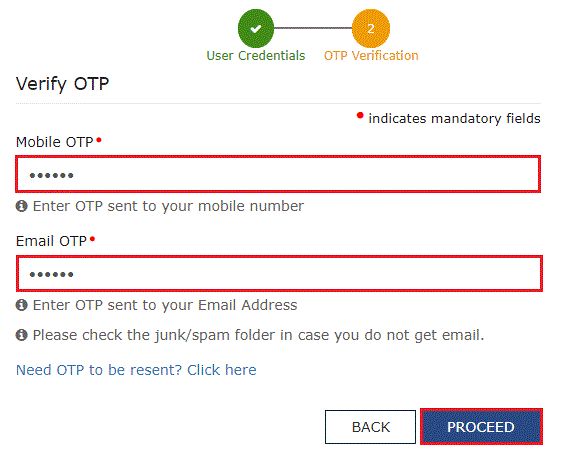
After successful validation, you will be directed to the OTP Verification page.
13. In the Mobile OTP field, enter the OTP you received on your mobile number. OTP is valid only for 10 minutes.
14. In the Email OTP field, enter the OTP you received on your email address. OTP is valid only for 10 minutes.
Note:
- OTP sent to mobile number and email address are separate.
- In case OTP is invalid, try again by clicking the Click here to resend the OTP link. You will receive the OTP on your registered mobile number or email ID again. Enter both the newly received OTPs again.
15. Click the PROCEED button.
The system generated 15-digit Temporary Reference Number (TRN) is displayed.
Note: Once TRN is generated, you will receive the TRN information on your e-mail address as well as your mobile number. Note that below the TRN, the expiry date of the TRN will also be mentioned.

16. Click the PROCEED button. Alternatively, you can also click Services > Registration > New Registration option and select the Temporary Reference Number (TRN) radio button to login using the TRN.
PART B:
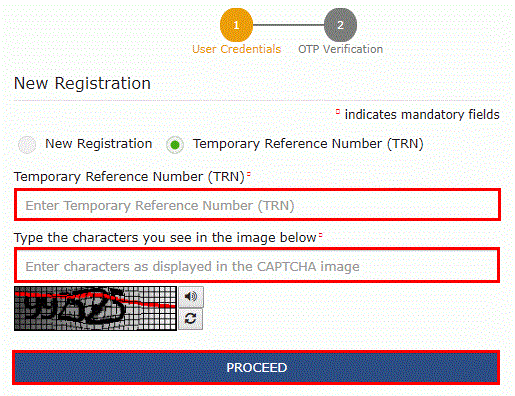
17. In the Temporary Reference Number (TRN) field, enter the TRN generated.
18. In the Type the characters you see in the image below field, enter the captcha text.
19. Click the PROCEED button.
 The Verify OTP page is displayed. You will receive same Mobile OTP and E-mail OTP. These OTPs are different from the OTPs you received in previous step.
20. In the Mobile / E-mail OTP field, enter the OTP you received. OTP is valid only for 10 minutes.
Note: OTP sent to mobile number and e-mail address are same.
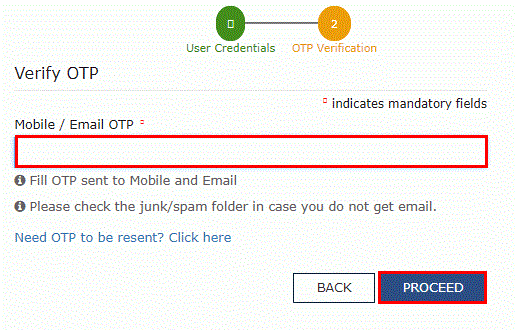
In case OTP is invalid, try again by clicking the Need OTP to be resent? Click here link. You will receive the OTP on your registered mobile number or e-mail ID again. Enter the newly received OTP again.
After Successful validation of OTP, user is navigated to the dashboard page.
21. The My Saved Applications page is displayed. Under the Action column, click the Edit icon (icon in blue square with white pen).
Note:
- Notice the expiry date shown below in the screenshot. If the applicant doesn’t submit the application within 15 days, TRN and the entire information filled against that TRN will be purged after 15 days.
- The status of the registration application is ‘Draft’ unless the application is submitted.

Clicking on the Action link to navigate to The Registration Application form. The Registration Application form with various tabs is displayed.
On the top of the page, there are Five tabs as Basic Details, Entity Details, Authorized Signatory, Bank accounts and Verification. Click each tab to enter the details.
Basic Details tab:
a) In the MEA Letter Number, if applicable field, enter the MEA number.
Ministry of External affairs (MEA) have issued a letter to tax officials, its details like MEA number and MEA issued Date which can be entered in the application.
MEA details are optional for creation of UN Body.
b) Select the MEA Letter Date using the calendar.
c) Select theCountryfrom the drop-down list.
d) Click the SAVE & CONTINUE button and you will be directed to the next section.
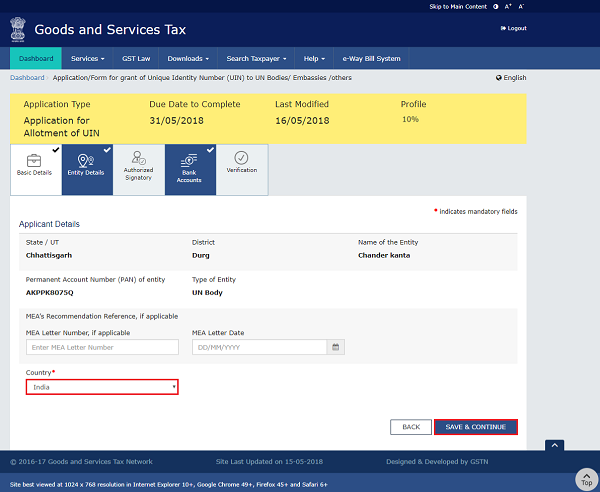
Entity Details tab:
a) Enter the address and contact details of the entity in State.
b) Click the SAVE & CONTINUE button and you will be directed to the next section.
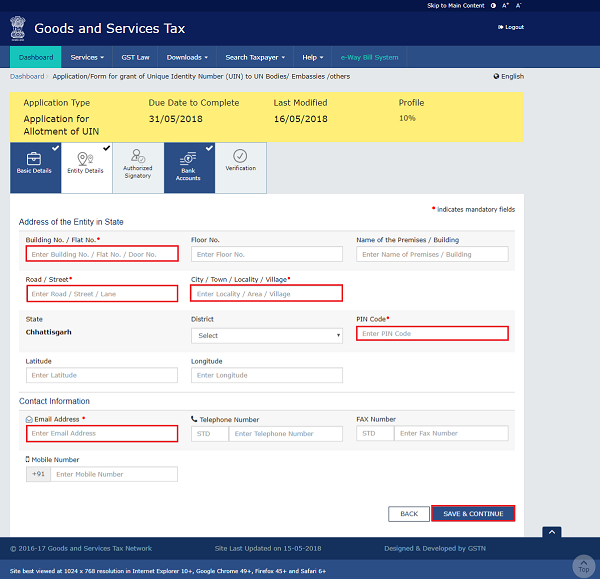
Authorized Signatory tab:
This tab page displays the details to be entered for Authorized signatory.
Note: Details of Authorized signatory such as Name, Mobile Number, E-mail address and PAN are auto-populated on this tab based on the details provided in Part A of the application form.
a) In Primary Authorized Signatory, select the check box for Primary Authorized Signatory.
b) In the Personal Information section, enter the personal details of the authorized signatory’s like Name of Father, date of birth of authorized signatory, Mobile number, E-mail address and Gender.
c) In the Identity Information section, enter the official information of the Authorized signatory.
d) In the Residential Address section, enter the address details of the authorized signatory. Based on the State selected, select the district and enter the corresponding pin code.
e) In the Document Upload section, upload document for Proof of details of Authorized Signatory and Photograph of the Authorized Signatory.
Note: Document to be uploaded as Proof of Authorized Signatory can be:
- Letter of Authorization
- Copy of Resolution passed by BoD (Board of Directors) / Managing Committee and Acceptance Letter
Note:
- For photographs, format should be JPEG and file size must not exceed 100 KB.
- For Proof of details of Authorized Signatory, format should be PDF or JPEG and file size must not exceed 1 MB.
f) Click the SAVE & CONTINUE button and you will be directed to the next section.
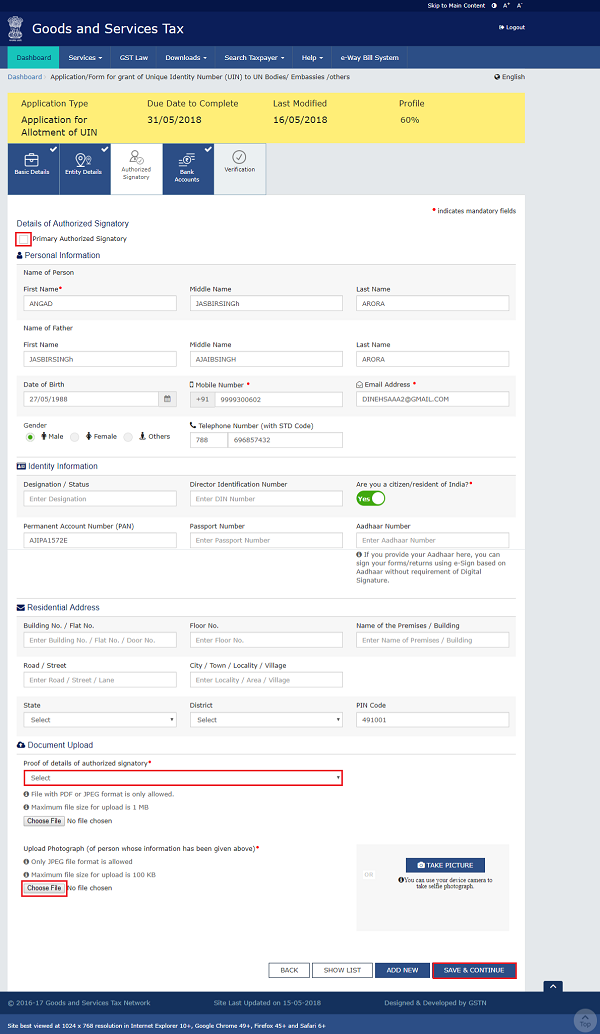
Bank Details tab:
This tab page displays the details of the bank account maintained for conducting business.
a) In Total number of Bank Accounts maintained field, enter the number of accounts that you have and click the ADD NEW
Note: Total number of Bank Accounts Maintained should be equal to Total number bank account added. In case of mismatch, you will not be able to submit the form.
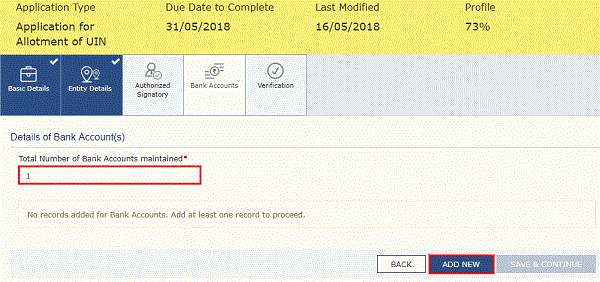
b) In the Account Number field, enter the account number of the Bank.
c) In the Type of Account drop-down list, select the type of account.
d) In the Enter Bank IFSC field, enter the IFSC code of the Bank.
Note:
- In case you don’t know the IFSC code, click the here Link to know the IFSC code.
- Alternatively, you can also find the IFSC code in the cheque book or the cheque leaflet of your Bank.
e) In the Document Upload section, click the Choose file button. Navigate and select the document.
Note:
You can upload PDF or JPEG files with maximum file size for upload of as 1 MB.
You can upload below documents as proof of Details of Bank Account:
- First Page of Bank Passbook
- Bank Statement
- Cancelled cheque
f) Click the SAVE & CONTINUE button.
Note: In case you want to add details of more Bank accounts, click the ADD NEW button.

Verification tab:
This tab page displays the details of the verification for authentication of the details submitted in the form.
a. Select the Verification checkbox.
b. In the Name of Authorized Signatory drop-down list, select the name of authorized signatory.
c. In the Place field, enter the place where the form is filed.
d. After filling the application, you need to digitally sign the application using Digital Signature Certificate (DSC)/ EVC.
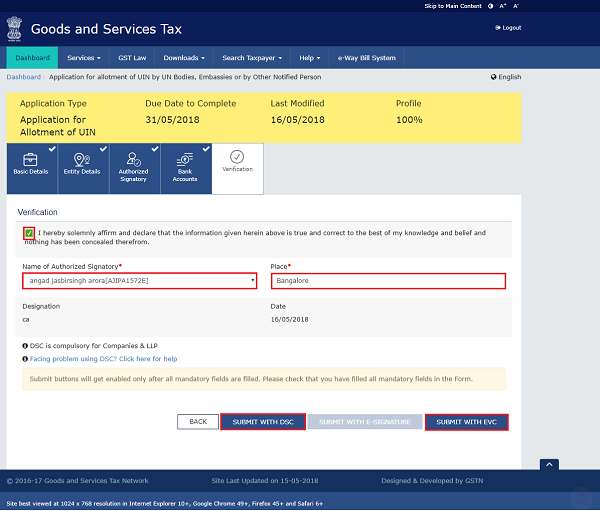
In Case of DSC:
e. Click the SUBMIT WITH DSC button.
f. Click the PROCEED button.
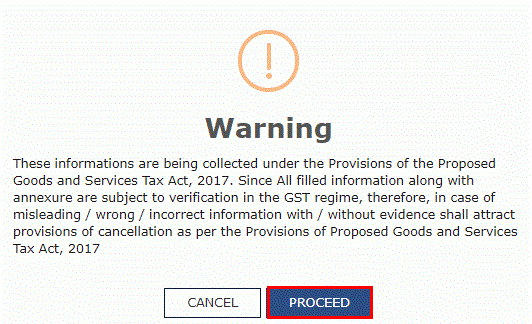
g. Select the certificate and click the SIGN button.
In Case of EVC:
e. Click the SUBMIT WITH EVC button.
f. Enter the OTP sent to email and mobile number of the Authorized Signatory registered at the GST Portal and click the VALIDATE OTP button.
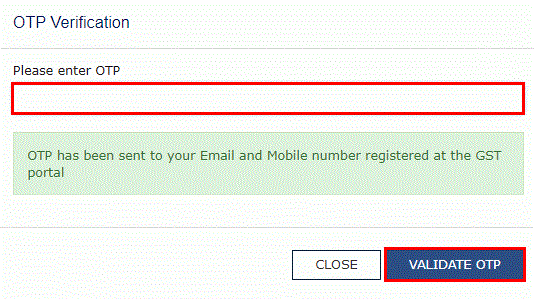
The success message is displayed. You will receive the acknowledgement in next 15 minutes on your registered e-mail address and mobile phone number. Application Reference Number (ARN) receipt is sent on your e-mail address and mobile phone number.
You can track the status of your application using the Services > Registration > Track Application Status command.

Once the form is submitted until the ARN is generated, the status would be ‘Pending for Validation’. On successful validation of application form, ARN would be generated and status changes to ‘Pending for Processing’. In case the validations fail, the status would be updated as ‘Validation Error’.
C. Manual on Applying for Registration as an Embassy
What are the steps involved in applying for Registration as a Consulate/ Embassy of Foreign Country on the GST Portal?
For registering yourself as a Consulate/ Embassy of Foreign Country on the GST Portal, perform the following steps:
1. Access the https://www.gst.gov.in/ URL. The GST Home page is displayed.
2. Click Services > Registration > New Registration option.

The Application form is divided into two parts as:
Part A
Part B
PART A:
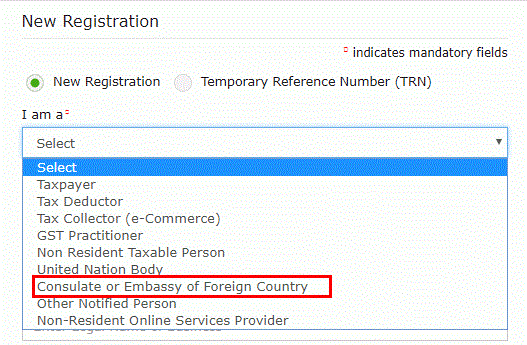
3. The New Registration page is displayed. Select the New Registration option and Consulate or Embassy of Foreign Country from I am a drop down list.
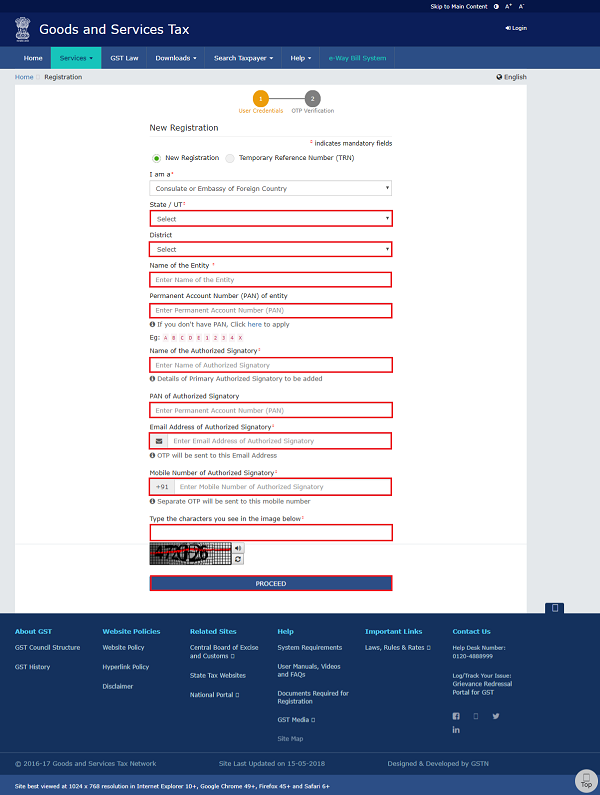
4. In the State/UT and District drop down list, select the state for which registration is required and district.
5. In the Name of the Entity field, enter the legal name.
6. In Permanent Account Number (PAN) of entityfield, enter the PAN of the entity.
7. In Name of the Authorized Signatory field, enter the name of your Authorized Signatory.
8. In PAN of Authorized Signatory, enter the PAN number of the Authorized Signatory.
9. In the E-mail Address of Authorized Signatory field, enter the e-mail address of the Primary Authorized Signatory.
10. In the Mobile Number of Authorized Signatory field, enter the valid Indian mobile number of the Primary Authorized Signatory.
Note: Different One Time Password (OTP) will be sent on your e-mail address and mobile number you just mentioned for authentication.
Once the validation is done, all further communications will be sent to above mentioned e-mail address and mobile number.
11. In the Type the characters you see in the image below field, enter the captcha text.
12. Click the PROCEED button
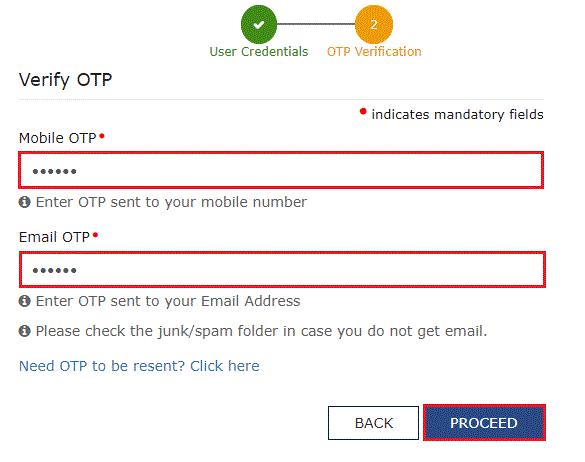
After successful validation, you will be directed to the OTP Verification page.
13. In the Mobile OTP field, enter the OTP you received on your mobile number. OTP is valid only for 10 minutes.
14. In the Email OTP field, enter the OTP you received on your email address. OTP is valid only for 10 minutes.
Note:
- OTP sent to mobile number and email address are separate.
- In case OTP is invalid, try again by clicking the Click here to resend the OTP link. You will receive the OTP on your registered mobile number or email ID again. Enter both the newly received OTPs again.
15. Click the PROCEED button.
The system generated 15-digit Temporary Reference Number (TRN) is displayed.
Note: Once TRN is generated, you will receive the TRN information on your e-mail address as well as your mobile number. Note that below the TRN, the expiry date of the TRN will also be mentioned.

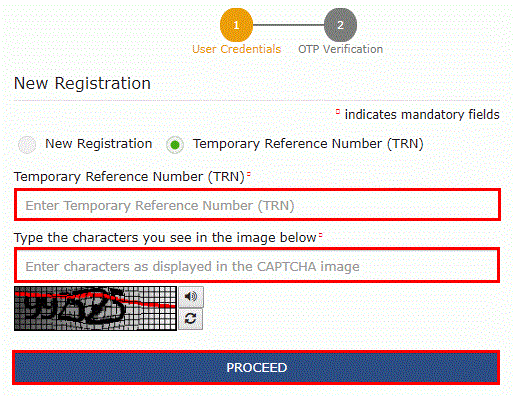
16. Click the PROCEED button. Alternatively, you can also click Services > Registration > New Registration option and select the Temporary Reference Number (TRN) radio button to login using the TRN.
PART B:
17. In the Temporary Reference Number (TRN) field, enter the TRN generated.
18. In the Type the characters you see in the image below field, enter the captcha text.
19. Click the PROCEED button.
The Verify OTP page is displayed. You will receive same Mobile OTP and E-mail OTP. These OTPs are different from the OTPs you received in previous step.
20. In the Mobile/E-mail OTP field, enter the OTP you received. OTP is valid only for 10 minutes.
Note: OTP sent to mobile number and e-mail address are same.
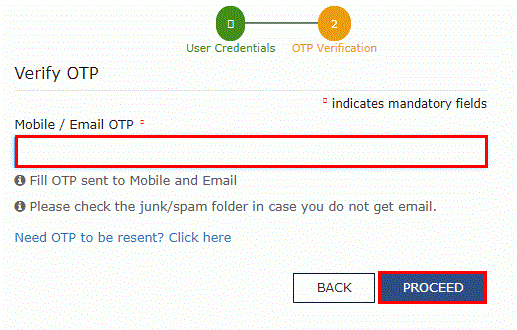
In case OTP is invalid, try again by clicking the Need OTP to be resent? Click here link. You will receive the OTP on your registered mobile number or e-mail ID again. Enter the newly received OTP again.
After Successful validation of OTP, user is navigated to the dashboard page.
21. The My Saved Applications page is displayed. Under the Action column, click the Edit icon (icon in blue square with white pen).
Note:
- Notice the expiry date shown below in the screenshot. If the applicant doesn’t submit the application within 15 days, TRN and the entire information filled against that TRN will be purged after 15 days.
- The status of the registration application is ‘Draft’ unless the application is submitted.

Clicking on the Action link to navigate to The Registration Application form. The Registration Application form with various tabs is displayed.
On the top of the page, there are Five tabs as Basic Details, Entity Details, Authorized Signatory, Bank accounts and Verification. Click each tab to enter the details.
Basic Details tab:
a) In the MEA Letter Number, if applicable field, enter the MEA number.
Ministry of External affairs (MEA) have issued a letter to tax officials, its details like MEA number and MEA issued Date which can be entered in the application.
MEA details are optional for creation of UN Body.
b) Select the MEA Letter Date using the calendar.
c) Select the Country from the drop-down list.
d)Click the SAVE & CONTINUE button and you will be directed to the next section.

Entity Details tab:
a) Enter the address and contact details of the entity in State.
b)Click the SAVE & CONTINUE button and you will be directed to the next section.
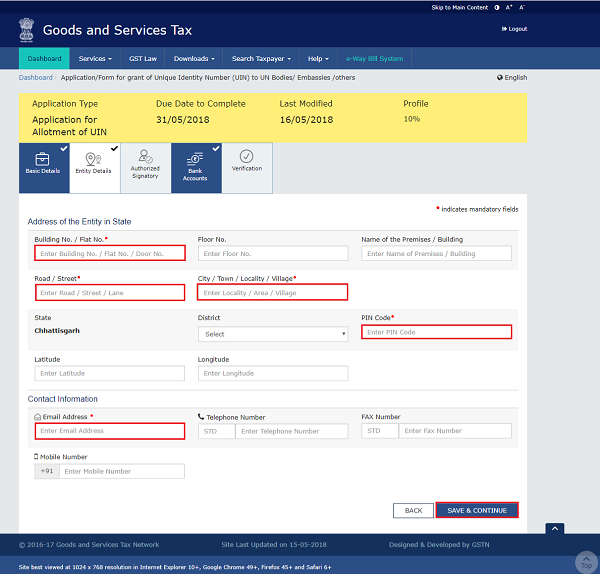
Authorized Signatory tab:
This tab page displays the details to be entered for Authorized signatory.
Note: Details of Authorized signatory such as Name, Mobile Number, E-mail address and PAN are auto-populated on this tab based on the details provided in Part A of the application form.
a) In Primary Authorized Signatory, select the check box for Primary Authorized Signatory.
b) In the Personal Information section, enter the personal details of the authorized signatory’s like Name of Father, date of birth of authorized signatory, Mobile number, E-mail address and Gender.
c) In the Identity Information section, enter the official information of the Authorized signatory.
d) In the Residential Address section, enter the address details of the authorized signatory. Based on the State selected, select the district and enter the corresponding pin code.
e) In the Document Upload section, upload document for Proof of details of Authorized Signatory and Photograph of the Authorized Signatory.
Note: Document to be uploaded as Proof of Authorized Signatory can be:
- Letter of Authorization
- Copy of Resolution passed by BoD (Board of Directors) / Managing Committee and Acceptance Letter
Note:
- For photographs, format should be JPEG and file size must not exceed 100 KB.
- For Proof of details of Authorized Signatory, format should be PDF or JPEG and file size must not exceed 1 MB.
f) Click the SAVE & CONTINUE button and you will be directed to the next section.

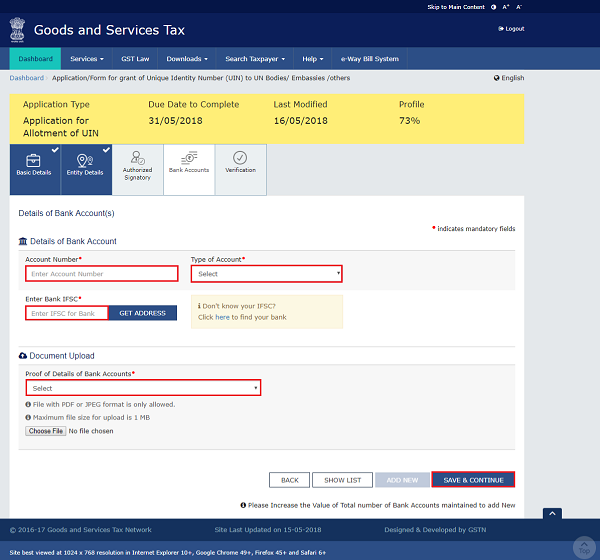
Bank Details tab:
This tab page displays the details of the bank account maintained for conducting business.
a) In Total number of Bank Accounts maintained field, enter the number of accounts that you have and click the ADD NEW
Note: Total number of Bank Accounts Maintained should be equal to Total number bank account added. In case of mismatch, you will not be able to submit the form.

b) In the Account Number field, enter the account number of the Bank.
c) In the Type of Account drop-down list, select the type of account.
d) In the Enter Bank IFSC field, enter the IFSC code of the Bank.
Note:
- In case you don’t know the IFSC code, click the here Link to know the IFSC code.
- Alternatively, you can also find the IFSC code in the cheque book or the cheque leaflet of your Bank.
e) In the Document Upload section, click the Choose file Navigate and select the document.
Note:
You can upload PDF or JPEG files with maximum file size for upload of as 1 MB.
You can upload below documents as proof of Details of Bank Account:
- First Page of Bank Passbook
- Bank Statement
- Cancelled cheque
f) Click the SAVE & CONTINUE
Note: In case you want to add details of more Bank accounts, click the ADD NEW button.
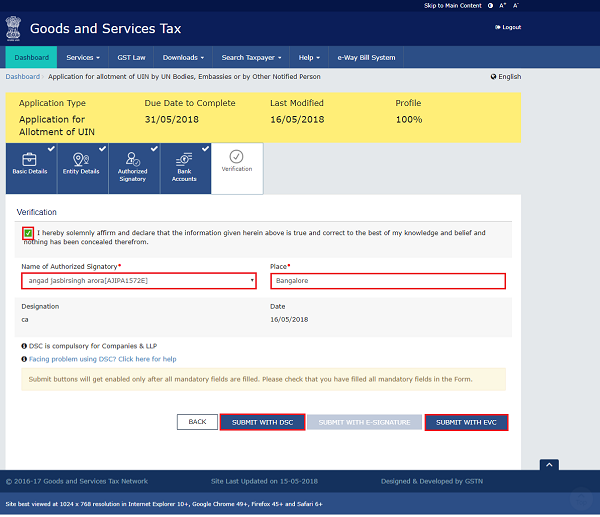
Verification tab:
This tab page displays the details of the verification for authentication of the details submitted in the form.
a. Select the Verification checkbox.
b. In the Name of Authorized Signatory drop-down list, select the name of authorized signatory.
c. In the Place field, enter the place where the form is filed.
d. After filling the application, you need to digitally sign the application using Digital Signature Certificate (DSC)/ EVC.
In Case of DSC:
e. Click the SUBMIT WITH DSC button.
f. Click the PROCEED button.
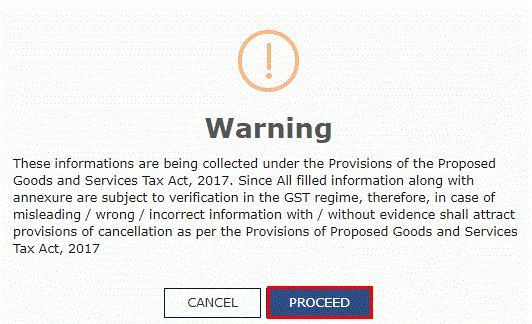
g. Select the certificate and click the SIGN button.
In Case of EVC:
e. Click the SUBMIT WITH EVC button.
f. Enter the OTP sent to email and mobile number of the Authorized Signatory registered at the GST Portal and click the VALIDATE OTP button.
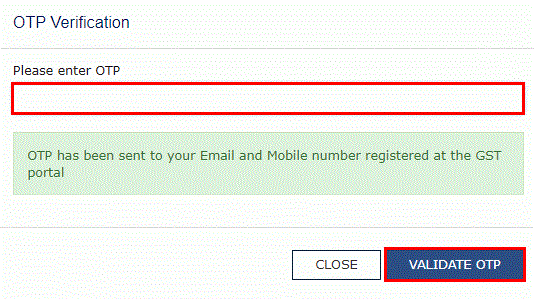
The success message is displayed. You will receive the acknowledgement in next 15 minutes on your registered e-mail address and mobile phone number. Application Reference Number (ARN) receipt is sent on your e-mail address and mobile phone number.
You can track the status of your application using the Services > Registration > Track Application Status command.

Once the form is submitted until the ARN is generated, the status would be ‘Pending for Validation’. On successful validation of application form, ARN would be generated and status changes to ‘Pending for Processing‘. In case the validations fail, the status would be updated as ‘Validation Error‘.
D. Manual on Applying for Registration as Other Notified Person
What are the steps involved in applying for Registration as Other Notified Person on the GST Portal?
For registering yourself as Other Notified Person on the GST Portal, perform the following steps:
1. Access the https://www.gst.gov.in/ URL. The GST Home page is displayed.
2. Click Services > Registration > New Registration option.

The Application form is divided into two parts as:
Part A
Part B
PART A:
3. The New Registration page is displayed. Select the New Registration option and Other Notified Person from I am a drop down list.
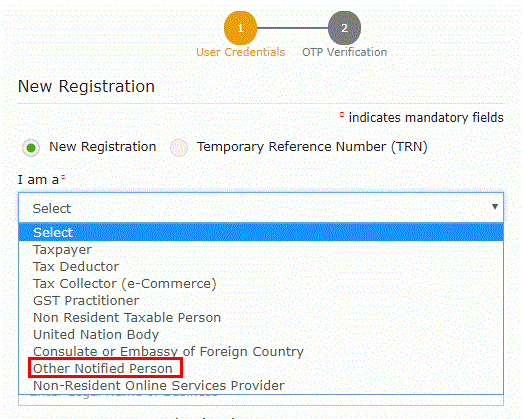
4. In the State/UT and District drop down list, select the state for which registration is required and district.
5. In the Name of the Entity field, enter the legal name.
6. In Permanent Account Number (PAN) of entity field, enter the PAN of the entity.
7. In Name of the Authorized Signatory field, enter the name of your Authorized Signatory.
8. In PAN of Authorized Signatory, enter the PAN number of the Authorized Signatory.
9. In the E-mail Address of Authorized Signatory field, enter the e-mail address of the Primary Authorized Signatory.
10. In the Mobile Number of Authorized Signatory field, enter the valid Indian mobile number of the Primary Authorized Signatory.
Note: Different One Time Password (OTP) will be sent on your e-mail address and mobile number you just mentioned for authentication.
Once the validation is done, all further communications will be sent to above mentioned e-mail address and mobile number.
11. In the Type the characters you see in the image below field, enter the captcha text.
12. Click the PROCEED button

After successful validation, you will be directed to the OTP Verification page.
13. In the Mobile OTP field, enter the OTP you received on your mobile number. OTP is valid only for 10 minutes.
14. In the Email OTP field, enter the OTP you received on your email address. OTP is valid only for 10 minutes.
Note:
- OTP sent to mobile number and email address are separate.
- In case OTP is invalid, try again by clicking the Click here to resend the OTP link. You will receive the OTP on your registered mobile number or email ID again. Enter both the newly received OTPs again.
15. Click the PROCEED button.
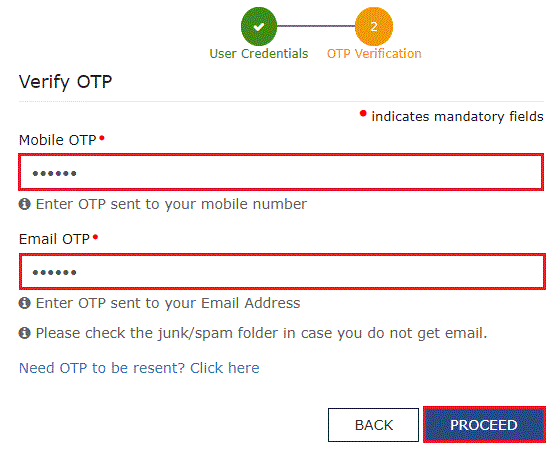
The system generated 15-digit Temporary Reference Number (TRN) is displayed.
Note: Once TRN is generated, You will receive the TRN information on your e-mail address as well as your mobile number. Note that below the TRN, the expiry date of the TRN will also be mentioned.

16. Click the PROCEED button. Alternatively, you can also click Services > Registration > New Registration option and select the Temporary Reference Number (TRN) radio button to login using the TRN.
PART B:
17. In the Temporary Reference Number (TRN) field, enter the TRN generated.
18. In the Type the characters you see in the image below field, enter the captcha text.
19. Click the PROCEED button. 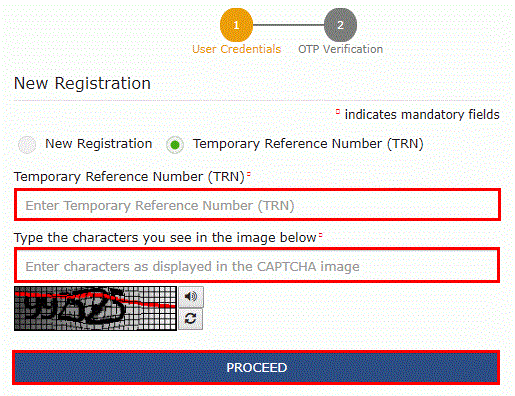
The Verify OTP page is displayed. You will receive same Mobile OTP and E-mail OTP. These OTPs are different from the OTPs you received in previous step.
20. In the Mobile/E-mail OTP field, enter the OTP you received. OTP is valid only for 10 minutes.
Note: OTP sent to mobile number and e-mail address are same.
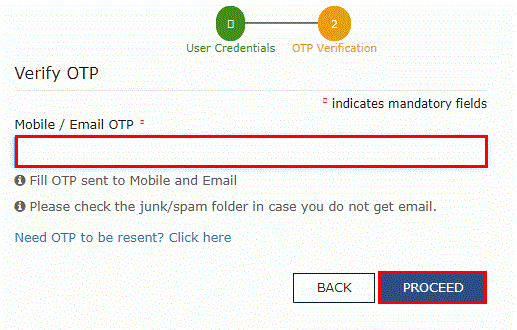
In case OTP is invalid, try again by clicking the Need OTP to be resent? Click here link. You will receive the OTP on your registered mobile number or e-mail ID again. Enter the newly received OTP again.
After Successful validation of OTP, user is navigated to the dashboard page.
21. The My Saved Applications page is displayed. Under the Action column, click the Edit icon (icon in blue square with white pen).
Note:
- Notice the expiry date shown below in the screenshot. If the applicant doesn’t submit the application within 15 days, TRN and the entire information filled against that TRN will be purged after 15 days.
- The status of the registration application is ‘Draft’ unless the application is submitted.

Clicking on the Action link to navigate to The Registration Application form. The Registration Application form with various tabs is displayed.
On the top of the page, there are Five tabs as Basic Details, Entity Details, Authorized Signatory, Bank accounts and Verification. Click each tab to enter the details.
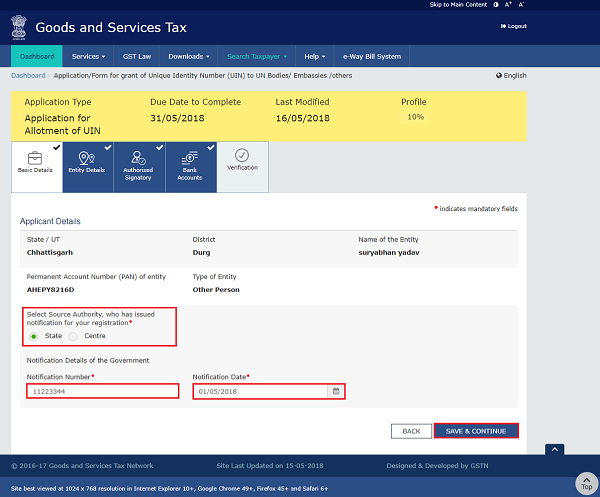
Basic Details tab:
a)Select the source authority who has issued notification for registration.
b) In the Notification Number field, enter the notification number.
c) Select the Notification Date using the calendar.
d)Click the SAVE & CONTINUE button and you will be directed to the next section.
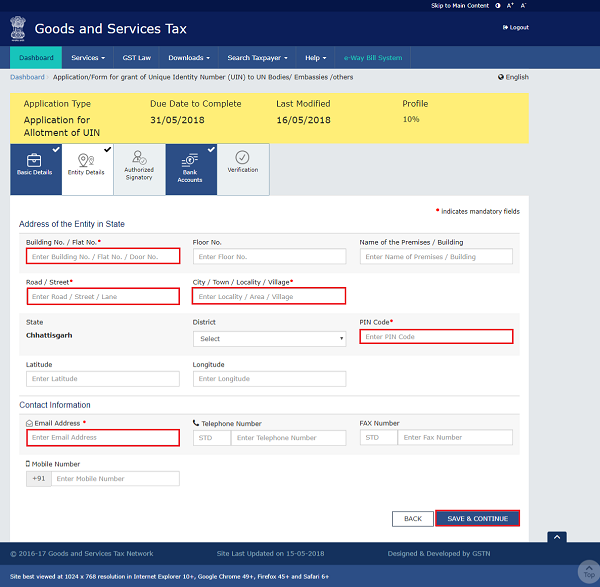
Entity Details tab:
a) Enter the address and contact details of the entity in State.
b)Click the SAVE & CONTINUE button and you will be directed to the next section.
Authorized Signatory tab:
This tab page displays the details to be entered for Authorized signatory.
Note: Details of Authorized signatory such as Name, Mobile Number, E-mail address and PAN are auto-populated on this tab based on the details provided in Part A of the application form.
a) In Primary Authorized Signatory, select the check box for Primary Authorized Signatory.
b) In the Personal Information section, enter the personal details of the authorized signatory’s like Name of Father, date of birth of authorized signatory, Mobile number, E-mail address and Gender.
c) In the Identity Information section, enter the official information of the Authorized signatory.
d) In the Residential Address section, enter the address details of the authorized signatory. Based on the State selected, select the district and enter the corresponding pin code.
e) In the Document Upload section, upload document for Proof of details of Authorized Signatory and Photograph of the Authorized Signatory.
Note: Document to be uploaded as Proof of Authorized Signatory can be:
- Letter of Authorization
- Copy of Resolution passed by BoD (Board of Directors) / Managing Committee and Acceptance Letter
Note:
- For photographs, format should be JPEG and file size must not exceed 100 KB.
- For Proof of details of Authorized Signatory, format should be PDF or JPEG and file size must not exceed 1 MB.
f)Click the SAVE & CONTINUE button and you will be directed to the next section.

Bank Details tab:
This tab page displays the details of the bank account maintained for conducting business.
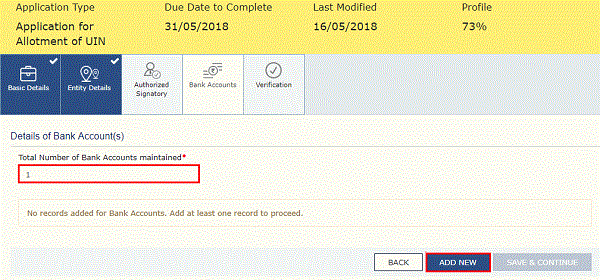
a) In Total number of Bank Accountsmaintained field, enter the number of accounts that you have and click the ADD NEW
Note: Total number of Bank Accounts Maintained should be equal to Total number bank account added. In case of mismatch, you will not be able to submit the form.
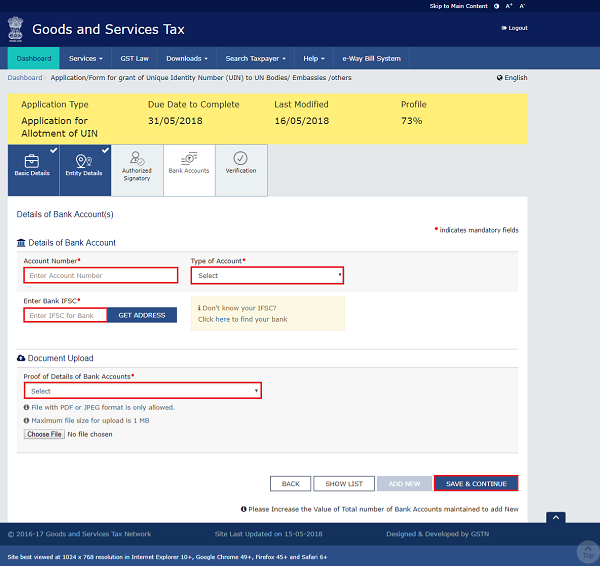
b) In the Account Number field, enter the account number of the Bank.
c) In the Type of Account drop-down list, select the type of account.
d) In the Enter Bank IFSC field, enter the IFSC code of the Bank.
Note:
- In case you don’t know the IFSC code, click the here Link to know the IFSC code.
- Alternatively, you can also find the IFSC code in the cheque book or the cheque leaflet of your Bank.
e) In the Document Upload section, click the Choose file Navigate and select the document.
Note:
You can upload PDF or JPEG files with maximum file size for upload of as 1 MB.
You can upload below documents as proof of Details of Bank Account:
- First Page of Bank Passbook
- Bank Statement
- Cancelled cheque
f) Click the SAVE & CONTINUE
Note: In case you want to add details of more Bank accounts, click the ADD NEW button.
Verification tab:
This tab page displays the details of the verification for authentication of the details submitted in the form.
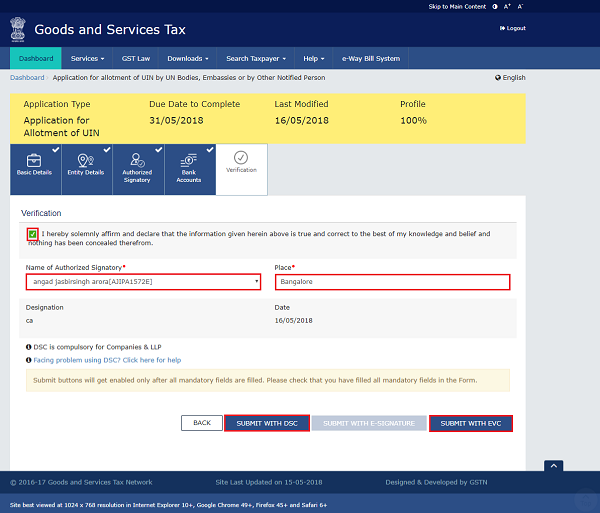
a. Select the Verification checkbox.
b. In the Name of Authorized Signatory drop-down list, select the name of authorized signatory.
c. In the Place field, enter the place where the form is filed.
d. After filling the application, you need to digitally sign the application using Digital Signature Certificate (DSC)/ EVC.
In Case of DSC:
e. Click the SUBMIT WITH DSC button.
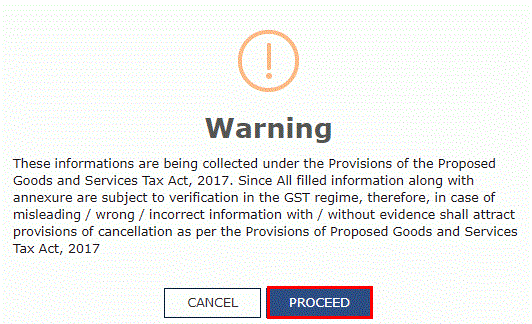
f. Click the PROCEED button.
g. Select the certificate and click the SIGN button.
In Case of EVC:
e. Click the SUBMIT WITH EVC button.
f. Enter the OTP sent to email and mobile number of the Authorized Signatory registered at the GST Portal and click the VALIDATE OTP button.

The success message is displayed. You will receive the acknowledgement in next 15 minutes on your registered e-mail address and mobile phone number. Application Reference Number (ARN) receipt is sent on your e-mail address and mobile phone number.
You can track the status of your application using the Services > Registration > Track Application Status command.

Once the form is submitted until the ARN is generated, the status would be ‘Pending for Validation’. On successful validation of application form, ARN would be generated and status changes to ‘Pending for Processing‘. In case the validations fail, the status would be updated as ‘Validation Error‘.
(Republished with amendments)
****
Disclaimer: The contents of this article are for information purposes only and does not constitute an advice or a legal opinion and are personal views of the author. It is based upon relevant law and/or facts available at that point of time and prepared with due accuracy & reliability. Readers are requested to check and refer relevant provisions of statute, latest judicial pronouncements, circulars, clarifications etc before acting on the basis of the above write up. The possibility of other views on the subject matter cannot be ruled out. By the use of the said information, you agree that Author / TaxGuru is not responsible or liable in any manner for the authenticity, accuracy, completeness, errors or any kind of omissions in this piece of information for any action taken thereof. This is not any kind of advertisement or solicitation of work by a professional.


