Page Contents
- A. Manual on Enrolment of Existing Taxpayer with Provisional ID and Password
- B. FAQs on GST Enrolment Activities Post Appointed Date
- Q.1. I have submitted my Enrolment Application, when will I get my Registration?
- Q.2. Can my Enrolment Application be rejected?
- Q.3. I received an e-mail message that my Jurisdiction has been updated? Why has my Jurisdiction been updated? Who has updated my Jurisdiction?
- Q.4. My PAN is cancelled; I have already enrolled as taxpayer with the GST Portal. What can I do for updating PAN in the GST Portal?
- Q.5. What are the various type of status of Enrolment Application?
- Q.6. When will I get Final RC (GST REG -06)?
- Q.7. I am getting validation error after submission of application. What should I do?
- Q.8. As a Migrated user I am not able to see dashboard which has option for Amendment/ Return/payment?
- C. FAQs on Amendment of GST Enrolment Application Post Appointed Date
A. Manual on Enrolment of Existing Taxpayer with Provisional ID and Password
I am an existing taxpayer registered under Excise, Service Tax and State Tax Laws such as VAT, Entry Tax, Luxury Tax and Entertainment Tax. I received SMS/ E-Mail with Provisional ID and Password. What are next steps for me? How do I begin to enrol with the GST Portal with Provisional ID and Password?
All existing taxpayers and VAT, Service tax and Central Excise taxpayers who are not registered under State VAT will be given a provisional ID and a password. You first need to create your username and password using this provisional ID and password at the GST Common Portal – www.gst.gov.in.
Note:
Do not share the provisional ID and password with anyone.
To enrol with the GST Portal, you need to perform the following steps:
1. Access the www.gst.gov.in URL. The GST Home page is displayed.
2. Click the LOGIN button.
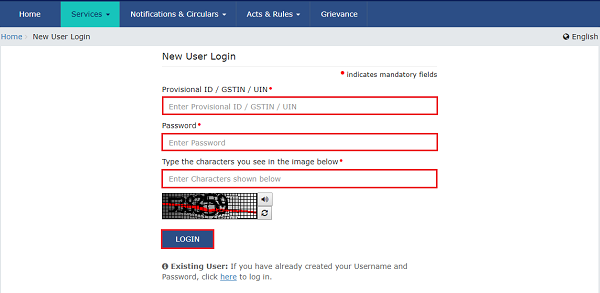
3. The Login page is displayed. Click the here link in the instruction at the bottom of the page that says “First time login: If you are logging in for the first time, click here to login”.
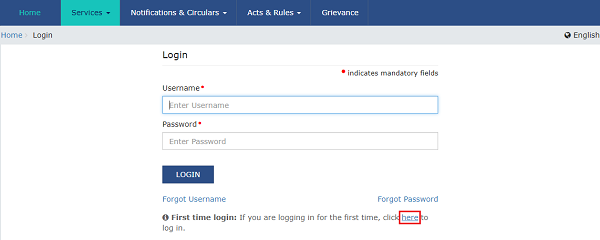
4. The Login page is displayed. In the Provisional ID field, type the username that you received in the e-mail, SMS or any other communication received from the State VAT and CBEC.
5. In the Password field, type the password that you received in the e-mail, SMS or any other communication received from the State VAT and CBEC.
6. In the Type the characters you see in the image below field, type the captcha text as shown in the screen.
7. Click the LOGIN button.
Note:
In case you have not received or lost your Provisional ID and Password, contact your State VAT Department.
In case you have already created your username, click the here link to login.
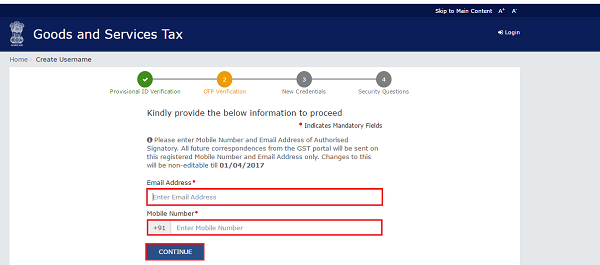
8. The Provisional ID Verification page is displayed. In the E-mail Addressfield, enter your e-mail address.
9. In the Mobile Number field, enter your valid Indian mobile number.
There are two One time Password (OTPs) which will be sent on your e-mail address and mobile number you just mentioned. Both OTPs are required for the verification.
Note:
Enter your own e-mail address and mobile number if you are the Primary Authorised Signatory. All future correspondences from the GST Common Portal will be sent on this registered e-mail address and mobile number only.
E-mail address and mobile number cannot be changed till 01/04/2017.
Any change in the registered e-mail address and mobile number can be done through the amendment process after 01/04/2017 as specified in the GST Act.
10. Click the CONTINUE button.
Note:
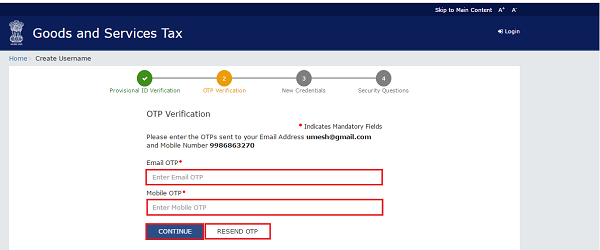
You must have received two different OTPs. Do not share these OTPs with anyone. Check your e-mail address and note your e-mail OTP. Also check text message sent on your mobile phone and note your mobile OTP. In case you have not received the e-mail OTP in your Inbox, you can check your spam folder for same.
11. The OTP Verification page is displayed. In the Email OTP field, enter the OTP you received in your e-mail address.
12. In the Mobile OTP field, enter the OTP you received on your mobile phone.
Note:
In case you have not received the OTP, click the RESEND OTP button to resend the OTP to your e-mail address and mobile number. Both new OTPs have to be used for the verification. The validity period of OTP is 10 minutes.
13. Click the CONTINUE button.
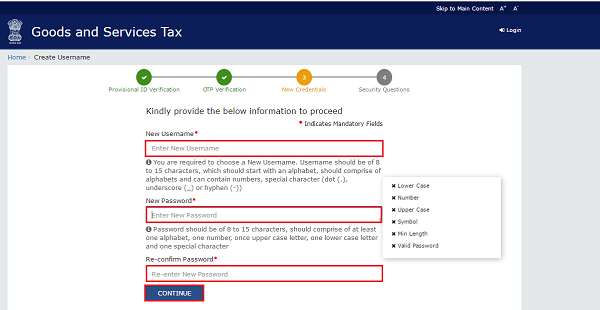
14. The New Credentials page is displayed. In the New Username field, enter a username for yourself.
15. In the New Password field, enter a password of your choice that you will be using from next time on wards.
Note:
Username should be of 8 to 15 characters, which should comprise of alphabets, numbers and can contain special character (dot (.), underscore (_) or hyphen (-)).
Password should be of 8 to 15 characters, which should comprise at least one alphabet, one number, one upper case letter, one lower case letter and one special character.
Avoid saving password in system/ browser especially in public or shared systems to avoid misuse of your account information.
16. In the Re-confirm Password field, reenter the password.
17. Click the CONTINUE button.
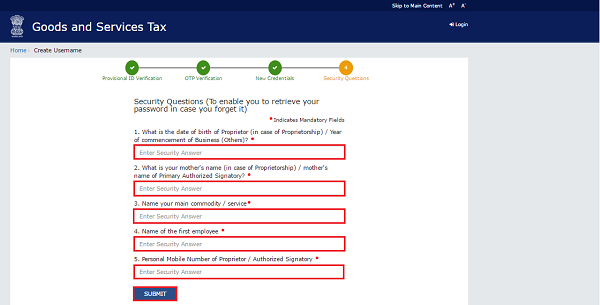
18. The Security Questions page is displayed. For each security question, enter the answers.
Note:
There are five questions on this page. It is mandatory to enter answers to all the security questions. Be careful when answering the security questions. In case you forget your password, you will be required to answer these security questions to retrieve your password.
19. Click the SUBMIT button.
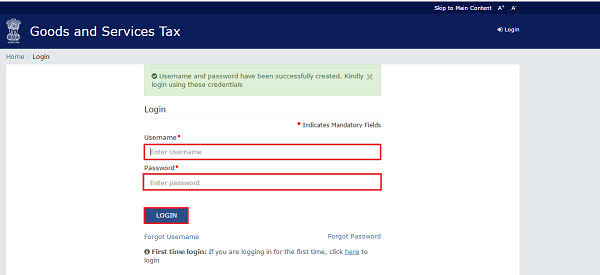
The message “Username and password have been successfully changed. Kindly login using these credentials” is displayed. You can now login to the GST Common Portal using the username and password you just created.
Note:
- Do not disclose your confidential account information like username and password, security question and answers with anyone through written note, phone or e-mail message.
- Beware of social engineering attempts. No government department or official would ask for your account credentials or OTP details. Refrain from sharing your login credentials details.
- Be cautious about suspicious looking e-mail messages asking you to click on unknown links/ URLs. It could be a Phishing attack.
20. In the Username field, enter the username you just created.
21. In the Password field, enter the password.
22. In the Type the characters you see in the image below field, type the captcha text as shown on the screen.
23. Click the LOGIN button.
24. The Welcome page is displayed. Click the CONTINUE button
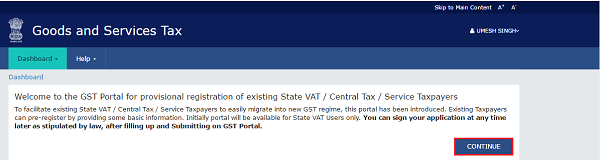
Your Dashboard is displayed. Notice, in the Dashboard, the Last Modified section displays the date when you last modified the Enrolment Application.
- If there is a suspicion that your login credentials (username and password) is known to someone else, please change it immediately.
- If you suspect any unauthorized activity on your user account or any loss/ leakage of data, please inform GST Helpdesk immediately.
Note:
Enrolment application can be filled only in English language. You can save and retrieve the application later. All the fields marked with red dot are mandatory to be filled.
Alternatively, you can the click the Dashboard > Provisional ID Enrolment command to access the Enrolment Application.
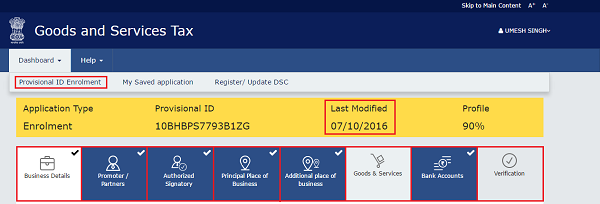
On the top of the page, there are eight tabs as Business Details, Promoter/ Partners, Authorized Signatory, Principal Place of Business, Additional Place of Business, Goods & Services, Bank Accounts and Verification. Click each tab to enter the details.
Click the tab names to know more details:
Business Details
Promoter/ Partners
Authorized Signatory
Principal Place of Business
Additional Places of Business
Goods & Services
Bank Accounts
Verification
Business Details:
The Business Details tab is selected by default. This tab displays the information to be filled for the business details required for enrolment.
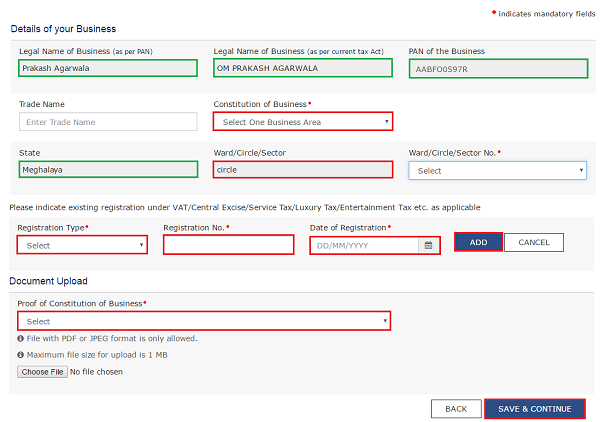
In case of registration under State VAT System:
Note:
Following details are auto-populated in the enrolment application based on your existing data in State VAT system but you cannot edit these details:
- Legal Name of Business (as per PAN)
- Legal Name of Business (as per current tax Act)
- PAN of the Business
- State
- Ward/Circle/Sector
The Trade Name is pre-populated but you can edit the same.
a. In the Trade Name field, enter the trade name of your business.
b. In the Constitution of Business drop-down list, select the type of constitution of your business.
Note:
If you pay service tax on the rent received on your own property and your turnover is above threshold under GST or if you are self-employed professional and pay Service Tax, select the Others option in the Proof of Constitution of Business drop-down list .
c. In the Ward/Circle/Sector No.drop-down list, select the Ward/ Circle/ Sector number of your business.
d. Under the Please indicate existing registration section, in the Registration Type drop-down list, select the appropriate registration type.
e. In the Registration No. field, enter the registration number
f. Select the Date of Registration using the calendar.
g. Click the Add button.
h. In the Document Upload section, in the Proof of Constitution of Business drop-down list, select the appropriate document to be uploaded.
Note:
If you pay service tax on the rent received on your own property and your turnover is above threshold under GST or if you are self-employed professional and pay Service Tax, select the Registration Certificate option and attach the Service Tax Registration Certificate as a support document.
i. Click the Choose File button. Navigate and select the document.
j. Click the SAVE & CONTINUE button.
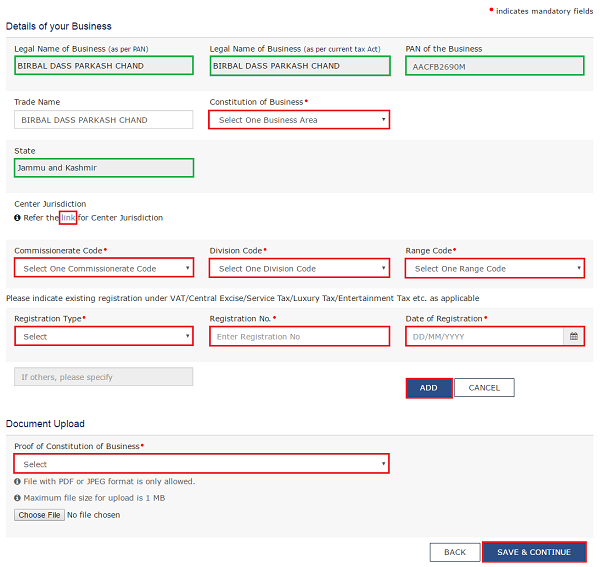
In case of registration under Central Excise or Service Tax:
Note:
Following details are auto-populated in the enrolment application based on your existing data in the Central Excise or Service Tax system but you cannot edit these details:
- Legal Name of Business (as per PAN)
- Legal Name of Business (as per current tax Act)
- PAN of the Business
- State
The Trade Name is pre-populated but you can edit the same.
a. In the Trade Name field, enter the trade name of your business.
b. In the Constitution of Business drop-down list, select the type of constitution of your business.
Note:
If you pay service tax on the rent received on your own property and your turnover is above threshold under GST or if you are self-employed professional and pay Service Tax, please select the Others option in the Constitution of Business drop-down field.
Note:
In case you do not know your Center Jurisdiction, click the link hyperlink.
c. In the Commissionerate Code drop-down list, select the Commissionerate Code of your jurisdiction.
d. In the Division Code drop-down list, select the Division Code under the Commissionerate of your jurisdiction.
e. In the Range Code drop-down list, select the Range Code under the Division of your jurisdiction.
f. Under the Please indicate existing registration section, in the Registration Type drop-down list, select the appropriate registration type.
g. In the Registration No. field, enter the registration number
h. Select the Date of Registration using the calendar.
i. Click the Add button.
j. In the Document Upload section, in the Proof of Constitution of Business drop-down list, select the appropriate document to be uploaded.
Note:
If you pay service tax on the rent received on your own property and your turnover is above threshold under GST or if you are self-employed professional and pay Service Tax, select the Registration Certificate option and attach the Service Tax Registration Certificate as a support document.
k. Click the Choose File button. Navigate and select the document.
l. Click the SAVE & CONTINUE button.
Promoter/ Partners:
This tab page displays the details of the stakeholders chosen in the Constitution of Business detail.
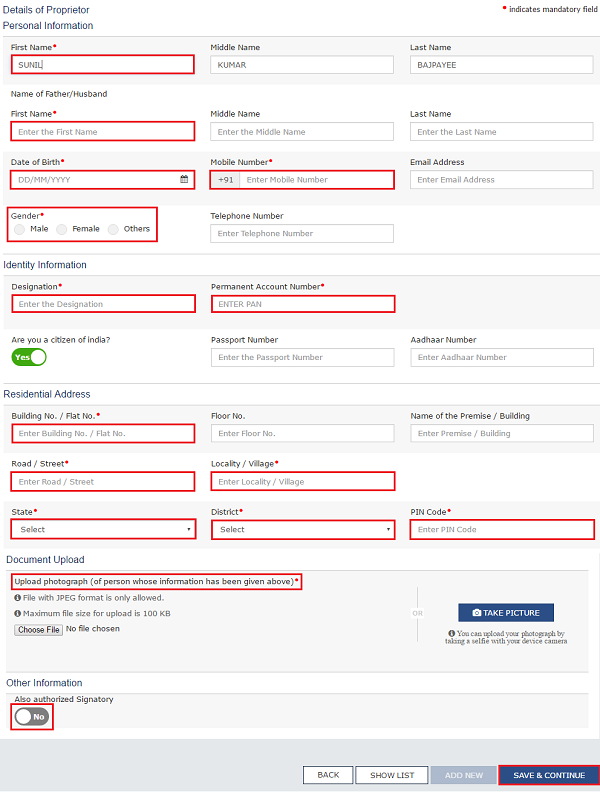
a. In the First Name field, enter the first name of the stakeholder.
b. In the Middle Name field, enter the middle name of the stakeholder.
c. In the Last Name field, enter the last name of the stakeholder.
d. Under the Name of Father/Husband, in the First Name field, enter the first name of the father of the stakeholder.
e. Under the Name of Father/Husband, in the Middle Name field, enter the middle name of the father of the stakeholder.
f. Under the Name of Father/Husband, in the Last Name field, enter the last name of the father of the stakeholder.
g. Select the Date of Birth of the stakeholder using the calendar.
h. In the Mobile Number field, enter the valid Indian mobile number of the stakeholder.
i. In the Email Address field, enter the valid e-mail address of the stakeholder.
j. Select the Gender of the stakeholder.
k. In the Designation field, enter the designation of the stakeholder.
l. In the Permanent Account Number field, enter the Permanent Account Number(PAN) of the stakeholder.
m. In the Aadhaar Number field, enter the Aadhaar Number of the stakeholder.
n. In case you are a citizen of India, select Yes or else select No.
i. In case of NO, in the Passport Number field, enter the passport number of the stakeholder.
o. In the Building No. / Flat No. field, enter the building number and flat number of the residential address of the stakeholder.
p. In the Floor No. field, enter the floor number of the residential address.
q. In the Name of the Premise / Building field, enter the name of the building of the residential address.
r. In the Road / Street field, enter the road name where the residential address is located.
s. In the Locality / Village field, enter the locality or village name where the residential address is located.
t. In the State drop-down list, select the State where the residential address is located.
u. In the District drop-down list, select the city or district where the residential address is located.
v. In the PIN Code field, enter the pin code of the place where the residential address is located.
w. In the Document Upload section, click the Choose File button to add the photograph of the stakeholder. Navigate and select the document.
x. Click the SAVE & CONTINUE button.
Note:
In case the stakeholder whose details are entered is also the authorized signatory, select the Also authorized Signatory option.
To add more details of any other stakeholder, click the ADD NEW button.
To view the list of all the stakeholders, click the SHOW LIST button.
Authorized Signatory:
This tab page displays the details of the authorized signatory.
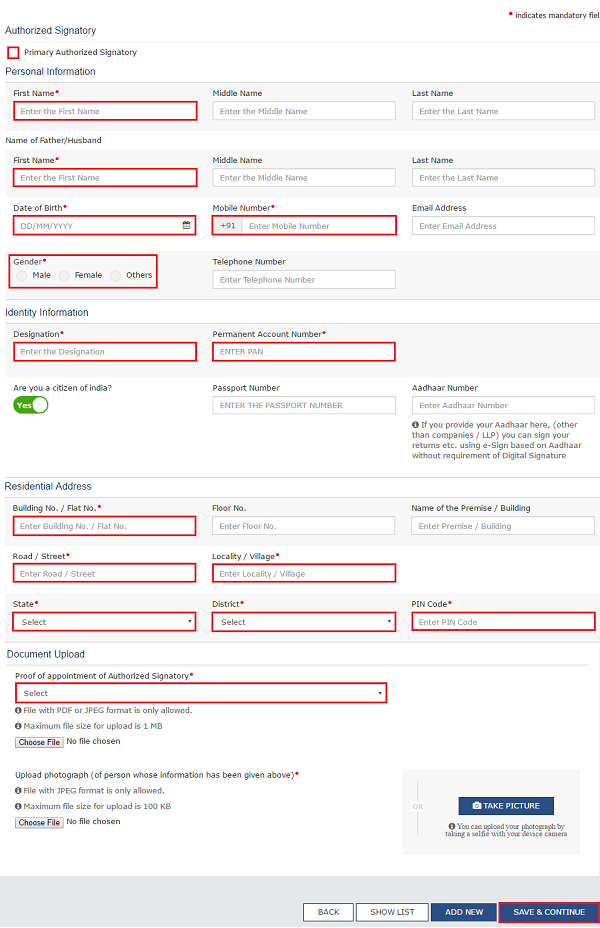
a. In case you are the primary Authorized Signatory, select the checkbox for Primary Authorized Signatory.
b. In the First Name field, enter the first name of the authorized signatory.
c. Under the Name of Father/Husband, in the First Name field, enter the first name of the father of the authorized signatory.
d. Under the Name of Father/Husband, in the Middle Name field, enter the middle name of the father of the authorized signatory.
e. Under the Name of Father/Husband, in the Last Name field, enter the last name of the father of the authorized signatory.
f. Select the Date of Birth of the authorized signatory using the calendar.
g. In the Mobile Number field, enter the valid Indian mobile number of the authorized signatory.
h. In the Email Address field, enter the valid e-mail address of the authorized signatory.
i. Select the Gender of the authorized signatory.
j. In the Designation field, enter the designation of the authorized signatory.
k. In the Permanent Account Number field, enter the Permanent Account Number(PAN) of the authorized signatory.
l. In case you are a citizen of India, select Yes or else select No.
1. In case of NO, in the Passport Number field, enter the passport number of the authorized signatory.
m. In the Aadhaar Number field, enter the Aadhaar Number of the authorized signatory.
n. In the Building No. / Flat No. field, enter the building number and flat number of the residential address of the authorized signatory.
o. In the Floor No. field, enter the floor number of the residential address.
p. In the Name of the Premise / Building field, enter the name of the building of the residential address.
q. In the Road / Street field, enter the road name where the residential address is located.
r. In the Locality / Village field, enter the locality or village name where the residential address is located.
s. In the State drop-down list, select the State where the residential address is located.
t. In the District drop-down list, select the city or district where the residential address is located.
u. In the PIN Code field, enter the pin code of the place where the residential address is located.
v. In the Document Upload section, in the Proof of appointment of Authorized signatory drop-down list and Upload photograph, select the appropriate document to be uploaded.
w. Click the Choose File button. Navigate and select the document.
x. In the Document Upload section, click the Choose File button to add the photograph of the stakeholder. Navigate and select the document.
y. Click the SAVE & CONTINUE button.
Note:
To add more details of any other authorized signatory, click the ADD NEW button.
To view the list of all the authorized signatories, click the SHOW LIST button.
Principal Place of Business:
This tab page displays the details of the principal place of business.
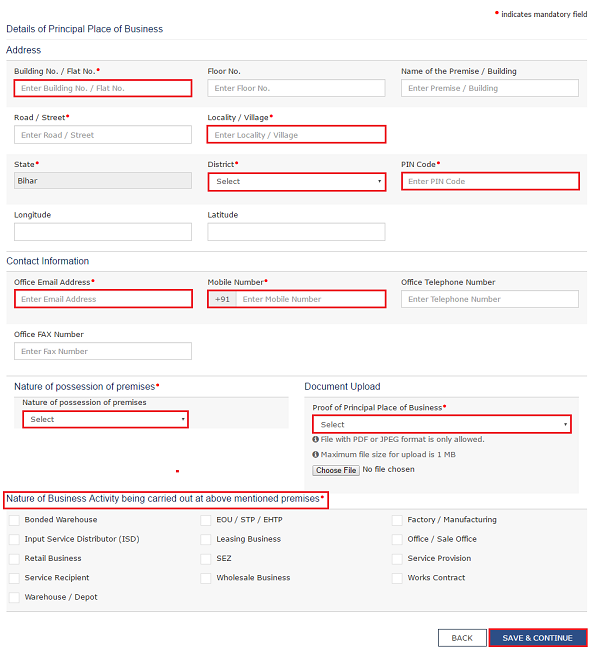
a. In the Building No. / Flat No. field, enter the building number and flat number of the principal place of your business.
b. In the Floor No. field, enter the floor number of the principal place of your business.
c. In the Name of the Premise / Building field, enter the name of the building of the principal place of your business.
d. In the Road / Street field, enter the road name where the principal place of your business is located.
e. In the Locality / Village field, enter the locality or village name where the principal place of your business is located.
f. In the District drop-down list, select the city or district where the principal place of your business is located.
g. In the PIN Code field, enter the pin code of the place where the principal place of your business is located.
h. In the Office Email Address field, enter the official e-mail address used for business purpose.
i. In the Mobile Number field, enter the official Indian mobile number used for business purpose.
j. In the Office Telephone Number field, enter the official telephone number used for business purpose.
k. In the Office FAX Number field, enter the official FAX number used for business purpose.
l. In the Nature of possession of premises drop-down list, select the nature of possession of premises.
m. In the Document Upload section, in the Proof of Principal Place of Business drop-down list, select the appropriate document to be uploaded.
n. Select the checkbox for Nature of Business Activity being carried out at the premises whose details are entered here.
o. Click the SAVE & CONTINUE button.
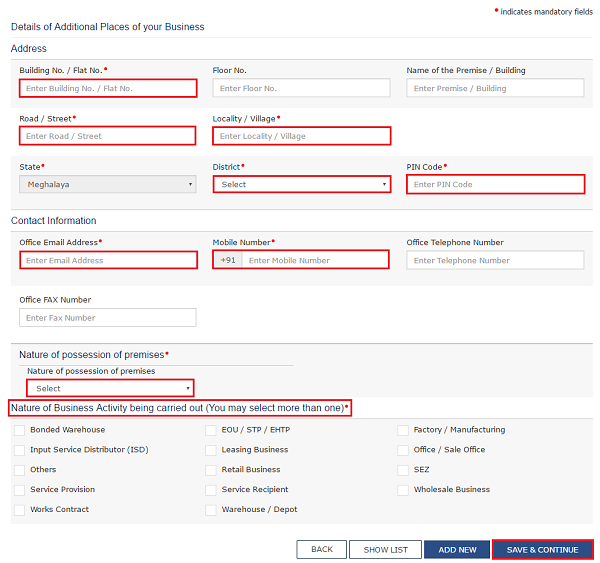
Additional Places of Business:
This tab page displays the details of the additional places of the business. Enter the details similarly like Principal Place of Business Details provided above.
Click here to go back to tab names
Goods & Services:
This tab page displays the details of the goods and services supplied by the business.
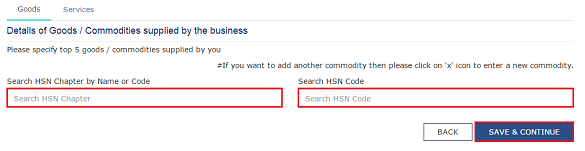
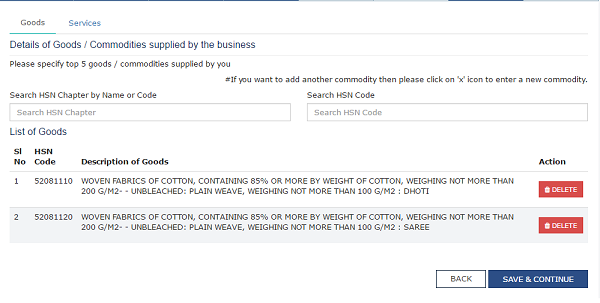
In case you deal with Goods or Commodities, you need to mention the HSN Code in the Goods tab. In case you deal with services, you need to mention the Service Classification Code in the Services tab. You can add maximum 5 goods and 5 services. In case, you have more than 5 goods or services, you must add the top 5 goods or services you are dealing with.
Goods Tab:
In some cases you may know the HSN Code, and in some cases you might not know the HSN Code. Follow the steps given below to fill the HSN Code.
In case you know the HSN Code:
Let us take an example that you need to add the HSN Code 61051010. To add the HSN Code, perform the following steps:
a. In the Search HSN Chapter by Name or Code field, enter the first four digit 6105 from the HSN Code.
b. In the Search HSN Code field, enter the HSN code 61051010. HSN Code is successfully added.
In case you do not know the HSN Code:
Let us take an example where the dealer deals with cotton textile.
a. In the Search HSN Chapter by Name or Code field, type cotton; related HSN Chapter list is displayed. From the displayed list, scroll and select the appropriate option (in this case 5208)
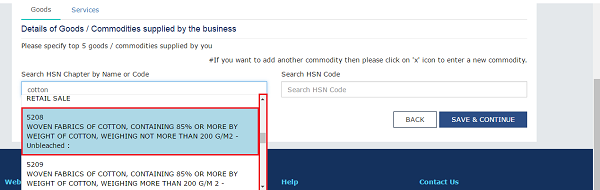
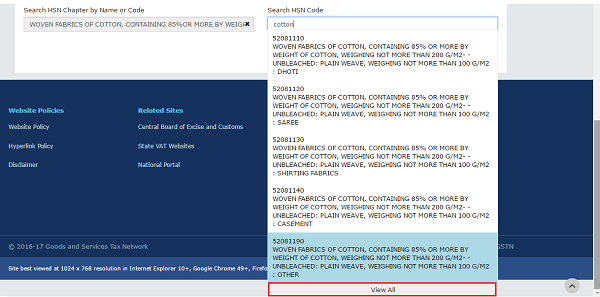
b.In the Search HSN Code field, again type cotton or 5208; related HSN Code list is displayed. From the displayed list, scroll and select the appropriate option. In case the appropriate option is not visible, scroll and select the View All link
c. Select the check boxes for HSN codes to be added. Scroll between the pages to select the appropriate option.
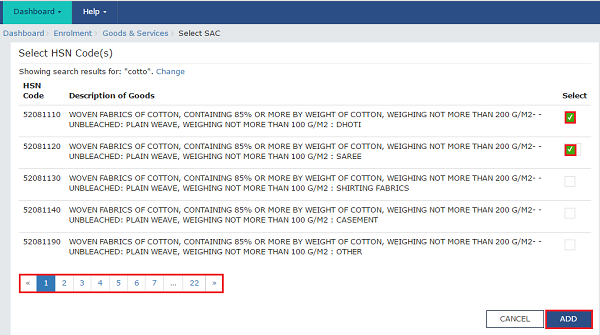
d. Click the Add button. HSN Code is successfully added
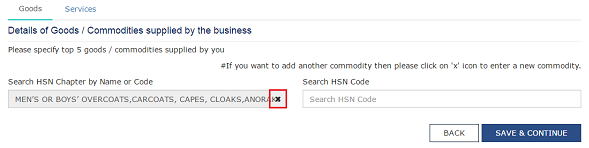
Note:
In case you want to add another good or commodity, click the X icon as shown in the image below.
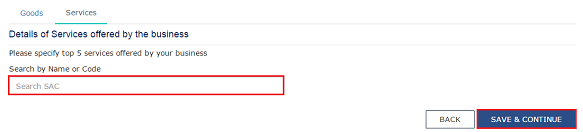
Services Tab:
a. In the Search by Name or Code field, type the name or the Service Classification Code of the services supplied by the business. Service Classification Code is successfully added.
b. Click the SAVE & CONTINUE button.
Bank Accounts:
This tab page displays the details of the bank accounts maintained for conducting business.
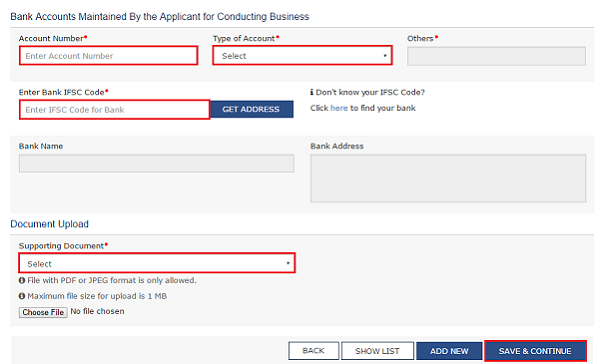
a. In the Account Number field, enter the account number of the Bank.
b. In the Type of Account drop-down list, select the type of account.
c. In the Enter Bank IFSC Code field, enter the IFSC code of the Bank.
Note:
In case you don’t know the IFSC code, click the here link to know the IFSC code.
Alternatively, you can also find the IFSC code in the cheque book or the cheque leaflet of your Bank.
d. In the Document Upload section, in the Supporting Document drop-down list, select the appropriate document to be uploaded.
e. Click the SAVE & CONTINUE button.
Note:
In case you want to add details of more Bank accounts, click the ADD NEW button.
To view the list of all the stakeholders, click the SHOW LIST button.
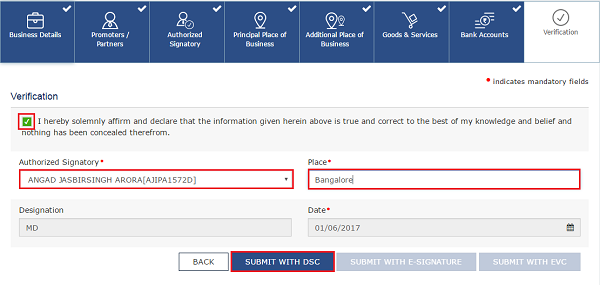
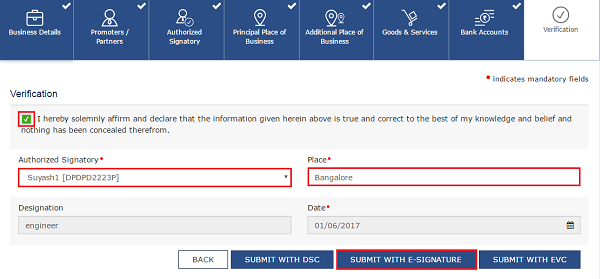
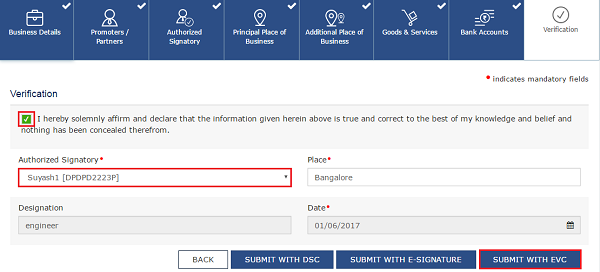
Verification:
This tab page displays the details of the verification for authentication of the details submitted in the form.
a. Select the Verification checkbox.
b. In the Authorized Signatory drop-down list, select the name of the authorized signatory.
c. In the Place field, enter the place of your principal place of business.
d. After filling the enrolment application, you need to digitally sign the application using Digital Signature Certificate (DSC) or E-Signature or Electronic Verification Code (EVC). Submission of application with the details is NOT completed unless DSC/ E-Signature/ EVC is affixed.
Digitally signing using DSC is mandatory in case of LLP and Companies.
The Enrolment Application can be electronically signed using E-Signature only if the authorized signatory has an Aadhar number and same is mentioned in the Partners/Promoters tab page of the Enrolment Application. This is because E-Signature is an Aadhar based electronic verification service.
In Case of DSC:
e. Click the SUBMIT WITH DSC button.
Note: In case, your DSC is not registered, you will need to register DSC.
Click here to know more about how to register DSC.
f. Click the PROCEED button
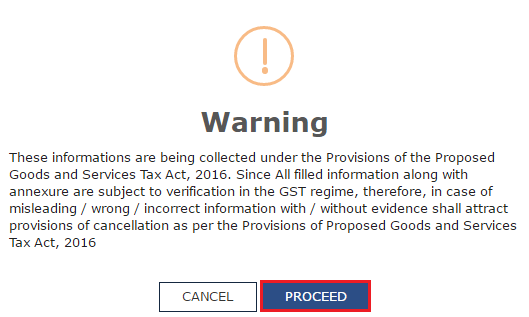
Note:
- Make sure your DSC dongle is inserted in your laptop/ desktop.
- Make sure emSigner (from eMudra) is running on your laptop/ desktop with administrator permissions.
To check if the emSigner is running on you laptop/ desktop, perform the following steps:
1. Click the item tray.
2. Double click the em Signer icon.
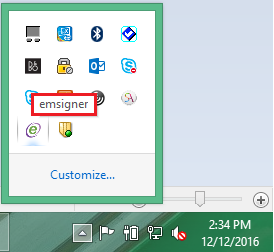
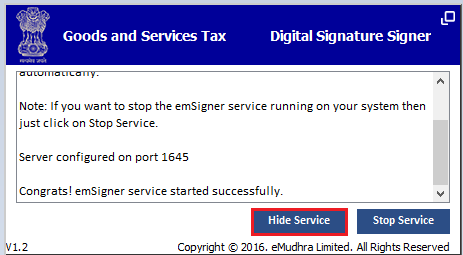
- Click the Hide Service button to minimize the dialog box.
g. Select the certificate and click the SIGN button.
h. Enter the PIN (dongle password) for the attached DSC.
Note:
To view the details of your DSC, click the View Certificate button.
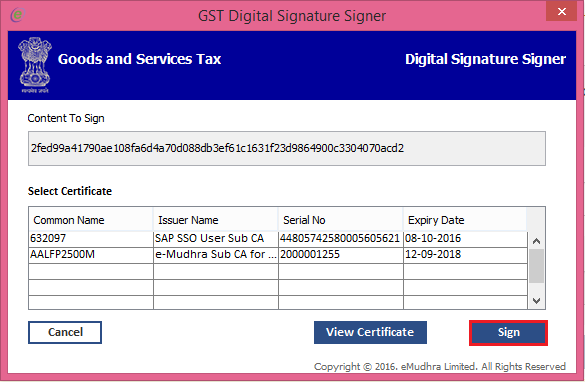
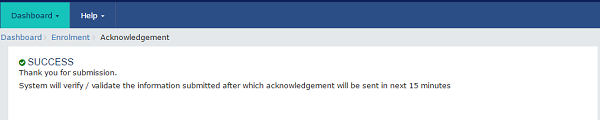
The success message is displayed after the validation of the PIN. You will receive the acknowledgement in next 15 minutes on your registered e-mail address and mobile phone number. Application Reference Number (ARN) receipt is sent on your e-mail address and mobile phone number.
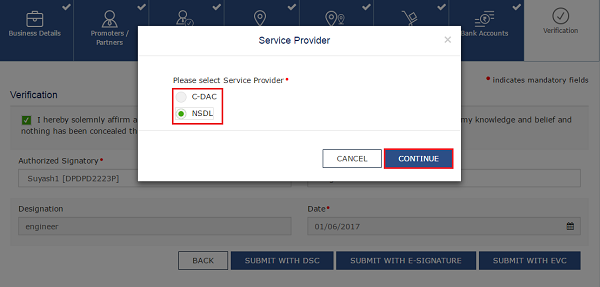
In Case of E-Signature:
e. Click the SUBMIT WITH E-SIGNATURE button
f. In the Please select Service Provideroption, select the appropriate Service Provider.
Note: C-DAC and NSDL are e-sign Service Providers (Both are free of cost).
g. Click the CONTINUE button.
h. In the Declaration box, click the AGREE button.
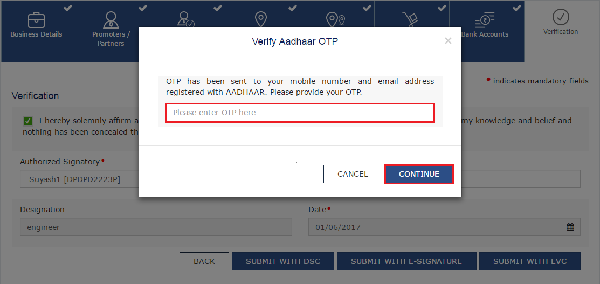
Note: OTP will be sent to your e-mail address and mobile phone number registered with Aadhaar
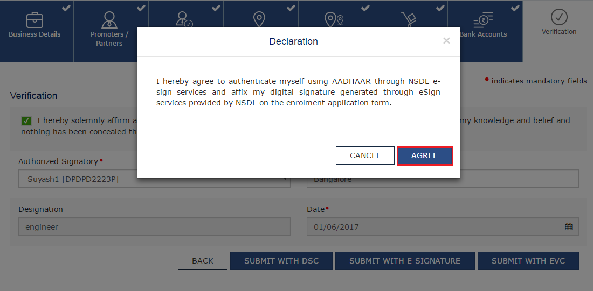
i. Verify Aadhaar OTP screen is displayed. Enter the OTP received on your e-mail address and mobile phone number registered with Aadhaar. Click the CONTINUE button.
The success message is displayed. You will receive the acknowledgement in next 15 minutes on your registered e-mail address and mobile phone number. Application Reference Number (ARN) receipt is sent on your e-mail address and mobile phone number.

In Case of Electronic Verification Code:
e. Click the SUBMIT WITH EVC button
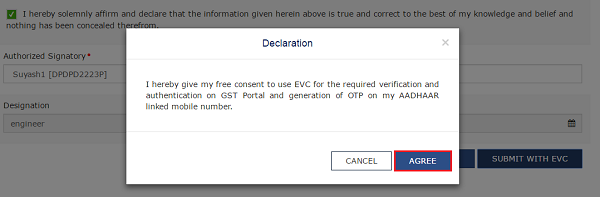
f. In the Declaration box, click the AGREE button.
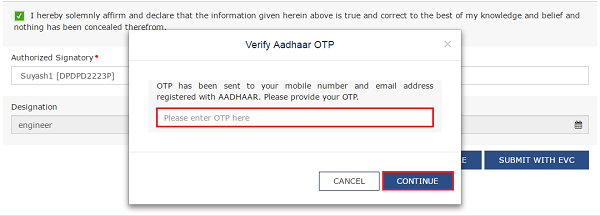
Note: OTP will be sent to your e-mail address and mobile phone number registered with Aadhaar
g. Verify Aadhaar OTP screen is displayed. Enter the OTP received on your e-mail address and mobile phone number registered with Aadhaar. Click the CONTINUE button.
The success message is displayed. You will receive the acknowledgement in next 15 minutes on your registered e-mail address and mobile phone number. Application Reference Number (ARN) receipt is sent on your e-mail address and mobile phone number.

B. FAQs on GST Enrolment Activities Post Appointed Date
Q.1. I have submitted my Enrolment Application, when will I get my Registration?
Ans. Enrolment Applications signed and submitted successfully by the migrated taxpayers is sent for processing to the Tax Officials. Below mentioned Rules applies for Processing of Enrolment Application.
| Description | Enrolment Applications signed and submitted successfully by the Migrated Taxpayers on or after 24th August 2017 |
| No Action by Tax Official | Deemed approved if no action taken by Tax Official within 15 working days from the date of ARN generation |
| Tax Official can raise a SCN | Within 15 working days of ARN generation |
| Taxpayer to respond to the SCN issued | Within 7 working days from the date of SCN.
If no response received from migrated taxpayer on the SCN issued, application can only be rejected by Tax Official. |
| Action (Approve/ Reject) to be taken by the Tax Officer on receipt of response of SCN | Within 7 working days from the date of receipt of response to SCN.
If no action is taken by Tax Official, Enrolment Application will be deemed Approved within 7 working days from the receipt of response to SCN. If the response to the SCN is satisfactory, Tax Official can approve the Enrolment Application. In case of unsatisfactory response form the taxpayer, the Tax Official can reject the Enrolment Application |
Q.2. Can my Enrolment Application be rejected?
Ans. Enrolment Application are processed by Tax Officials. During processing:
- Tax Official may approve the registration OR
- Tax Official may issue a SCN to the taxpayer within 15 days of generation of ARN (filing of application), after scrutiny of the documents. If the response to the SCN is satisfactory, Tax Official can approve the Enrolment Application. In case of unsatisfactory response form the taxpayer or no response from Taxpayer, the Tax Official can reject the Enrolment Application.
Q.3. I received an e-mail message that my Jurisdiction has been updated? Why has my Jurisdiction been updated? Who has updated my Jurisdiction?
Ans. In case the Jurisdiction details are wrongly entered by the taxpayer, the Tax Official can update the Jurisdiction details in the Enrolment Application. In such cases, the Enrolment Application will be approved/ rejected/ asked for clarification by the Tax Official in-charge of the revised Jurisdiction.
Q.4. My PAN is cancelled; I have already enrolled as taxpayer with the GST Portal. What can I do for updating PAN in the GST Portal?
Ans. The GSTIN is based on PAN in GST regime. In case your PAN is cancelled, you need to apply for cancellation of your migrated enrolment under GST.
In order to do business, you need to apply as a new taxpayer at the GST Portal, with (new) active PAN.
Q.5. What are the various type of status of Enrolment Application?
Ans.
| S.No | Description | Provisional ID Status |
| 1 | On creation of Provisional ID | Provisional |
| 2 | On submission of Application for Enrolment with signature before the appointed date < 01/07/2017 > | Migrated |
| 3 | On appointed day <<1st Jul, 2017>> “Migrated” status of Enrolment Form will be changed to | Active pending verification |
| 4 | On submission of Application for Enrolment with signature after the appointed date < 01/07/2017 > “Provisional” status will change to | Active pending verification
|
| 5 | On approval of application | Active |
| 6 | On rejection of application | Inactive |
| S.No | Description | ARN Status |
| 1 | Form assigned to Approving Officer | Pending for Processing |
| 2 | Notice issued for seeking clarification | Pending for Clarification |
| 3 | Response to Notice submitted | Clarification filed – Pending for Order |
| 4 | In case no reply submitted against Notice | Clarification not filed – Pending for Order |
| 5 | Application approved | Approved |
| 6 | Application rejected | Rejected |
Q.6. When will I get Final RC (GST REG -06)?
Ans. Once you complete Part-B of enrolment form and submit the same electronically via DSC/ EVC with required documents, ARN will be generated after successful validation, and your form will be shared with Proper officer of the same jurisdictional authority where you are registered under the earlier Act for processing. In case no action is taken by proper officer within 15 working days, your application will be deemed approved and the Final RC (GST REG -06) will be generated.
Q.7. I am getting validation error after submission of application. What should I do?
Ans. Validation error occurs due to mismatch of details of Promoters or Authorized signatories with details of PAN / CIN / DIN / Aadhaar database. Please log in and correct the relevant data as intimated in the email.
Q.8. As a Migrated user I am not able to see dashboard which has option for Amendment/ Return/payment?
Ans. Registration related functionality like Amendment (Core or Non-Core), Return/ Payment option will be available once the status of the taxpayer become Active.
C. FAQs on Amendment of GST Enrolment Application Post Appointed Date
Q.1. Can amendments be made after the Enrolment Application is submitted?
Ans. No. Details submitted in the Enrolment Application can be amended only AFTER the Enrolment application status is in approved status. After approval, the application for amendment can be filed by the taxpayer. Click the link below to know more about it.
• Amendment of Core and Non-Core fields
Q.2. Can the mobile number and e-mail address given at the time of enrolment be changed after enrolment?
Ans. Yes, the mobile phone number and e-mail address of the primary authorized signatory can be changed by filing the Non-core field amendment.
After this change, all communications will be sent to the updated mobile phone number and e-mail address of the primary authorized signatory.
Ans. Yes, you can change the details of the authorized signatory. You can file an application for Non-core field amendment for addition or deletion of an authorized signatory.
If partner or promoter is the (only) authorized signatory (also), then a new person can be made primary authorized signatory via filing the application for Non-Core field amendment. In such cases,
1. Add a new authorized signatory via non-core amendment.
2. Make the newly added authorized signatory as Primary authorized signatory via non-core amendment and uncheck partner/ promoter as authorized signatory.


