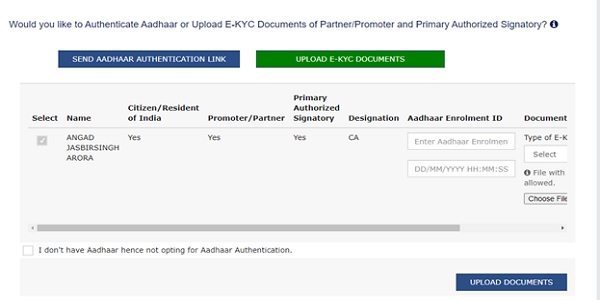
An existing taxpayer can get Aadhaar authentication done using the following two options:
a) SEND AADHAAR AUTHENTICATION LINK: If the Taxpayer selects this option, the Aadhaar Authentication is done for only one Promoter/ Partner and the Primary Authorized Signatory. The Aadhaar Authentication link is sent on the GST registered e-mail IDs and mobile number. The steps below explain the complete process of Aadhaar Authentication.
b) UPLOAD E-KYC DOCUMENTS: If the Taxpayer chooses not to get Aadhaar authentication done and do E-KYC instead, then the Taxpayer can select the UPLOAD E-KYC DOCUMENTS option and then upload the documents for Primary Authorized Signatory and selected (one) Promoter/ Partner.
Once taxpayer has uploaded the documents, then an ARN will be generated by the System and the same will be shown in the Tax Official’s dashboard, who can either approve or reject the documents, after verification.
For Aadhaar Authentication of existing taxpayer, perform following steps:
1. Access the www.gst.gov.in URL. The GST Home page is displayed. Login to the GST Portal with valid credentials i.e. your user id and password.
2. A pop-up message window is displayed with the question “Aadhaar Authentication facility is available. Would you like to authenticate Aadhaar of Partner/ Promoter and Primary Authorized Signatory? “. Two options are displayed: YES, NAVIGATE TO MY PROFILE and REMIND ME LATER.
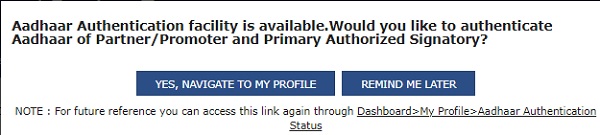
Note: In case the taxpayer selects the option, REMIND ME LATER, the pop-up message window is closed.
3. In case the taxpayer selects the option, YES, NAVIGATE TO MY PROFILE, the My Profile page is displayed.

3 (a) SEND AADHAAR AUTHENTICATION LINK
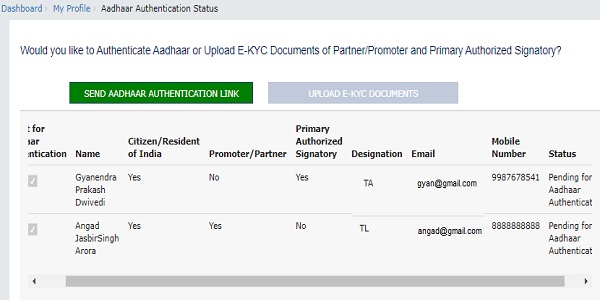
3 (a).1. In case the taxpayer selects the option, SEND AADHAAR AUTHENTICATION LINK, the color of tab changes from blue to green and the Aadhaar Authentication Status page is displayed. The Aadhaar Authentication Status page displays the list of Promoters/ Partners and Primary Authorized Signatory.
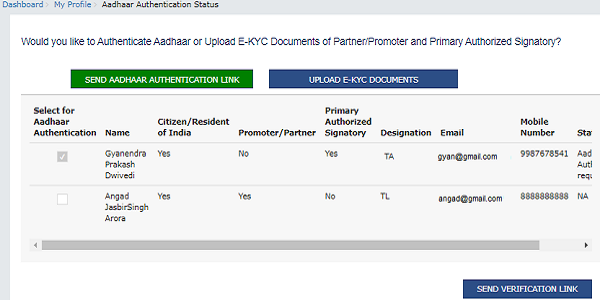
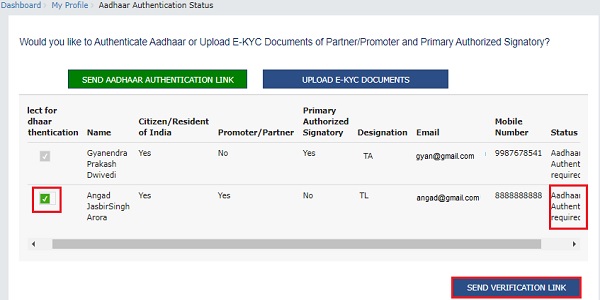
3 (a). 2. Select the Promoter/ Partner for Aadhaar authentication by selecting the check box in Select for Aadhaar Authentication column.
Note:
- Primary Authorized Signatory will be auto selected in the list.
- Selecting the check box changes the status as Aadhaar Authentication required.
- In case, the column of Promoter/ Partner displays more than one name, the taxpayer needs to select only one name out of the.
- If the Promoter/ Partner is same as the Primary Authorized Signatory, in that case the check box against the name would be auto selected and the taxpayer is required to directly click the SEND VERIFICATION LINK.
3 (a). 3. Click the SEND VERIFICATION LINK to send link to the selected promoter/ partner. The link will simultaneously be sent to the Primary Authorized Signatory also.
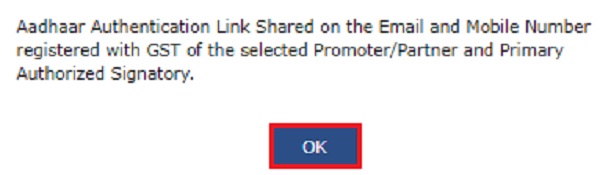
3 (a). 4. A pop-up message window is displayed stating the link has been shared on the GST registered Email and mobile number. Click OK to close the window.
Note: The status gets changed to Pending for Aadhaar Authentication.
3 (a). 5. Once you have clicked on SEND AADHAAR AUTHENTICATION LINK, an authentication link will be shared on GST registered mobile number and e-mail IDs of the Promoters/ Partners and Authorized Signatories. Aadhaar authentication link will be received on e-mail IDs of the Promoters/ Partners or Authorized Signatories as mentioned in the registration application and is valid only for 15 days.
Note:
- Please note you will receive common OTP on mobile number and E-mail ID linked with your Aadhaar for its authentication.\
- At least one of these i.e. e-Mail or mobile number needs to be registered with UIDAI for you to receive OTP.
- The e-Mail or mobile number registered with UIDAI may be different from the e-Mail or mobile number registered on GST Portal.
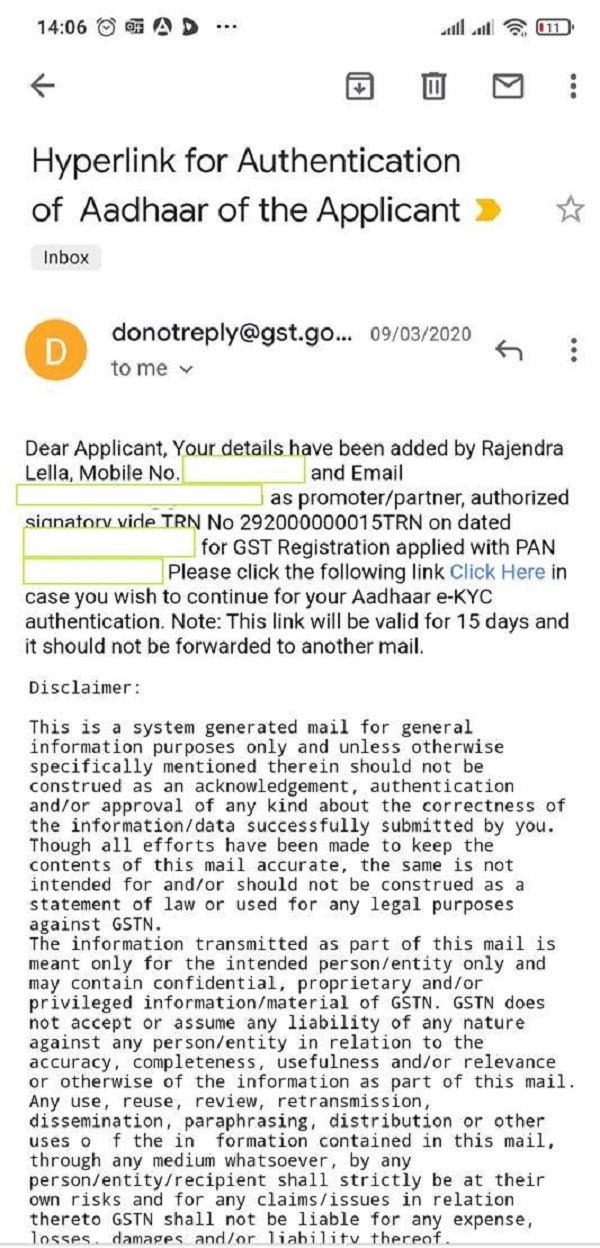
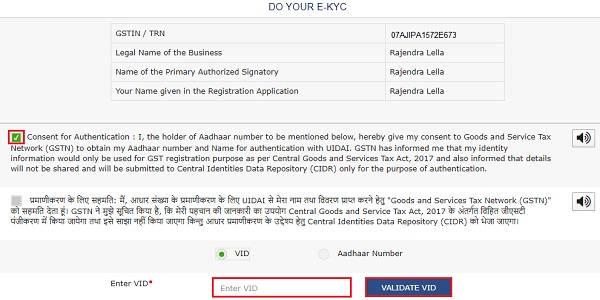
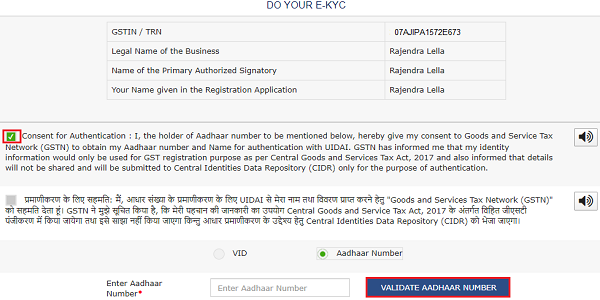
3 (a). 6. Click the authentication link received on GST registered mobile number and e-mails IDs of the Promoters/ Partners, Authorized Signatories. Select the Consent for Authentication. Enter your VID or Aadhaar Number.
The screenshot below displays the authentication link received on GST registered E-mail Id of Promoters/ Partners, Authorized Signatories.
–
–
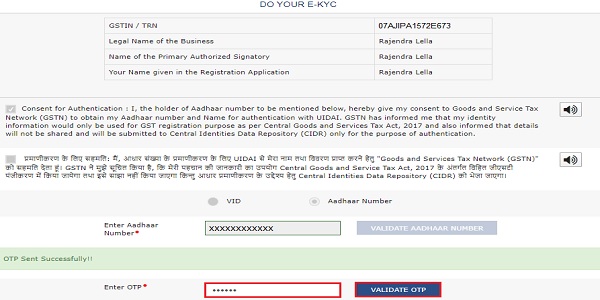
3 (a). 7. Enter the OTP sent to email and mobile number of the Authorized Signatory registered at the UIDAI and click the VALIDATE OTP button.
Note: You can request for Aadhaar OTP again only after 45 seconds has passed from the previous request of Aadhaar OTP.
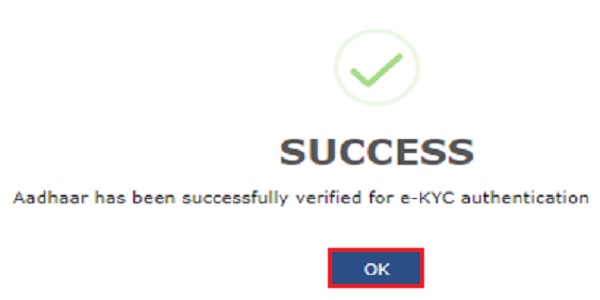
3 (a). 8. A success message is displayed when Aadhaar is successfully verified for e-KYC authentication. Click OK.
Note:
- Aadhaar authentication link will be received on e-mail IDs of the Promoters/ Partners or Authorized Signatories as mentioned in the registration application of the GST and is valid only for 15 days.
- Please note you will receive common OTP on mobile number and E-mail ID linked with your Aadhaar for its authentication.
- If Aadhaar authentication link is used once for authentication, same authentication link cannot be accessed again.
Note:
- The pop-up message window for pending Aadhaar authentication will not appear again when the taxpayer logs in to the GST Portal. However, until the authentication is completed, the taxpayer will receive three Email reminders for Aadhaar authentication on 5th, 10th and 15th day from the date of generation of Aadhaar authentication link.
- In case the link expires before Aadhaar authentication is completed, the taxpayer will again receive the pop-up message window on log in to GST Portal.
- If the authentication is completed successfully for one of the person and it fails for another, the pop up will be shown again whenever taxpayer will login into the GST Portal. However, if taxpayer chooses to send verification link again, then the link will be sent to Email ID and mobile number of the only person whose authentication had failed previously.
- If both persons were required to authenticate Aadhaar and one of them has tried to authenticate Aadhaar and has passed and other one didn’t try to authenticate till 15 days of the link, then again pop up will come to taxpayer after the expiry of 15 days of the link. And again taxpayer will have two options either to upload e-KYC document or send verification link. If taxpayer chooses to send verification link, then link will be send to one only whose authentication has failed on his/her email id and mobile number.
- If both the Persons tried to authenticate Aadhaar and both have failed or both have not tried during next 15 days, again the pop up will come every time the taxpayer logs in to the GST Portal. Again, the taxpayer will have two options i.e. to upload e-KYC document or send verification link.
- If both Persons try to authenticate Aadhaar and both fail to do so, the link will be sent again from the day on which both tried to access the link.
3 (b) UPLOAD E-KYC DOCUMENTS
3 (b).1. To upload E-KYC documents, click the UPLOAD E-KYC DOCUMENTS tab.

3 (b). 2. Clicking the tab, turns the color of tab from blue to green and the details of both the Promoter/ Partner and Primary Authorized Signatory are displayed.
Note: Aadhaar authentication is a mandatory step, and the user cannot proceed without completing it.
3 (b). 3. Click the Type of E-KYC Document drop-down list to select the type of document for E-KYC. The list of type of documents that can be attached is displayed. Select the document from the list that you wish to upload.
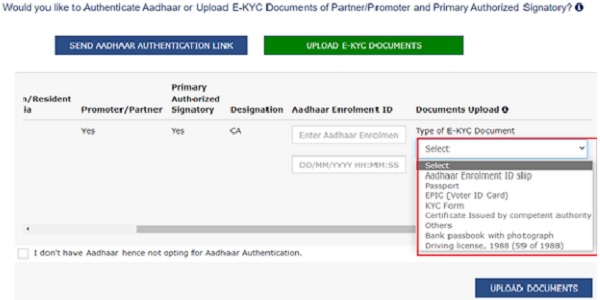
3 (b). 4. Click the UPLOAD DOCUMENTS button.

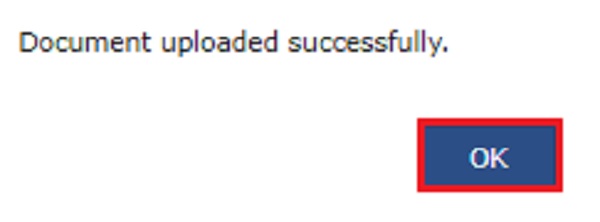
3 (b). 5. A confirmation message is displayed that documents have been uploaded successfully.
Note:
• Once taxpayer has uploaded the documents by clicking on UPLOAD DOCUMENTS, an ARN will be generated for this and it will go to Tax Official dashboard. The Tax Official can either approve or reject the documents.
• If Tax Official approves the document, then taxpayer will be considered E-KYC Authenticated and not Aadhaar Authenticated. Pop up will not come to taxpayer after this. Thereafter if taxpayer himself wishes to authenticate Aadhaar subsequently, the taxpayer can do so by navigating to MY PROFILE > AADHAAR AUTHENTICATION STATUS > SEND AADHAAR AUTHENTICATION LINK. Taxpayer won’t be able to upload documents again after they have been once approved by the Tax Official. However, taxpayer can view the document uploaded in Upload E-KYC Document column.
• Till the time Tax Official doesn’t take any action on the ARN, taxpayer won’t be able to upload documents again.
• If Tax Official rejects the documents, then taxpayer will again get the same pop up whenever taxpayer will login into the GST Portal and same procedure will follow and in this case taxpayer will have two options either to Authenticate Aadhaar or Upload E-KYC Documents.
• If the link expires, the taxpayer can generate the Aadhaar Authentication link again by navigating to My Profile page.

Author Bio


I failed in adhar authentication because i used someone else’s adhar number.
is it possible to get link again immediately for adhar authentication for GST ?