GSTR – 1 is the monthly return to be filed by a Registered Person under GST Regime. GSTR – 1 includes the details of all outward supplies made in the given period. Ensure you have installed the latest GST Offline Tool for filing returns.
The outward supplies include B2B, B2C invoices, adjustments to sales made in debit/ credit notes, export, nil rated invoices, advances received with tax adjustment.
When you complete your monthly sales, purchase, credit note, debit note etc. details for filing of GST Return.
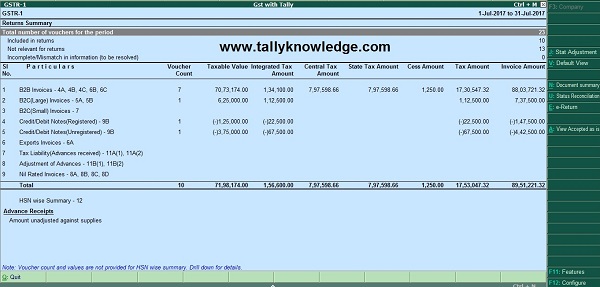
Go to Gateway of Tally – Display – Statutory Report – GST – GSTR – 1.
GSTR – 1 default view will open on your screen. If everything is correct then E-Return option is available on right side side bar.
Press Ctrl + E to save GSTR – 1 in Excel or CSV Format on the Export screen.
Specify the file name and save it to specific location.
Note: If you select CSV Format then tally create separate CSV file for each table in GSTR – 1.
Now Import the data to Offline GST Tool
First install offline GST tool and open and click on new.
Enter required details like GSTN No., year, month, last year turnover and last quarter turn over.
Click import files.
You can import Excel Files. If tool show some warning that information provided in GSTR return is invalid, ignore it and proceed.
This happens when you do not have transactions in the given sections. To export the return details in the CSV format, select the name of the table in Select Section under Return Import – One section at a time, and click Import CSV. You have to individually import files for each section.
Click YES on the warning message, and click VIEW SUMMARY.
Click on Generate File and offline tool create Json file that has to be uploaded on GST Portal.
Login to GST Portal with your user id and password. Click on Services – Returns – Return dashboard. Select return filing period and search. Click on prepare offline and import your Json file. Once your Json file is uploaded successfully, you will notified by a message.
System verify the uploaded details after the time specified in the GSTR Return screen. Click on each table and verify details uploaded by you. If everything is fine then click on Submit.
For more details contact haridasbetaramdas@gmail.com or visit www.tallyknowledge.com


If option of directly uploading relevant data from exported Exelon or CSV file to GSTR portal we aee excepting from tally
Very Good