Page Contents
- A. FAQs on GSTR-11 – Statement of inward supplies by persons having Unique Identification Number (UIN).
- Q.1 What is Form GSTR-11?
- Q.2 Who needs to file Form GSTR-11?
- Q.3 By when do I need to file Form GSTR-11?
- Q.4 Is there any due date to file Form GSTR-11?
- Q.5 From where can I file Form GSTR-11?
- Q.6 Is there any Offline Tool for filing Form GSTR-11?
- Q.7 What are the pre-conditions for filing Form GSTR-11?
- Q.8 What happens after Form GSTR-11 is filed?
- Q.9 Can I preview Form GSTR-11 before filing?
- Q.10 What are the modes of signing Form GSTR-11?
- Q.11 Are there any ledgers maintained for UIN holders on GST Portal?
- B. Manual on Procedure for Filing of GSTR-11
A. FAQs on GSTR-11 – Statement of inward supplies by persons having Unique Identification Number (UIN).
Q.1 What is Form GSTR-11?
Ans: Form GSTR-11 is to be filed by persons who have been assigned a Unique Identity Number (UIN). It is a statement of inward supply of goods or services or both received by an UIN holder.
Q.2 Who needs to file Form GSTR-11?
Ans: Persons having Unique Identification Number (UIN) are required to file Form GSTR-11.
Q.3 By when do I need to file Form GSTR-11?
Ans: Form GSTR-11 is to be filed on Quarterly basis. However, the form is not mandatory to be filed for such period in which there is no inward supplies received by such UIN holder. However, before claiming refund through Form GST RFD-10, filing of Form GSTR-11 is necessary for that relevant quarter.
Q.4 Is there any due date to file Form GSTR-11?
Ans: There is no due date for Filing of Form GSTR-11. UIN holder can file Form GSTR-11 any time after end of the relevant Quarter.
Q.5 From where can I file Form GSTR-11?
Ans: Form GSTR-11 can be accessed on the GST Portal, post login in the Returns Dashboard by the UIN holder.
The path is Services > Returns > Returns Dashboard.
Q.6 Is there any Offline Tool for filing Form GSTR-11?
Ans: Yes, there is an offline tool for filing Form GSTR-11.
Q.7 What are the pre-conditions for filing Form GSTR-11?
Ans: Pre-conditions for filing of Form GSTR-11 are:
1. The UIN holders should have a valid/ active UIN and password to login into the GST Portal.
2. The UIN Holders should also have valid mobile number details updated for filing through EVC or non-expired/ non-revoked digital signature (DSC) where DSC is prescribed as mandatory for signature.
Please note that signing with DSC would not be applicable for UIN who have not provided PAN details.
Q.8 What happens after Form GSTR-11 is filed?
Ans: After Form GSTR-11 is filed:
1. ARN will be generated on successful filing of the Form.
2. An SMS and email will be sent to the mobile number of authorized signatory of the UIN Holder on the successful submission of Form.
3. A link would be made available to generate GST RFD-10 for claiming refund on the Returns Filing for GST GSTR 11 page.
Q.9 Can I preview Form GSTR-11 before filing?
Ans: Yes, you can preview Form GSTR-11 before filing on the GST Portal.
Q.10 What are the modes of signing Form GSTR-11?
Ans: You can file Form GSTR-11 using DSC or EVC.
Digital Signature Certificate (DSC)
Digital Signature Certificates (DSC) are the digital equivalent (that is electronic format) of physical or paper certificates. A digital certificate can be presented electronically to prove one’s identity, to access information or services on the Internet or to sign certain documents digitally. In India, DSC are issued by authorized Certifying Authorities.
The GST Portal accepts only PAN based Class II and III DSC.
To obtain a DSC, please contact any one of the authorised DSC-issuing Certifying Authorities: http://www.cca.gov.in/cca/?q=licensed_ca.html
Please note DSC signing cannot be used in case PAN has not be provided for the authorized signatory during registration.
Electronic Verification Code (EVC)
The Electronic Verification Code (EVC) authenticates the identity of the user at the GST Portal by generating an OTP. The OTP is sent to the mobile phone number of the registered mobile phone of Authorized Signatory filled in part A of the Registration Application.
Q.11 Are there any ledgers maintained for UIN holders on GST Portal?
Ans: There are no Electronic Liability Register, Electronic Cash Ledger and Electronic Credit Ledger for UIN holders on GST Portal.
B. Manual on Procedure for Filing of GSTR-11
How can I file details in Form GSTR-11?
In case you want to add records more than 500, you need to prepare Form GSTR-11 in Offline mode.
Click here to know more about add details in GSTR-11 in Offline mode.
To file details in Form GSTR-11 through Online mode, perform following steps:
A. Login and Navigate to GSTR-11 page
B. Enter details in various tiles
C. Preview GSTR-11
D. File GSTR-11 with DSC/ EVC
1. Access the www.gst.gov.in URL. The GST Home page is displayed.
2. Login to the GST Portal with valid credentials.
3. Click the Services > Returns > Returns Dashboard command.
Alternatively, you can also click the Returns Dashboard link on the Dashboard.

4. The File Returns page is displayed. Select the Financial Year & Return Filing Period (Month) for which you want to file the return from the drop-down list.
5. Click the SEARCH button.
6. The File Returns page is displayed. In the GSTR-11 tile, click the PREPARE ONLINE button if you want to prepare the return by making entries on the GST Portal.

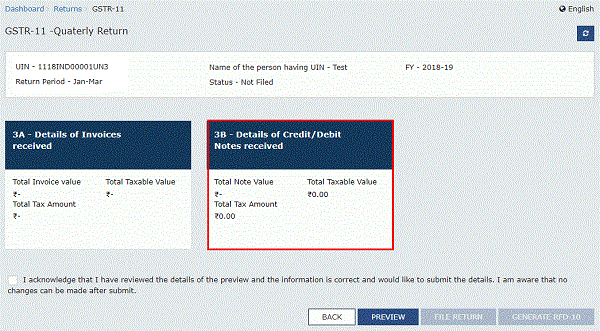
7. The GSTR-11 -Quarterly Return page is displayed.

B. Enter details in various tiles
Click on the tile names to know and enter related details:
3A – Details of Invoices received
3B – Details of Credit/Debit Notes received
3A – Details of Invoices received
8.1. Click the 3A – Details of Invoices received tile to enter details of taxable inward supplies received from registered taxpayers.

8.2. The Details of Invoices received – Summary page is displayed. Click the ADD DETAILS button.

8.3. The Details of Invoices received- Add Invoice page is displayed. In the Supplier GSTIN field, enter the GSTIN of the supplier. The field accepts only GSTIN of Normal taxpayer or Non Resident taxpayer.
8.4. In the Invoice No., Invoice Date and Invoice Value fields, enter the Invoice number, date of the invoice and value of the total invoice.
Note:
- Once the GSTIN of the supplier is entered, Supplier Name and Supply Type fields are auto-populated based on the GSTIN of the supplier.
- The auto-populated POS is editable. Depending on selected POS, the supply type gets auto-populated.
- The screen will expand downwards and more fields will appear to enter line item details of the invoice.
8.5 (a) In case of Intra-State transaction:
In case the POS (place of supply) of the goods/ services is the same State as that of the supplier, the transaction is an Intra-State transaction.
Notice, fields for Central Tax and State/UT Tax will appear.
a) In the Taxable Value field against the rates, enter the taxable value of the goods or services.
b) In the Cess field, enter the cess amount.
c) Click the SAVE button to save the invoice details.
Note: The Amount of Tax fields are auto-populated based on the values entered in Taxable Value fields respectively. The CESS field is not auto populated and has to be entered by the taxpayer.

8.5 (b) In case of Inter-State transaction:
In case, the Place of Supply (POS) is different from the State of the supplier, transaction becomes an Inter-State transaction.
Fields for Integrated Tax will appear.
a) In the Taxable Value field against the rates, enter the taxable value of the goods or services.
b) In the Cess field, enter the cess amount.
c) Click the SAVE button to save the invoice details.
Note: The Amount of Tax fields are auto-populated based on the values entered in Taxable Value and tax rate fields respectively. The CESS field is not auto populated and has to be entered by the taxpayer.

8.6. You will be directed to the previous page and a message is displayed that Request accepted successfully.
Here, you can also edit/delete the added invoices (under Actions). Click the BACK button to go back to the GSTR-11 page.

You will be directed to the GSTR-11 landing page and the 3A – Details of Invoices received tile in GSTR-11 will reflect the number of invoices added along with Total Invoice value, Total taxable value and total tax amount.

3B – Details of Credit/Debit Notes received
8.1. Click the B – Details of Credit/Debit Notes received tile to enter details of credit/debit notes received from registered taxpayers.
8.2. The Details of Credit/Debit Notes received – Summary page is displayed. Click the ADD DETAILS button.

8.3. The Details of Credit/Debit Notes received – Add Note page is displayed. In the Supplier GSTIN field, enter the GSTIN of the supplier.
8.4. In the Debit/Credit Note No., Debit/Credit Note Date, Note Value and Note Type fields, enter the number, date, value and type of the Debit/Credit Note.
Note:
- Once the GSTIN of the supplier is entered, Supplier Name and Supply Type fields are auto-populated based on the GSTIN of the supplier.
- The auto-populated POS is editable. Depending on selected POS, the supply type gets auto-populated.
- The screen will expand downwards and more fields will appear to enter line item details of the invoice.
8.5 (a) In case of Intra-State transaction:
In case the POS (place of supply) of the goods/ services is the same State as that of the supplier, the transaction is an Intra-State transaction.
Notice, fields for Central Tax and State/UT Tax will appear.
a) In the Taxable Value field against the rates, enter the taxable value of the goods or services.
b) In the Cess field, enter the cess amount.
c) Click the SAVE button to save the invoice details.
Note: The Amount of Tax fields are auto-populated based on the values entered in Taxable Value and tax rate fields respectively. The CESS field is not auto populated and has to be entered by the taxpayer.

8.5 (b) In case of Inter-State transaction:
In case the Place of Supply (POS) is different from the State of the supplier, transaction becomes an Inter-State transaction.
Fields for Integrated Tax will appear.
a) In the Taxable Value field against the rates, enter the taxable value of the goods or services.
b) In the Cess field, enter the cess amount.
c) Click the SAVE button to save the invoice details.
Note: The Amount of Tax fields are auto-populated based on the values entered in Taxable Value and tax rate fields respectively. The CESS field is not auto populated and has to be entered by the taxpayer.

8.6. You will be directed to the previous page and a message is displayed that Request accepted successfully.
Here, you can also edit/delete the added invoices (under Actions). Click the BACK button to go back to the GSTR-11 page.

You will be directed to the GSTR-11 landing page and the B – Details of Credit/Debit Notes received tile in GSTR-11 will reflect the number of notes added along with Total note value, Total taxable value and total tax amount. The total tax amount and taxable value are net off of debit and credit notes.

C. Preview GSTR-11
9. Once you have entered details, click the PREVIEW button. This button will download the draft Summary page of your GSTR-11 for your review. It is recommended that you download this Summary page and review the summary of entries made in different sections with patience before submitting the GSTR-11.

10. The PDF file is generated with watermark of draft as the details are yet to be submitted.

D. File GSTR-11 with DSC/ EVC
11. Select the Declaration checkbox.
12. Click the FILE RETURN button.

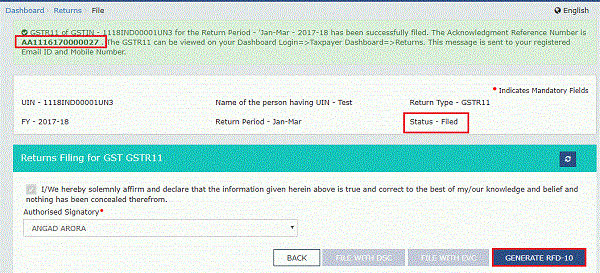
13. A message is displayed that “Tax amount as declared here would be posted as refund amount in RFD-10 State wise and same is non-editable on higher side. Select Yes to proceed to File. No changes can be made in GSTR-11 after filing”. Click the YES button.

14. The Returns Filing for GST GSTR11 page is displayed. Select the Declaration checkbox.
15. In the Authorised Signatory drop-down list, select the authorized signatory. This will enable the two buttons – FILE WITH DSC or FILE WITH EVC.
16. Click the FILE WITH DSC or FILE WITH EVC button to file GSTR-11.

FILE WITH DSC:
a. Click the PROCEED button.
b. Select the certificate and click the SIGN button.
FILE WITH EVC:
a. Enter the OTP sent on email and mobile number of the Authorized Signatory registered at the GST Portal and click the VERIFY button.

17. The success message is displayed and ARN is displayed. Status of the GSTR-11 return changes to “Filed”.
You can click GENERATE RFD-10 button to generate GST RFD-10 application form of the same quarter for which Form GSTR-11 is filed.