E-Way Bill System User Manual (Release Date 26/03/2018)
Table of Contents
1. Introduction
2. e-Way Bill System
3. Registering and Enrolling for e-Way Bills Systems
4. Opening the e-Way Bill System
5. Options of e-Way Bill
6. Managing Consolidated e-Way Bills
7. Rejecting e-Way Bills
8. Generating Reports
9. My Masters
10. User Management
11. Registration
12. Update
13. Grievance
14. Best Practices to follow
Page Contents
- List of Abbreviations
- 1. Introduction
- 2. e-Way Bill System
- 3. Registering and Enrolling for e-Way Bills
- 4. Opening the e-Way Bill System
- 5. Options of e-Way Bill
- 6. Managing Consolidated e-Way Bills
- 6.2 Generate Bulk Consolidated E-way bill
- 7. Rejecting e-Way Bills
- 8. Generating Reports
- 9. My Masters
- 10. User Management
- 11. Registration
- 12. Update
- 13. Grievance
- 14. Best Practices to follow
List of Abbreviations
| Abbreviation | Full Form |
| API | Application Program Interface |
| CGST | Central Goods and Services Tax |
| CKD | Completely Knocked Down |
| EBN | e-way bill Number |
| EWB | e-way bill |
| GSP | Goods and Services Tax Suvidha Provider |
| GST | Goods and Services Tax |
| GSTIN | Goods and Services Tax Identification No |
| GSTN | Goods and Services Tax Network |
| GSTR-1 | Goods and Services Tax Form -1 |
| HSN | Harmonized System of Nomenclature |
| ICT | Information and Communication Technology |
| IGST | Integrated Goods and Services Tax |
| IT | Information Technology |
| MIS | Management Information System |
| NIC | National Informatics Centre |
| OTP | One Time Password |
| PAN | Permanent Account Number |
| QR | Quick Response |
| RFID | Radio-Frequency identification Device |
| SGST | State Goods and Services Tax |
| SKD | Semi Knocked Down |
| SMS | Short Message Service |
| URL | Uniform Resource Locator |
| VAT | Value added Tax |
1. Introduction
1.1 Background
Introduction of Goods and Services Tax (GST) across India with effect from 1st of July 2017 is a very significant step in the field of indirect tax reforms in India. For quick and easy movement of goods across India without any hindrance, all the check posts across the country are abolished. The GST system provides a provision of e-Way Bill, a document to be carried by the person in charge of conveyance, generated electronically from the common portal. To implement the e-Way Bill system, ICT based solution is required. Hence, as approved by the Goods and Services Tax (GST) Council, a web based solution has been designed and developed by National Informatics Centre and it is being rolled out for the use of taxpayers and transporters.
1.2 Purpose and Intended Audience
This document aims to explain the operational procedure on how to use web based e-Way Bill system. Also it explains the features and roles of the stake holders in using this system.
This document is intended for registered taxpayers under GST and un-registered transporters, who are the main stakeholders of e-Way Bill system under GST.
1.3 Scope
The scope of this document covers:
- Explaining the features of the e-Way Bill system.
- Activities of the various stake holders.
- Registering and enrolling for the e-Way Bill system.
- Processes involved in generation of web based e-Way Bill.
- Enabling the various modes of the e-Way Bill generation.
- Managing the sub-users by the stake holders.
1.4 URL
http://gst.kar.nic.in/ewaybill
2. e-Way Bill System
2.1 Waybill under Earlier VAT system
2.1.1 In order to monitor the bulk trade which necessarily takes place through trucks, it was mandated under VAT that each such consignment shall be accompanied by a ‘Delivery Note’ which were issued from the VAT offices to the taxpayers. At the end of every month the taxpayer had to submit an utilisation statement of the forms issued. The intention of the tax office was that to control the tax evasion being done by few of the tax payers. The taxpayer also used to face a great deal of hardship while seeking the blank Delivery Notes as he/she would have to make several visits to the tax office. At check-posts the trucks, would get detained for a long time on frivolous grounds. Thus, it was a lose-lose situation for the trade as well as the government. In order to overcome these challenges, a new idea/system was introduced. In the new system, the taxpayer could upload the details of each transaction to the departmental ‘Server’ through the internet, and once uploaded the ‘Server’ would automatically generate a Delivery Note with a unique number, then this unique number could accompany the goods vehicle as a proof of having uploaded the transaction. Such a system would by itself ensure that once the Delivery Note is issued there could be no possibility of tax evasion. It was one of the most successful and efficient system of prevention of tax evasion on one hand and an e-Governance initiative that provided the speedy and efficient services to the taxpayers on the other hand. This system was introduced and used by number of states.
2.2 e-Way Bill System under GST
Unique Selling Proposition (USP) of Goods and Services Tax is One Nation- One Tax – One Market. Introducing a separate way bill for each State under the GST system would definitely complicate the compliance and in turn affect the business of the taxpayers and transporters. Such a system of separate e-Way Bill for each State would result in hindrance of movement of goods and free trade from one State to another. The State and Central Government officers will also find it difficult to cross-verify such e-Way Bills if generated independently by each State. A new process is thus required which would ensure that a taxpayer, prior to movement of goods via a conveyance , would inform each transaction’s details to the tax department, obtain an acknowledgement number for having thus informed, and then use this acknowledgement number as a valid document accompanying the truck. The idea is that the taxpayer be made to upload the details of each transaction to a common portal through the Internet, and once uploaded, the common portal would automatically generate a document which can be tracked and verified easily by any stakeholder
2.3 e-Way Bill in GST Rule
- Information to be furnished by every registered person prior to commencement of the movement of goods and generation of e-Way Bill.
- Upon generation of the e-Way Bill on the common portal, a unique e-Way Bill number (EBN) shall be made available to the supplier, the recipient and the transporter on the common portal.
- The person in charge of a conveyance shall carry — (a) the invoice or bill of supply or delivery challan, as the case may be; and (b) a copy of the e-Way Bill or the e-Way Bill number.
- The details of e-Way Bill generated shall be made available to the recipient, if registered, on the common portal, who shall communicate his acceptance or rejection of the consignment covered by the e-Way Bill.
- The information furnished while generating e-Way Bill such as 1) GSTIN of recipient, 2) Place of delivery, 3) Invoice Number, 4) invoice date, 5) Value of goods, 6) HSN code, etc. shall be made available to the registered supplier on the common portal who may utilize the same for furnishing details in FORM GSTR-1.
- An officer authorised by the State can intercept any conveyance to verify the e-Way Bill or the e-Way Bill number in physical form for all inter-State and intra-State movement of goods.
- A summary report of every inspection of goods in transit shall be recorded online by the proper officer in specified format within twenty four hours of inspection and the final report in specified format shall be recorded within three days of the inspection.
- Where a vehicle has been intercepted and detained for a period exceeding thirty minutes, the transporter may upload the said information in a specified format on the common portal.
2.4 Objectives
- Single e-Way Bill for movement of the goods throughout the country.
- To prevent the evasion of tax.
- Hassle free movement of goods across India.
- Tracking the movement of goods with e-Way Bill number.
- Easier verification of the e-Way Bill by officers.
2.5 Stakeholders
The objective behind introducing e-Way Bill is to effectively address the expectations and concerns of the stakeholders by leveraging the use of ICT.
The following are four key stakeholders of the e-Way Bill:
- Suppliers – Generate the e-Way Bills and reject the e-Way Bills generated by other party against his/her name, if it does not belong to him/her.
- Recipients – Generate the e-Way Bills and reject the e-Way Bills generated by other party against his/her name, if it does not belong to him/her.
- Transporters – Generate the e-Way Bills, consolidated e-Way Bills and update the vehicle numbers for the e-Way Bills assigned to him for transportation by the taxpayers.
- Department Officers – Verify the e-Way Bills and consignments carried with the e-Way Bills.
2.6 The Benefits
The major benefits are as follows:
- The traders need not visit tax offices to collect and submit the Way Bill forms as used to be done in VAT regimes in some states.
- Average waiting time at mobile squad reduces drastically – As the verification of the e-Way Bill is done with the common portal, it will speed up the process of verification and allowing the vehicle to pass faster.
- Self-policing by traders. A trader while uploading gives the identification of the buying trader who will also account the transaction automatically.
- Environment friendly – The need of the paper form of the multiple copies of way bill is eliminated. Hence, the tons of paper are saved per day.
- Generation of GSTR-1 returns – GSTR-1 return of the supplier is auto prepared, hence he need not have to upload the same.
- Officials saved of monotonous work collecting and matching the manual way bill with the returns of the taxpayers.
2.7 Features of the e-Way Bill System
- User friendly System – The system is user friendly with lots of easy to use operations by the users.
- Easy and quick generation of methods – There are a number of methods are provided using which the users can easily and quickly generate the e-Way Bills.
- Checks and balances – The number of checks and balances have been introduced as per the requirements so that errors/mistakes of the users are eliminated.
- Multiple modes for e-Way Bill generation – This system support different modes of e-Way Bill generation. The user can register the mode of e-Way Bill generation and use them for e-Way Bill generation.
- Creating own masters – The user has a provision to create his own masters like customers, suppliers, products and transporters. The system facilitates to use them while generating the e-Way Bill.
- Managing sub-users – The taxpayer or registered person can create, modify and freeze the sub-users for generation of the e-Way Bill and assign them to his employees or branches as per need. This system also facilitates him to assign the roles/activities to be played by the sub-user on the system.
- Monitoring the e-Way Bills generated against me – The system facilitates the registered person to know the number of e-Way Bills, generated by other registered persons, against him/her. There is an option to user to reject these e-Way Bills, if they do not belong to him.
- Generating the GSTR-1 from the e-Way Bills – Based on the e-Way Bills generated, the system pulls the GSTR-1 related information and pushes it to the taxpayers GSTR-1 returns. This avoids the taxpayers in uploading these transaction details.
- Consolidated e-Way Bill – The system supports the transporters to prepare the consolidated e-Way Bill and hand over to the person in charge of the conveyance instead of giving the multiple e-Way Bills for movement of multiple consignments like parcel in one vehicle.
- Enabling the unregistered transporters to use e-Way Bill – There is a provision for unregistered transporters to enrol and create a user for him to generate the e-Way Bills and update the vehicle numbers.
- Alerting the taxpayers – The system alerts and notifies the users through the web and SMS about the various activities like new notifications, rejected EWB, verified EWB, etc.
- QR bar code on the e-Way Bill – The QR code on the e-way bill helps for easier and faster verification of the e-Way Bill by the tax officers.
- Integrating with RFID for tracking the movement of the e-Way Bill – The provision has been made to integrate with the RFID for tracking the movement of e-Way Bill by the tax officers, without stopping the vehicle on the road.
3. Registering and Enrolling for e-Way Bills
There are four stakeholders who have some stake in the movement of the consignment from one place to another and hence on the e-Way Bill. They are suppliers, recipients, transporters and tax officers. The suppliers, recipients and transporters want to see that the consignment moves from source to destination without any hurdles and tax officers want to see that the consignment is accounted by the supplier and recipient.
To achieve, they need to have access to the e-Way Bill system. The provision has been made for them to access the system. The GST registered person can register on the e-way bill and create his user credentials to use the system. GST registered person can be a supplier, recipient or transporter. In case the transporter is small operator and not registered under the GST, then this system provides the mechanism to enrol and create his user credentials to operate on this system.
3.1 Registering by Taxpayers on the e-Way Bill System
The registration mechanism for the GST taxpayers for the e-Way Bill system is a simple process. One time GST taxpayer need to register on this system. To do that the taxpayer need to have the GSTIN issued under the GST system and mobile number registered with the GST system with him.
Once a user enters into the URL address of the E-Way Bill System in his browser, the following screen will be displayed.

Figure 1: E-way bill Portal.
On the e-Way Bill portal, a first time user of registered person type can register by clicking on the ‘e-way bill Registration’ link. Then the user will be redirected to the ‘e-Way Bill Registration Form’. The registration form is shown below.

Figure 2: e-Way Bill registration form 1.
The user needs to enter the GSTIN number of a registered tax payer and shall click ‘Go’ to submit the request. Once the request is submitted the user will be redirected to the following page.

Figure 3: e-Way Bill registration, form2.
In the above mentioned form, Applicant name, Trade name, Address and Mobile Number are auto populated. User needs to click on ‘Send OTP’ to get the OTP on the registered mobile. Once OTP is received on the registered mobile number, user needs to enter the OTP and verify the same in the system. After that he/she has to click on verifying OTP to verify the same and validate.
Next, the user needs to provide his choice of User ID or username, which he/she plans to use to operate his account n this system. Username should be about 8 to 15 alphanumeric characters and can include special characters. A Unique user name should be given by the user, which is not there in the system. Once a request for registration is submitted, the system validates the entered values and pops up the appropriate message if there is any error. Otherwise the username with password is created and registered with e-Way Bill System. The tax payer can use this registered username and password to work on the system.
| Tips for Registration
1. GSTIN number should be in hand. 2. Registered mobile number should be with the user. 3. The username should be of at least 6 characters with a combination of alphabets (A-Z/a-z), numerals (0-9) and special characters (@, #, $, %, &, *, ^) and can’t exceed more than 15 characters. 4. The password should be of at least 6 characters. 5. Keep your Username and Password securely. |
As explained previously, the un-registered person under GST cannot register using the previous option. He needs to enrol on this system by providing his business details. After authenticating these details, the system generates the Transporter ID and user credentials for him. The enrolment form asks for his PAN details, business type, business place, Aadhar authentication.
For enrolling, the un-registered transporter has to open the e-Way Bill portal and select the ‘Enrolment for Transporters’ option. On selection of the same, the system shows the following screen.

Figure 4: e-Way Bill Enrolment.
- The user has to select the State and enter his legal name as given in his PAN and PAN number. The system user gets it validated by on click of ‘Validate’ button.
- The user has to then select the type of enrolment and constitution of business (Partnership, Proprietorship, Public/Private Limited etc.)
- After that he will enter his business details and contact details.
- The user has to then enter his Aadhaar number related details, if Aadhaar card is available with him and verify them through OTP sent to his registered mobile. The user can also provide his consent to GSTN to use the Aadhaar details and declaration of enrolment by clicking on the checkbox.
- If the Aadhaar number is not available, user has to enter the mobile number and mobile is authenticated by sending the OTP to it.
- The user can then upload the Address and ID proofs (PoA and PoI) by clicking on respective ‘Upload’ buttons.
After this user has to create username and password based on his choice and rules mentioned for username and password creation. - The user has to then provide his declaration regarding the correctness of the given information by clicking on the checkbox.
- Once the user clicks the ‘Save’ button, the system generates the 15 digits TRANS ID and shows him. This TRANS ID, he can provide to his clients to enter in the e-way bill so as to enable the transporter to enter the vehicle number for movements of goods.
3.3 Forgot Password
If the e-Way Bill user forgets his password for his username, he needs to enter the basic information of GSTIN in the following screen. On successful verification, he can use this option to get the new one time password through SMS to his mobile or mail on his email address. Using this password, he can login and create his new password.

Figure 5: Forgot Password.
If the details entered are not matching with the GSTIN data available in the system, the system pops up message saying so. If the tax payer has updated his details in GST Common Portal, but is not being reflected in the e-way bill system, he can select ‘Update details from GST CP’. Now, the system pulls the latest data from the Common Portal and updates and he can try again the same so that he can get the SMS to his new mobile.
3.4 Forgot User Name
If the user of the e-Way Bill system has forgotten his username, he needs to enter the basic information of GSTIN in the following screen. On successful verification, he can use this option to get his user name. On entry of his GSTIN, the system will send the username to his mobile number through SMS and mail on his email address.

Figure 6: Forgot Username.
If the details entered are not matching with the GSTIN data available in the system, the system pops up message saying so. If the tax payer has updated his details in GST Common Portal, but is not being reflected in the e-way bill system, he can select ‘Update details from GST CP’. Now, the system pulls the latest data from the Common Portal and updates and he can try again the same so that he can get the SMS to his new mobile and mail on his email address.
4. Opening the e-Way Bill System
4.1 Logging into e-Way Bill System
The user to open or login to the e-Way Bill system, he should have registered in the e-Way Bill system, if he is the GSTIN holder or he should have enrolled in the e-Way Bill system, if he is GST unregistered transporter. The user can read the chapter 3 to know how to register or enrol into the e-Way Bill system.
The user has to open the e-Way Bill portal and enter his username and password along with the displayed captcha. On successful authentication, the system shows him the main menu of the e-Way Bill System.
4.2 Main Menu
The main menu lists the options available to a user to operate on the e-Way Bill.

Figure 7: Main Menu.
In the middle, the system shows the Latest updates available for the users.
On the left hand side, the system shows the main options. They are:
- e-Way bill – It has sub-options for generating, updating, cancelling and printing the e-Way Bill along with the option of extending the e-Way Bill.
- Consolidated e-Way Bill – It has sub-options to generate, re-generate and print consolidated e-Way Bills.
- Reject – It has the option to reject the e-Way Bill generated by others, if it does not belong to the user.
- Reports – It has sub-options for generating various kinds of reports.
- My Masters – It has sub-options to create the users masters like customers, suppliers, products, transporters.
- User Management – It has sub-options for the users to create, freeze, update the sub-users and change passwords for sub-users.
- Registration – It has sub-options to register for SMS, Android App, GSP and API facilities to use.
- Update- It has sub-options to update the details as Transporter/Taxpayer and GSTIN details from common portal.
- Grievance- It has sub-option for generating the Detention report based on E-way Bill number.
5. Options of e-Way Bill

5.1 Generating new e-Way Bill
When the user selects the ‘Generate e-way bill’ sub-option under ‘e-waybill’ option, the following screen will be displayed allowing the user to enter the e-way bill request form. This option is used to generate the new e-Way Bill.

Before going for generating a new e-Way Bill, the user should have the Invoice/Bill/Challan document/details in his hand and user should know the, Transporter Id, through whom he/she is going to move the consignment or vehicle number through which the consignment is being moved.
In the e-Way Bill entry form, first the user needs to select the type of transaction – outward or inward. The outward indicates, the user is supplying the goods and inward indicates the user is receiving the goods. Depending upon the type of transaction selected, the system will show the sub-type of transactions. The user needs to select the sub-type accordingly.
Now the user needs to select the type of document from the drop down menu as per the document in his hand. The user will enter the document number and select the date of document, as given in the document (invoice, bill or challan). The system will not allow user to enter the future date.
For an outward type of transaction, in the ‘From’ section, name, GSTIN and address of the supplier is auto populated with the user details in ‘Bill From’ and ‘Dispatch From’ section. If the address of place of dispatch of goods is different from the auto populated address in ‘Dispatch From’ section, the user is allowed to edit the address accordingly.
For an inward type of transaction, in the ‘From’ section, name, GSTIN , address and State need to be filled by the user. It can be auto populated if the user has entered the consignor details in ‘Master → Suppliers’ option (Please refer to chapter 9 on My Masters). When a user enters 2-3 characters of the consignor, the system allows the user to select the consignor name which he has entered in the suppliers masters. All the other fields like GSTIN, from address are auto populated after selection. However, the system allows the user to edit. If the suppliers master has not been entered by the user, the system will allow him to enter the name, GSTIN and address details. If the supplier is un-registered for GST, then the user has to enter the GSTIN as URP, indicating that the supplier is ‘Unregistered Person’.
For an outward type of transaction, the user needs to enter the name, GSTIN, address and State of the consignee in the ‘TO’ section. The consignee details can be auto populated if the user has entered the consignee details in the ‘Master → Clients’ option (Please refer to chapter 9 on My Masters). When the user enters 2-3 characters of the consignee name, the system allow the user to select the consignee name which he has entered in the masters. All the other fields like GSTIN, the address are auto filled and is also editable by the user. If the address of the ‘Ship To’ place is different from the ‘Bill To’ address user can edit the same in ‘Ship To’ section accordingly. If the master has not been entered for the consignee, the user shall enter the complete details. Here, also the user has to enter the URP in GSTIN column, if the consignee is un-registered person.
For an inward type of transaction in the ‘TO’ section, the name, GSTIN and address of the recipient are auto populated with the user details. If he has the additional places of business, he will be allowed to select the place. Here, in spite of auto update, the user is allowed to edit the address.
Now, the user needs to enter the ‘Item Details’. Product details can be auto populated if the user has entered the product details in ‘Masters → Products’ (Please refer to chapter 9 on My Masters). By entering 2-3 characters of the product name, which is being transported, the system allows the user to select the product name which was updated in the masters by him previously. All other fields under this section like description, HSN, Unit, Tax rate are auto filled from the master. The user needs to enter the quantity and taxable value of the product mentioned in the document. The user shall add multiple products by clicking on ![]() . Based on the taxable value and rate of tax, the system will calculate CGST, SGST, IGST and CESS amount. The user is allowed to edit this amount also. It may be noted that the system will show the CGST and SGST tax rate for intra-state movement and IGST tax rate for inter-state movement.
. Based on the taxable value and rate of tax, the system will calculate CGST, SGST, IGST and CESS amount. The user is allowed to edit this amount also. It may be noted that the system will show the CGST and SGST tax rate for intra-state movement and IGST tax rate for inter-state movement.
Now, the user needs to select the mode of transportation – road, rail, air or ship and the approximate travelling distance between the selected supplier (source) to recipient (destination) under PART-B section. If the goods are being moved directly by the user himself, then he can enter the Vehicle Number without entering the transporter details. It may be noted that the approximate distance to be entered is the distance the consignment is being moved within the country, in case of import or export. Secondly, in case of export or import, the GSTIN will be URP and pincode and state will be 999999 and ‘Outside Country’.
If a user is carrying out the transportation through a third party, then he /she will generate the E-way bill by entering the transporter id, transporter document number and date given by the transporter. The transporter ID can be auto populated, if the user has entered the transporters details in ‘Masters → Transporters’ (Please refer to chapter 9 on My Masters). By entering 2-3 characters of the transporter, the system will allow the user to select the transporter’s name which was entered in the master. If the transporter ID is entered, the generated E-Way Bill will be forwarded to the concerned transporter login account, allowing the transporter to enter the vehicle number while goods are getting moved.
It may be noted that if the transportation details like vehicle number or transport document number is not entered, then the system generates the temporary unique number as ‘Part-A Slip’.
If the goods are being moved in the ‘Over Dimensional Cargo’ then only user has to select the Vehicle type as O so that he can get additional validity period as per the rules.
If a transporter is generating the e-Way Bill on behalf of the consignor/consignee, then the complete e-Way Bill entry form will be entered by him to generate the e-Way Bill. Here, the system allows him to enter both the consignor and consignee details without blocking any column.
Once a request for e-Way Bill is submitted with Part-B details, the system validates the entered values and pops up appropriate message if there is any error. Otherwise E-Way Bill in the EWB-01 form will be shown with the unique 12 digit number.
The e-Way Bill will not be valid for movement of the goods without the vehicle entry in the e-way bill form. Once the vehicle number is entered, the system will show the validity of the e-way bill. This indicates the user to get the goods moved within that valid date. The validity time is midnight of the validity date. Otherwise the movement of goods becomes illegal. The user can take the print out of the e-Way Bill from there. (Please refer to chapter 5.8 for printing e-Way bill).

| Tips for easy and quick generation of e-way bill
1. Mandatory fields are indicated by 2. Mandatory fields for GSTR-1 are indicated with 3. Please ensure that you have the document details of the goods, to be moved, in hand before starting the data entry. 4. Please ensure that you have vehicle number in hand for road and transporter id, document number and date for movement by rail, air, or ship before starting the data entry. 5. Please ensure that your regular clients, suppliers, products and transporters details are entered in the master’s option for easier, quick and accurate generation of e-way bill. 6. Please ensure that document number is entered with alphanumeric value as |
5.2 Generate Bulk
The system enables the user to generate bulk e-way bills. A bulk e-Way bill is generated when a user needs to generate multiple e-Way Bills at one shot.
Pre-requisite: For generating a Bulk e-Way Bill the user needs to have the EWB bulk convertor or the excel file, which helps the user to convert the multiple e-Way Bills excel file into a single JSON file.
To generate a Bulk e-Way Bill, user needs to select the sub option ‘Generate Bulk’ under the option ‘e-Waybill’. The following screen will be displayed.

The user has to choose file and select the JSON to be uploaded (maximum allowed file size for upload is 5 MB). Once a JSON file is from the user’s system, the user needs to upload the same JSON file in the e-Way Bill portal and can use the file to generate bulk e-Way Bill.

After processing the JSON file, the system generates the E-Way Bills and shows the EWB for each request. If it is not possible it will show the error for each request.
Note: Please refer Bulk E-way Bill generation manual for detailed information and procedure to generate the bulk e-Way Bills.
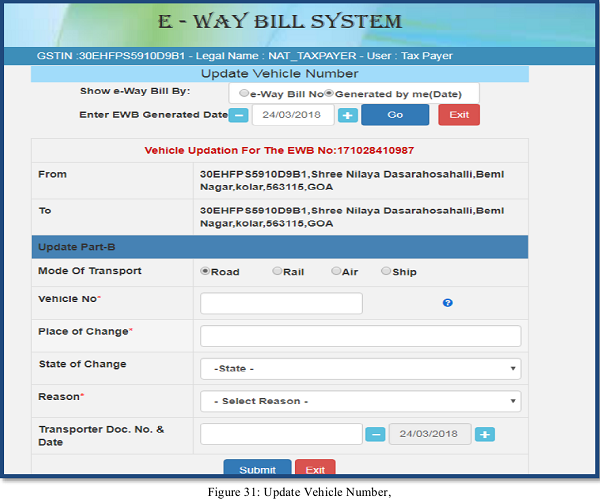
5.3 Update Part B/Vehicle
This option can be used to update the vehicle number of the e-Way Bill, if it has not been entered while generating e-Way Bill or vehicle has been changed for moved goods because of various reasons like transit movement, vehicle breakdown etc.
The present transporter is enabled to update the Part-B. If the transporter has not been assigned to the e-way bill, the generator can update the Part-B.
When the user selects the ‘Update Vehicle No’ sub-option under ‘e-Waybill’ option, the following screen will be displayed. In this form the user needs to check at least one option e-way bill No/ Generated Date/Generator GSTIN accordingly.

After entering the corresponding parameter, the system will show the list of related E-way bills for those parameters. Here, the user will click on the select for the corresponding e-way bill for the vehicle update. Next, the user will be redirected to the following form.
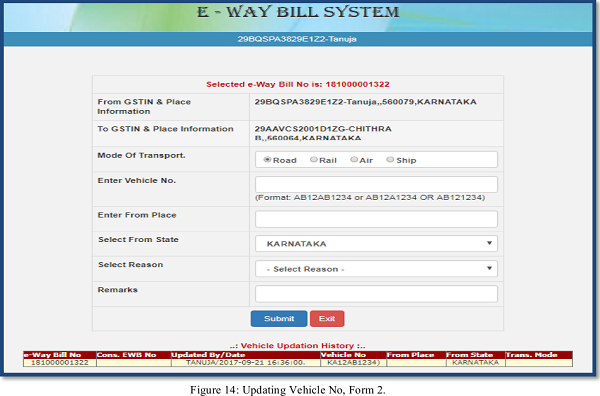
Pre-requisite: Before going for updating vehicle number, the user should have the E- Way Bill for which the user wants to update vehicle number and the new vehicle number in hand for the data entry.
In the vehicle updating form, the user needs to enter the vehicle number on which the transportation is being done, next the user enters the from place, the state, where the transportation is being done.
Now, the user needs to give the reason for which the vehicle is being changed. The system allows the user to select the reason for the transport change. Next, the user needs to enter the ‘remarks’; under this field the user shall enter a brief remark.
Once a request for updating of vehicle number is submitted, the system validates the entered values and pops up appropriate message if there is any error. Otherwise the vehicle no is updated instantly and will be aligned with the concern e-Way Bill.
|
Tips to remember 1. E-way bill is not valid for movement of goods without vehicle number on it. 2. Once E-way bill is generated, it cannot be edited for any mistake. However, it can be cancelled within 24 hours of generation. 3. E- Way Bill may be updated with vehicle number any number of times. 4. The latest vehicle number should be available on e-way bill and should match with the vehicle carrying it in case checked by the dept. |
5.4 Update Vehicle-Bulk
The system enables the user to update vehicle details in bulk for multiple e-way bills in one go. .For updating Part-B in Bulk, the user needs to have the EWB bulk convertor or the excel file, which helps the user to convert the multiple Part-B of e-Way Bills excel file into a single JSON file update a Bulk Part-B of e-Way Bills, user needs to select the sub option ‘Update Vehicle Bulk’ under the option ‘eWaybill’.
The user has to select and upload the JSON (maximum allowed file size for upload is 5 MB) and upload the same in the e-Way Bill portal and can use the file to update bulk Part-B of e-Way Bills.
After processing the JSON file, the system shows the list of e-way bills updated with Part-B for each request.
 5.5 Extend Validity
The provision has been provided to the taxpayer to extend the validity of E-way bill, if he / she is not able to reach the destination before the expiry of the validity of e-way bill. The user can extend the e-way Bill few hours before or few hours after the existing validity time of EWB. The few hours available for extending is defined in the web-site. The present transporter of the e-way bill can only extend the validity.

 If the user says he wants to extend the validity, the system prompts him to select the reason option and explain the reason in detail in the reason description/remarks field.

Subsequently, the user has to enter the presently, where is the consignment in ‘From Place’ column and approximate distance to travel from there to the destination and transportation details. Now the system will give the additional validity depending upon the distance to travel as per the rules.
By default, the validity of the extended EWB in the system is kept till midnight of the extended day.
5.6 Update Transporter
The system enables the user to update the Transporter details against a particular EWB, if the transporter is getting changed for the further movement of the goods. Here, the present transporter can only update the next transporter and subsequently, the next transporter is enabled to update the Part-B till he has been changed. If the transporter is not there, then the generator of the e-way bill can update the transporter.
The user has to enter the EWB number and click ‘Go’ as shown in the screen below.

The Transporter details can then be updated by the user as shown in below screen.

5.7 Cancel E-way bill
The provision has been provided to the taxpayer to cancel the E-way bill for various reasons like goods are not being moved, incorrect entry in the E-way bill entered by him etc.
When user selects the ‘Cancel’ sub-option under ‘E-way bill’ option, the following screen will be displayed.

Before going for e-Way Bill Cancellation, the user should have the e-Way Bill number in hand which he intends to cancel.
Next, the user needs to enter the 12 digit e-Way Bill number and select go. That particular e-way bill will be displayed, and after giving a suitable reason for the cancellation of e-Way Bill, the user can cancel the e-way bill.
Once the e-Way Bill is cancelled it’s illegal to use the same.
Note: The e-Way Bill once generated cannot be deleted. However, it can be cancelled by the generator within 24 hours of generation. If it has been verified by any empowered officer, then it cannot be cancelled. e-Way Bill can be cancelled if either goods are not transported or are not transported as per the details furnished in the e-Way Bill.
5.8 Print EWB
When the user selects the ‘Print EWB’ sub option under ‘e-Waybill’ option, the following screen will be displayed; the print of an e-Way Bill can be taken only by the generator and the transporter of the e-Way Bill.
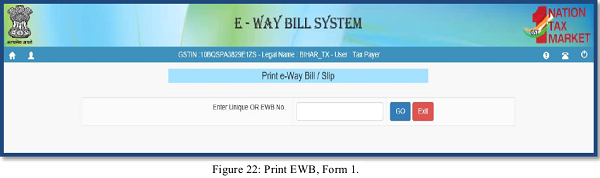
After entering the e-Way Bill number, the below mentioned form will be displayed. The system shows the e-Way Bill with an option to take the print.

A user shall take a detailed print as well.
6. Managing Consolidated e-Way Bills

6.1 Generate New Consolidated E-way bill
A consolidated E-way bill is generated when the transporter is carrying out multiple consignments in a single vehicle. In such cases, the transporter will select a number of E-way bills populated by the supplier and assign a common vehicle. Consolidated E-way bill allows the transporter to carry a single document, instead of a separate document for each consignment in a conveyance.
A user should have all the e-Way Bill numbers of the multiple consignments, which the transporter shall transport in the conveyance.
When the user selects the ‘Generating New’ sub-option under ‘Consolidated EWB’ option, the following screen will be displayed.
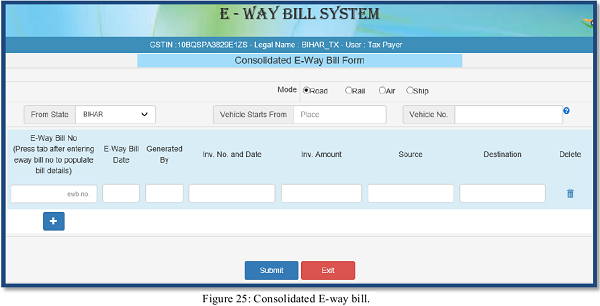
In this form the user needs to check the mode of transportation from the given options, road/rail/air/ship. Then the user enters the ‘From State’, ‘Vehicle Starts From’ where the vehicle is starting and ‘the vehicle no’.
Now, the user needs to enter the e-Way Bill Number. Once the EBN is entered the rest of the fields in the form are auto populated. The user can add multiple consignments by clicking on![]() . It may be noted that user should be the generator or the transporter of the selected e-way bill to use in consolidated EWB. Otherwise, it will not allow him to update the details. Then click on submit. The system will display a consolidated e-Way Bill with the consolidated EBN as given below.
. It may be noted that user should be the generator or the transporter of the selected e-way bill to use in consolidated EWB. Otherwise, it will not allow him to update the details. Then click on submit. The system will display a consolidated e-Way Bill with the consolidated EBN as given below.

6.2 Generate Bulk Consolidated E-way bill
The e-way bill system enables the user to generate consolidated bulk e-way bills. A consolidated bulk e-Way bill is used when a user needs to generate multiple consolidated e-Way Bills at one shot.
For generating a consolidated Bulk e-Way Bill the user needs to have the EWB bulk convertor or the excel file, which helps the user to convert the multiple consolidated e-Way Bills excel file into a single JSON file.
To generate a consolidated Bulk e-Way Bill, user needs to select the sub option ‘Generate Bulk’ under the option ‘Consolidated EWB’. The following screen will be displayed.
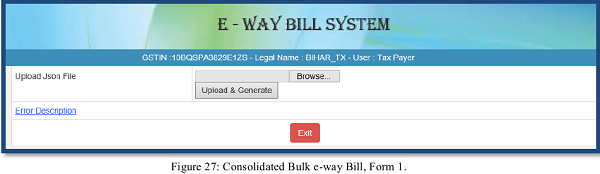
The user has to choose file and select the JSON to be uploaded. Once a JSON file is from the user’s system, the user needs to upload the same JSON file in the e-Way Bill portal and can use the file to generate consolidated bulk e-Way Bill.

After processing the JSON file, the system generates the E-Way Bills and shows the consolidated EWB for each request. If it is not possible it will show the error for each request.
Note: Please refer Bulk E-way Bill generation manual for detailed information and procedure to generate the bulk e-Way Bills.
6.5 Re-Generate Consolidated EWB
The E-Way Bill system gives the user an option to update the transportation details for the consolidated EWB and re-generate the new Consolidated EWB (CEWB).
A user can update the transportation or vehicle number for the consolidated EWB by selecting the sub option ‘Re-Generate’ under the option ‘consolidated EWB’. The following screen is displayed
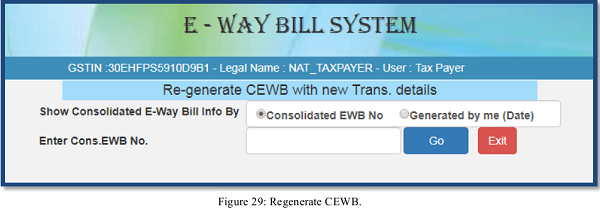
On this screen, the user shall enter the 10 digit consolidated EWB or by selecting the date on which the consolidated EWB was generated. A list of consolidated EWB will be shown; the user shall select the particular consolidated EWB to update the vehicle number. The following screen will be displayed

On this form the user needs to update the vehicle number along with the place, state, reason for the change in transportation and Transporter Doc. No. and Date. The system will pop up an error message if any fields are entered wrongly, otherwise the vehicle number will get updated to that particular consolidated E-way bill number.
6.4 Print Consolidated EWB
A user can take the print of consolidated EWB by selecting sub option ‘print consolidated EWB’ under the option consolidated EWB. The following screen is displayed.

Once the user enters the consolidated EWB number and clicks ‘GO’. The system will display the requested consolidated EWB and shall take the print out of the consolidated EWB.
7. Rejecting e-Way Bills
The option is used by the taxpayer to watch the e-Way Bills generated by the other taxpayers against his / her GSTIN as the other party as recipient or supplier. If the recipient is not getting the consignment mentioned in the e-Way Bill, he/she can reject them using this option.
The user needs to have the e-Way Bill number which he/she wants to reject. The following screen is shown once ‘Reject’ is selected from the main menu options.

A user needs to the select the e-Way Bill number by selecting the date on which the e-Way Bill was generated and click submit button. The system will show all the e-way bills generated on that particular date, select the concern e-Way Bill and shall reject the e-Way Bill by checking the check box on the right side of the e-Way Bill.
Note: As the other party, one can communicate the acceptance or rejection of such consignment specified in the e-Way Bill. If the acceptance or rejection is not communicated within 72 hours from the time of generation of e-Way Bill, it is deemed that he has accepted the details.
8. Generating Reports
There is an option for the user to generate various reports to manage his business – some are detailed and others are summarised. The system also helps him to generate action based reports. The following reports are available:

8.1 My EWB Reports
This will give the list of e-Way Bills generated by the user for a particular date which includes the following:
- Outward Supplies- This will generate the list of e-Way Bills which have been shown as outward supplies from the user for a particular date
- Inward Supplies- This will generate the list of e-Way Bills which have been shown as inward supplies to the user for a particular date.
- CEWB Generated- This will generate the list of consolidated e-Way Bills for a particular date.
- Cancelled EWBs- This will list the e-Way Bills cancelled by the user for a particular date.
- Rejected EWBs- This will list the e-Way Bills cancelled by the user for a particular date.
- Assigned for Transporters- This will list the e-Way Bills assigned by the user for Transporters for a particular date.
8.2 Others EWB Reports
This will give the list of e-Way Bills generated by the others against the user as the other party for a particular date which includes the following:
- EWBs generated by others- This will list the e-Way Bills generated by others for the user.
- Rejected EWBs by others- This will list the e-Way Bills assigned to others by the user but rejected by them.
- Assigned to me for Transport- This will list the e-Way Bills assigned to user for Transport by others.
8.3 Master Reports
Following reports are available under this option:
- My Masters – This generates the list of master entries under different categories like Clients, Suppliers, Transporters and Products.

- EWB Masters – This will list the e-Way Bills based on Unit Quantity Code and State Code.

8.4 Summary Reports
Datewise Activities- This will list the activities pertaining to particular e-Way Bill for a particular date. The user can export the populated details in an excel by clicking on ‘Export to Excel” tab.

9. My Masters
The e-Way Bill system allows the user to create his own business related Masters. Masters data simplifies the data entry while generating the e-Way Bill. It helps user to generate e-Way Bill easily and quickly without any errors. The master consists of Products, Clients, Suppliers, and Transporters.
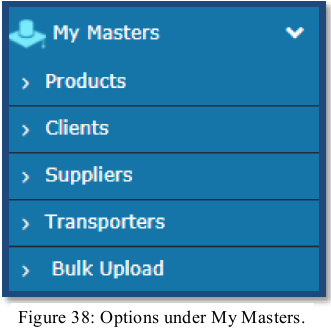
9.1 Products
When the user selects sub option ‘Product’ under option ‘Masters’, the following screen will be displayed.

The user needs to start entering with the basic details like the product name; a measurement unit of the product in which he sells and a brief description about the product shall be entered by the user.
Next, the user needs to enter the HSN code. If the user doesn’t know the HSN code, the system allows the user to select the HSN code from the search options and HSN name accordingly.
Next, the user needs to enter the rate of tax as applicable for the product – CGST, SGST, IGST, Cess, and Cess Non-ad valorem. Once a request for product details are submitted, the system validates the entered values and saves. Otherwise the system pops up appropriate message if there is any error. The user can repeat this for all his products. User can make multiple entries for the same product, if the unit of measurement and rate of tax is in multiple for the same product. Accordingly, he can give the product name for his understanding and remembering.
9.2 Clients
A user shall select the sub option ‘Clients’ under option ‘Masters’ to enter the client details into the masters, the following screen is shown when the clients tab is selected.

The user can enter the customer details as a GST registered or GST un-registered customer. When the GST registered option is selected, the user has to enter the GSTIN of the customer. Once the GSTIN is entered, the system shows the customer details in the combo box. If the GSTIN holder has additional place of the business, then the combo will show main and additional places of business. The user has to select whichever is required. If multiple places have to be selected, click ![]() button and select. Once submit is given, the system saves the details of that particular customer in the masters.
button and select. Once submit is given, the system saves the details of that particular customer in the masters.
If the user selects the GST un-registered option, the following screen is displayed.

The user needs to enter the state, name, client address, place, pin code, mobile number and email of the client and select submit.
Once a request for client details are submitted, the system validates the entered values and pops up appropriate message if there is any error. Otherwise the client details are captured into the masters and will be available to use while generating e-Way Bill.
9.3 Suppliers
The user can also add the suppliers by selecting sub option ‘Supplier’ in the same manner like clients are added. Please see the procedure for the entry of cus tomer in masters in above section.

9.4 Transporters
A user can enter the details of a registered transporter into the masters; the user needs to have the transporter number. Once the transporter number is entered, the system allows the user to select and submit the same. This is used to enable the registered person to allow the transporter to update the vehicle number in the e-Way Bill whenever, it is required.

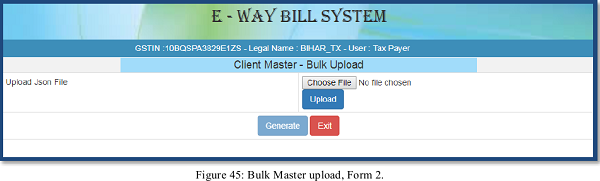
9.5 Bulk Upload
The system enables the user to upload bulk Masters for Product, Client, Supplier and Transporter. For generating a Bulk e-Way Bill the user needs to have the EWB bulk convertor or the excel file, which helps the user to convert the multiple e-Way Bills excel file into a single JSON file.
To upload a Bulk Master, user needs to click the ‘Bulk upload’ under ‘My Masters’ module and then select the option for Bulk Master as shown in screen below.

The user can then upload the JSON file for the selected option and generate the respective Master accordingly.
10. User Management

10.1 Create Sub-User
The system enables the user to create a sub user.
Once the user clicks on the sub option ‘Create Sub user’ under the option user management, the system asks the user to enter the mobile number and validates the same via the OTP. Once correct OTP is entered the following screen is displayed.
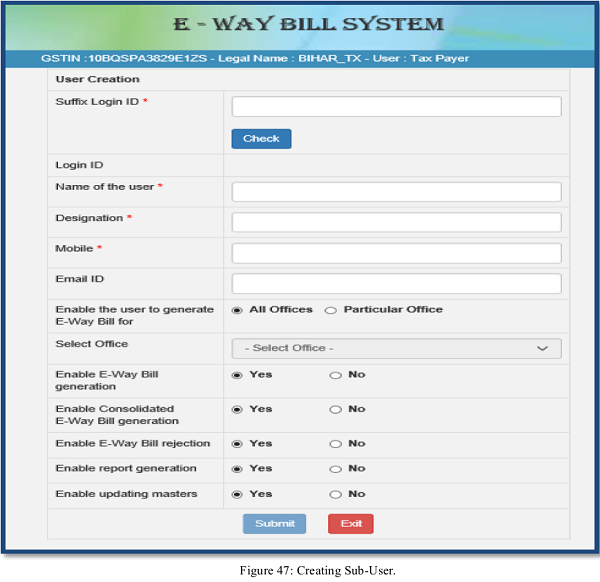
In this form, the user can create the sub-user by entering a ‘suffix user id’ for the sub user and shall check the availability of the user id. That is, if the tax payer’s username is ‘abcdef’ and he is giving suffix as ‘rvk’, then the sub user id will be ‘abcdef_rvk’ is created.
Then the user needs to enter the name, destination, and mobile number, email id, enabling the user to generate the EWB for all the offices or for a particular office.
The user can authorise the sub user to generate EWB, consolidated EWB, rejection of EWB, report generation of EWB and updating the masters from the check boxes given in the screen.
The system will pop up an error if the entered fields are incorrect otherwise the system will create a sub-user and send SMS pop up a message with password to the sub-user.
10.2 Freeze Sub-User
The system gives an option to the user to freeze the sub user.
Once the user selects ‘Freeze sub-user’ under the option user management. The following screen is displayed.

The user shall select the freeze button to freeze a sub user. Once a sub-user is frozen, he/she won’t be able to login E-way bill portal.
10.3 Update Sub-User
In the same manner explained under chapter 10.1 create sub user, a user can update a sub-user. In the sub option Update sub-user under user management.
10.4 Change Password
A user shall change his login password under this option. Once the user clicks on sub option change password under the option user management, the following screen is displayed.

In this form the user needs to enter the old password, enter the new password he/she wants to use and click submit. The system will change the login password of the user with new entered password.
Note: Remember the old and the new password entered. Don’t share your password with others and regularly change your password.
11. Registration
E-Way Bill system provides the users to generate the e-Way Bills from different modes. One of them is the web based mode, which has been explained in chapter 5. There are other modes like SMS based, android app based, API based and Suvidha based. For all these modes, the user needs to register on the web based system with other details for these modes. The following options explain the registration for these modes.

11.1 For SMS
User needs to have the registered mobile number which he/she used for registration on the e- Way Bill portal. Once user selects option ‘for SMS’ under main option ‘Registration’, following screen is displayed.
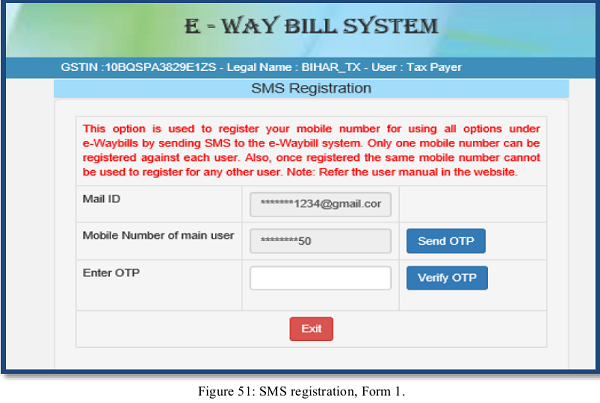
The user needs to verify the OTP received on his/her registered mobile number and mail ID. The system validates the OTP and directs the user to the following screen.

Next, the user needs to select the User id from the drop down menu, the mobile number of the selected user will be auto populated by the system. Once the user gives the submit request the particular user can generate e-Way Bill through SMS system.
Note: Please refer user manual on SMS system to generate e-Way Bill through SMS. A tax payer can register a maximum of 2 mobile numbers for the m-Way Bill purpose.
11.2 For Android
The e-Way Bill system enables the user to generate an e -Way bill through android application as well.
Once a user selects ‘For Android’ under the option ‘Registration’, the following screen is shown.


The user needs to select the concern user from the drop down menu, name and place will be auto populated by the system. The user shall enable the concern user with android app, needs to enter the IMIE Number of the concern user and save the details in the e-Way Bill system. Once saved the concerned user will be able to generate e-Way Bill through android applications.
11.3 For GSP
Under Development. Please wait for the next version.
11.4 For API
Under Development. Please wait for the next version.
12. Update
Following options are available under Update module.

12.1 For Transporter/Taxpayer
The E-Way Bill system allows a user to generate an e-way bill for other parties as Transporter/Taxpayer. By using this option a user can change himself into a Transporter/Taxpayer, which enables him to generate e-way Bill for other parties.
A user needs to select ‘For Transporter/Taxpayer ‘under the option ‘registration’. Any time, the user can change between tax payer and transporter.
The following screen will be displayed:

Here the user needs to ‘verify OTP’ by entering the OTP received in his registered mobile number and mail ID.
Once, the OTP is verified the system asks the user, whether he/she wants to be registered transporter so that he can generate e-way bills for his clients. The user can check the yes box to do the same, again if the user wants to be a registered tax payer can check the no box and can save the details by clicking on ‘Save’.

12.2 My GSTIN from Common Portal (CP)
The E-Way Bill system allows a user to update their business details from the common portal. Once updated successfully, these details can be auto populated in various e-Way bill modules based on GSTIN as and when required.

13. Grievance
The system allows a provision for Transporter to fill the information for cases where a vehicle has been intercepted and detained for a period exceeding thirty minutes. This will be used to watch the grievances on the detention.


14. Best Practices to follow
14.1 Mistakes while generating e-Way Bills
It has been observed that some of the Tax Payers and Transporters are making the mistakes while generating the E-Way Bills. These mistakes may be happening as operators want to generate the e-Way Bills fast. The followings are some of the general mistakes.
- In some cases, ‘Total of Tax Values of SGST, CGST, IGST and Cess’ are being entered more than ‘Value/Taxable Value’ of the product.
- In some cases, abnormal value is being entered for ‘Value / Taxable Value’, that is, more than ₹ 50.00 Crores and so.
- In some cases, GSTIN of the other party is being entered wrongly.
- In some cases, PIN Codes are being entered wrongly.
- In some cases, the HSN codes are being entered wrongly.
This may result in cancellation of e-Way Bill by the tax payers himself or rejection by the other party.
14.2 Best Practices to overcome these Mistakes
To overcome these mistakes, the following actions may be taken by the Tax Payers/Operators.
- Enter your Clients/Customers and Suppliers master in the master menu – The tax payer has been facilitated on the e-Way Bill system to create onetime master details of his/her customers and suppliers by just entering the GSTIN. This helps in easily populating the customers and suppliers details by the system, just by typing his/her name at name field while generating the e-Way Bills. This avoids the mistakes in GSTIN, Place, State and PIN codes of customers or suppliers.
- Enter your products master in the master menu – The tax payer can create his/her product masters by entering the product details like name, HSN, rate of tax, etc. So that the product details are auto populated by the system by just typing the 2-3 chars of product name. This avoids the mistakes in HSN code, rate of tax, UQC, etc.
- Verify before submission – The operators can cross-check the values of parameters entered before submitting.
- Manage sub-users carefully – Some of the tax payers may not operate directly themselves always and also they may have multiple additional places from where they need to generate the e-way bills for movement of goods. To achieve this, the tax payers can create the sub-users to manage the e-way bill system depending upon the requirements. The different roles can also be assigned to these users. However, the tax payers should take care while generating these users. Whenever, the employees/operators/managers change, he/she should change the password or freeze the account from miss-utilising the same.
- Register for other facilities carefully – There are other facilities to register. They are SMS based and Android based e-Way Bill management and registration to work as a transporter. The utmost care should be taken while using these facilities to avoid miss-utilisation. SMS based E-way Bill has to be generated carefully to avoid mistakes while typing the parameters. The registration as transporter facilitates the tax payers to generate the e-Way Bill for other parties as a transporter.
- API Interface – The best method for the large tax payers/transporters, who generate the large number of e-Way Bills, is API interface. This is site-to-site integration of the systems for e-way Bill generation. In this method, the tax payer system will directly request the E-way Bill system while generating invoice in his system and get the e-Way Bill number. This can be printed on the Invoice document and movement of the goods can be started. This avoids duplicate data entry and eliminates complete data entry mistakes. To use this facility, the tax payers have to request the department for this service. This facility is available only for the selected large tax payers or transporters, who generate the more than the defined invoices in a month. This defined invoices in a month will be changed as per the required by the government time-to-time.
Role of GST Practitioner Under GST
Link:- https://docs.ewaybillgst.gov.in/Documents/usermanual_ewb.pdf


I get error in Eway bill “Error in saving bill details (D)
how can i solve this error
for ewaybill can we do one truck of three partys ewaybill in same city
can we do send material in one truck of three party in same city
While clicking submit button I get the error that Error in saving bill details(D)
i want to change of my contact no and email id in eway bill profile
kindly advice me
Error :Invalid Dispatch Statecode,Invalid ShiptoStatecode
Solution For This Error
if we load shipment in two vehicles for one single invoice how to enter 2 vehicle number in one e way bill
There is no option found to change password of Sub-User.
Sir
Below URL of eway bill only for karnataka or All India Basis.
http://gst.kar.nic.in/ewaybill
Also, pls explain if material send through By Road & same material further transport by Rail then how to issue way Bill