FAQs of filing of GSTR-4
Q.1 What is Form GSTR-4?
Ans: Form GSTR-4 is to be filed by taxpayers to provide summary of outward supplies, tax payable thereon etc. Such taxpayers are also required to report summary of import of services and supplies attracting reverse charge. Form GSTR-4 is to be filed by taxpayers who have opted for composition scheme.
Q.2 Who needs to file Form GSTR-4?
Ans: Taxpayer who have opted for composition scheme from the date of grant of registration or normal taxpayer who have opted into composition scheme, after obtaining registration or are availing composition scheme as notified by Government are required to file Form GSTR-4.
Q.3 By when do I need to file Form GSTR-4?
Ans: Form GSTR-4 is to be filed on yearly basis. The due date for filing Form GSTR-4 is 30th of the month succeeding the financial year or as extended by Government from time to time.
Q.4 From where can I file Form GSTR-4?
Ans:Form GSTR-4 can be accessed on the GST Portal, post login in the Returns Dashboard by the composition taxpayer.
The path is Services > Returns > Returns Dashboard.
Q.5 Is it mandatory to file Form GSTR-4?
Ans: Yes, it is mandatory to file Form GSTR-4, in case you have opted for composition scheme.
Q.6 Can I file nil return in Form GSTR-4?
Ans: Yes, you can file nil return in Form GSTR-4.
Q.7 Is there any Offline Tool for preparing Form GSTR-4?
Ans: Yes, there is an offline tool for preparing Form GSTR-4.
Q.8 What are the pre-conditions for filing Form GSTR-4?
Ans: Pre-conditions for filing of Form GSTR-4 are:
1. Taxpayer must be registered as Composition Taxpayer or have opted for Composition scheme or are availing composition scheme as notified by Government and must have an active GSTIN.
2. Taxpayer must have valid User ID and password.
3. Taxpayer must also have valid & non-expired/non-revoked digital signature (DSC), in case taxpayer wishes to file their forms/returns etc. using digital signature.
Q.9 Form GSTR-4 comprises of which tables?
Ans: Form GSTR-4 comprises of following tables:
- 4A, 4B. Inward Supplies (Registered): To add details of inward supplies received from a registered supplier (with or without reverse charge)
- 4C. Inward supplies (Unregistered): To add details of inward supplies received from an unregistered supplier
- 4D. Import of Service: To add details of import of service
- 5A, 5B. Amendment of Inward supplies (Registered): To add amendment details of inward supplies received from a registered supplier (with or without reverse charge)
- 5A. Amendment of Inward supplies (Unregistered): To add amendment details of inward supplies received from an unregistered supplier
- 5A. Amendment of Import of services: To add amendment details of import of service.
- 5B. Debit/Credit Notes (Registered): To add details of credit or debit notes received from the registered recipients.
- 5B. Debit/Credit Notes (Unregistered): To add details of credit or debit notes received from the unregistered recipients.
- 5C. Amendment Debit/Credit Notes (Registered): To add amendment details of credit or debit notes received from the registered recipients.
- 5C. Amendment Debit/Credit Notes (Unregistered): To add amendment details of credit or debit notes received from the unregistered recipients.
- 6. Tax on Outward Supplies: To add details of tax on outward supplies made (Net of advance and goods returned).
- 7. Amendment of Tax on Outward Supplies: To add amendment details of tax on outward supplies made (Net of advance and goods returned).
- 8A. Advance amount paid: To add details of advance amount paid for reverse charge supplies in the tax period.
- 8B. Adjustment of Advances paid: To add details of advance amount on which tax was paid in earlier period but invoice has been received in the current period.
- 8A-II. Amendment of Tax Liability: To add details of amendment of advance amount paid for reverse charge supplies in the tax period.
- 8B-II. Amendment of Adjustment of advances: To add amendment details of advance amount on which tax was paid in earlier period but invoice has been received in the current period.
- 10 & 11. Tax, Interest, Late fee payable and paid: Auto calculated on GST portal on clicking ‘Proceed to File’.
Q.10 Is the amount in tax fields auto-populated based on the values entered in Taxable Value fields?
Ans: The Amount of Tax fields are auto-populated based on the values entered in Taxable Value fields respectively. The CESS field is not auto populated and has to be entered by the taxpayer.
Q.11 When can summary displayed for amendments table be negative in Form GSTR-4 dashboard?
Ans: The summary displayed for amendments table can have negative values, in case of downward amendment, as the values displayed are net of (Amended values – Original value).
Q.12 Is there any late fee in case of delayed filing of Form GSTR-4?
Ans: Yes, there is a late fee prescribed in Law.
Q.13 Is there any questionnaire available to select only the relevant table?
Ans: Yes, questionnaire is available to select only relevant tables in which details are required to be provided.
Q.14 How can I discharge my tax, interest and late fee liabilities?
Ans: Tax, interest and late fee liabilities can be discharged through Electronic Cash Ledger only.
Q.15 How can I offset my liabilities?
Ans: You can offset the liabilities by clicking the 10 & 11. Tax, Interest, Late fee payable and paid tile.
- If available balance in Electronic Cash Ledger is less than the amount required to offset the liabilities, then a part payment of liability can be made from available balance of the Electronic Cash Ledger. You may directly create challan for payment of remaining part of liability, by clicking on the CREATE CHALLAN button.
- If available cash balance in Electronic Cash Ledger is more than/equal to the amount required to offset the liabilities, no additional cash payment is required for offsetting liability.
Q.16 What happens after Form GSTR-4 is filed?
Ans: After Form GSTR-4 is filed:
1. ARN will be generated on successful filing of the Form.
2. An SMS and email will be sent to the mobile number of the authorized signatory on the successful filing of Form GSTR-4.
3. Electronic Cash Ledger and Electronic Liability Register Part-I will get updated.
4. The return is made available on the dashboard of tax official.
Q.17 Can I preview Form GSTR-4 before filing?
Ans: Yes, you can view/download the preview of Form GSTR-4 by clicking on ‘Preview GSTR-4’ before filing on the GST Portal.
Q.18 What are the modes of signing Form GSTR-4?
Ans: You can file Form GSTR-4 using DSC or EVC.
Digital Signature Certificate (DSC)
Digital Signature Certificates (DSC) are the digital equivalent (that is electronic format) of physical or paper certificates. A digital certificate can be presented electronically to prove one’s identity, to access information or services on the Internet or to sign certain documents digitally. In India, DSC are issued by authorized Certifying Authorities.
The GST Portal accepts only PAN based Class II and III DSC.
To obtain a DSC, please contact any one of the authorised DSC-issuing Certifying Authorities: http://www.cca.gov.in/cca/?q=licensed_ca.html
Electronic Verification Code (EVC)
The Electronic Verification Code (EVC) authenticates the identity of the user at the GST Portal by generating an OTP. The OTP is sent to the mobile phone number of the registered mobile phone of Authorized Signatory filled in part A of the Registration Application.
Q.19 Can the due date of filing of Form GSTR-4 be extended?
Ans: Yes, due date of filing of Form GSTR-4 can be extended by Government through notification.
Manual on filing of GSTR-4
How can I create and file details in Form GSTR-4?
To create and file details in Form GSTR-4, perform following steps:
(I) In case, you want to file NIL return in Form GSTR-4,
(II) In case, you want to file quarterly return in Form GSTR-4, perform following steps:
A. Login and Navigate to Form GSTR-4 page
B. Enter details in various tiles
Preview Form GSTR-4
D: Payment of Tax
File Form GSTR-4 with DSC/ EVC
View Debit entries in Electronic Cash Ledger for tax payment
A. Login and Navigate to Form GSTR-4 page
1. Access the www.gst.gov.inURL. The GST Home page is displayed.
2. Login to the GST Portal with valid credentials.
3. Click the Services > Returns > Returns Dashboard command.
Alternatively, you can also click the Returns Dashboard link on the Dashboard.
4. The File Returns page is displayed. Select the Financial Year & Return Filing Period (Quarter) for which you want to file the return from the drop-down list.
5. Click the SEARCH button.
6. The File Returns page is displayed. In the GSTR-4 tile, click the PREPARE ONLINE button if you want to prepare the return by making online entries on the GST Portal.
Note: Please read the important message in the box carefully.
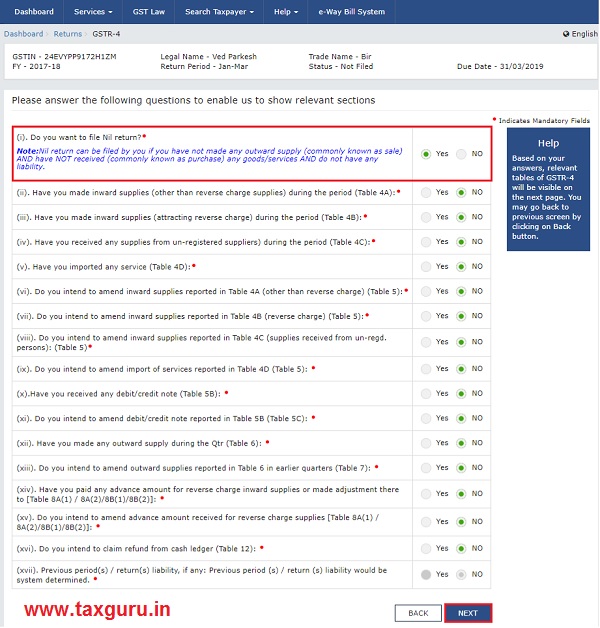
7. A list of questions are displayed. You need to answer all the questions to show the relevant sections applicable to you.
8 (a) To file Nil return: Nil return can be filed by you if you have not made any outward supply (commonly known as sale) and have NOT received (commonly known as purchase) any goods/ services and do not have any tax liability etc.
8.1. Select Yes for option (i).
8.2. Click the NEXT button and follow steps 8.3 to 8.5 below to file Nil Form GSTR-4 for the month. .
8.3. Preview Draft GSTR-4
8.4. Proceed to File and Payment of Tax
8.5. File GSTR-4
8 (b) To file Quarterly return:
8.1. Click the NEXT button. Based on your answers, relevant tables of GSTR-4 will only be visible here. You may go back to previous screen by clicking on BACK button.
8.2. The GSTR-4 – Quarterly Return page is displayed.
Note:
- Based on the selection made in previous page, applicable tiles will be visible to you for providing the details.
- A question in which Yes, is selected can’t be made ‘No’ after clicking on ‘Next’ button. However, question on which ‘No’ is selected can be made as ‘Yes’ subsequently.
B. Enter details in various tiles
4A, 4B. Inward Supplies (Registered): To add details of inward supplies received from a registered supplier (with or without reverse charge)
4C. Inward supplies (Unregistered): To add details of inward supplies received from an unregistered supplier
4D. Import of Service: To add details of import of service
5A,5B. Amendment of Inward supplies (Registered): To add amendment details of inward supplies received from a registered supplier (with or without reverse charge)
5A. Amendment of Inward supplies (Unregistered): To add amendment details of inward supplies received from an unregistered supplier
5A. Amendment of Import of services: To add amendment details of import of service
5B. Debit/Credit Notes (Registered): To add details of credit or debit notes issued/ received to/from the registered recipients
5B. Debit/Credit Notes (Unregistered): To add details of credit or debit notes issued to the unregistered recipients
6. Tax on Outward Supplies: To add details of tax on outward supplies made (Net of advance and goods returned)
5C. Amendment Debit/Credit Notes (Registered): To add amendment details of credit or debit notes issued/received to/from the registered recipients
5C. Amendment Debit/Credit Notes (Unregistered): To add amendment details of credit or debit notes issued to the unregistered recipients
7. Amendment of Tax on Outward Supplies: To add amendment details of tax on outward supplies made (Net of advance and goods returned)
8A. Advance amount paid: To add details of advance amount paid for reverse charge supplies in the tax
8B. Adjustment of Advances paid: To add details of advance amount on which tax was paid in earlier period but invoice has been received in the current period
8A-II. Amendment of Tax Liability: To add details of amendment of advance amount paid for reverse charge supplies in the tax period
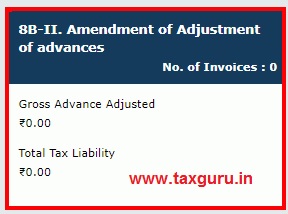
8B-II. Amendment of Adjustment of advances: To add amendment details of advance amount on which tax was paid in earlier period but invoice has been received in the current period
Click on the tile names to know more and enter related details:
4A, 4B. Inward Supplies (Registered)
9.1. To add details of inward supplies received from a registered supplier (with or without reverse charge), click the 4A, 4B. Inward Supplies (Registered) tile.
9.2. The B2B Invoices – Supplier-Wise-Summary page is displayed. Click the ADD DETAILS button.
9.3. The B2B – Add Invoice page is displayed.
9.4. In the Supplier GSTIN field, enter the GSTIN of the supplier.
9.5. In the Invoice No., Invoice Date and Total Invoice Value fields, enter the Invoice number, date of the invoice and value of the total invoice.
Note:
- Once the GSTIN of the supplier is entered, Supplier Name and Supply Type fields are auto-populated based on the GSTIN of the supplier.
- The auto-populated POS is editable. Depending on selected POS, the supply type gets auto-populated.
- The screen will expand downwards and more fields will appear to enter line item details of the invoice.
9.6. Select the checkbox for Supply attract Reverse Charge, if supply attracts any reverse charge.
9.7. (a) In case of Intra-State transaction:
In case the POS (place of supply) of the goods/ services is the same State as that of the supplier, the transaction is an Intra-State transaction.
Notice, fields for Central Tax and State/UT Tax will appear.
a) In the Taxable Value field against the rates, enter the taxable value of the goods or services.
b) In the Cess field, enter the cess amount.
c) Click the SAVE button to save the invoice details.
Note: The Amount of Tax fields are auto-populated based on the values entered in Taxable Value fields respectively. The CESS field is not auto populated and has to be entered by the taxpayer.
9.7. (b) In case of Inter-State transaction:
In case, the Place of Supply (POS) is different from the State of the supplier, transaction becomes an Inter-State transaction.
Fields for Integrated Tax will appear.
a) In the Taxable Value field against the rates, enter the taxable value of the goods or services.
b) In the Cess field, enter the cess amount.
c) Click the SAVE button to save the invoice details.
Note: The Amount of Tax fields are auto-populated based on the values entered in Taxable Value and tax rate fields respectively. The CESS field is not auto populated and has to be entered by the taxpayer.
9.8. You will be directed to the previous page and a message is displayed that Request accepted successfully. Here, you can also edit/delete the added invoices (under Actions). Click the BACK button to go back to the GSTR-4 page.
9.9. You will be directed to the GSTR-4 landing page and the 4A, 4B. Inward Supplies (Registered) tile in GSTR-4 will reflect the number of invoices added along with Total Invoice value, Total taxable value, total tax liability and total tax amount entered.
Similarly, you can add more details of inward supplies received from a registered supplier (with or without reverse charge).
4C. Inward supplies (Unregistered)
9.1. To add details of inward supplies received from an unregistered supplier, click the 4C. Inward supplies (Unregistered) tile.
9.2. The 4C. Inward supplies received from an unregistered supplier page is displayed. Click the ADD DETAILS button.
9.3. The B2B Unregistered Supplier – Add Invoice page is displayed.
9.4. In the Invoice No., Invoice Date and Total Invoice Value fields, enter the Invoice number, date of the invoice and value of the total invoice.
9.5. Select the POS from the drop-down list.
9.6. Select the Supply Type from the drop-down list.
9.7. (a) In case of Intra-State transaction:
In case supply type is an Intra-State transaction, fields for Central Tax and State/UT Tax will appear.
a) In the Taxable Value field against the rates, enter the taxable value of the goods or services.
b) In the Cess field, enter the cess amount.
c) Click the SAVE button to save the invoice details.
Note: The Amount of Tax fields are auto-populated based on the values entered in Taxable Value fields respectively. The CESS field is not auto populated and has to be entered by the taxpayer.
9.7. (b) In case of Inter-State transaction:
In case supply type is an Inter-State transaction, fields for Integrated Tax will appear.
Fields for Integrated Tax will appear.
a) In the Taxable Value field against the rates, enter the taxable value of the goods or services.
b) In the Cess field, enter the cess amount.
c) Click the SAVE button to save the invoice details.
Note: The Amount of Tax fields are auto-populated based on the values entered in Taxable Value and tax rate fields respectively. The CESS field is not auto populated and has to be entered by the taxpayer.
9.8. You will be directed to the previous page and a message is displayed that Request accepted successfully.
Here, you can also edit/delete the added invoices (under Actions). Click the BACK button to go back to the GSTR-4 page.
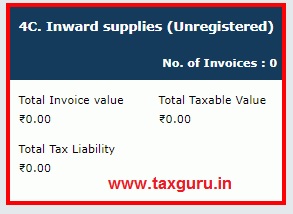
9.9. You will be directed to the GSTR-4 landing page and the 4C. Inward supplies (Unregistered) tile in GSTR-4 will reflect the number of invoices added along with Total Invoice value, Total taxable value and total tax liability.
Similarly, you can add more details of inward supplies received from an unregistered supplier (with or without reverse charge).
4D. Import of Service
9.1. To add details of import of service, click the 4D. Import of Service tile.
9.2. The 4D. Import of Service page is displayed. Click the ADD DETAILS button.
9.3. The Import of Services – Add page is displayed.
9.4. In the Invoice No., Invoice Date and Total Invoice Value fields, enter the Invoice number, date of the invoice and value of the total invoice.
9.5. Select the POS from the drop-down list.
9.6. In the Taxable Value field against the rates, enter the taxable value of the goods or services.
9.7. In the Cess field, enter the cess amount.
9.8. Click the SAVE button to save the invoice details.
9.9. You will be directed to the previous page and a message is displayed that Request accepted successfully.
Here, you can also edit/delete the added invoices (under Actions). Click the BACK button to go back to the GSTR-4 page.
9.10. You will be directed to the GSTR-4 landing page and the 4D. Import of Service tile in GSTR-4 will reflect the number of invoices added along with Total Invoice value, Total taxable value and total tax liability.
Similarly, you can add more details of import of services.
5A, 5B. Amendment of Inward supplies (Registered)
9.1. To add amendment details of inward supplies received from a registered supplier (with or without reverse charge), click the 5A, 5B. Amendment of Inward supplies (Registered) tile.
9.2. The Amendment of B2B (Registered) – Summary page is displayed.
9.3. Select the Financial Year from the drop-down list.
9.4. In the Invoice No. field, enter the invoice number which you want to amend from earlier tax period.
9.5. Click the AMEND INVOICE button.
9.6. The Amendment of B2B (Registered) – Summary page is displayed.
9.7. In the Revised Invoice No. field, enter the revised invoice number for the previous invoice.
9.8. Select the Revised Date using the calendar. Make amendments to the details like Revised Invoice No., Revised Invoice Date, Total Invoice Value, Taxable Value etc. as required.
Note: Select the checkbox for Supply attract Reverse Charge, if supply attracts any reverse charge.
9.9. Click the SAVE button.
9.10. You will be directed to the previous page. Here, you can also edit/delete the added invoices (under Actions).
9.11. Click the BACK button to go back to the GSTR-4 page.
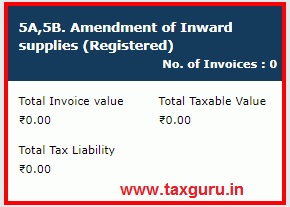
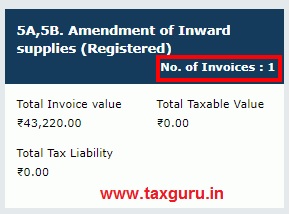
9.12. You will be directed to the GSTR-4 landing page and the 5A, 5B. Amendment of Inward supplies (Registered) tile in GSTR-4 will reflect the number of such invoices amended along with Total Invoice value, Total Taxable Value and Total Tax Liability.
Similarly, you can add amendment details of inward supplies received from a registered supplier (with or without reverse charge).
5A. Amendment of Inward supplies (Unregistered)
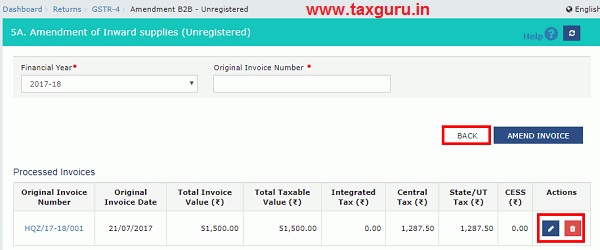
9.1. To add amendment details of inward supplies received from an unregistered supplier, click the 5A. Amendment of Inward supplies (Unregistered) tile.
9.2. The Amendment of Inward supplies (Unregistered) page is displayed.
9.3. Select the Financial Year from the drop-down list.
9.4. In the Original Invoice Number field, enter the invoice number which you want to amend from earlier tax period.
9.5. Click the AMEND INVOICE button.
9.6. The Amendment of Inward supplies (Unregistered) page is displayed.
9.7. In the Revised Invoice No. field, enter the revised invoice number for the previous invoice.
9.8. Select the Revised Date using the calendar. Make amendments to the details like Revised Invoice No., Revised Invoice Date, Total Invoice Value, Taxable Value etc. as required.
9.9. Click the SAVE button.
9.10. You will be directed to the previous page. Here, you can also edit/delete the amended invoices (under Actions).
9.11. Click the BACK button.
9.12. You will be directed to the GSTR-4 landing page and the 5A. Amendment of Inward supplies (Unregistered) tile in GSTR-4 will reflect the number of such invoices amended along with Total Invoice Value, Total Taxable value and Total Tax Liability.
5A. Amendment of Import of services
9.1. To add amendment details of import of services of supplier, click the 5A. Amendment of Import of services tile.
9.2. The Amendment of Import of Services – Summary page is displayed.
9.3. Select the Financial Year from the drop-down list.
9.4. In the Original Invoice Number field, enter the invoice number which you want to amend from earlier tax period.
9.5. Click the AMEND INVOICE button.
9.6. The Amendment of B2B (Registered) – Summary page is displayed.
9.7. In the Revised Invoice No. field, enter the revised invoice number for the previous invoice.
9.8. Select the Revised Date using the calendar. Make amendments to the details like Revised Invoice No., Revised Invoice Date, Total Invoice Value, Taxable Value etc. as required.
Note: Select the checkbox for Supply attract Reverse Charge, if supply attracts any reverse charge.
9.9. Click the SAVE button.
9.10. You will be directed to the previous page. Here, you can also edit/delete the added invoices (under Actions).
9.11. Click the BACK button to go back to the GSTR-4 page.
9.12. You will be directed to the GSTR-4 landing page and the 5A, 5B. Amendment of Inward supplies (Registered) tile in GSTR-4 will reflect the number of such invoices amended along with Total Invoice value, Total Taxable Value and Total Tax Liability.
5B. Debit/Credit Notes (Registered)
9.1 To add details of credit or debit notes issued to the registered recipients, click the 5B. Debit/Credit Notes (Registered) tile.
9.2. The Credit/Debit Notes (Registered)- Summary page is displayed. Click the ADD DETAILS button.
9.3. The Credit/Debit Notes (Registered) – Add Note page is displayed.
9.4. In the Supplier GSTIN field, enter the GSTIN of the supplier. Once the GSTIN of the supplier is entered, Supplier Name field is auto-populated based on the GSTIN of the supplier.
9.5. In the Debit/Credit Note No., Debit/Credit Note Date, Note Value and Note Type fields, enter the number, date, value and type of the Debit/Credit Note.
9.6. In the Original Invoice Number and Original Invoice Date, enter the original invoice number and date.
9.7. Select the Supply Type from the drop-down list.
9.8 (a) In case of Intra-State transaction:
In case, the supply type is Intra-State, fields for Central Tax and State/UT Tax will appear.
a) In the Taxable Value field against the rates, enter the taxable value of the goods or services.
b) In the Cess field, enter the cess amount.
c) Click the SAVE button to save the invoice details.
Note: The Amount of Tax fields are auto-populated based on the values entered in Taxable Value and tax rate fields respectively. The CESS field is not auto populated and has to be entered by the taxpayer.
9.8 (b) In case of Inter-State transaction:
In case, the supply type is Inter-State, field for Integrated Tax will appear.
a) In the Taxable Value field against the rates, enter the taxable value of the goods or services.
b) In the Cess field, enter the cess amount.
c) Click the SAVE button to save the invoice details.
Note: The Amount of Tax fields are auto-populated based on the values entered in Taxable Value and tax rate fields respectively. The CESS field is not auto populated and has to be entered by the taxpayer.
9.9. You will be directed to the previous page and a message is displayed that Request accepted successfully. Here, you can also edit/delete the added invoices (under Actions).
9.10. Click the BACK button to go back to the GSTR-4 page.
9.11. You will be directed to the GSTR-4 landing page and the 5B. Debit/Credit Notes (Registered) tile in GSTR-4 will reflect the number of invoices added along with Total note value, Total taxable value and total tax liability.
Note: The summary displayed for amendments table can have negative values, in case of downward amendment, as the values displayed are net of (Amended values – Original value).
5B. Debit/Credit Notes (Unregistered)
9.1. To add details of credit or debit notes issued to the unregistered recipients, click the 5B. Debit/Credit Notes (Unregistered) tile.
9.2. The Credit/Debit Notes (Unregistered)- Summary page is displayed. Click the ADD DETAILS button.
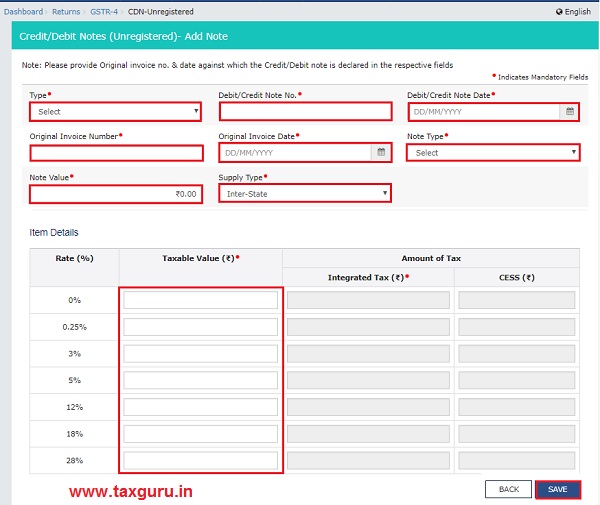
9.3. The Credit/Debit Notes (Unregistered) – Add Note page is displayed.
9.4. Select the Type from the drop-down list.
9.5. In the Debit/Credit Note No., Debit/Credit Note Date, Note Value and Note Type fields, enter the number, date, value and type of the Debit/Credit Note.
9.6. In the Original Invoice Number and Original Invoice Date, enter the original invoice number and date.
9.7. Select the Supply Type from the drop-down list.
9.8 (a) In case of Intra-State transaction:
In case, the supply type is Intra-State, fields for Central Tax and State/UT Tax will appear.
a) In the Taxable Value field against the rates, enter the taxable value of the goods or services.
b) In the Cess field, enter the cess amount.
c) Click the SAVE button to save the invoice details.
Note: The Amount of Tax fields are auto-populated based on the values entered in Taxable Value and tax rate fields respectively. The CESS field is not auto populated and has to be entered by the taxpayer.
9.8 (b) In case of Inter-State transaction:
In case, the supply type is Inter-State, field for Integrated Tax will appear.
a) In the Taxable Value field against the rates, enter the taxable value of the goods or services.
b) In the Cess field, enter the cess amount.
c) Click the SAVE button to save the invoice details.
Note: The Amount of Tax fields are auto-populated based on the values entered in Taxable Value and tax rate fields respectively. The CESS field is not auto populated and has to be entered by the taxpayer.
9.9. You will be directed to the previous page and a message is displayed that Request accepted successfully. Here, you can also edit/delete the added invoices (under Actions).
9.10. Click the BACK button to go back to the GSTR-4 page.
9.11. You will be directed to the GSTR-4 landing page and the 5B. Debit/Credit Notes (Unregistered) tile in GSTR-4 will reflect the number of invoices added along with Total note value, Total taxable value and total tax liability.
6. Tax on Outward Supplies
9.1. To add details of tax on outward supplies made (Net of advance and goods returned), click the 6. Tax on Outward Supplies tile.
9.2. The Tax on Outward Supplies made (net of advance and goods returned) page is displayed.
9.3. Enter the turnover details against rate of tax for composition tax amount.
9.4. Click the SAVE button.
9.5. A message is displayed that Request accepted successfully. Click the BACK button to go back to the GSTR-4 page.
9.6. You will be directed to the GSTR-4 landing page and the 6. Tax on Outward Supplies tile in GSTR-4 will reflect the number of invoices added along with Total value, Total taxable value and total tax liability.
5C. Amendment Debit/Credit Notes (Registered)
9.1. To add amendment details of credit or debit notes issued to the registered recipients, click the 5C. Amendment Debit/Credit Notes (Registered) tile.
9.2. The Amended Credit/ Debit Notes – Summary page is displayed.
9.3. Select the Financial Year from the drop-down list.
9.4. In the Supplier GSTIN field, enter the GSTIN of the supplier.
9.5. In the Original Note No. field, enter the original note number which you want to amend from earlier tax period.
9.6. Click the AMEND NOTE button.
9.7. The Amended Credit/Debit Notes – Add Note page is displayed.
9.8. In the Revised Credit/Debit Note No. field, enter the revised credit or debit note number.
9.9. Select the Revised Credit/Debit Note Date using the calendar. Make amendments to the details as required.
9.10. Click the SAVE button.
9.11. You will be directed to the previous page. Here, you can also edit/delete the amended invoices (under Actions).
9.12. Click the BACK button.
9.13. You will be directed to the GSTR-4 landing page and the 5C. Amendment Debit/Credit Notes (Registered) tile in GSTR-4 will reflect the number of such invoices amended along with Total Invoice Value, Total Taxable value and Total Tax Liability.
5C. Amendment Debit/Credit Notes (Unregistered)
9.1. To add amendment details of credit or debit notes issued to the unregistered recipients, click the 5C. Amendment Debit/Credit Notes (Unregistered) tile.
9.2. The Amended Credit/ Debit Notes (Unregistered) – Summary page is displayed.
9.3. Select the Financial Year from the drop-down list.
9.4. In the Original Note No. field, enter the original note number which you want to amend from earlier tax period.
9.5. Click the AMEND NOTE button.
9.6. The Amended Credit/Debit Notes – Details page is displayed.
9.7. In the Revised Credit/Debit Note No. field, enter the revised credit or debit note number.
9.8. Select the Revised Credit/Debit Note Date using the calendar. Make amendments to the details as required.
9.9. Click the SAVE button.
9.10. You will be directed to the previous page. Here, you can also edit/delete the amended invoices (under Actions).
9.11. Click the BACK button.
9.12. You will be directed to the GSTR-4 landing page and the 5C. Amendment Debit/Credit Notes (Unregistered) tile in GSTR-4 will reflect the number of such invoices amended along with Total Invoice Value, Total Taxable value and Total Tax Liability.
7. Amendment of Tax on Outward Supplies
9.1. To add amendment details of tax on outward supplies made (Net of advance and goods returned), click the 7. Amendment of Tax on Outward Supplies tile.
9.2. The Amendment of tax on Outward Supplies page is displayed.
9.3. Select the Financial Year and Return Filing Period from the drop-down list.
9.4. Click the AMEND INVOICE button.
9.5. The Amendment of Tax on Outward Supplies page is displayed.
9.6. Enter the turnover details against rate of tax for composition tax amount.
9.7. Click the SAVE button.
9.8. You will be directed to the previous page. Here, you can also edit/delete the added invoices (under Actions). Click the BACK button to go back to the GSTR-4 page.
9.9. You will be directed to the GSTR-4 landing page and the 7. Amendment of Tax on Outward Supplies tile in GSTR-4 will reflect the number of invoices added along with Total value, Total taxable value and total tax liability.
8A. Advance amount paid
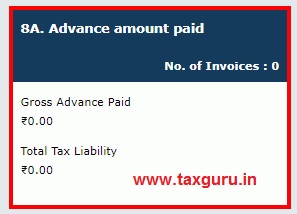
9.1. To add details of advance amount paid for reverse charge supplies in the tax, click the 8A. Advance amount paid tile.
9.2. The Tax Liability (Advance Received)-Summary page is displayed. Click the ADD STATE WISE DETAILS button.
9.3. The Tax Liability (Advance Received) – Add Details page is displayed.
9.4. Select the POS from the drop-down list. Depending on selected POS, the supply type gets auto-populated.
9.5. (a) In case of Intra-State transaction:
Notice, fields for Central Tax and State/UT Tax will appear.
a) In the Gross Advance paid field against the rates, enter the gross advance paid.
b) In the Cess field, enter the cess amount.
c) Click the SAVE button to save the details.
Note: The Amount of Tax fields are auto-populated based on the values entered in Taxable Value fields respectively. The CESS field is not auto populated and has to be entered by the taxpayer.
9.5. (b) In case of Inter-State transaction:
Notice, fields for Integrated Tax will appear.
a) In the Gross Advance paid field against the rates, enter the gross advance paid.
b) In the Cess field, enter the cess amount.
c) Click the SAVE button to save the details.
Note: The Amount of Tax fields are auto-populated based on the values entered in Taxable Value and tax rate fields respectively. The CESS field is not auto populated and has to be entered by the taxpayer.
9.6. You will be directed to the previous page and a message is displayed that Request accepted successfully. Here, you can also edit/delete the added invoices (under Actions). Click the BACK button to go back to the GSTR-4 page.
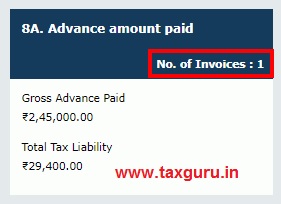
9.7. You will be directed to the GSTR-4 landing page and the 8A. Advance amount paid tile in GSTR-4 will reflect the number of gross advance paid and total tax liability.
8B. Adjustment of Advances paid
9.1. To add details of advance amount on which tax was paid in earlier period, but invoice has been received in the current period, click the 8B. Adjustment of Advances paid tile.
9.2. The Adjustment of Advances-Summary page is displayed. Click the ADD STATE WISE DETAILS button.
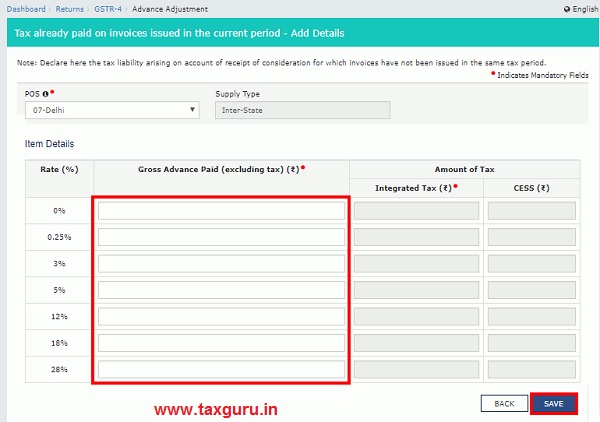
9.3. The Tax already paid on invoices issued in the current period – Add Details page is displayed.
9.4. Select the POS from the drop-down list. Depending on selected POS, the supply type gets auto-populated.
9.5. (a) In case of Intra-State transaction:
Notice, fields for Central Tax and State/UT Tax will appear.
a) In the Gross Advance paid field against the rates, enter the gross advance paid.
b) In the Cess field, enter the cess amount.
c) Click the SAVE button to save the details.
Note: The Amount of Tax fields are auto-populated based on the values entered in Taxable Value fields respectively. The CESS field is not auto populated and has to be entered by the taxpayer.
9.5. (b) In case of Inter-State transaction:
Notice, fields for Integrated Tax will appear.
a) In the Gross Advance paid field against the rates, enter the gross advance paid.
b) In the Cess field, enter the cess amount.
c) Click the SAVE button to save the details.
Note: The Amount of Tax fields are auto-populated based on the values entered in Taxable Value and tax rate fields respectively. The CESS field is not auto populated and has to be entered by the taxpayer.
9.6. You will be directed to the previous page and a message is displayed that Request accepted successfully. Here, you can also edit/delete the added invoices (under Actions). Click the BACK button to go back to the GSTR-4 page.
9.7. You will be directed to the GSTR-4 landing page and the 8B. Adjustment of Advances paid tile in GSTR-4 will reflect the number of gross amount adjusted and total tax liability.
8A-II. Amendment of Tax Liability
9.1. To add details of amendment of advance amount paid for reverse charge supplies in the previous tax period, click the 8A-II. Amendment of Tax Liability tile.
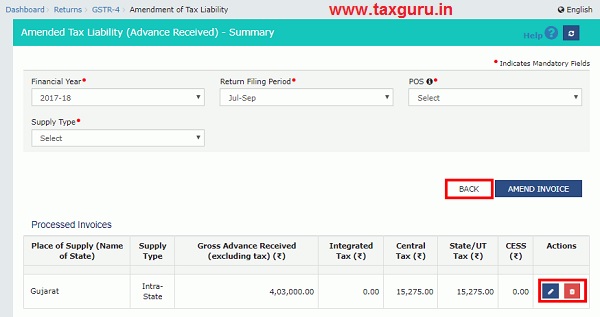
9.2. The Amendment Tax Liability (Advance Received) – Summary page is displayed.
9.3. Select the Financial Year and Return Filing Period from the drop-down list.
9.4. Select the POS and Supply Type from the drop-down list.
9.5. Click the AMEND INVOICE button.
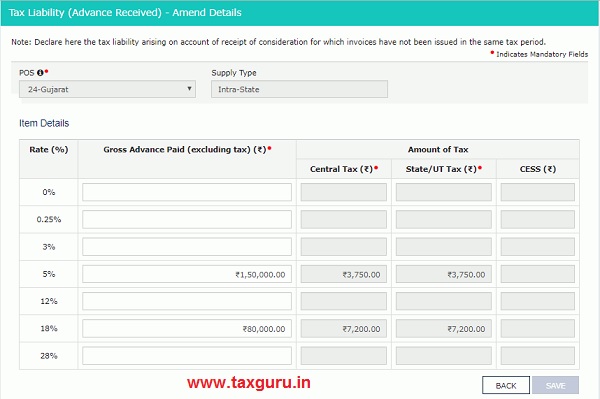
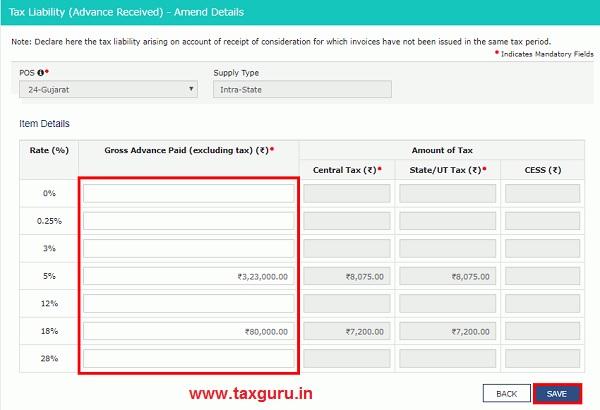
9.6. The Tax Liability (Advance Received) – Amend Details page is displayed.
9.7. Amend the Gross Advance Paid details against the rate.
9.8. Click the SAVE button.
9.9. You will be directed to the previous page. Here, you can also edit/delete the added invoices (under Actions).
9.10. Click the BACK button to go back to the GSTR-4 page.
9.11. You will be directed to the GSTR-4 landing page and the 8A-II. Amendment of Tax Liability tile in GSTR-4 will reflect the number of invoices added along with Gross amount adjusted and Total tax liability.
8B-II. Amendment of Adjustment of advances
9.1. To add amendment details of advance amount on which tax was paid in earlier period, but invoice has been received in the current period, click the 8B-II. Amendment of Adjustment of advances tile.
9.2. The Amendment of Adjustment of advances – Summary page is displayed.
9.3. Select the Financial Year and Return Filing Period from the drop-down list.
9.4. Select the POS and Supply Type from the drop-down list.
9.5. Click the AMEND INVOICE button.
9.6. The Amendment of Adjustment of advances – Edit Details page is displayed.
9.7. Enter the Gross Advance Paid details against the rate.
9.8. Click the SAVE button.
9.9. You will be directed to the previous page. Here, you can also edit/delete the added invoices (under Actions).
9.10. Click the BACK button to go back to the GSTR-4 page.
9.11. You will be directed to the GSTR-4 landing page and the 8B-II. Amendment of Adjustment of Advances tile in GSTR-4 will reflect the number of invoices added along with Gross Advance adjusted and Total tax liability.
C. Preview GSTR-4
10. Once you have entered details, click the PREVIEW button. This button will download the draft Summary page of your Form GSTR-4 for your review. It is recommended that you download this Summary page and review the summary of entries made in different sections before filing Form GSTR-4.
11. The PDF file is generated with watermark of draft as the details are yet to be submitted.
D. Proceed to File and Payment of Tax
12. Click the PROCEED TO FILE button.
13. A message is displayed on top page of the screen that Proceed to file request has been received. Please check the status in sometime. Click the Refresh button.
14. Once the status of Form GSTR-4 is “Ready to File”, 10 & 11 – Tax, Interest, Late fee payable and paid tile gets enabled. Click the 10 & 11 – Tax, Interest, Late fee payable and paid tile.
15. The Payment of Tax page is displayed. Go through the instructions as shown at the top of the page.
16.1. The cash ledger balance as available on date is shown in below table.
16.2 (a). Scenario 1: If available balance in Electronic Cash Ledger is less than the amount required to offset the liabilities
i. If available balance in Electronic Cash Ledger is less than the amount required to offset the liabilities, then a part payment of liability can be made from available balance of the Electronic Cash Ledger. Additional cash required to be paid by taxpayer is shown in the “Tax to be paid, Interest to be paid and Late Fee to be paid” column.
You may directly create challan for payment of remaining part of liability, by clicking on the CREATE CHALLAN button.
ii. The Create Challan page is displayed.
Note: In the Tax Payment grid, the Total Challan Amount field and Total Challan Amount (In Words) fields are auto-populated with amount of remaining part of liability (for which payment is to be made). You cannot edit the amount shown in challan.
iii. Select the Payment Modes as E-Payment/ Over the Counter/ NEFT/RTGS.
iv. Click the GENERATE CHALLAN button.
v. The Challan is generated.
Note:
In case of Net Banking: You will be directed to the Net Banking page of the selected Bank. The payment amount is shown at the Bank’s website. If you want to change the amount, abort the transaction and create a new challan.
In case of successful payment, you will be re-directed to the GST Portal where the transaction status will be displayed.
In case of Over the Counter:
Take a print out of the Challan and visit the selected Bank. Pay using Cash/ Cheque/ Demand Draft within the Challan’s validity period. Status of the payment will be updated on the GST Portal after confirmation from the Bank.
In case of NEFT/ RTGS:
Take a print out of the Challan and visit the selected Bank. Mandate form will be generated simultaneously. Pay using Cheque through your account with the selected Bank/ Branch. You can also pay using the account debit facility. The transaction will be processed by the Bank and RBI shall confirm the same within <2 hours>. Status of the payment will be updated on the GST Portal after confirmation from the Bank.
16.2 (b). Scenario 2: If available balance in Electronic Cash Ledger is more than/equal to the amount required to offset the liabilities
i. If available balance in Electronic Cash Ledger is more than/equal to the amount required to offset the liabilities, no additional cash payment is required for paying liability.
17. Click the PREVIEW GSTR-4 button to view the summary page of Form GSTR-4 for your review. It is recommended that you download this Summary page and review the summary of entries made in different sections carefully before proceeding further.
18. The summary page of Form GSTR-4 is displayed.
E. File Form GSTR-4 with DSC/ EVC
19. Select the Declaration checkbox.
20. Select the Authorized Signatory from the drop-down list.
21. Click the FILE GSTR-4 button.
22. The Submit Application page is displayed. Click the FILE WITH DSC or FILE WITH EVC button.
23.1. FILE WITH DSC:
a. Select the certificate and click the SIGN button.
23.2. FILE WITH EVC:
a. Enter the OTP sent on email and mobile number of the Authorized Signatory registered at the GST Portal and click the VALIDATE OTP button.
24. The success message is displayed and ARN is displayed. Status of the Form GSTR-4 return changes to “Filed”. Click the BACK button.
Note: After Form GSTR-4 is filed:
- ARN is generated on successful filing of the Form GSTR-4 Return.
- An SMS and an email are sent to the taxpayer on his registered mobile and email id.
F. View Debit entries in Electronic Cash Ledger for tax payment
25. Click the Debit entries in cash ledger for tax/interest payment tile.
26. The entries in Electronic Cash Ledger for tax payment is displayed. Click the BACK button.
26. Click the PREVIEW button to view the summary in PDF format.
27. The summary is displayed in PDF format.


