CBIC Bank Account Management Module
Authorized Dealer Code Bank Account Registration Advisory
Advisory for Authorized Dealer Code (ADC) Bank Account Registration – Applicable to a new Bank Account Registration and Modification of an existing Bank Account registered against an AD Code at a Port Location
A. Background
Every IEC holder registers himself in multiple Port locations with their bank account number as provided by an Authorized Dealer Bank Branch to commence Import/Export of Cargo. This facility has been provided for the registered users of ICEGATE
1. Regular registered users holding a valid digital signature
2. Simplified registered users
to register a new account or modify a registered Bank account provided Authorized Dealer Bank Branch, earlier done through Customs Locations.
Bank Account registration under Authorised Dealer Code is mandatory for Drawback refund claims by any IEC Holder.
IMPORTANT: Only one AD Code Bank account is allowed to be registered for an IEC holder for one location.
B. General guidelines
1. Locations added in User profile
Users are advised to ensure that all their Ports of operation are added in their Registered User profile at ICEGATE. The following process can be followed to add a location in the User profile
Step 1: Login at ICEGATE
Step 2: Click on View Profile
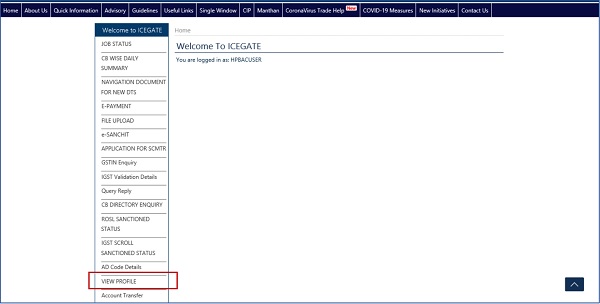
Step 3: Click on Modify option
Step 4: Click on Add location option and select the respective location and submit.
Once Location added successfully, IEC holder needs to select the Bank Management System option and accordingly perform action to Add Bank Account for Authorized Dealer Code Bank Account Registration.
2. Mandatory documents
User are advised to prepare the following documents before proceeding to add/update a Bank account.
| Document Code | Code Name | Code Description |
| 046PB1 | Passbook Photo | Photo Passbook of Running Bank Account |
| 046L01 | Bank Letter or Certificate | Bank Letter or Certificate for A/C Holder |
3. Digital Signature guidelines
Registered users may use their digital signature (Class-3 category) to sign the documentary proofs and upload them in e-SANCHIT and provide the IRN number hence received.
Simplified Regsitered Users will be asked to enter valid IRN number of the documents he has uploaded in e-SANCHIT and the ‘Uploading ICEGATE ID’ (ICEGATE ID of the Registered user whose Digital Signature has been used to sign the uploaded documents. The list of document in support of the Bank Account held by the Entity may be uploaded as mentioned under Section B.2. User may upload either one of the document and accordingly enter the 16 digit IRN number (ex. 202010XXXXXXX145)
C. Step by Step guide
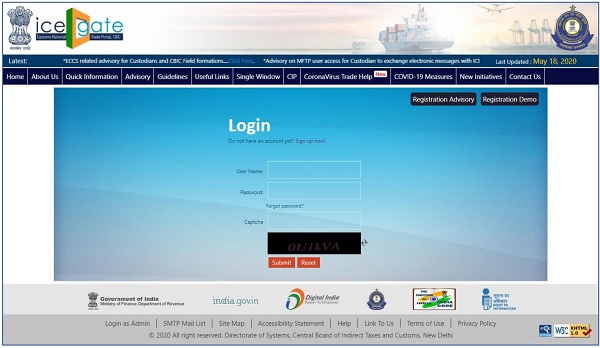
1. Step 1: Login at ICEGATE
Login into ICEGATE with ICEGATE Login ID and password
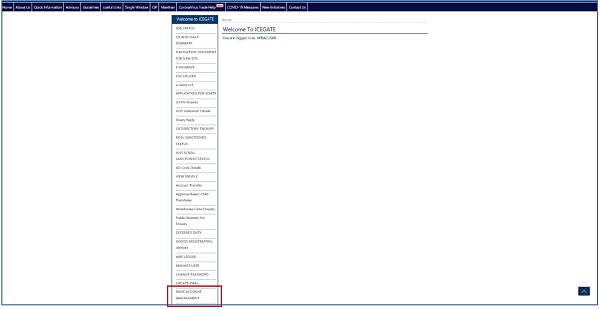
2. Step 2: Bank Account Management Module
On left panel click on Bank Account Management, Export Promotion Bank Account Management page appears
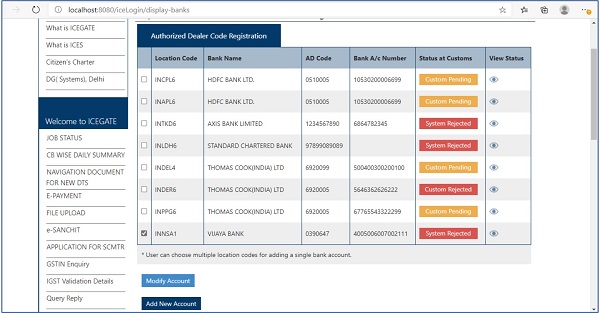
3. Step 3: AD Code Bank Account Registration Dashboard
On Export Promotion Bank Account Management page, the user gets two options in the dropdown
a. Bank A/c for Export Promotion Incentive and
b. Authorized Dealer Code Registration
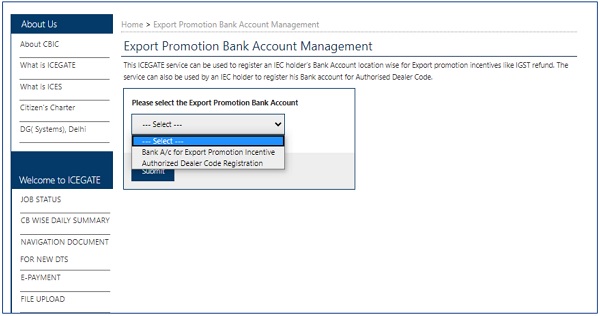
Select the Authorized Dealer Code Registration and click on Submit to view the dashboard for AD Code Bank Account Registration.
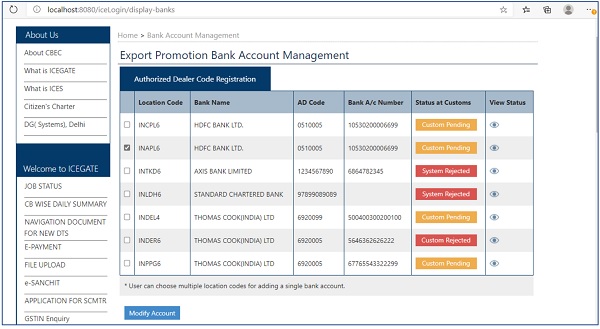
Kindly ensure that guidelines under Section B.1. in case Location code(s) is (are) not visible or dashboard appears empty with the error “No location added for the user”
4. Step 4: Add New Account
User will be able to Add Account option at the bottom of the Dashboard next to Modify Account only if an account is not registered for any of his registered locations previously. If user has added bank account for all his registered locations, he won’t be able request for bank account addition for any location.
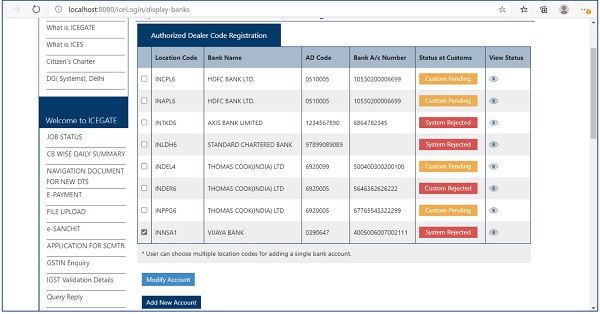
Click the Add New Account button to open the form as shown below:
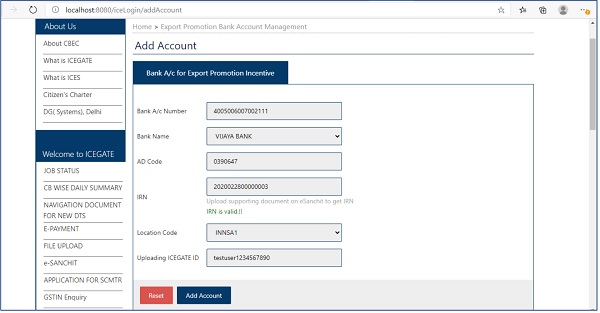
1. User is required to fill in this form
2. The location dropdown contains only those locations on which user is registered and he has not added any bank account for the same.
3. Bank list dropdown has auto complete feature in which user may enter some key word from bank name and bank name gets searched.
4. User is asked to select bank name and enter valid AD code of the Bank Branch. This code can be fetched the AD Code Help Enquiry available on the left panel of the post login page shown to a registered user (https://www.icegate.gov.in/EnqMod/adCodeEntry)

The AD code is validated against bank name.
5. The User is asked to enter valid IRN number of the documents he has uploaded in e-SANCHIT and uploading ICEGATE ID. Here the Document in support of the Bank Account held by the Entity may be uploaded (refer Section 2.). In case the user does not have his own Class 3 Digital Signature, user is suggested to use the digital signature (Class-3 category) of any other person (Registered at ICEGATE), sign the document and accordingly upload to e-SANCHIT. Once the IRN number is received, the IRN Number and ICEGATE ID (from which the user has uploaded documents on e-SANCHIT) is required to be provided in the form input.
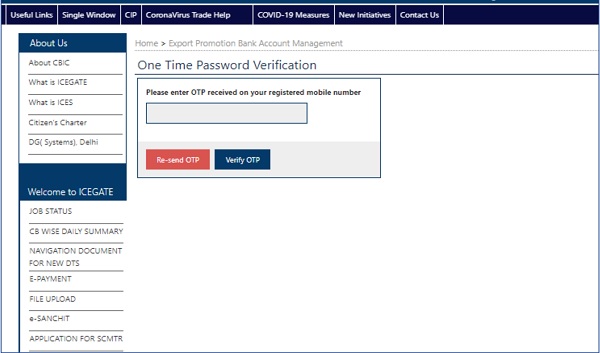
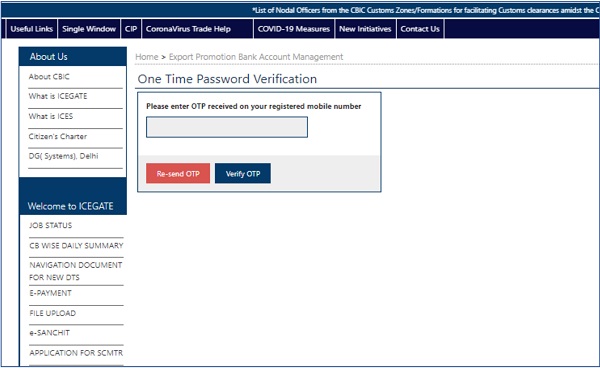
6. Once the user enters all valid inputs and clicks on Save Change, a six-digit OTP is sent to user’s email id and mobile number and user is directed to the OTP page as below:
7. Once the OTP is verified, request for bank account modification is submitted to When the bank account add request is approved by ICEGATE, the bank account details will start reflecting on AUTHORISED DEALER CODE dashboard. User can check the status of his request by clicking on the View icon next to a registration request entry
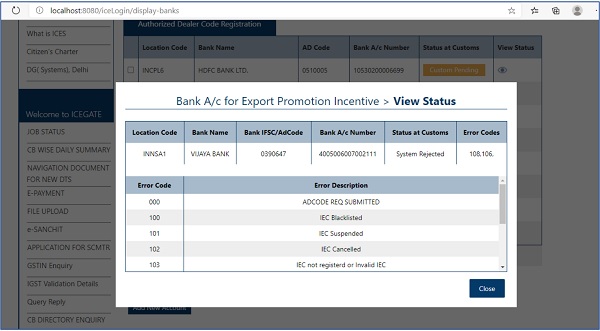
8. On Status page, the user can view request status with error code if
9. User can view description of the error
10. Status at Custom may have following status:
a. System Pending – Request is pending for verification at system
b. System Rejected – Request has an error
c. Custom Approved – Request has no error and ICEGATE has approved the The bank account will be reflected on dashboard once the request is Custom Approved.
d. Custom Rejected – Request has been rejected by ICEGATE
e. Custom Pending – Request has no any system level error and request is pending at
5. Step 5: MODIFY Account
User can select one or more location from Authorized Dealer Code dashboard and click on Modify Account to open the Modify Account page.
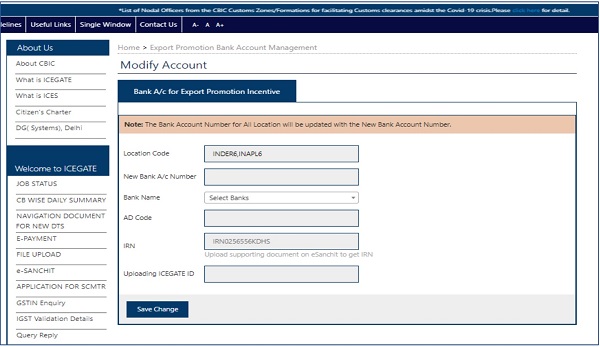
1. On the Modify page, the registered locations and Banks list gets prepopulated in the form
2. The Bank list dropdown has auto complete feature in which user may enter some key word from bank name and bank name gets searched.
3. The User is asked to select bank name and enter valid AD This code can be fetched the AD Code Help Enquiry available on the left panel of the post login page shown to a registered user (https://www.icegate.gov.in/EnqMod/adCodeEntry)
The AD code is validated against bank name.
4. The User is asked to enter valid IRN number of the documents he has uploaded in e-SANCHIT and uploading ICEGATE ID. Here the Document in support of the Bank Account held by the Entity may be uploaded (refer Section 2.). In case the user does not have his own Class 3 Digital Signature, user is suggested to use the digital signature (Class-3 category) of any other person (Registered at ICEGATE), sign the document and accordingly upload to e-SANCHIT. Once the IRN number is received, the IRN Number and ICEGATE ID (from which the user has uploaded documents on e-SANCHIT) is required to be provided in the form input.
5. Once the user enters all valid inputs and clicks on Save Change, a six-digit OTP is sent to user’s email id and mobile number and user is directed to the OTP page as below:
6. Once the OTP is verified, request for bank account modification is submitted to ICEGATE. When the bank account add request is approved by ICEGATE, the bank account details will start reflecting on Authorized Dealer Code User can check the status of his request by clicking on the View icon next to a registration request entry
–
![]()
7. On Status page, the user can view request status with error code if
8. User can view description of the error
9. Status at Custom may have following status:
a. System Pending – Request is pending for verification at system
b. System Rejected – Request has an error
c. Custom Approved – Request has no error and ICEGATE has approved the The bank account will be reflected on dashboard once the request is Custom Approved.
d. Custom Rejected – Request has been rejected by ICEGATE
e. Custom Pending – Request has no any system level error and request is pending at ICEGATE


