Office of the Additional Director General of Systems,
1st & 5th Floor, GST Bhavan,
26/1, Mahatma Gandhi Salai,
Nungambakkam, Chennai-600034
Phone:044-28331101 Fax:044-28331104
C.No IV/26/11/2017 Part File —1 Systems(S)
Date: 26.09.2019
Advisory No.29 — Online Refund Functionality
Sub: Availability of Online Refunds functionality in the CBIC-GST Application – Regarding.
Till now, the Refund application — RFD-01A filed online by the tax payer at the GSTN common portal is pushed to the CBIC back end system, in which the jurisdictional tax officer can view and download these applications. Thereafter, the proper officer manually processes the applications and refund sanction order and Payment advice are sent to PAO for payment. The rejected amount if any, which has been debited from the ledgers of the tax payer is re-credited automatically upon successful submission of RFD-01 B.
2. The development of complete online mode of refunds including payment through Single Disbursal Authority(PFMS) i.e Online filing of RFD-01 application and online processing of the application starting from issuance of acknowledgement/ deficiency memo to disbursal of payment and re-credit of rejected amount through PMT-03 has been completed and has been made available to the field formations today.
3. A detailed advisory explaining the process with screenshots is attached herewith. This advisory is prepared in order to explain the various screens and functionalities and will be a useful tool for the officers who handle refunds module in the system. It is requested that this advisory may be circulated widely to all field officers and may be used for training the officers.
4. It is further informed that the RFD-01B functionality would continue to be available to dispose of the older refund applications i.e., the ARNs of RFD-01A filed till 25.09.2019 midnight.
4. Any technical issues faced in the functionality may be reported to the I lelpdesk at cbecmitra.lielpdes@icegate.gov.in by raising tickets. Any improvements/suggestions on the functionality may also please be sent to this office.
Encl:As above.
(S. Thirunavukkarasu)
Additional Director General
Directorate of Systems, Chennai
To,
1. All the Principal Chief Commissioners/Chief Commissioners of GST Zones.
2. All the Pr.ADGs/ADG, DGGI,DGGST,DG(AUDIT),DGT(TPS).
3. The Principal Commissioner, GST Policy Wing.
4. All the Pr.Commissioners/Commissioners of Central tax.
5. All the ADGs of DG Systems, New Delhi, Bengaluru, Kolkata & Mumbai
6. All ACL Admin of Zone/Commissionerate/Division.
7. All the SSOID registered in the GST System for this functionality.
Copy submitted to:
The Member and Principal Director General, Systems and Data Management, New Delhi for kind information please.
INDEX
| Section No. | Contents |
| 1. | Prologue |
| 2. | Transaction Summary |
| 3. | List Page |
| 4. | Details Page |
| 5. | Application Details Tab |
| 6. | Application History Tab |
| 7. | Verification Report Tab |
| 8. | Acknowledgement Tab |
| 9 | Deficiency Memo |
| 10. | Provisional Refund |
| 11. | Payment Order |
| 12. | Skipping Provisional Refund Order |
| 13. | Final Sanction Order |
| 14. | Payment Order for final refund order |
| 15. | Show Cause Notice |
| 16. | Reply to Show Cause Notice |
| 17. | Archive List |
| 18. | PMT-03 |
| 19. | Upload Document |
| 20. | Delegation and Verification |
| 21. | PFMS Error Task |
| 22. | Error List |
ONLINE REFUNDS –ADVISORY
1. Prologue
At present the Refund applications for various types are filed online by the tax payer at the GSTN common portal. These applications are pushed to the CBIC back end system, in which the jurisdictional tax officer can view and download these applications. The proper officer manually processes the applications and sanctions or rejects the refund as deemed fit. The action so taken is communicated to the taxpayer through the GSTN common portal using the RFD-01 B functionality. The rejected amount if any, which has been debited from the ledgers of the tax payer is re-credited automatically upon successful submission of RFD-01 B( This is only for the types of refunds for which there is a debit of the ledger at the time of filing of the refund application ).
1.2 Now, the fully online mode of refunds i.e Online filing of RFD-01 application and online processing of the application starting from issuance of acknowledgement/ deficiency memo to disbursal of payment (RFD-05) and re-credit of rejected amount through PMT-03 has been developed and gone live w.e.f. 26.09.2019. The RFD-01B functionality would continue to be available to dispose of the older refund applications i.e. the ARNs of RFD-01A filed till 25.09.2019 midnight. This advisory is prepared in order to explain the various screens and functionalities and will be a useful tool for the field officers who handle refunds module in the system.
1.3 The following functionalities have been developed and will be implemented.
(i) Form- GST RFD-01 Online application for refund filed by the tax payer
(ii) Form- GST RFD-02- Acknowledgment
(iii) Form- GST RFD-03- Deficiency Memo
(iv) Form- GST RFD-04 – Provisional Refund Order
(v) Form- GST RFD-05- Payment Order
(vi) Form- GST RFD-06- Refund Sanction/ Rejection Order
(vii) Form- GST RFD-08- Notice for rejection of application for refund
(viii) Form- GST RFD-09-Reply to show cause notice
(ix) Form GST-PMT-03- Order for re-credit of the amount to cash or credit ledger on rejection of refund claim
2.Transaction Summary:
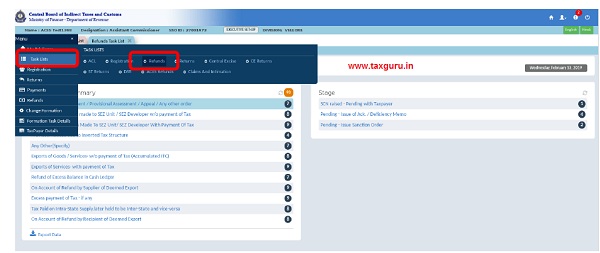
2.1 The transaction summary screen under refund module is the home screen where in a summary of all the refund ARNs under various types and different stages is listed in the proper officer’s dashboard. This screen will give a picture about the number of applications and stages at which they are pending for action by the Jurisdictional officer. The proper officer has to navigate to this screen using the below mentioned path as shown in Fig (i).
2.2 The proper officer can choose any of the refund type by clicking on the type on the left side of the screen. Once the proper officer clicks on a particular type, the number of applications pending at different stages is displayed on the right side of the screen – Fig(ii). The following stages are displayed.
i. Pending for Issuance of Acknowledgement/ Deficiency Memo
ii. Pending issuance of provisional Order
iii. Provisional Order Issued- Pending issuance of Payment Order
iv. Pending issuance of Sanction Order
v. Sanction Order issued- Pending issuance of Payment Order
vi. SCN Issued- Response awaited
vii. SCN Issued- Response received
viii. Error List
ix. PFMS Error List
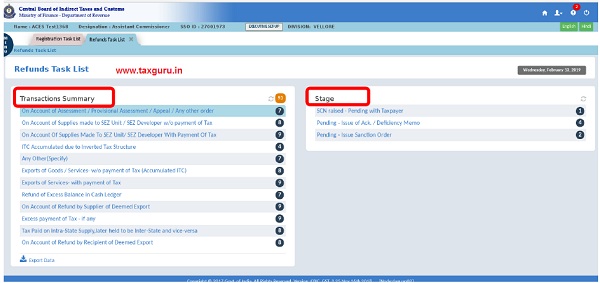
Fig (ii)
2.3 When the ARN is first received, it would be listed under “Pending –for Ack. / Deficiency memo” stage (Fig.(iii)). If the proper officer clicks on the stage, the list page will open and all the ARNs that are pending for issuance of acknowledgement or deficiency memo will be listed as shown in Fig(iv).
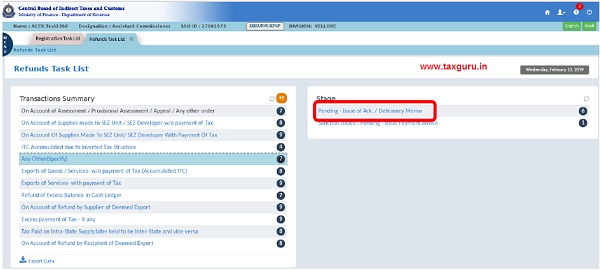
Fig (iii)
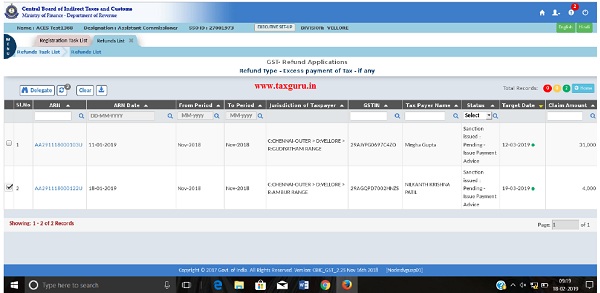
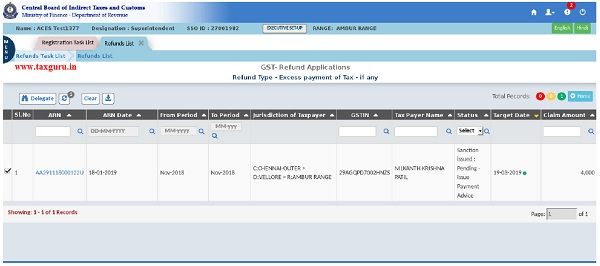
3. List page:
3.1 In this screen the proper officer has the facility to sort and search based on the ARN number, ARN date, Tax period, GSTIN, Name of the Tax payer, Target Date, the sub-stage (Status column) in which the ARN is pending and the claimed amount.

Fig (iv)
3.2 The proper officer, if required can delegate the ARN for the purpose of verification, to any subordinate officer, from this screen by selecting the ARN using the check box shown in Fig (v). The proper officer can delegate multiple ARNs, maximum of up to 10 at a time and click on the “Delegate” button on the top. Once the button is clicked, the system will show the list of officers in the formation to whom the ARN(s) can be delegated. The proper officer can choose any of the SSOID from the list, enter the remarks and submit. Upon completion of this process, the ARNs will be moved to the officer to whom it has been delegated and appear in the dashboard of the said officer. The verification process by the officer to whom the ARN was delegated is enumerated in para No 19.
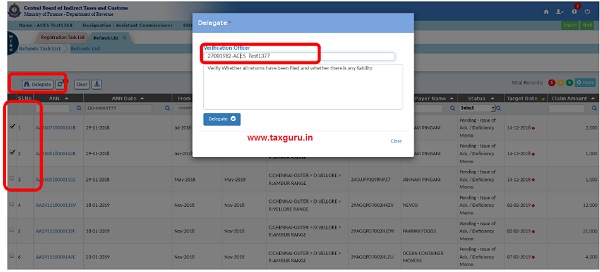
Fig (v)
4. Details page:
4.1 The officer can view the details of the ARN by clicking on the hyperlink of ARN. The detailed page will open and will contain the details of the GSTIN/Temporary ID , ARN, Legal Name, Trade Name, Address and Tax period will be auto-populated on the header and the other details of the application will be available under relevant tabs and sub-tabs. When the ARN is at “Pending for Acknowledgement/ deficiency memo” stage, two tabs viz., “Application Details” and “Application History” will be displayed in the details page.
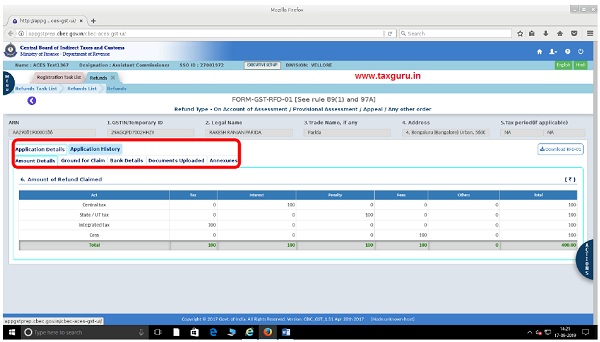
Fig (vi)
5. Application Details Tab:
5.1 Below the application details tab, the other relevant details will be displayed on separate tabs viz., “Amount Details”, “Grounds of Claim”, “Bank Details”, “Documents Uploaded” and “Annexures”. — Fig(vii).
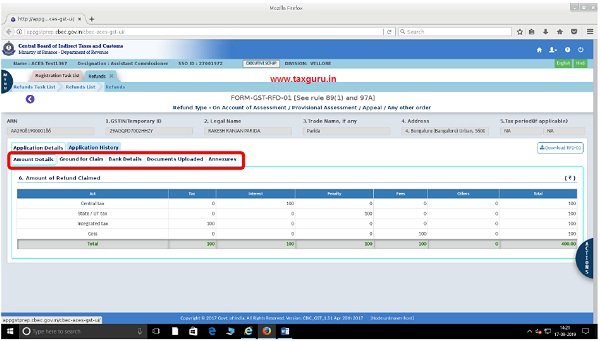
Fig (vii)
6. Application History Tab:
6.1 This tab will contain the history of the application like the movement of the ARN from tax payer to the CBIC GST Back end system, movement from one SSOID to another for verification, details regarding each action like issuance of provisional order, Payment Order, SCN, Final order etc. It will also show the details of the officer who has performed the task, the time stamp at which the action was completed and remarks if any, entered by the officer while performing the action. Refer Fig(viii), Fig(ix) and Fig(x).
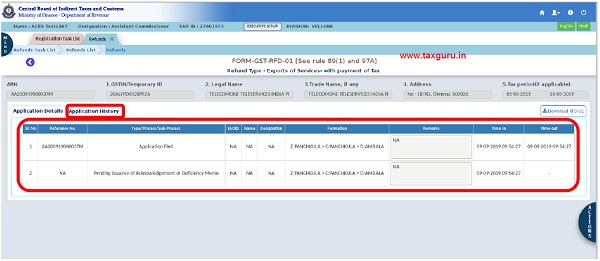
Fig (viii)
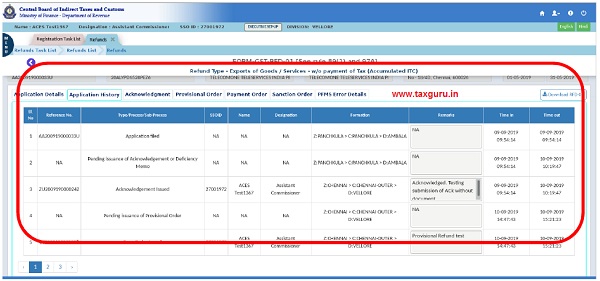
Fig (ix)
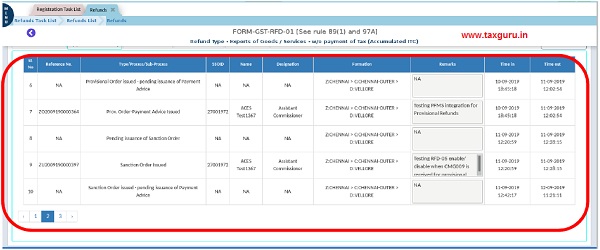
Fig (x)
7. Verification Report Tab:
7.1 If the verification report has been updated by any of the officers i.e AC/DC or Superintendents or Inspectors working in the formation to whom the ARN has been delegated, a third tab “Verification Report” will appear wherein all the details of the verification and remarks entered by the officer will be displayed. Refer Fig (xi).
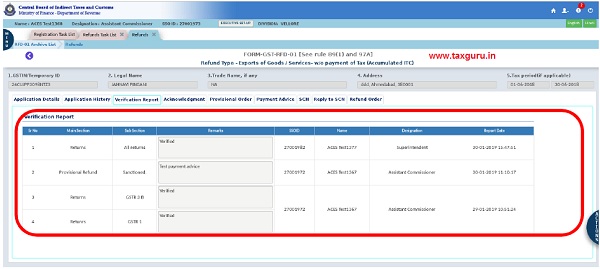
Fig (xi)
8. Acknowledgement Tab:
8.1 This tab will appear only after the officer has issued an acknowledgment in respect of an ARN. The details as to how to issue an acknowledgement in the system is shown in Fig (xii), Fig(xiii) and Fig (xiv).
8.2 The officer after navigating to the details page of a particular ARN can chose any of the three action viz. “Verification”, “Acknowledgment” or “Deficiency Memo”, displayed under the “Action” button. If the AC/DC wants to update verification report he/she may do so by clicking on the “Verification” button. If AC/DC thinks that the application is complete in all respects, he/she can issue an acknowledgement by clicking on the “Acknowledgment” button and entering the remarks in the text area. The maximum allowed character limit in the text area is 250.

Fig (xii)
8.3 If the AC/DC, who is the proper officer, chooses to issue acknowledgement or deficiency memo pending completion of verification process by the delegated officer he may do so by clicking on the ARN and directly issue the acknowledgement with or without updating the verification report. It is to be noted that the verification report is not forwarded to GSTN or tax payer and is saved in the data base for internal purpose only.
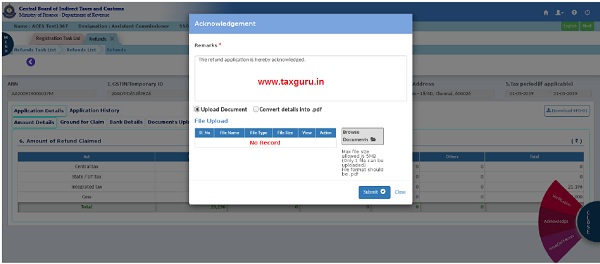
Fig (xiii)
8.4 The facility for uploading a document is optional at present and is available for all the forms except RFD-05. The details as to how to upload a document is explained in Section 19 and the procedure is common for all the forms for which the facility is made available.
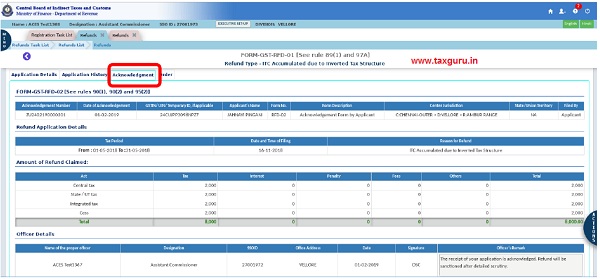
Fig (xiv)
8.5 It is to be noted that once a refund application pertaining to the refund type “Excess balance in Electronic Cash Ledger” is submitted at the common portal, an Acknowledgement is generated at the common portal itself. The officer is not required to issue an acknowledgement or deficiency memo for this type of refund. The ARN will directly be appearing in the “Pending for Sanction Order” stage. The officer can proceed to process the refund from this stage.
9. Deficiency Memo:
9.1 If the AC/DC feels that the application is incomplete for any reason, he/she may issue a deficiency memo by clicking on the deficiency memo button. The deficiency memo pop-up will open as shown in the Fig (xv).
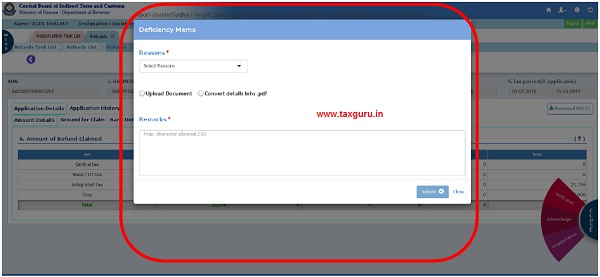
Fig (xv)
9.2 The AC/DC has to select the reasons for issuance of deficiency memo from the drop down. The proper officer can select one or more reasons from the drop down. In case the AC/DC wants to choose any other reason, he/she may do so by selecting “Others”. Upon choosing others, a text box will open below the drop down. Fig(xvi). The AC/DC can enter the reasons in the text box which has a character limit of 150. If the AC/DC feels that more details need to be provided to the tax payer, he/she may do so by preparing a deficiency memo manually and sign the same, scan and upload it in the system using the document upload button provided in the pop up. In addition to the above if the AC/DC wants to record some detail in the system for future reference, he may do so by entering the same in the remarks text area below the document upload tab Fig(xvii).). This text area has a character limitation of 250 characters, and it is to be noted that the remarks entered here are transmitted to GSTN but the same is not displayed by GSTN to the tax payer. Next, AC/DC clicks on “Submit” button and a confirmation screen is displayed with a message “Document is not uploaded. Are you sure you want to issue deficiency memo?” see Fig(xviii). Clicking on the option “Yes”, the Success message pops up. Fig(xix).
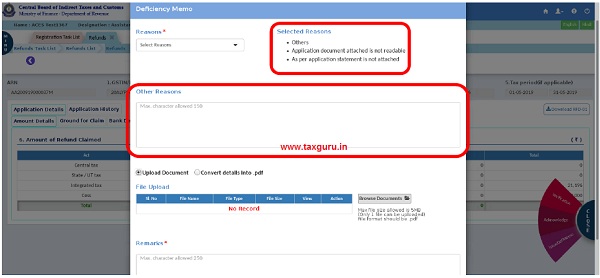
Fig (xvi)
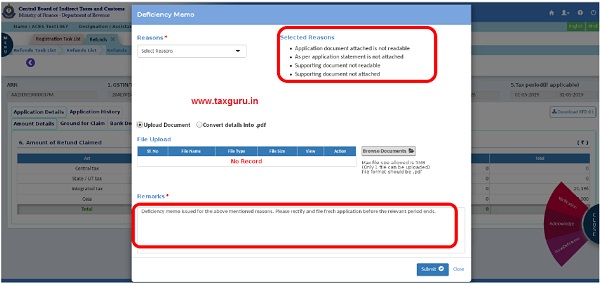
Fig (xvii)
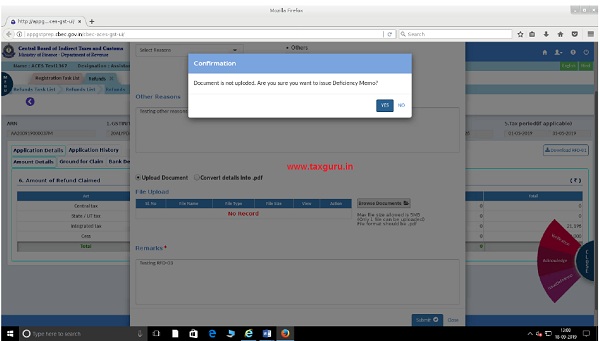
Fig (xviii)

Fig (xix)
9.3 Once a deficiency memo is issued in respect of an ARN, No further action is there in respect of that ARN and is pushed to the archive list – Fig(xx). The officer can view the ARN in the archive list, and upon clicking on the ARN, the details page will open, where he will be able to see the deficiency memo tab. All details of deficiency along with document uploaded if any and optional remarks if any will be available in this tab.
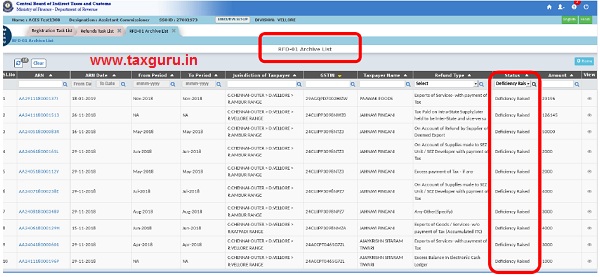
Fig (xx)
9.4 It is to be noted if the ARN pertains to any of the types for which a debit happens in the electronic ledger of the taxpayer, issuance of a deficiency memo will automatically re-credit the entire amount to the same ledger. There is no requirement to issue PMT-03 in case of an ARN where deficiency memo has been issued.
Types of refunds for which a debit takes place in the cash ledger:
1. Refund of Excess balance of cash in the electronic cash ledger (RFD-02/03 is not applicable for this type as acknowledgement is generated at common portal)
Types of refunds for which a debit takes place in the electronic credit ledger:
1. Accumulated ITC in Export of Goods or Services without payment of tax
2. On account of supplies made to SEZ unit/ SEZ developer (without payment of tax)
3. Recipient of deemed export supplies
4. ITC accumulated due to inverted tax structure
10. Provisional Refund:
10.1 Provisional Refund is applicable to the following four type of refunds which involves Zero rated supplies.
1. Accumulated ITC in Export of Goods or Services without payment of tax
2. Export of services with payment of tax
3. On account of supplies made to SEZ unit/ SEZ developer (without payment of tax)
4. On account of supplies made to SEZ unit/ SEZ developer (with payment of tax)
10.2 After successful issuance of acknowledgement in respect of ARNs pertaining to any of the above listed refund types, the task will be automatically moved to the “Pending for Provisional Refund” Stage. The AC/DC can choose any ARN from the list and proceed to sanction provisional refund. In addition to the “Application Details” and “Application History” tabs, two new tabs will appear now in the details page. The “Acknowledgement” tab will contain the details of the acknowledgement and the “Order” tab. See Fig(xxi).
10.3 The order tab has to be updated before the proper officer can issue a provisional sanction order. If the proper officer clicks on the action button before updating the order tab, the system will display the message Fig (xxii).:
“Please enter the Amount Details in Provisional Order tab, Save and then proceed for Issuing Provisional Order”
When the proper officer clicks on the order tab, the table shown in Fig (xxiii) will be displayed. In the said table, the first three rows viz., amount of refund claimed, 10% of the amount claimed as refund (to be sanctioned later) and Balance amount (i-ii) will be auto-populated by the system. These fields will be calculated/ populated from the Amount of refund claimed and the officer cannot make any entry or edit the fields. In the fourth row viz., Percentage of refund claimed amount sanctioned at present, the proper officer can enter value upto a maximum of 90% of the amount claimed under each head. In this column, the officer has to enter the % of claimed amount he wishes to sanction as provisional refund. The system will not allow the officer to enter any amount above 90% and also will not allow decimals in this field as per the validations set by GSTN. In case the officer enters an amount more than 90%, the system will display an error at the time of saving. — Fig(xxiv). The system will calculate the amount as per the % entered in column No 4 against each head and auto populate the amount under the corresponding head in the fifth row viz., “Amount of refund sanctioned” in read only mode. The officer cannot make entry or edit the fields in fifth row. After checking the amounts, the officer has to save the calculations done under the tab. After successfully saving the data, the “Issue Provisional Order” button under the action button will be enabled. The officer can click on the button now and a pop-up will open which will show the details entered in the calculations tab in a read-only mode. The proper officer can enter remarks if required, in the text area (max 250 characters) provided below the table and submit – Fig(xxv), Fig(xxvi). It is to be noted that the remarks entered here are transmitted to GSTN but the same is not displayed by GSTN to the taxpayer.
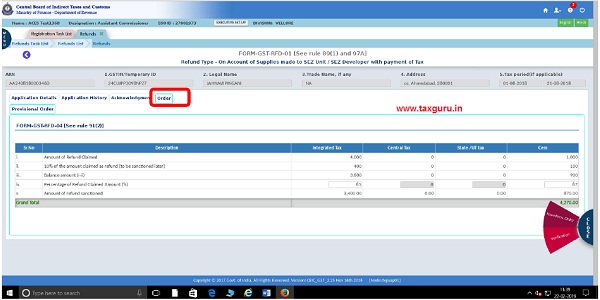
Fig (xxi)
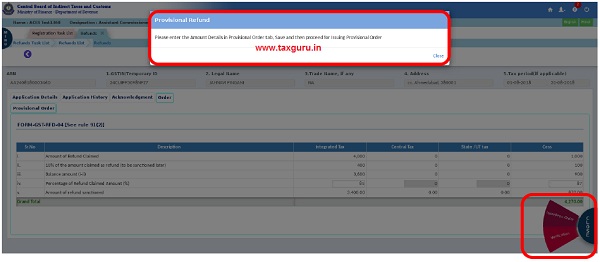
Fig (xxii)
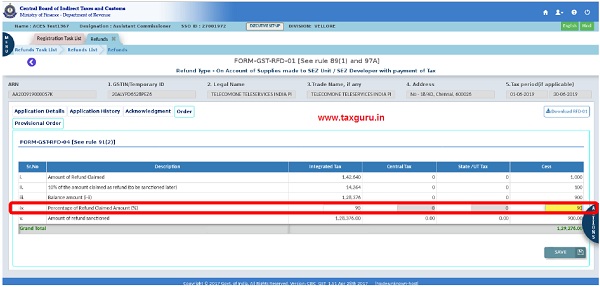
Fig (xxiii)

Fig (xxiv)
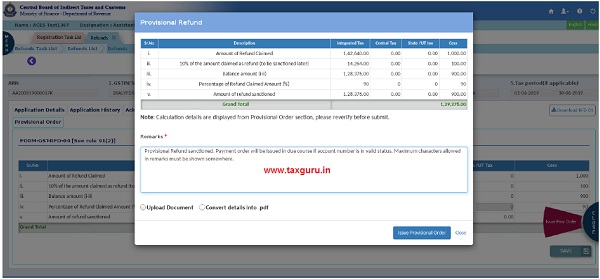
Fig (xxv)
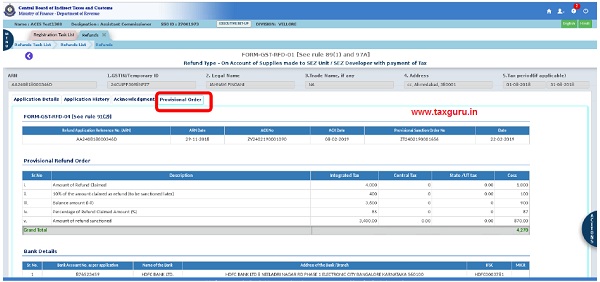
Fig (xxvi)
11. Payment Order:
11.1 After successful submission of provisional refund order, a Payment Order for the sanction has to be issued in the system. The ARN would have moved to the “Provision Order issued- Pending issuance of Payment Order” stage. The officer can click on the stage to see the list of ARNs pending for Payment Order and select an ARN for issuing Payment Order. The details of the provisional refund sanctioned will be available under the sub tab “Provisional Refund” under the “Order” tab. Issue Payment Order will be available under the action button and if the officer clicks on it a pop up is loaded, wherein the details sanctioned under the order tab will be auto populated and shown in read-only mode. The proper officer has to enter the remarks if any in the text area provided below “Latest Bank Account Details” table. It is to be noted that the remarks entered here are transmitted to GSTN but the same is not displayed by GSTN to the taxpayer. – Fig(xxvii).
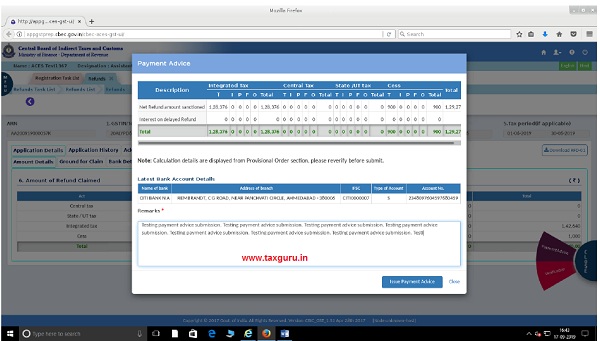
Fig (xxvii)
After clicking on the “Issue Payment Order”, a Success message in pop up is displayed –Fig(xxviii)
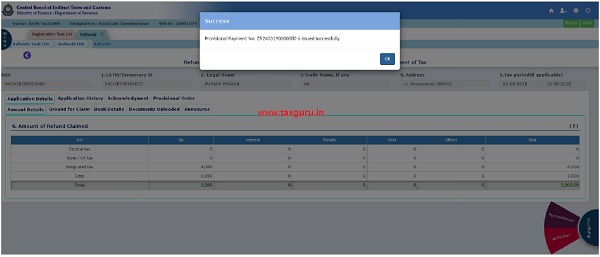
Fig (xxviii)
11.2 The same procedure is to be adopted to issue a Payment Order after sanctioning the final refund order also.
11.3 It is to be noted that the RFD-05 can be issued only when the bank account of the taxpayer is in “valid” status. If the bank account is in either “Invalid” or “Validation under progress” status, the Payment Order button will not be enabled. (click the bank details tab) – Fig(xxix) and Fig(xxx).
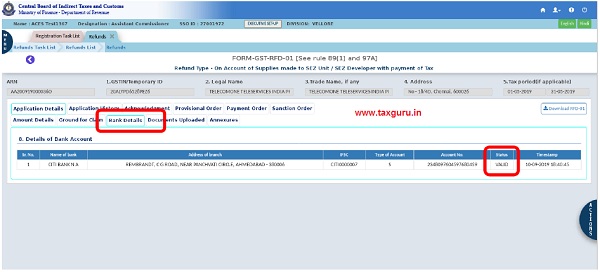
Fig (xxix)
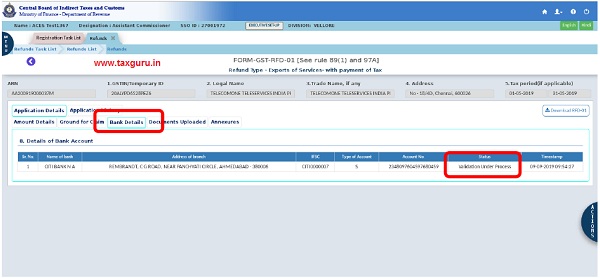
Fig (xxx)
12. Skipping Provisional Refund Order:
12.1 If the officer is of the opinion ( see the list of types eligible for provisional refund above) that a tax payer is prima facie not eligible for a Provisional Refund, he may skip the provisional refund by clicking on the Skip Provisional Refund button as shown in Fig(xxxi). Upon clicking the button, the system will ask for a confirmation – Fig(xxxii) and once the officer clicks on the “Submit” button, the ARN will be moved to the “Pending for Sanction” stage—Fig (xxxiii) and Fig(xxxiv).
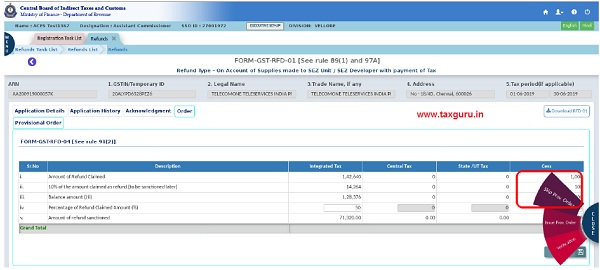
Fig (xxxi)
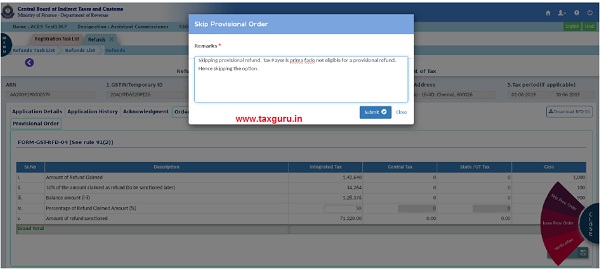
Fig (xxxii)
12.2 Revert Provisional Order: If the officer wants to revert the ARN back to the provisional refund stage, he shall do so by opening the ARN in the “pending for sanction” stage and clicking on the revert option as shown in Fig(xxxiii) and Fig(xxxiv). Once the revert button is clicked and submitted, the ARN will be moved back to the “Pending issuance of Provisional order” stage – Fig(xxxv) and Fig(xxxvi). It may be noted that the skip option and revert option can be exercised only once and therefore adequate caution may be taken before initiating the skip or revert option.
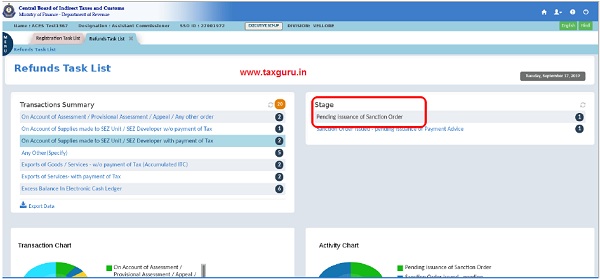
Fig (xxxiii)

Fig (xxxiv)
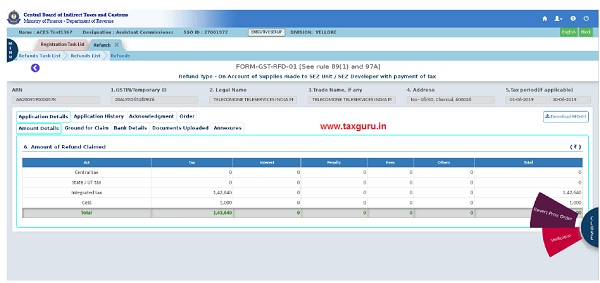
Fig (xxxv)
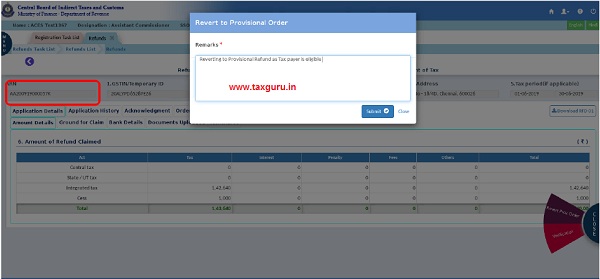
Fig (xxxvi)
13. Final Sanction Order:
13.1 In case of refunds of zero-rated supplies, once the Payment Order for the provisional refund has been issued successfully the system would move the ARN to the “Pending issuance of sanction order” stage. In case of other refund types, the ARN will move to this stage once the acknowledgement is issued successfully. The calculations table has to be updated and saved successfully before issuing sanction order. The table will be auto-populated with claimed amount and with provisional amount sanctioned and remaining amount if any. These fields will be in read-only mode and the proper officer will not be able to edit or make any entry in these fields. If the proper officer wishes to reject any part of the claimed amount, he/she has to select any one of the reasons from the drop down provided in item (d) “Refund Amount inadmissible”. —Fig(xxxvii). The officer can select one or multiple reason from the list of reasons provided by GSTN which is available in the drop down. The proper officer has to enter the amount to be rejected under the major/ minor head and click on the save button. Since issuance of SCN is mandatory if any amount is rejected, the system will allow only the option to issue SCN whenever an entry is made in the “Refund Amount inadmissible”. The details as to how to issue a SCN is explained in Section 15 below.
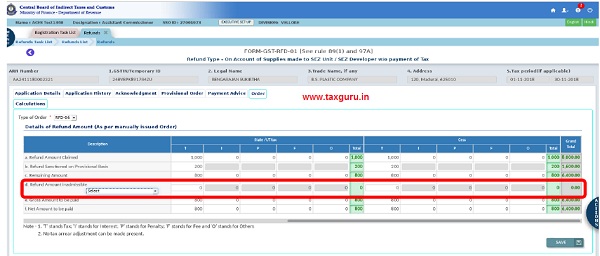
Fig (xxxvii)
13.2 If no amount is entered in the “Refund Amount inadmissible” column, upon clicking the “Save” button, the “Sanction Refund” button will be enabled under the “Action” button (Fig xxxviii). It is pertinent to note here that for both sanction and rejection orders the same button will be enabled as the form is common (RFD-06). After clicking on the “Sanction Refund” button a pop up with the sanction details as saved in the calculations table will open in read only mode –Fig(xxxix). The details cannot be edited in the pop-up. The proper officer can upload a document if required in the pop-up and enter remarks in the text area Fig(xxxix). Once the proper officer clicks on the “Sanction Refund” button, a success message pop-up is displayed – Fig(xl). The documents along with the sanctioned details will be transmitted to GSTN and the tax payer. It is to be noted that the remarks entered here are transmitted to GSTN but the same is not displayed by GSTN to the tax payer.
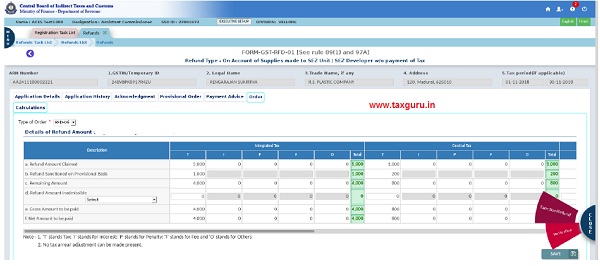
Fig (xxxviii)
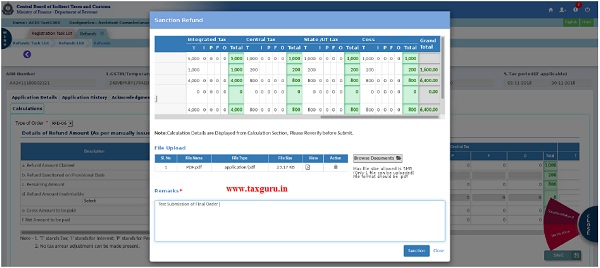
Fig (xxxix)
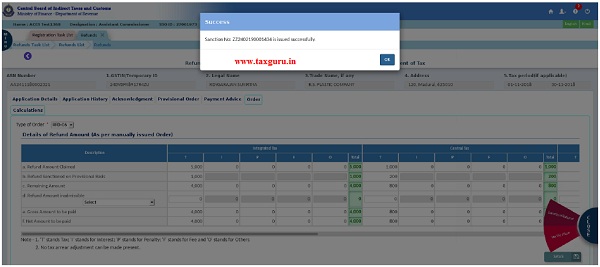
Fig (xl)
13.3 Adjustment of existing arrears: It is pertinent to note here that, at present there is no provision to adjust any existing liability or demand in the RFD-06 order. The RFD-07 (Part-A) order for complete adjustment also is not available and hence the proper officer will not be able to do any partial or complete adjustment at present in the system. The functionality for adjustment is being developed and will be made available soon. Separate advisory will be issued when the functionality is made available.
14. Payment Order for final refund order:
14.1 The procedure for issuance of Payment Order after final order is similar to the issuance of Payment Order after a provisional refund order. The only difference is that the ARNs will be listed under “Sanction issued: pending-issue of Payment Order” stage Fig(xli).
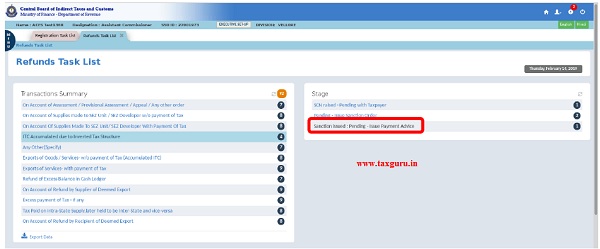
Fig (xli)
15. Show Cause Notice:
15.1 As notified by rules, any amount claimed cannot be rejected without issuing a show cause notice to the taxpayer. As explained above, whenever inadmissible amount is entered in the “Refund Amount inadmissible” column, system will not allow any other action other than issuance of SCN. In the inadmissible column, the officer can enter a maximum amount upto the claimed amount. In case the Taxpayer has been granted a provisional refund which is more than the eligible amount, the same also shall be included in the inadmissible amount. In such cases, the Gross amount will become negative as shown in the Fig(xlii). On saving the data entered in the table with some inadmissible amount the “Issue SCN” button will be enabled under the “Action” button on clicking it, the SCN pop up will open – Fig(xliii). In the pop-up the reason selected by the officer for rejecting the claim in the calculation table along with the amount will be pre-populated in read only mode. The proper officer has to choose a date and time for Personal Hearing as it has been made a mandatory feature Fig(xliii).
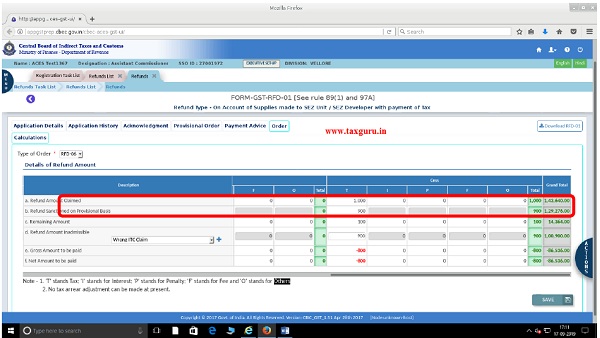
Fig (XLII)
15.2 The officer can choose one or more reasons from the list provided by GSTN in the drop down. In case the officer wants to enter any other reason other than the reasons available in the list he can choose others and enter the details in the text box provided below. It is pertinent to note that GSTN does not display the date and time of Personal Hearing to the tax payer and therefore it is essential for the officer to upload a document in PDF format with the details of the SCN along with the details of the date and time allotted for Personal Hearing or the officer can choose the convert to PDF option on the SCN pop up. On clicking submit after choosing the option, the entries made in the popup along with the PH date and timing will be converted into a PDF document as per the notified format and transmitted to GSTN. So that taxpayer would be able to download it.
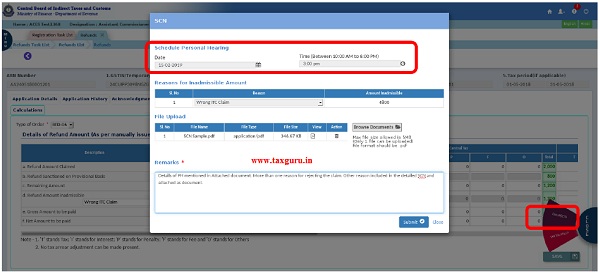
Fig (xliii)
15.3 The proper officer can enter the remarks in the text box provided in the pop-up (250 character. limit) which will be saved in the system for future reference. It is to be noted that the remarks entered here are transmitted to GSTN but the same is not displayed by GSTN to the taxpayer.
16. Reply to Show Cause Notice:
16.1 Once a Show Cause Notice is issued to a tax payer, the ARN will be moved by the system to the “SCN issued- Response awaited” stage – Fig(xliv). The tax payer has to reply to the SCN in the front end common portal and can attend the Personal Hearing. The reply to the SCN has to be submitted by the tax payer within 15 days as provided by the rules. During these 15 days, when the ARN is pending in the “SCN issued- response awaited” stage, the officer cannot perform any action on the ARN. All the action buttons will be disabled. Once SCN is issued, a tab “SCN” appears. – Fig(xlv).
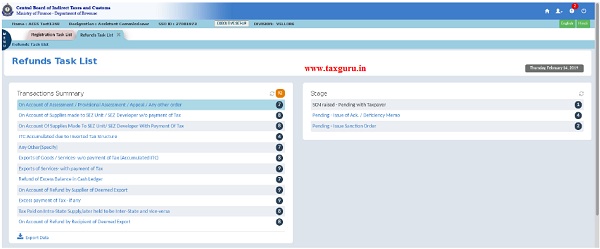
Fig (xliv)
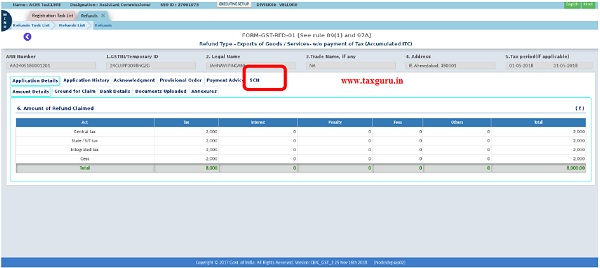
Fig (xlv)
16.2 If the taxpayer responds to the SCN within 15 days, the ARN is moved to the stage “SCN issued – Response Received”. If the tax payer does not respond to the SCN within 15 days from the issuance of the SCN, the “Sanction Refund” button will be enabled when the ARN is still under the “SCN issued- response awaited” stage – Fig(xlvi) and Fig(xlvii)) and the officer will be free to issue a sanction or rejection order as deemed fit. If the taxpayer replies to the SCN after the order has been passed by the proper officer, the reply will be simply saved in the system under the “reply to SCN” tab for reference.

Fig (xlvi)
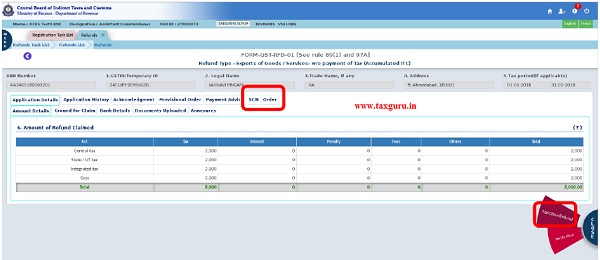
Fig (xlvii)
16.3 In case the tax payer responds to the SCN any time before the order is issued by the officer, the ARN will be moved to the “SCN issued- response received” stage and the reply submitted by the tax payer will be shown under the “Reply to SCN” tab. The officer, after viewing the reply can issue a sanction or rejection order as deemed fit – Fig(xlviii)
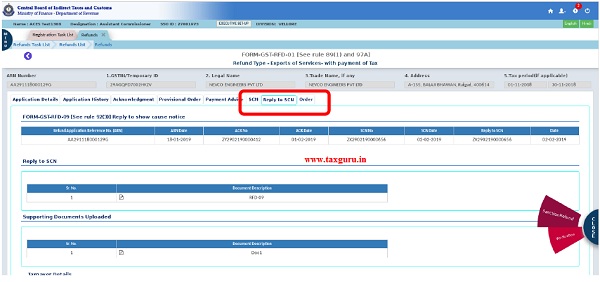
Fig (xlviii)
16.4 In case, the reply is received in the system when the officer is acting on the ARN in the “SCN issued- response awaited” stage, the officer will not be able to submit a refund sanction or rejection order. If the officer tries to submit, an error message will be displayed at the time of submission. The officer has to navigate back to the refunds task list home page and has to access the ARN in “SCN issued- response received” to view the reply and thereafter submit a sanction/ rejection order as deemed fit.
17. Archive List:
17.1 The archive list is the page where all the ARNs in respect of which finality is reached i.e deficiency memo or final sanction and Payment Order has been submitted. In case of complete rejection, as there is no Payment Order the ARN will move to the archive list immediately after a complete rejection order has been issued by the officer. The archive list is formation specific and only the proper officer holding charge of the division will be able to access the archive list. The proper officer can sort and search the ARN list based on ARN, Date, GSTIN, Refund type, Status and Claimed Amount Fig(xlix) and Fig(l).
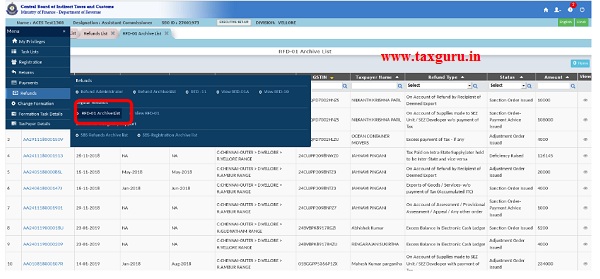
Fig (xlix)

Fig (l)
17.2 The order for re-credit of the amount to cash or credit ledger on rejection of refund claim in PMT-03 has to be issued from the archive list – Fig(li). This action cannot be done through the task list.
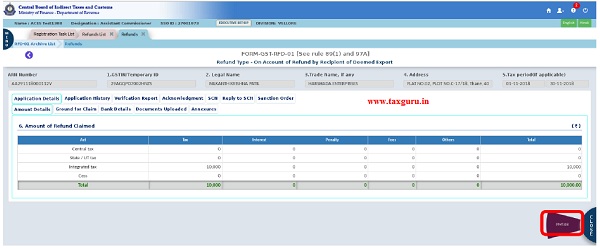
Fig (li)
18. PMT-03:
18.1 Once the final order has been issued and Payment Order has been issued in respect of any sanctioned amount, the ARN will be moved to the archive list as explained above. In case there is a partial rejection or complete rejection in the refund order “issue PMT-03” button will be enabled in the action button. The officer has to choose an ARN from the list page in the archive list for which he wishes to issue PMT-03. In the details page, the action button will be enabled. Once the officer clicks on the button, the system will display the PMT-03 pop-up prepopulated with the amount rejected under each end in the sanction order – Fig(lii). The officer can enter his remarks if any in the text area below the PMT-03 table and submit the PMT-03 order – Fig(liii). the officer then clicks on the “Submit” button. It is to be noted that the remarks entered here are transmitted to GSTN but the same is not displayed by GSTN to the taxpayer. Further at the time of issue of PMT-03 two documents viz..
1. Declaration of the taxpayer (mandatory)
2. Any other document( not mandatory )
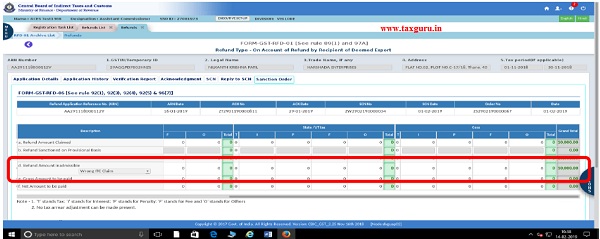
Fig (lii)

Fig (liii)
18.2 Once the PMT-03 is successfully issued and submitted to GSTN, the status will be updated in the archive list as shown in the Fig(liv)).
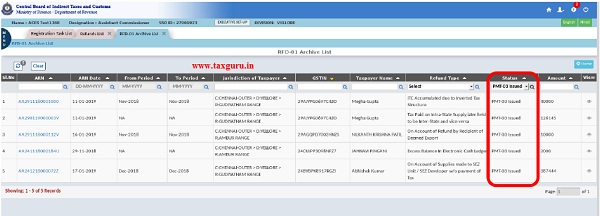
Fig (liv)
18.3 PMT-03 can be issued only for those refund types for which a debit takes place in the electronic ledger of the tax payer, at the time of filing the refund claim. For other types as there is no debit or re-credit, the PMT-03 button will not appear in the archive list. The list of types for which a debit takes place is provided below for reference.
Types of refunds for which a debit takes place in the cash ledger:
1. Refund of Excess balance of cash in the electronic cash ledger
Types of refunds for which a debit takes place in the electronic credit ledger:
1. Accumulated ITC in Export of Goods or Services without payment of tax
2. On account of supplies made to SEZ unit/ SEZ developer (without payment of tax)
3. Recipient of deemed export supplies
4. ITC accumulated due to inverted tax structure
19. Upload Document:
19.1 The upload document functionality is built on the same model as available in RFD-01 B. The RFD -01B functionality allows uploading of multiple documents in PDF and JPEG formats of size 1 MB each. In the online refund module, only one PDF document of maximum size 5 MB is allowed to be uploaded. ( except PMT-03 where two documents are allowed )
19.2 The document which the proper officer wishes to upload has to be scanned and transmitted through webmail and saved into the D drive of the AIO. After successfully saving the document the proper officer can access the same from the application by clicking on the upload document button on the pop-up- Fig(lv). When the button is clicked the system will open a window and the proper officer has to click on his/her SSOID displayed on the left side of the window – Fig(lvi). A list of folders would be listed on the main window and now the officer has to click on ctxmnt and open the folder– Fig(lvi). The system will display the drives available in the system now and officer has to click on Drive D- Fig(lvii) where he can access and upload the file-Fig(lviii). Once uploaded the document will be listed as shown in the – Fig(lix). If the officer wants to delete the document, he can do so by clicking on the delete icon in the table – Fig(lix). If the proper officer wants to add a different document, he may do so by following the steps as explained above. It is to be noted that once the document has been uploaded and submitted the officer cannot change the document. Therefore, due care may be taken while uploading the documents.
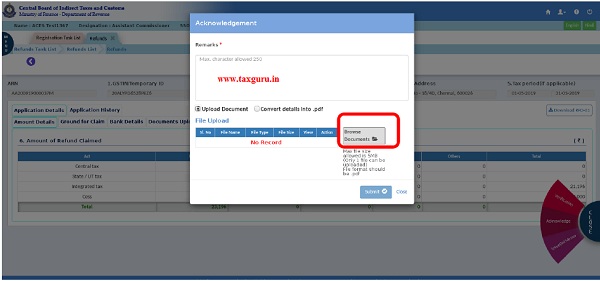
Fig (lv)
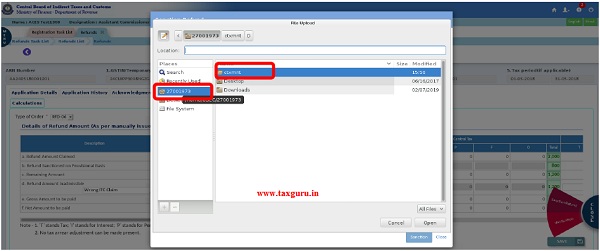
Fig (lvi)
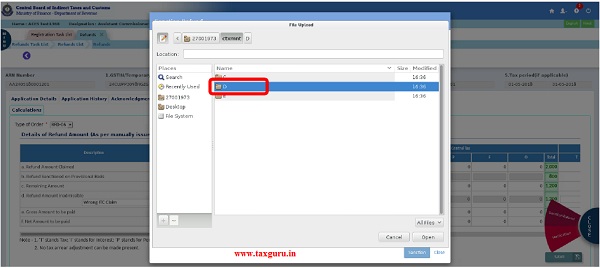
Fig (lvii)
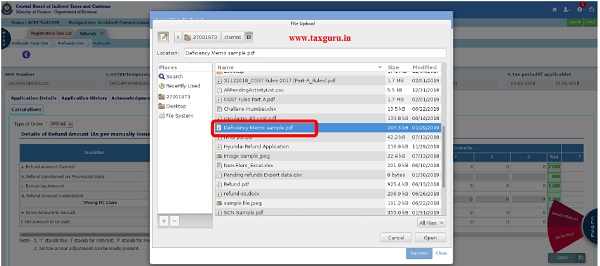
Fig (lviii)
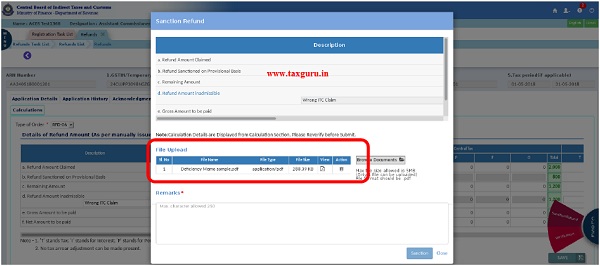
Fig (lix)
19.3 Convert to PDF Option:
A new feature to convert the entries made in the pop up has been built to simplify uploading of documents. This facility is made available for all the forms except RFD-05. The officer after entering the remarks in the columns chooses the option “ Convert details into PDF”, the entries made in the pop up screen will be converted into a PDF format and submitted to GSTN as shown in the figures (lx), (lxi) and (lxii).

Fig (lx)
If the officer chooses to submit, the following alert message will be displayed. Once officer clicks on “Yes” the form will be submitted.
“You have chosen to convert details into PDF. Upon submission the entries made in this tab will be converted into PDF document in the notified RFD-02 format and submitted to GSTN. Do you want to proceed?”
The uploaded document can be found in the acknowledgment tab as shown in the figure (lxi) below.
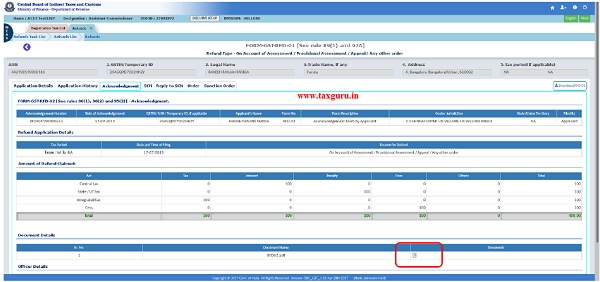
Fig (lxi)
The document can be downloaded and saved for reference.
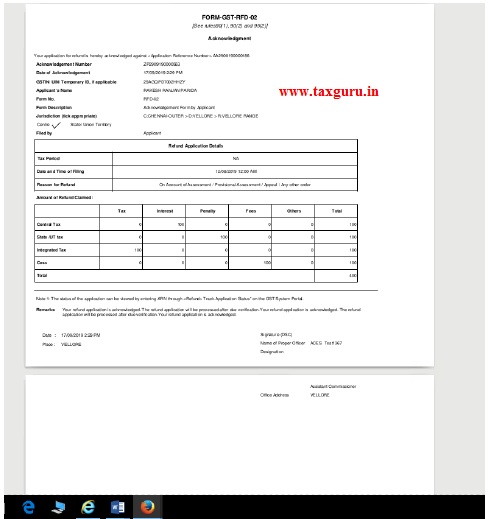
Fig (lxii)
20. Delegation and Verification:
20.1 The option to delegate and verify are available at all stages before issuance of acknowledgement or deficiency memo, before issuance of Provisional Refund Order, before issuance of final order or before issuance of Payment Order. There is no facility to delegate at the stage of issuance of PMT-03 as the ARN would have moved to the archive list from where PMT-03 is issued. The AC/ DC can delegate a maximum of 10 ARNs at a time to any of the Superintendents working in his jurisdiction within the formation, with specific remarks to verify any detail as required. The Superintendent can further delegate the ARNs to any Inspector working under his Jurisdiction within the formation with additional remarks as required. The AC/ DC cannot delegate ARNs pertaining to different jurisdiction in one go. If the officer tries to delegate ARNs of different jurisdiction, the system will display error message as shown in Fig(lxiii).
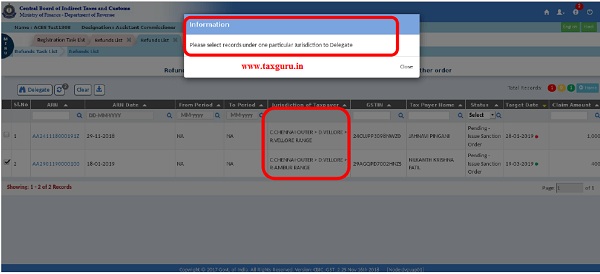
Fig (lxiii)
–
–

–
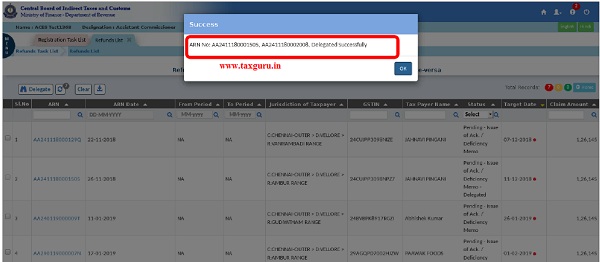
Fig (lxvii)
Fig(lxviii)
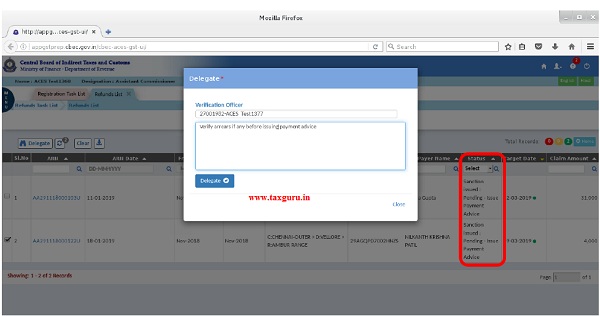
Fig (lxix)
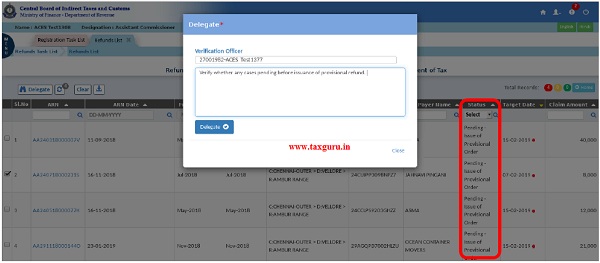
Fig (lxx)
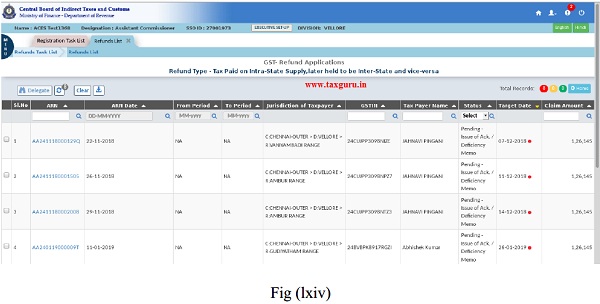
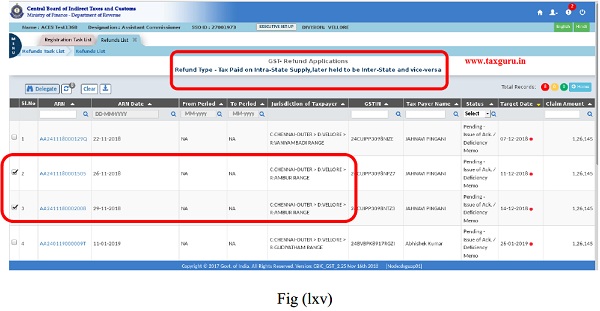
20.2 As shown in the above figures – Fig(lxiv) to Fig(lxx), four ARNs pertaining to different refund types and pending at different stages have been delegated to Superintendents. The Superintendent can either update the verification report themselves or delegate the ARNs further to Inspectors for verification as shown in the Fig (lxv) and (lxvii).
The Superintendent/ Inspector can view the ARNs delegated to them in the transaction summary by navigating through the below mentioned pathway.
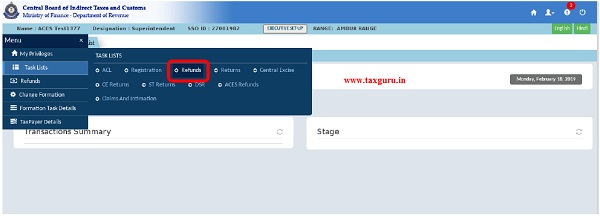
Fig (lxxi)
20.3 In the transaction summary the four ARNs that were delegated by the AC/DC to the Superintendent are listed as shown – Fig(lxxii) and Fig(lxxiii). The ARNs will be listed under the corresponding Type and stage at which the ARN is pending will be displayed at the right side similar to the AC/ DC dashboard.
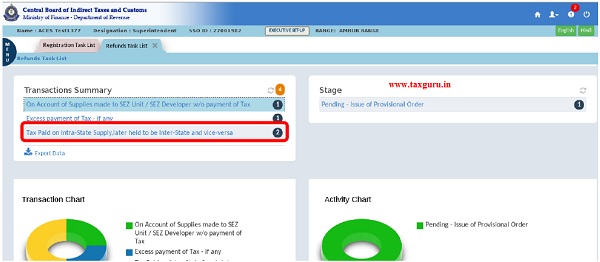
Fig (lxxii)
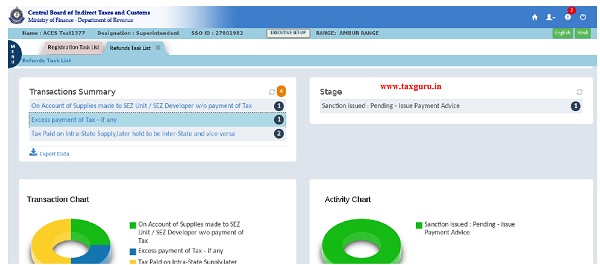
Fig (lxxiii)
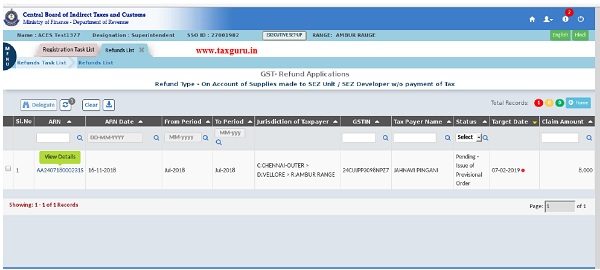
Fig (lxxiv)
20.4 The officer can choose any one of the pending ARNs and upon clicking the ARN at the list page, the details page will open Fig(lxxiv).
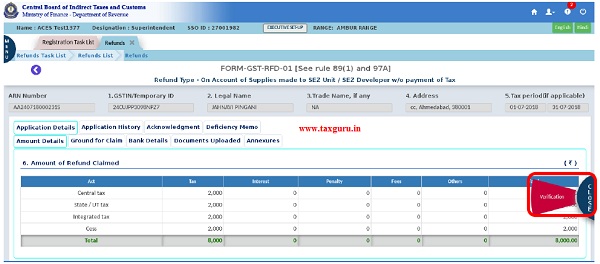
Fig (lxxv)
20.5 The delegation remarks entered by the AC/DC at the time of delegation will be captured in the application history Fig(lxxvi). The delegatee officer can view these remarks and verify the details as per the orders .
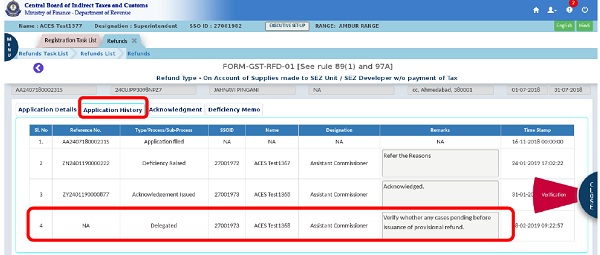
Fig (lxxvi)
20.6 In the details page, under the action button, only the “Verification” button will be available for the delegatee officers. The officer can update the verification report by clicking on the button. If the Superintendent wants to delegate further, he can do so from the list page itself as explained in Fig(lxv) to Fig(lxx). Upon clicking the verification button, the verification report pop up will open and the officer can update and submit Fig(lxxvii).
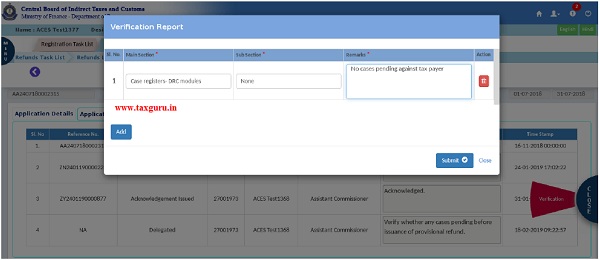
Fig (lxxvii)
Fig(lxxviii)
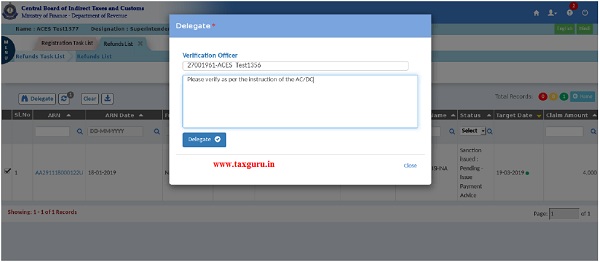
Fig (lxxix)
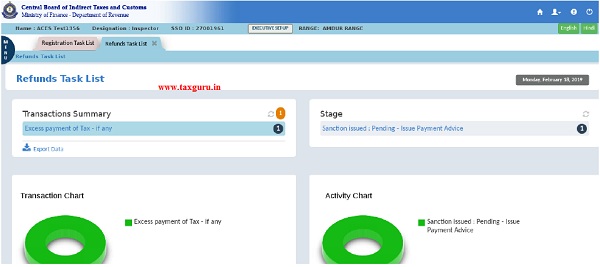
Fig (lxxx)

Fig (lxxxi)
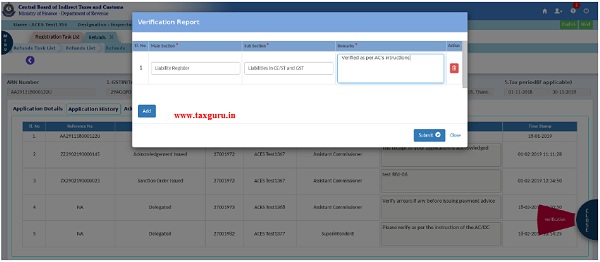
Fig (lxxxii)
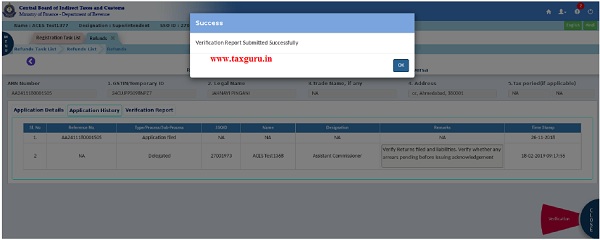
Fig (lxxxiii)
20.7 Once the delegatee officer submits the verification report the ARN will move to the officer who has delegated the ARN and the status will be updated as – <Stage>- verified. (where Stage will be pending issuance of ACK/Def memo, Provisional Order etc.). When the inspector submits the verification report, the ARN will move to the Superintendent who in turn can submit it to the AC/DC. Till the time the Superintendent pushes the ARN to the AC, the status will be shown as delegated as shown in Fig (lxxxiv). Once the Superintendent submits the ARN to the AC, the status will change as Verified as shown in Fig (lxxxv). However, it is to be noted that AC can act on the ARN even before the Inspector or Superintendent verifies and submits the ARN. In case, the Inspector or Superintendent has not done the verification and AC takes action on the ARN, the ARN will no longer be available in the Inspector/ Superintendent’s dashboard.

Fig(lxxxiv)
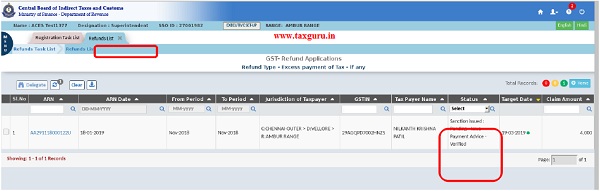
Fig (lxxxv)

Fig (lxxxvi)
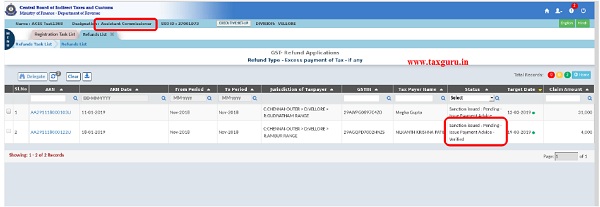
Fig (lxxxvii)
20.8 The verification reports entered by the officers will be available in the verification report tab available next to the acknowledgement tab as shown in Fig(lxci).

Fig (lxxxviii)
21. PFMS ERROR TASK
Once the Payment Order is successfully submitted to the GSTN the same is forwarded by GSTN to PFMS for disbursement of the sanctioned amount. If there is any failure at PFMS or Bank’s end, the record is returned with an error. These ARNs which have been returned with an error from PFMS are listed in the PFMS Error List as shown in the figures (lxxxix) to (xcii) below. The list of ARNs which have failed at PFMS or Bank end will figure here along with the bank validation status. Whenever the ARNs are returned with an error, the Taxpayer will be notified by the common portal to rectify the issue or provide a new account. Once the issue is rectified or the new bank account is validated by the PFMS, the bank validation status will change to “Valid”. The bank account validation failure can happen at the time of filing the application (assessee master validation ) and after issuance of RFD-05.
21.2 The officer can sort the ARNs based on the Bank validation status as shown in the figure and re-issue payment order for those ARNs where the bank account status is valid. In other, cases the Payment Order button will be disabled as shown in the figure. It is to be noted that, no amendment except bank details is allowed while re-submitting the Payment Order. The latest valid Bank account will be auto-populated in the Payment Order Pop-up. The officer shall verify whether the latest valid bank details, as reflected in the Bank details tab, is reflecting in the new Payment Order pop up, before submission.

Fig (lxxxix)
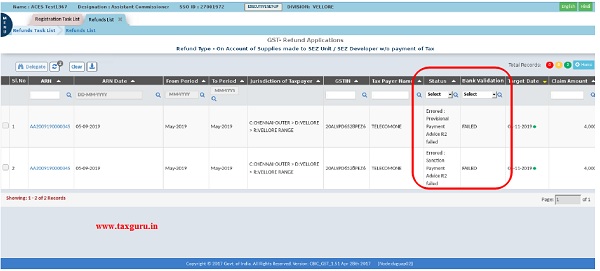
Fig (xc)
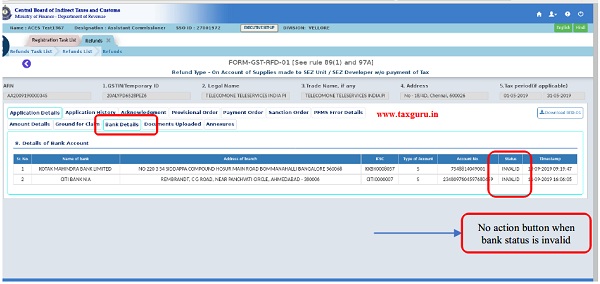
Fig (xci)
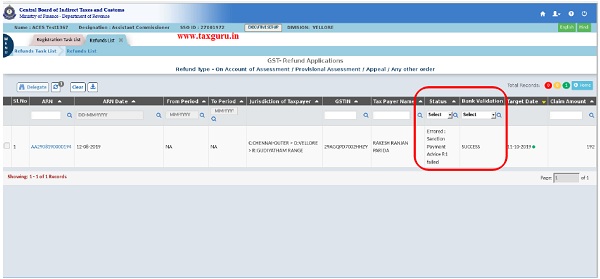
Fig (xcii)
22. Error List
22.1 If there is an error during the submission of any form to the GSTN system, the ARN is returned with an error message. All such ARNs will be listed in the Error List as shown in the figure (xciii). Upon clicking on the Error List, the list page opens where all the ARNs pertaining to the Refund type that have resulted in errors at different stages will be listed. The stage under which the ARN has failed will be reflected under the Status column as shown in the figure (xciv). The officer can click on any ARN to see the reason for the error under the error tab as shown in Figure (xcv).
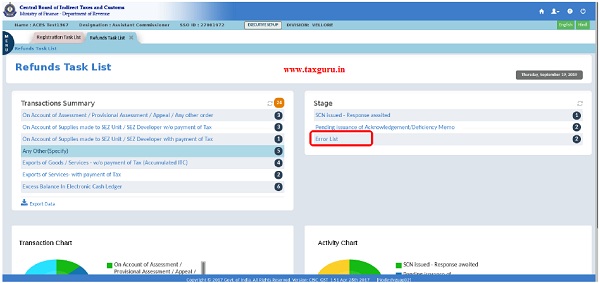
Fig (xciii)
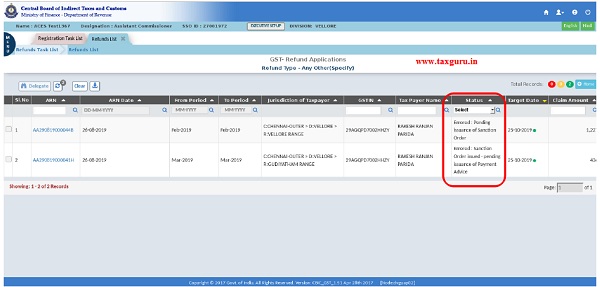
Fig (xciv)

Fig (xcv)
22.2 Most of the validations built at the GSTN end have also been built in the CBIC-GST backend refund application to prevent any error while submission. There may be errors due to network issues at the time of submission, in which the officer has to resubmit the form without making any changes. Notwithstanding the validations if there are any scenarios in which the ARN has been returned with specific errors, the officer shall contact the helpdesk with screenshot of the error screen, so that the same can be resolved by the helpdesk.
In case of any difficulty in using the functionalities please reach us at dgschennai@icegate.gov. in.


The GSTN System is Hanging once, while we attach DSC to GSTR RFD09
(Reply to Show Cause Notice issued / GSTR RFD08)