
3. Select the Embassy/ International Organization radio button.
4. Click the CREATE button.

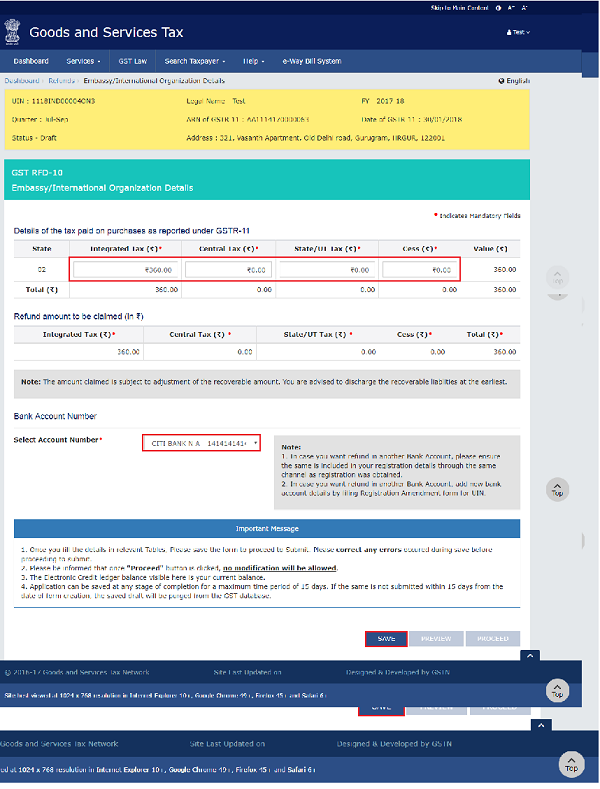
Notes: The header area auto displays the UIN, Name, Address, ARN number and ARN date for the corresponding GSTR-11.
5. Amounts in table “Details of the tax paid on purchases as reported under GSTR-11”from return of respective period are auto-populated.
Note:
- If the UIN holder wants to claim the refund amount which is less than the amount displayed, he/she can edit the amount downward in the above table.
- Taxpayer can make a downward editing of the tax amount but cannot make an upward editing of the tax amount. After editing in table “Refund Amount Details (in INR), the total will get auto-populated in table “Refund Amount Claimed (in INR)”. In no case, the amount of refund can be more than the respective values of tax/Cess. (E.g. If IGST amount is 100 in GSTR-11 and is auto-populated, then you can edit the amount to 99 but not to 101).
6. Select the bank account where you wish to receive the refund.
7. Click the SAVE button to upload your entered refund details to the GST Portal.
Notes:
- The Taxpayer must select a bank account from the drop-down list in order to receive refund.
- The bank accounts displayed in the drop-down are those accounts that were provided during GST registration.
- Till registration amendment form is not available, in case taxpayer want refund in another Bank Account, please ensure the same is included in registration details through the same channel as registration was obtained.
- After registration amendment form is available, in case taxpayer want refund in another Bank Account, add new bank account details by filing Registration Amendment form for UIN. 8. Click the SAVE button to upload your entered refund details to the GST Portal.
Notes:
- The refund application must be saved before filing.
- The system will flash a confirmation message when saving the application for the first time.
- The system displays a confirmation message upon saving the application.
- Application can be saved at any stage and can be retrieved using My Saved / Submitted Applications option under Refunds.
- Saved applications are stored in the system for 30 days, after which they get automatically deleted. Taxpayer have to submit the application form within 30 days from the date of creation of application.
- Saving the application activates the Declaration checkbox.
You can click the PREVIEW button to preview the details of refund before submitting on the GST Portal.

8. Click the PROCEED button.
9. Check the declaration box.
10. Select an Authorized Signatory from the list of registered names in drop-down.
11. Click either SUBMIT WITH DSC or SUBMIT WITH EVC option:
- Submit with DSC: Sign the application using the registered Digital Signature Certificate of the selected authorized signatory.
- Submit with EVC: If the EVC option is selected, the system will trigger an OTP to the registered mobile phone number and e-mail address of the authorized signatory. Enter that OTP in the pop-up to sign the application.

Notes:
- The system generates an ARN and displays it in a confirmation message, indicating that the refund application GST RFD-10 has been successfully filed.
- GST Portal sends the ARN at registered email and mobile of the Taxpayer by e-mail and SMS.
- ARN and refund application form can be downloaded as PDF document using the My Saved / Submitted Applications option under Refunds.
- Filed GST RFD -10 applications can be tracked using the Track Application Status option under Refunds.
- Once the ARN is generated on submission of form GST RFD-10, the Taxpayer needs to take prints of the filed application and the Refund ARN Receipt generated at the portal, and submit the same along with supporting documents to the jurisdictional authority. The application will be processed and refund will be disbursed manually.
- The disbursement is made once the concerned Tax Official processes the refund application.

b. Generate GST RFD-10 application form through Dashboard
To submit the application for refund on the GST Portal, perform the following steps:
1. Access the https://www.gst.gov.in/ URL. The GST Home page is displayed.
2. Click the Services > Refunds > Application for Refund command. The Select the refund type page displayed.

3. Select the Embassy/ International Organization radio button.
4. Select the Financial Year and Quarter for which the refund application needs to be filed.
5. Click the CREATE button.
Notes: The header area auto displays the UIN, Name, Address, ARN number and ARN date for the corresponding GSTR-11.
6. Amounts in table “Details of the tax paid on purchases as reported under GSTR-11”from return of respective period are auto-populated.
Note:
- If the UIN holder wants to claim the refund amount which is less than the amount displayed, he/she can edit the amount downward in the above table.
- Taxpayer can make a downward editing of the tax amount but cannot make an upward editing of the tax amount. After editing in table “Refund Amount Details (in INR), the total will get auto-populated in table “Refund Amount Claimed (in INR)”. In no case, the amount of refund can be more than the respective values of tax/Cess. (E.g. If IGST amount is 100 in GSTR-11 and is auto-populated, then you can edit the amount to 99 but not to 101).
7. Select the bank account where you wish to receive the refund.
8. Click the SAVE button to upload your entered refund details to the GST Portal.
Notes:
- The Taxpayer must select a bank account from the drop-down list in order to receive refund.
- The bank accounts displayed in the drop-down are those accounts that were provided during GST registration.
- Till registration amendment form is not available, in case taxpayer want refund in another Bank Account, please ensure the same is included in registration details through the same channel as registration was obtained.
- After registration amendment form is available, in case taxpayer want refund in another Bank Account, add new bank account details by filing Registration Amendment form for UIN. 8. Click the SAVE button to upload your entered refund details to the GST Portal.

Notes:
- The refund application must be saved before filing.
- The system will flash a confirmation message when saving the application for the first time.
- The system displays a confirmation message upon saving the application.
- Application can be saved at any stage and can be retrieved using My Saved / Submitted Applications option under Refunds.
- Saved applications are stored in the system for 30 days, after which they get automatically deleted. Taxpayer have to submit the application form within 30 days from the date of creation of application.
- Saving the application activates the Declaration checkbox.
You can click the PREVIEW button to preview the details of refund before submitting on the GST Portal.
9. Click the PROCEED button.
10. Check the declaration box.
11. Select an Authorized Signatory from the list of registered names in drop-down.
19. Click either SUBMIT WITH DSC or SUBMIT WITH EVC option:
- Submit with DSC: Sign the application using the registered Digital Signature Certificate of the selected authorized signatory.
- Submit with EVC: If the EVC option is selected, the system will trigger an OTP to the registered mobile phone number and e-mail address of the authorized signatory. Enter that OTP in the pop-up to sign the application.
Notes:
- The system generates an ARN and displays it in a confirmation message, indicating that the refund application GST RFD-10 has been successfully filed.
- GST Portal sends the ARN at registered email and mobile of the Taxpayer by e-mail and SMS.
- ARN and refund application form can be downloaded as PDF document using the My Saved / Submitted Applications option under Refunds.
- Filed GST RFD -10 applications can be tracked using the Track Application Status option under Refunds.
- Once the ARN is generated on submission of form GST RFD-10, the Taxpayer needs to take prints of the filed application and the Refund ARN Receipt generated at the portal, and submit the same along with supporting documents to the jurisdictional authority. The application will be processed and refund will be disbursed manually.
- The disbursement is made once the concerned Tax Official processes the refund application.


