Page Contents
- FAQs on GST ITC-03
- Q.1 What is Form GST ITC-03?
- Q.2 When filing of Form GST ITC-03 is needed for a taxpayer?
- Q.3 From where can I as taxpayer file Form GST ITC-03?
- Q.4 What is the frequency for filing Form GST ITC-03?
- Q.5 Can I preview the Form GST ITC-03 before filing?
- Q.6 What is MAKE PAYMENT button for? What happens when MAKE PAYMENT button is clicked?
- Q.7 Why do I need to create a Challan?
- Q.8 GST Portal has auto-populated the “Tax to be paid through ITC” fields. Can I edit the amount for ITC utilization?
- Q.9 What are the modes of signing Form GST ITC-03?
- Q.10 What happens after Form GST ITC-03 is filed?
- Manual on GST ITC-03
FAQs on GST ITC-03
Q.1 What is Form GST ITC-03?
Ans: Form GST ITC-03 is to be filled up by those taxpayers who opts for composition scheme or where goods or services or both supplied by taxpayer becomes wholly exempt. This form is to be filed by taxpayers, to pay an amount, by way of debit in the electronic credit ledger or electronic cash ledger, equivalent to credit availed in respect of:
- Inputs held in stock, and
- Inputs contained in semi-finished goods or finished goods held in stock, and
- Capital goods or plant and machinery
Q.2 When filing of Form GST ITC-03 is needed for a taxpayer?
Ans: In following conditions taxpayer must file Form GST ITC-03:
- Taxpayer has opted for composition scheme or goods or services or both supplied by a taxpayer becomes wholly exempt.
- Taxpayer has availed ITC in respect of input held in stock and input contained in semi-finished goods or finished goods held in stock and on capital goods or plant and machinery.
Q.3 From where can I as taxpayer file Form GST ITC-03?
Ans: Form GST ITC-03 can be accessed on the GST Portal, post login by the taxpayer.
The path is Services > Returns > ITC Forms.
Q.4 What is the frequency for filing Form GST ITC-03?
Ans: Registered person can file ‘Form GST ITC-03’ only once in a financial year for opting for composition scheme. For reversal/payment of tax in case of exemption of supplies it can be filed multiple times, as and when notifications exempting such supplies are issued by Government.
Q.5 Can I preview the Form GST ITC-03 before filing?
Ans: Yes, you can preview the Form GST ITC-03 before filing it on the GST Portal.
Ans: MAKE PAYMENT button is clicked to pay off the liabilities, computed based on details declared by the taxpayer. Once you click the MAKE PAYMENT button, liabilities are payed off and you cannot make any changes to Form GST ITC-03.
Q.7 Why do I need to create a Challan?
Ans: If available cash balance in Electronic Cash Ledger is less than the amount required to offset the liabilities; additional cash is required for paying the liabilities. You need to create the challan for that additional cash required, to offset the liabilities.
Q.8 GST Portal has auto-populated the “Tax to be paid through ITC” fields. Can I edit the amount for ITC utilization?
Ans: “Tax to be paid through ITC” fields show optimum credit utilization amounts by the GST Portal, based on provisions of the law/rules relating to credit utilization. However, you may edit the ITC utilization. As you change ITC utilization, the cash to be paid by you will also change.
Q.9 What are the modes of signing Form GST ITC-03?
Ans: You can file Form GST ITC-03 using DSC, or EVC.
Digital Signature Certificate (DSC)
Digital Signature Certificates (DSC) are the digital equivalent (that is electronic format) of physical or paper certificates. A digital certificate can be presented electronically to prove one’s identity, to access information or services on the Internet or to sign certain documents digitally. In India, DSC are issued by authorized Certifying Authorities.
The GST Portal accepts only PAN based Class II and III DSC.
To obtain a DSC, please contact any one of the authorized DSC-issuing Certifying Authorities: http://www.cca.gov.in/cca/?q=licensed_ca.html
Electronic Verification Code (EVC)
The Electronic Verification Code (EVC) authenticates the identity of the user at the GST Portal by generating an OTP. The OTP is sent to the mobile phone number of the registered mobile phone of Authorized Signatory filled in part A of the Registration Application.
Q.10 What happens after Form GST ITC-03 is filed?
Ans: After Form GST ITC-03 is filed:
- ARN will be generated in the GST portal and the same will be communicated to Taxpayer by SMS and E-mail, on their registered mobile number and e-mail id respectively.
- Balance of credit lying in Electronic Credit Ledger will lapse on filing of this form, after ITC reversal /payment of tax, in case of Opt-in for composition scheme.
Manual on GST ITC-03
How can I file Form GST ITC-03?
To file Form GST ITC-03, perform following steps:
A. Login and Navigate to Form GST ITC-03 page
B. Select Section and enter details in various tiles
- Section 18.4(a)
- Section 18.4(b)
C. Update Certifying Chartered Accountant’s or Cost Accountant’s Details
D. Enter Payment Details in 6 – Amount of ITC payable and paid tile
E. View Debit entries in Cash/Credit Ledger for tax payment
F. File Form GST ITC-03 with DSC/ EVC
G. Download Filed Return
A. Login and Navigate to Form GST ITC-03 page
1. Access the www.gst.gov.in URL. The GST Home page is displayed.
2. Login to the GST Portal with valid credentials.
3. Click the Services > Returns > ITC Forms command.

4. The GST ITC Forms page gets displayed. Click the PREPARE ONLINE button on the GST ITC-03 tile.

5. Select appropriate section from the Section drop-down list.
Note:
5 (a) Section 18.4(a) – Applicable for taxpayers who are opting in for composition scheme. Can be filed only once in a financial year.
5 (b) Section 18.4(b) – Applicable for taxpayers whose goods or services or both supplied by them becomes exempt. Can be filed multiple times as and when notification for exemption is issued.

5(a) Section 18.4(a)
6. Click the PROCEED button.

7. The Form GST ITC-03 page is displayed. Click on the tile names to know and enter related details:

7(a) Goods Details With Invoices
7(b) Goods Details Without Invoices
7(a) Goods Details With Invoices
7.1. Click the Goods Details With Invoices tile.

7.2. Select the Supplier’s Registration, Registered Under (GST/CX/VAT) from the drop-down list.

7.3(a). In case of GST:
i. Select the Date of Opt in using the calendar.
Note: To change date of opt in, please close the current form using CLOSE button and open a new form. Closing of current form will delete all the saved data.
ii. In the Application Reference Number (ARN) field, enter the ARN number.
iii. In the GSTIN field, enter the GSTIN number of the supplier.
iv. In the Invoice/Bill of entry Number field, enter the invoice or bill of entry number.
v. Select the Invoice/Bill of entry Date using the calendar.
vi. Enter the details of the item.
vii. Click the ADD button.
viii. Click the SAVE button.

ix. A success message is displayed and invoice is added. You can click edit/delete button to edit/ delete the invoices (under Actions). Click the BACK button

7.3(b). In case of CX/VAT:

i. In the CX/VAT Registration Number field, enter the CX or VAT Registration number of the supplier.
ii. In the Invoice/Bill of entry Number field, enter the invoice or bill of entry number.
iii. Select the Invoice/Bill of entry Date using the calendar.
iv. Enter the details of the item.
Scroll to the right using the scroll bar.

v. Click the ADD button.
vi. Click the SAVE button.

vii. A success message is displayed and invoice is added. You can click edit/delete button to edit/ delete the invoices (under Actions). Click the BACK button.

7(b) Goods Details Without Invoices
7.1. Click the Goods Details Without Invoices tile.

Note: If you have more than 500 Records, then use upload functionality to upload the invoices
7.2. Select the Registered Under (GST/CX/VAT) from the drop-down list.

7.3(a). In case of GST:
i. In the In the GSTIN field, enter the GSTIN number of the supplier.
ii. Enter the details of the item.
iii. Click the ADD button.
iv. Click the SAVE button.

v. A success message is displayed and invoice is added. You can click edit/delete button to edit/ delete the invoices (under Actions). Click the BACK button.

7.3(b). In case of CX/VAT:
i. In the CX/VAT Registration Number field, enter the CX or VAT Registration number of the supplier.
ii. Enter the details of the item.
Scroll to the right using the scroll bar.

iii. Click the ADD button.
iv. Click the SAVE button.

v. A success message is displayed and invoice is added. You can click edit/delete button to edit/ delete the invoices (under Actions). Click the BACK button.

5(b) Section 18.4(b)
6. Click the PROCEED button.

7. The Form GST ITC-03 page is displayed. Click on the tile names to know and enter related details:

7(a) Goods Details With Invoices
7(b) Goods Details Without Invoices
7(a) Goods Details With Invoices
7.1. Click the Goods Details With Invoices tile.

7.2. Select the Supplier’s Registration, Registered Under (GST/CX/VAT) from the drop-down list.

7.3(a). In case of GST:
i. Select the Date from which exemption is effective using the calendar.
Note: To change date of exemption please close the current form using CLOSE button and open a new form. Closing of current form will delete all the saved data.
ii. In the GSTIN field, enter the GSTIN number of the supplier.
iii. In the Invoice/Bill of entry Number field, enter the invoice or bill of entry number.
iv. Select the Invoice/Bill of entry Date using the calendar.
v. Enter the details of the item.
vi. Click the ADD button.
vii. Click the SAVE button.
viii. A success message is displayed and invoice is added. You can click edit/delete button to edit/ delete the invoices (under Actions). Click the BACK button.

7.3(b). In case of CX/VAT:

i. In the CX/VAT Registration Number field, enter the CX or VAT Registration number of the supplier.
ii. In the Invoice/Bill of entry Number field, enter the invoice or bill of entry number.
iii. Select the Invoice/Bill of entry Date using the calendar.
iv. Enter the details of the item.
Scroll to the right using the scroll bar

v. Click the ADD button.
vi. Click the SAVE button.

vii. A success message is displayed and invoice is added. You can click edit/delete button to edit/ delete the invoices (under Actions). Click the BACK button.

7(b) Goods Details Without Invoices
7.1. Click the Goods Details Without Invoices tile.

Note: If you have more than 500 Records, then use upload functionality to upload the invoices
7.2. Select the Registered Under from the drop-down list.

7.3(a). In case of GST:
i. In the In the GSTIN field, enter the GSTIN number of the supplier.
ii. Enter the details of the item.
iii. Click the ADD button.
iv. Click the SAVE button.

v. A success message is displayed and invoice is added. You can click edit/delete button to edit/ delete the invoices (under Actions). Click the BACK button.

7.3(b). In case of CX/VAT:
i. In the CX/VAT Registration Number field, enter the CX or VAT Registration number of the supplier.
ii. Enter the details of the item.
Scroll to the right using the scroll bar.

iii. Click the ADD button.
iv. Click the SAVE button.

v. A success message is displayed and invoice is added. You can click edit/delete button to edit/ delete the invoices (under Actions). Click the BACK button.

C. Update Certifying Chartered Accountant’s or Cost Accountant’s Details
In case, where some details are added and where invoices are not available with you, then you need to update the Chartered Accountant (CA)/Cost Accountant details. You also need to upload the CA/Cost Accountant certificate on the GST Portal.
8.In the Name of the Firm issuing certificate field, enter the name of the firm which issued the certificate.
9.In the Name of the certifying Chartered Accountant/Cost Accountant field, enter the name of the Chartered Accountant or Cost Accountant.
10.In the Membership number field, enter the membership number of the Chartered Accountant or Cost Accountant.
11.Select the Date of issuance of certificate using the calendar.
12.Upload the Chartered Accountant or Cost Accountant certificate in JPEG format with maximum size of 500 KB.
13.Click the SAVE CA DETAILS button.

14. You can click the UPLOAD NEW button to upload a new attachment.

D. Enter Payment Details in 6 – Amount of ITC payable and paid tile
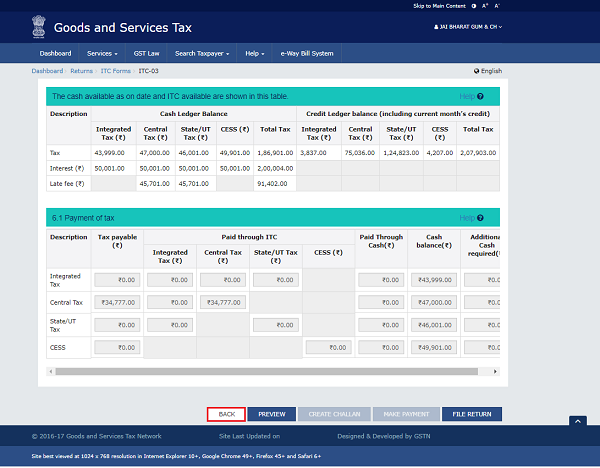
15. Click the 6 – Amount of ITC payable and paid tile.

16 (b). Please provide amount of credit and cash to be utilized from the respective available credit heads to pay off the liabilities.
Note:
- System auto-populates “Tax to be paid through ITC” fields with optimum utilization amounts based on provisions of the law/rules relating to credit utilization. However, you may edit the ITC utilization. As you change ITC utilization, the cash to be paid will also change.
- Tax liabilities as declared in the return along with the credits gets updated in the ledgers and reflected in the “Tax payable” column of the payment section.
Scenario 1: If available cash balance in Electronic Cash Ledger is less than the amount required to offset the liabilities
i. If available cash balance in electronic credit ledgeris less than the amount required to offset the liabilities, available cash balance is utilized from the Electronic Cash Ledger and additional cash required for paying liability is being reflected in the last column of the Table (Additional cash required). You may create challan for that additional cash directly by clicking on the CREATE CHALLAN button.

ii. In case of insufficient balance, “You do not have sufficient balance in Electronic Cash Ledger. Do you want to Create challan?” pop-up message is displayed. Click the YES button.

iii. The Create Challan page is displayed.
Note: In the Tax Liability Details grid, the Total Challan Amount field and Total Challan Amount (In Words) fields are auto-populated with total amount of payment to be made.
iv. Select the Payment Modes as E-Payment/ Over the Counter/ NEFT/RTGS.
v. Click the GENERATE CHALLAN button.
vi. The Challan is generated.

Note:
In case of Net Banking: You will be directed to the Net Banking page of the selected Bank. The payment amount is shown at the Bank’s website. If you want to change the amount, abort the transaction and create a new challan.
In case of successful payment, you will be re-directed to the GST Portal where the transaction status will be displayed.
In case of Over the Counter:
Take a print out of the Challan and visit the selected Bank. Pay using Cash/ Cheque/ Demand Draft within the Challan’s validity period. Status of the payment will be updated on the GST Portal after confirmation from the Bank.
In case of NEFT/ RTGS:
Take a print out of the Challan and visit the selected Bank. Mandate form will be generated simultaneously. Pay using Cheque through your account with the selected Bank/ Branch. You can also pay using the account debit facility. The transaction will be processed by the Bank and RBI shall confirm the same within <2 hours>. Status of the payment will be updated on the GST Portal after confirmation from the Bank.
For more details, click here to refer the FAQs and User Manual on Making Payment.
Scenario 2: If available cash balance in Electronic cash ledger is more than the amount required to offset the liabilities
i. If available cash balance in Electronic Cash Ledger is more than the amount required to offset the liabilities, no additional cash is required for paying liability and zero amount is being reflected in the last column of the Table (Addition cash required). You can click the MAKE PAYMENT button to pay off the liabilities.

17. Click the PREVIEW button to view the summary page of Form GST ITC-03 for your review. It is recommended that you download this Summary page and review the summary of entries made in different sections with patience before making payments.

18. The summary page of Form GST ITC-03 in PDF format is displayed.

19. Click the MAKE PAYMENT button to pay off the liabilities or to claim credit in case of no liabilities.
Note:
- In case, you want to make changes to any details in any of the sections in the previous page, you can go back to the previous page and make the changes after clicking the BACK button. Once you click the MAKE PAYMENT button and pay off the liabilities, you cannot go back and make any changes.
- Once you click the MAKE PAYMENT button and pay off the liabilities, you cannot make any changes.

20. Once the payment is done, a confirmation message is displayed. Click the YES button.

21. Click the OK button.

22. Click the FILE RETURN button to file the return. (go to step 26)
23. Click the BACK button to view the entries in Cash/Credit ledger for tax payment. Or else, click the FILE RETURN button to file Form GST ITC-03.
E.View Debit entries in Cash/Credit Ledger for tax payment
24. Click the Debit entries in Cash/Credit ledger for tax payment tile.

25. The entries in Cash/Credit ledger for tax payment is displayed. Click the BACK button.

F. File Form GST ITC-03 with DSC/ EVC
26. Click the FILE RETURN button.

27. Select the checkbox for declaration.
27. From the Authorised Signatory drop-down list, select the authorized signatory.
29. Click the FILE WITH DSC or FILE WITH EVC button.

FILE WITH DSC:
a. Click the PROCEED button.
b. Select the certificate and click the SIGN button.
FILE WITH EVC:
a. Enter the OTP sent on email and mobile number of the Authorized Signatory registered at the GST Portal and click the VERIFY button.

30. The success message with ARN is displayed. The status of Form GST ITC-03 is changed to Filed.

G. Download Filed Return
31. Click the DOWNLOAD FILED ITC-03 button to download the filed return.

The PDF file generated would now bear watermark of final Form GST ITC-03.


if there is no stock do we need to file ITC 03 if yes what should we enter in mandatory coloumns.. thank you
Dear I have no any stock, If there is no input reversal then there is no option to file NIL return. In such case how to file this form. Or in such case no need to file the Form. Please advise.
If there is no input reversal then there is no option to file NIL return. In such case how to file this form. Or in such case no need to file the Form. Please advise.
Hi, How to file ITC-03, for no stock, actually I mistakenly opted for Regular and after a month changed it to Composite and need to file ITC-03 but have nil inward and outward. Please help in filing ITC-03 form…
Thanks
If there is no input reversal then there is no option to file NIL return. In such case how to file this form. Or in such case no need to file the Form. Please advise.