In these article we will read the detailed analysis of FAQ’s related to the offline utility of GSTR-9. The following FAQ’s are About GSTR-9 Offline Utility, How to Download GSTR-9 Offline Utility, How to Download the Generated JSON File of GSTR-9, Worksheet Tabs in GSTR-9 Offline Utility, Entering and Validating Details in Offline, Upload the Generated JSON File, Download Error JSON File and Do’s & Don’ts related to GSTR-9 Offline Utility and Manual of GSTR-9 Offline Utility.
Page Contents
- FAQs of Form GSTR-9 Offline Utility
- B. Manual of GSTR-9 Offline Utility
- C. Downloading GSTR-9 Offline Tool and Uploading GSTR-9 details
- A. Download the GSTR-9 Offline Utility
- B. Open the GSTR-9 Offline Utility Excel Worksheet
- C. Download GSTR-9 JSON File(s) from the GST Portal
- D. Open Downloaded GSTR-9 JSON File(s)
- E. Add table-wise details in the Worksheet
- F. Generate JSON File to upload
- G. Upload the generated JSON File on GST Portal
- H. Preview Form GSTR-9 on the GST Portal
- I. Download Error Report, if any
- J. Open Downloaded Error GSTR-9 JSON File(s)
FAQs of Form GSTR-9 Offline Utility
1. About Form GSTR-9 Offline Utility
Q.1 What is Form GSTR-9 Offline Utility?
Ans: Form GSTR-9 Offline utility is an Excel-based tool to facilitate the preparation of annual return in Form GSTR-9. This Annual return is to be filed once, for each financial year, on the GST Portal, by the registered taxpayers who were regular taxpayers, including SEZ units and SEZ developers.
Taxpayers may use the offline utility to furnish details of purchases, sales, input tax credit or refund claimed or demand created etc. in this return. Once return is prepared using offline utility, it can be uploaded on GST Portal by generating a JSON file.
Q.2 What are the features of Form GSTR-9 Offline Utility?
Ans: The Key Features of Form GSTR-9 Offline Utility are given below:
- The Form GSTR-9 details of Table 4 to Table 18 can be prepared offline with no connection to Internet.
- Most of the data entry and business validations are inbuilt in the offline utility reducing chances of errors upon upload to GST Portal.
Q.3 Can I file Form GSTR-9 using Offline Utility?
Ans: No. You can prepare the Form GSTR-9 using the offline utility and then create a JSON file to upload on the Portal. Filing can take place only online on the GST Portal.
Q.4 What details in Form GSTR-9 can be entered by taxpayer using the Offline Utility?
Ans: Details for following Tables of Form GSTR-9 can be entered by taxpayer using the offline Tool:
- Table 4 Outward: Summary of outward/ inward supplies made during the financial year
- Table 5 Outward: Summary of non-taxable outward supplies made during the financial year
- Table 6 ITC availed: Summary of ITC availed during the financial year
- Table 7 ITC Rev: Summary of ITC reversed or ineligible for the financial year
- Table 8 Other ITC: Summary of ITC availed during the financial year
- Table 9 Tax Paid: Tax (including Interest, Late Fee, Penalty & Others) paid during the financial year
- Table 10 PY trans in current FY: Summary of transactions reported in next financial year
- Table 14 Differential tax: Total tax paid on transactions reported in next financial year
- Table 15 Demand & Refunds: Particulars of demands and refunds during the financial year
- Table 16 Comp DS & Goods sent on approval: Summary of supplies received from composition taxpayers, deemed supply under section 143 and goods sent on approval basis
- Table 17 HSN Outward: HSN wise summary of outward supplies made during the financial year
- Table 18 HSN Inward: HSN wise summary of inward supplies received during the financial year
2. Download Form GSTR-9 Offline Utility
Q.5 From where can I download and use the Form GSTR-9 Offline Utility in my system?
Ans: To download and open the Form GSTR-9 Offline Utility in your system from the GST Portal, perform following steps:
1. Access the GST Portal:www.gst.gov.in.
2. Go to Downloads > Offline Tools > Form GSTR-9 Offline Tool option and click on it.
3. Unzip the downloaded Zip file which contains GSTR 9 Offline Utility.xls excel sheet.
4. Open the GSTR 9 Offline Utility.xls excel sheet by double clicking on it.
5. Read the ‘Read Me’ instructions on excel sheet and then fill the worksheet accordingly.
Note: Downloading the Form GSTR-9 Offline utility is a one-time activity. However, the utility may get updated in future. So, always use the latest version available on the GST Portal.
Q.6 Do I need to login to GST Portal to download the Form GSTR-9 Offline Utility?
Ans: No. You can download the Form GSTR-9 Offline Utility under ‘Downloads’ section without logging in to the GST Portal.
Q.7 What are the basic system requirements/configurations required to use Form GSTR-9 Offline Tool?
Ans: The offline functions work best on Windows 7 and above and MS EXCEL 2007 and above.
Q.8 Is Offline utility mobile compatible?
Ans: As of now Form GSTR-9 Offline utility cannot be used on mobile. It can only be used on desktop/laptops.
3. Download the Generated JSON File
Q.9 Why do I need to download the generated JSON file from the GST Portal?
Ans: Generated JSON file needs to be downloaded to open the system-computed Form GSTR-9 data (based on GSTR-1 and Form GSTR-3B filed) for editing as well as to prepare details of Table 4 to Table 18 of Form GSTR-9 in the Offline Tool.
JSON file will also have non-editable fields such as table no. 6A (ITC claimed in returns filed in Form GSTR-3B), table no. 8A (ITC as per GSTR-2A (Table 3 & 5 thereof) and table no 9 (except tax payable column).
Q.10 Do I need to login to GST Portal to download the generated JSON file using Form GSTR-9 Offline Utility?
Ans: Yes. You must login in to the GST Portal to download the generated JSON file using Form GSTR-9 Offline Utility.
Q.11 Is it mandatory to enter details in all worksheets(tables)?
Ans: It is not mandatory to fill data in all worksheets/tables. The worksheet for which no details are required to be reported can be left blank.
4. Worksheet Tabs in Form GSTR-9 Offline Utility
Q.12 How many worksheet-tabs are there in Form GSTR-9 Offline Utility
Ans: There are 14 worksheet-tabs in Form GSTR-9 Offline Utility. These are:
1. Read Me
2. Home
3. 4 Outward
4. 5 Outward
5. 6 ITC availed
6. 7 ITC Rev
7. 8 Other ITC
8. 9 Tax Paid
9. 10 PY trans in current FY
10. 14 Differential tax
11. 15 Demand & Refunds
12. 16 Comp DS & Goods sent on appr
13. 17 HSN Outward
14. 18 HSN Inward.
Q.13 What is the use of Read Me worksheet-tab?
Ans: The Read Me sheet contains Introduction and help instructions for you to read and use them to easily fill data in Form GSTR-9 Offline Utility.
Q.14 What is “Go Home” button?
Ans: On click of ‘Go Home’, offline utility navigates to the Home sheet
Q.15 What is the use of Home worksheet-tab?
Ans: The Home sheet is the main page of the utility. It is used to perform following four functions:
1. Enter mandatory details— GSTIN and Financial Year — Without entering these details, you will not be able to validate the data which you have entered in various worksheets and also you will not be able to import the JSON file into the offline utility.
2. Import and open JSON File downloaded from GST portal using Open Downloaded Form GSTR-9 JSON File (taxpayer has to first import the json file from portal for auto-computed values)
3. Enter details in worksheet-tab
4. Generate JSON file, for upload of Form GSTR-9 return details prepared offline on GST portal, using Generate JSON File to upload
5. Import and open Error JSON File downloaded from GST portal using Open Downloaded Error JSON Files
Q.16 What is the use of ‘4 Outward’ worksheet-tab?
Ans: The 4 Outward sheet contains Table 4. It is used to perform following 3 functions:
1. Enter/ view the summary of taxable outward/ inward supplies made during the financial year.
2. Validate the entered details using the Validate Sheet
3. Navigate to the Home page by clicking on the Go Home button or navigate to the next sheet
Q.17 What is the use of ‘5 Outward’ worksheet-tab?
Ans: The 5 Outward sheet contains Table 5. It is used to perform following 3 functions:
1. Enter/ view the summary of non-taxable outward supplies made during the financial year.
2. Validate the entered details using the Validate Sheet
3. Navigate to the Home page by clicking on the Go Home button or navigate to the next sheet
Q.18 What is the use of ‘6 ITC availed’ worksheet-tab?
Ans: The 6 ITC availed sheet contains Table 6. It is used to perform following 3 functions:
1. Enter/ view the summary of ITC availed during the financial year.
2. Validate the entered details using the Validate Sheet
3. Navigate to the Home page by clicking on the Go Home button or navigate to the next sheet
Q.19 What is the use of ‘7 ITC Rev’ worksheet-tab?
Ans: The 7 ITC Rev sheet contains Table 7. It is used to perform following 3 functions:
1. Enter/ view the summary of ITC reversed or ineligible for the financial year.
2. Validate the entered details using the Validate Sheet
3. Navigate to the Home page by clicking on the Go Home button or navigate to the next sheet
Q.20 What is the use of ‘8 Other ITC’ worksheet-tab?
Ans: The 8 Other ITC sheet contains Table 8. It is used to perform following 3 functions:
1. Enter/ view the ITC availed during the financial year.
2. Validate the entered details using the Validate Sheet
3. Navigate to the Home page by clicking on the Go Home button or navigate to the next sheet
Q.21 What is the use of ‘9 Tax Paid’ worksheet-tab?
Ans: The 9 Tax Paid sheet contains Table 9. It is used to perform following 3 functions:
1. Enter/ view the tax (including Interest, Late Fee, Penalty & Others) paid during the financial
2. Validate the entered details using the Validate Sheet
3. Navigate to the Home page by clicking on the Go Home button or navigate to the next sheet
Q.22 What is the use of ‘10 PY trans in current FY’ worksheet-tab?
Ans: The 10 PY trans in current FY sheet contains Table 10, 11, 12 and 13. It is used to perform following 3 functions:
1. Enter/ view the summary of transactions reported in next financial year.
2. Validate the entered details using the Validate Sheet
3. Navigate to the Home page by clicking on the Go Home button or navigate to the next sheet
Q.23 What is the use of ‘14 Differential tax’ worksheet-tab?
Ans: The 14 Differential tax sheet contains Table 14. It is used to perform following 3 functions:
1. Enter/ view the total tax paid on transactions pertaining to the previous financial year reported in next financial year.
2. Validate the entered details using the Validate Sheet
3. Navigate to the Home page by clicking on the Go Home button or navigate to the next sheet
Q.24 What is the use of ‘15 Demand & Refunds’ worksheet-tab?
Ans: The 15 Demand & Refunds sheet contains Table 15. It is used to perform following 3 functions:
1. Enter/ view particulars of demands and refunds during the financial year.
2. Validate the entered details using the Validate Sheet
3. Navigate to the Home page by clicking on the Go Home button or navigate to the next sheet
Q.25 What is the use of ‘16 Comp DS & Goods sent on appr’ worksheet-tab?
Ans: The 16 Comp DS & Goods sent on appr sheet contains Table 16. It is used to perform following 3 functions:
1. Enter/ view the summary of supplies received from Composition taxpayers, deemed supply by job worker and goods sent on approval basis.
2. Validate the entered details using the Validate Sheet
3. Navigate to the Home page by clicking on the Go Home button or navigate to the next sheet
Q.26 What is the use of ‘17 HSN Outward’ worksheet-tab?
Ans: The 17 HSN Outward sheet contains Table 17. It is used to perform following 3 functions:
1. Enter/ view HSN wise summary of outward supplies made during the financial year.
2. Validate the entered details using the Validate Sheet
3. Navigate to the Home page by clicking on the Go Home button or navigate to the next sheet
Q.27 What is the use of ‘18 HSN Inward’ worksheet-tab?
Ans: The 18 HSN Inward sheet contains Table 18. It is used to perform following 3 functions:
1. Enter/ view HSN wise summary of inward supplies received during the financial year.
2. Validate the entered details using the Validate Sheet
3. Navigate to the Home page by clicking on the Go Home button or navigate to the next sheet.
5. Entering & validating Details in Offline Utility
Q.28 How can I prepare details in Offline Utility?
Ans:
- Download the Offline tool from GST Portal under download section.
- Download the JSON file from the Portal (Log in to GST portal > Annual return > select Financial year and click on search > Prepare offline > Go to ‘download’ tab > Download) containing system computed details of Form GSTR-9 and import it/ open it into the offline tool and then edit it.
- Enter/edit/view the details in table no. 4 to 18
- Generate the JSON file for upload.
Q.29 Can I generate the JSON file from the offline tool without first importing and opening the JSON file into the offline tool?
Ans: You can’t generate the JSON file from offline tool without first importing and opening the JSON file into the offline tool.
For downloading the system generated summary of Form GSTR-9, navigate to GST Portal > Annual return > select Financial year and click on search > Prepare Offline > Go to ‘download’ tab > Download. After downloading the summary, import the summary of Form GSTR-9 into the offline tool.
Imported JSON file also have details of non-editable fields such as table no. 6A (ITC claimed in returns filed in Form GSTR-3B), table no. 8A (ITC as per GSTR-2A (Table 3 & 5 thereof) and table no. 9 (except tax payable column).
Q.30 Can the offline utility populate name of the taxpayer based on GSTIN in “Home” Sheet?
Ans: No, the offline utility cannot populate name of the taxpayer based on GSTIN, as details will not be there to fetch name of the taxpayer in Excel/offline utility. GSTIN is to be manually entered. However, it can validate structure of GSTIN when GSTIN is entered in “Home” sheet of Offline utility.
Q.31 Can I enter negative or decimal amounts in the offline utility?
Ans: Yes, you can enter any negative value and decimal values in the offline utility wherever applicable.
Q.32 Can I enter two digit codes for HSN in the offline utility?
Ans: Yes, you can enter two digit codes for all HSN codes, including codes starting with code 99, in the Offline Utility.
Note: For HSN codes starting with 99, you are not required to provide UQC and Qty details
Q.33 What is “Validate Sheet” button?
Ans: After entering the data in each sheet, you must click on ‘Validate Sheet’ button to validate the records. If there are any errors, then those errors will be displayed in ‘Sheet validation errors’ column. You must correct these errors before you move to next sheet or generate JSON file to upload.
Q.34 Can the offline utility validate all details entered in it?
Ans: No, the offline utility will not be able to validate all the details as it would have no connection with GST portal at the time of data entry. Only limited validations would be available in the offline utility tool, namely: GSTIN structure, type of tax etc.
Q.35 After clicking “Validate Sheet” button, I can see cells highlighted in red and “Sheet Validation” column only shows “Error in row”. How can I know details about the error?
Ans: Point your mouse-cursor on each of the red-highlighted cells to read the error description of each cell. A yellow description box will appear. Correct the errors as mentioned in the description box. Alternatively, click Review > Show All Comments link in the ribbon-tab of the excel to view all the comments together.
Q.36 When will I be able to validate all details entered in the offline utility?
Ans: Most of the validations are made available in the offline tool itself on click of “validate sheet” button. The validations that have dependency of online connectivity like GSTIN validation, would be done at the time of upload of JSON File created using offline tool.
6. Upload the Generated JSON File
Q.37 Do I need to login to GST Portal to upload the generated JSON file using Form GSTR-9 Offline Utility?
Ans: Yes. You must login in to the GST Portal to upload the generated JSON file using Form GSTR-9 Offline Utility.
Q.38 I am uploading Form GSTR-9 JSON File again, after making changes. What will happen to details of the previous upload?
Ans: If some details exist from previous upload, all new details will be added as new entries. In case, some details exist from previous upload, it will be updated with latest uploaded details.
Q.39 Can I generate the JSON file from the offline utility without entering any details in any sheet?
Ans: No. You can’t generate nil JSON file.
7. Download Error JSON File
Q.40 What will the error report contain?
Ans: Error Report will contain only those entries that failed validation checks on the GST portal. The successfully-validated entries can be previewed online.
Q.41 Does the downloaded Error JSON File contain all the entries I have uploaded on the GST Portal?
Ans: No, the downloaded Error JSON File contains tables/worksheets which have failed validation during upload on the GST portal.
Q.42 I’ve uploaded Form GSTR-9 JSON File and it was processed without error. Do I need to download the generated file?
Ans: No, it is not necessary for you to download the Form GSTR-9 JSON File processed without error. You can download it only if you want to view or update the details added previously. Downloaded JSON file will contain the revised/updated details which you have previously uploaded on the GST Portal through offline/online.
8. Do’s & Don’ts
Q.43 Is there a list of key Dos and Don’ts we need to keep in mind while making entries in the utility?
Ans: Yes. Please refer to the following list of Dos and Don’ts for your easy reference:
| Before Generating JSON File… | |
| Do’s | Don’ts |
| Enter a valid GSTIN very carefully. Verify GSTIN from the GST portal: Home > Search Taxpayer > Search by GSTIN/UIN, and make sure the GSTIN registration was active during the year. | Don’t type the alphabet ‘O’ in place of the number ‘0’. |
| You can use the Copy/Paste (Ctrl+C/Ctrl+V) keyboard functions while entering data in the utility. | Don’t use the Cut (Ctrl+X) keyboard function while entering data in the utility. |
| Don’t forget to click Validate Sheet button after making changes in any of the sheets. | |
| You may change the file name and location of the generated JSON file.
|
Don’t change the extension (.json) of the generated JSON file. |
B. Manual of GSTR-9 Offline Utility
1. GSTR-9 Offline Utility Overview
GSTR-9 Offline utility is an Excel-based tool to facilitate the creation of annual return in Form GSTR-9, which is to be filed once, for each financial year, on the GST Portal, by the registered taxpayers who were regular taxpayers, including SEZ units and SEZ developers.
Taxpayers may use the offline utility to furnish details of outward supplies, inward supplies, input tax credit, refund claimed, if any and demand created, if any etc. in this return.
Details for following Tables of GSTR-9 can be entered by taxpayer using the offline Tool:
- Table 4 Outward: Summary of outward/ inward supplies made during the financial year
- Table 5 Outward: Summary of non-taxable outward supplies made during the financial year
- Table 6 ITC availed: Summary of ITC availed during the financial year
- Table 7 ITC Rev: Summary of ITC reversed or ineligible for the financial year
- Table 8 Other ITC: Summary of ITC availed during the financial year
- Table 9 Tax Paid: Tax (including Interest, Late Fee, Penalty & Others) paid during the financial year
- Table 10 PY trans in current FY: Summary of transactions reported in next financial year
- Table 14 Differential tax: Total tax paid on transactions reported in next financial year
- Table 15 Demand & Refunds: Particulars of demands and refunds during the financial year
- Table 16 Comp DS & Goods sent on appr: Summary of supplies received from Composition taxpayers, deemed supply by job worker and goods sent on approval basis
- Table 17 HSN Outward: HSN wise summary of outward supplies made during the financial year
- Table 18 HSN Inward: HSN wise summary of inward supplies received during the financial year
Once return is prepared using offline utility, it is to be uploaded on GST Portal by creating a JSON file and then you can make payment of late fees, if any, sign it through DSC or verify through EVC and file it.
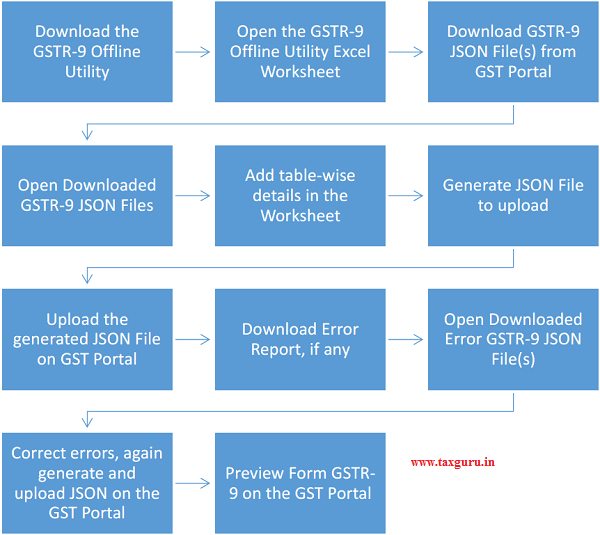
To Prepare Annual Return in Form GSTR-9 using offline utility, perform following steps:
A. Download the GSTR-9 Offline Utility
B. Open the GSTR-9 Offline Utility Excel Worksheet
C. Download GSTR-9 JSON File(s) GST Portal
D. Open Downloaded GSTR-9 JSON Files
E. Add table-wise details in the Worksheet
F. Generate JSON File to upload
G. Upload the generated JSON File on GST Portal
H. Preview Form GSTR-9 on the GST Portal
I. Download Error Report, if any
J. Open Downloaded Error GSTR-9 JSON File(s)
Click each hyperlink above to know more.
To know about the following steps of filing GSTR-9 on the GST Portal, please refer to GSTR-9 Online Manual:
K. Compute Liabilities and Pay Late Fees (If any)
L. File Form GSTR-9 with DSC/EVC
M. Download Filed Return
C. Downloading GSTR-9 Offline Tool and Uploading GSTR-9 details
A. Download the GSTR-9 Offline Utility
To download the GSTR-9 Offline Utility, perform following steps:
Downloading the GSTR-9 Offline utility is a one-time activity. However, the utility may get updated in future. So, always use the latest version available on the GST Portal.
1. Access the www.gst.gov.in URL. The GST Home page is displayed.
2. Click the Downloads > Offline Tools > GSTR-9 Offline Tool option.

You can download the GSTR-9 Offline Utility from the Portal without logging in to the GST Portal.
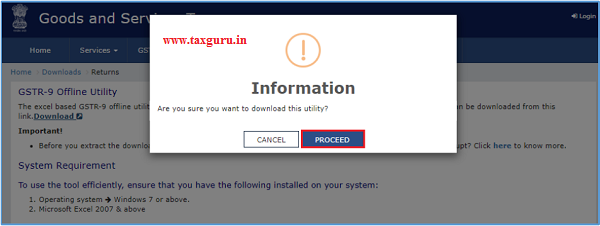
3. GSTR-9 Offline Utility page is displayed. Click the Download hyperlink.
Make sure you carefully read the Important message and System Requirement details displayed on the page.

4. An Information popup opens. Click PROCEED.
5. Zipped GSTR-9 Offline Utility folder gets downloaded.

B. Open the GSTR-9 Offline Utility Excel Worksheet
To open the downloaded GSTR-9 Offline Utility Excel Worksheet, perform following steps:
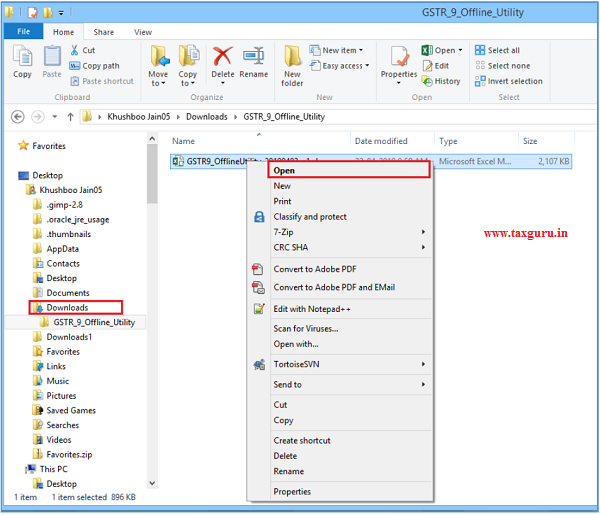
1. Extract the files from the downloaded zipped folder GSTR_9A_Offline_Utility.zip and you will see GSTR _9A _ Offline_Utility excel file in the unzipped folder. Right-click and click Open.
2. Click Enable Editing.
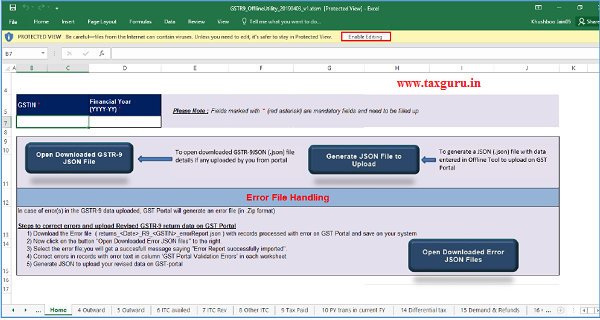
3. Click Enable Content. Then, click the Read Me tab.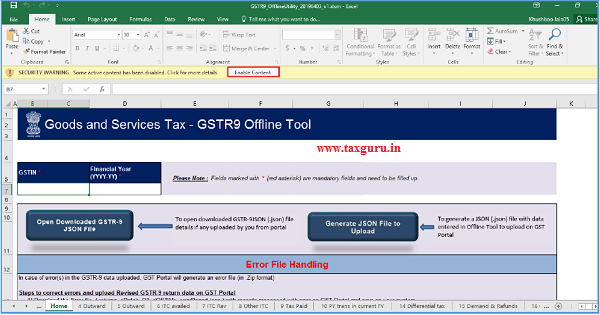
The Worksheet comprises of 14 tabs—Read Me, Home, 4 Outward, 5 Outward, 6 ITC availed, 7 ITC Rev, 8 Other ITC, 9 Tax Paid, 10 PY trans in current FY, 14 Differential tax, 15 Demand & Refunds, 16 Comp DS & Goods sent on appr, 17 HSN Outward and 18 HSN Inward.
4. Read Me page is displayed. It contains introduction and help instructions. Scroll down to read all the instructions carefully. Once you have completed your reading, you can now proceed to enter details in the worksheet.
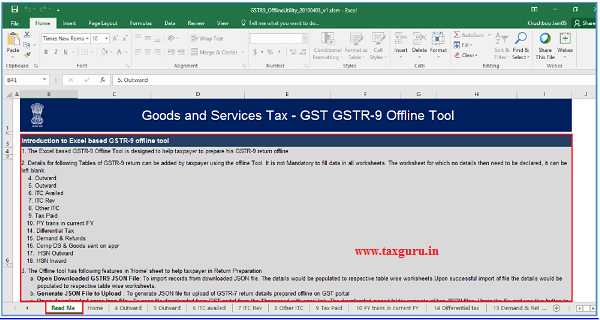
C. Download GSTR-9 JSON File(s) from the GST Portal
This step is to be performed to download and to open the system-computed Form GSTR-9 data based on filed Form GSTR-1 and Form GSTR-3B in the Offline Tool. Data so downloaded can be edited and can be used to prepare details of Form GSTR-9 for upload on the GST Portal. Few tables such as 6A, 8A & 9 (tax paid) are not editable.
To download the generated JSON File from the GST Portal, perform following steps:
1. Access the www.gst.gov.in URL. The GST Home page is displayed.
2. Login to the portal with valid credentials.
3. Dashboard page is displayed. Click the Services > Returns > Annual Return command. Alternatively, you can also click the Annual Return link on the Dashboard.
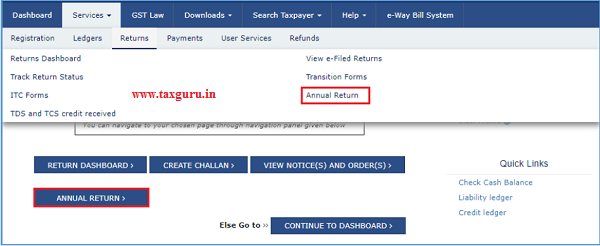
4. The File Annual Returns page is displayed. Select the Financial Year for which you want to file the return from the drop-down list.
5. Click the SEARCH button.

5. The GSTR-9 tile is displayed, with an Important Message box on the bottom. In the GSTR-9 tile, click the PREPARE OFFLINE button.
6. The Upload section of the Offline Upload and Download for GSTR-9 page is displayed, by default. Click the Download section.
7. Click the GENERATE JSON FILE TO DOWNLOAD button.
8. A message is displayed that “Your request for generation has been accepted kindly wait for 20 min”.
9. Once the JSON file is downloaded, click the “Click here to download – File 1” link.
10. The generated JSON file is downloaded. Generated JSON file contains the system-computed Form GSTR-9 data based on filed Form GSTR-1 and GSTR-3B for editing in the Offline Tool except few tables.
11. Unzip the downloaded file which contain the generated JSON file.
D. Open Downloaded GSTR-9 JSON File(s)
To open the downloaded GSTR-9 JSON File, to view & edit the system-computed Form GSTR-9 data, based on filed Form GSTR-1 and Form GSTR-3B and to prepare details of Form GSTR-9 in the Offline Tool, perform following steps:
1. Go to the Home tab and enter your GSTIN and Financial Year (select from the drop-down list) for which you want to file Form GSTR-9.
Note:
1. Generate JSON file, for upload of GSTR-9 return details prepared offline on GST portal, using Generate JSON File to upload button.
2. Import and open Error JSON File downloaded from GST portal using Open Downloaded Error JSON Files button.
3. Import and open JSON File downloaded from GST portal using Open Downloaded GSTR-9 JSON File button.
2. Click the Open Downloaded GSTR-9 JSON File button.
3. Browse the JSON(.json) file and click the Open button.
4. Select the downloaded JSON (. JSON) file and click on OK to proceed.
5. Success message is displayed. Click the OK button to proceed.
6. Now all the entries that were auto filled in relevant fields of different tables of Form GSTR 9, based on filed Form GSTR-1 and GSTR-3B, would be auto-populated in the respective sheets in the offline tool. Next, you need to add or edit table-wise details in the Worksheet, which is explained below.
E. Add table-wise details in the Worksheet
Note: For preparing details in Offline Utility, you will have two options:
- Either download the utility from GST Portal and fill up required details, create JSON and then upload on the GST Portal
- Download the JSON file from the Portal containing system computed details of Form GSTR-9 and import it/ open it into the offline tool and then edit it.
To add table-wise details in the Worksheet, perform following steps:
1. Go to the 4 Outward tab and enter summary of outward/ inward supplies made during the financial year.
Note: The table below provides the worksheet name, table name and detailed description for this worksheet.
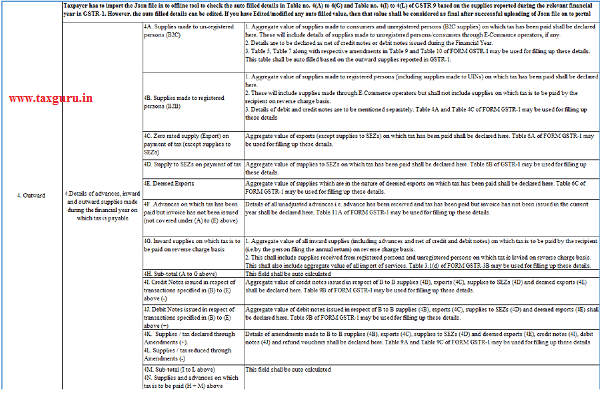
2. Once the details are entered, click the Validate Sheet button.
3. In case of unsuccessful validation, error-intimation popup will appear and the cells with error will be highlighted. Close the popup by clicking OK.
4. The comment box for each cell, that has errors, will show the error message. The user can read the error description of each cell and correct the errors as mentioned in the description box.
Alternatively, click the Review ribbon-tab > Show All Comments link to view the comments for fields with errors.
5. After you have corrected all the errors, again click the Validate Sheet button.
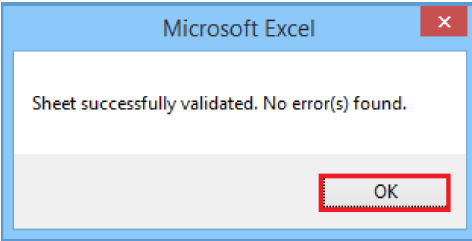
6. A popup Message box appears “Sheet successfully validated. No error(s) found”. Click OK.
7. Go to the 5 Outward tab and enter the summary of non-taxable outward supplies made during the financial year.
Note: The table below provides the worksheet name, table name and detailed description for this worksheet.
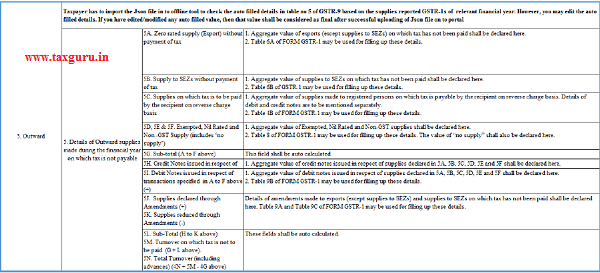
8. Once the details are entered, click the Validate Sheet button. In case of any errors, follow the steps as mentioned above to correct the errors.
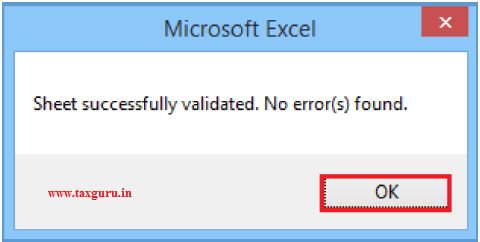
9. A popup Message box appears “Sheet Successfully Validated. No error(s) found. Click OK.
10. Go to the 6 ITC availed tab and enter the summary of ITC availed during the financial year.
Note: The table below provides the worksheet name, table name and detailed description for this worksheet.

11. Once the details are entered, click the Validate Sheet button. In case of any errors, follow the steps as mentioned above to correct the errors.
12. A popup Message box appears “Sheet Successfully Validated. No error(s) found. Click OK.

13. Go to the 7 ITC Rev tab and enter the summary of ITC reversed or ineligible for the financial year.
Note: The table below provides the worksheet name, table name and detailed description for this worksheet.

14. Once the details are entered, click the Validate Sheet button. In case of any errors, follow the steps as mentioned above to correct the errors.
15. A popup Message box appears “Sheet Successfully Validated. No error(s) found. Click OK.

16. Go to the 8 Other ITC tab and enter the ITC availed during the financial year.
Note: The table below provides the worksheet name, table name and detailed description for this worksheet.
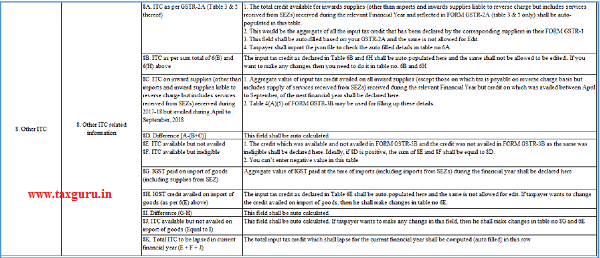
17. Once the details are entered, click the Validate Sheet button. In case of any errors, follow the steps as mentioned above to correct the errors.
18. A popup Message box appears “Sheet Successfully Validated. No error(s) found. Click OK.

19. Go to the 9 Tax Paid tab and enter the tax (including Interest, Late Fee, Penalty & Others) paid during the financial year.
Note: The table below provides the worksheet name, table name and detailed description for this worksheet.
![]()
20. Once the details are entered, click the Validate Sheet button. In case of any errors, follow the steps as mentioned above to correct the errors.
21. A popup Message box appears “Sheet Successfully Validated. No error(s) found. Click OK.

22. Go to the 10 PY trans in current FY tab and enter the summary of transactions reported in next financial year.
Note: The table below provides the worksheet name, table name and detailed description for this worksheet.

23. Once the details are entered, click the Validate Sheet button. In case of any errors, follow the steps as mentioned above to correct the errors.
24. A popup Message box appears “Sheet Successfully Validated. No error(s) found. Click OK.

25. Go to the 14 Differential tax tab and enter the total tax paid on transactions reported in next financial year.
Note: The table below provides the worksheet name, table name and detailed description for this worksheet.
![]()
26. Once the details are entered, click the Validate Sheet button. In case of any errors, follow the steps as mentioned above to correct the errors.
27. A popup Message box appears “Sheet Successfully Validated. No error(s) found. Click OK.

28. Go to the 15 Demand & Refunds tab and enter the particulars of demands and refunds during the financial year.
Note: The table below provides the worksheet name, table name and detailed description for this worksheet.

29. Once the details are entered, click the Validate Sheet button. In case of any errors, follow the steps as mentioned above to correct the errors.
30. A popup Message box appears “Sheet Successfully Validated. No error(s) found. Click OK.

31. Go to the 16 Comp DS & Goods sent on appr tab and enter the summary of supplies received from Composition taxpayers, deemed supply by job worker and goods sent on approval basis.
Note: The table below provides the worksheet name, table name and detailed description for this worksheet.

32. Once the details are entered, click the Validate Sheet button. In case of any errors, follow the steps as mentioned above to correct the errors.
33. A popup Message box appears “Sheet Successfully Validated. No error(s) found. Click OK.

34. Go to the 17 HSN Outward tab and enter the HSN wise summary of outward supplies made during the financial year.
Note: The table below provides the worksheet name, table name and detailed description for this worksheet.

35. Once the details are entered, click the Validate Sheet button. In case of any errors, follow the steps as mentioned above to correct the errors.
36. A popup Message box appears “Sheet Successfully Validated. No error(s) found. Click OK.

37. Go to the 18 HSN Inward tab and enter the HSN wise summary of inward supplies received during the financial year.
Note: The table below provides the worksheet name, table name and detailed description for this worksheet.

38. Once the details are entered, click the Validate Sheet button. In case of any errors, follow the steps as mentioned above to correct the errors.
39. A popup Message box appears “Sheet Successfully Validated. No error(s) found. Click OK.

F. Generate JSON File to upload
To generate JSON File to upload, perform following steps:
1. From the tab you are on, go to the ‘Home’ sheet by either clicking the ‘Go Home’ button or clicking the ‘Home’ sheet.
2. Click the Generate JSON File to upload button.
3. A success message is displayed that “data in the sheets are successfully captured in the JSON file. Please save this file and upload in the online portal to initiate filing.”
4. A Save As pop-up window appears. Select the location where you want to save the JSON file, enter the file name and click the SAVE button.
G. Upload the generated JSON File on GST Portal
To upload the generated JSON File on the GST Portal, perform following steps:
1. Access the www.gst.gov.in URL. The GST Home page is displayed.
2. Login to the portal with valid credentials.
3. Dashboard page is displayed. Click the Services > Returns > Annual Return command. Alternatively, you can also click the Annual Return link on the Dashboard.
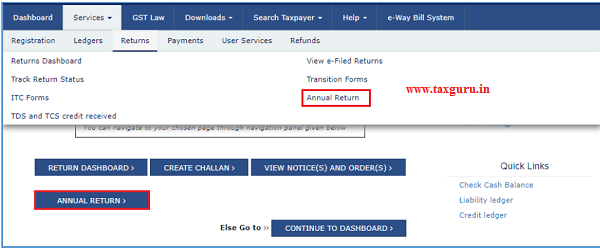
4. The File Annual Returns page is displayed. Select the Financial Year for which you want to file the return from the drop-down list.
5. Click the SEARCH button.

6. The GSTR-9 tile is displayed, with an Important Message box on the bottom. In the GSTR-9 tile, click the PREPARE OFFLINE button.
7. The Upload section of the Offline Upload and Download for GSTR-9 page is displayed. Click the Choose File button.
12. Browse and navigate the JSON file to be uploaded from your computer. Click the Open button.
13. The Upload section page is displayed. A green message appears confirming successful upload and asking you to wait while the GST Portal validates the uploaded data. And, below the message, is the Upload History table showing Status of the JSON file uploaded so far.
14. In case, there was some error in data uploaded, like Invalid GSTIN etc. then the Upload History table will show the Status of the JSON file as “Error Occurred”. Rectify the error and upload the JSON file again by following the steps mentioned in the hyperlink to download error report, if any: Download Error Report, If any: Download Error Report, If any
H. Preview Form GSTR-9 on the GST Portal
To preview Form GSTR-9 on the GST Portal, perform following steps:
1. Access the www.gst.gov.in URL. The GST Home page is displayed.
2. Login to the portal with valid credentials.
3. Dashboard page is displayed. Click the Services > Returns > Annual Return command. Alternatively, you can also click the Annual Return link on the Dashboard.
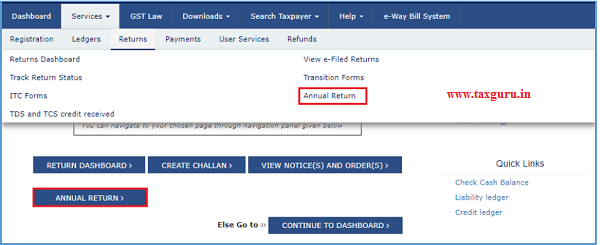
4. The File Annual Returns page is displayed. Select the Financial Year for which you want to file the return from the drop-down list.
5. Click the SEARCH button.

6. The GSTR-9 tile is displayed. In the GSTR-9 tile, click the PREPARE ONLINE button.
7. A question is displayed. You need to answer this question as to whether you want to file nil return for the financial year or not, to proceed further to the next screen.
Note: Nil return can be filed by you for the financial year, if you have:
- NOT made any outward supply (commonly known as sale); AND
- NOT received any goods/services (commonly known as purchase); AND
- NO other liability to report; AND
- NOT claimed any credit; AND
- NOT claimed any refund; AND
- NOT received any order creating demand
- There is no late fee to be paid etc.
8. Click the NEXT button.
9. The GSTR-9 Annual Return for Normal Taxpayers page is displayed.
10. The details you had successfully uploaded on the portal using the Offline Utility would be displayed in Table 4 to 18.
For knowing how to proceed to file and file the GSTR-9 Return online, please follow the steps mentioned in the following hyperlink: GSTR-9 Online Manual
I. Download Error Report, if any
To download the Error report, if any, while uploading GSTR-9 JSON File for correcting entries, that failed validation on the GST portal, perform following steps:
1. Error Report will contain only those entries that failed validation checks on the GST Portal. The successfully-validated entries can be previewed online. Click Generate error report hyperlink.
2. A confirmation-message is displayed and Columns Status and Error Report change as shown.
3. Once the error report is generated, Download error report link is displayed in the Column Error Report. Click the Download error report link to download the zipped error report.
4. The error JSON File is downloaded on your machine. Error Report will contain only those entries that failed validation checks on the GST portal.
5. Unzip and save the JSON File in your machine.
6. Import the JSON file into the offline utility and make updates as necessary, as explained below.
J. Open Downloaded Error GSTR-9 JSON File(s)
To open the downloaded Error GSTR-9 JSON File for correcting entries that failed validation on the GST portal, perform following steps:
1. Open GSTR-9 Offline Utility and go to the Home tab. Under the section Error File Handling, click the Open Downloaded Error JSON Files button.
2. A file dialog box will open. Navigate to extracted error file. Select the file and click the OK button.
3. Success message will be displayed. Click the OK button to proceed.
4. Navigate to individual sheets. Correct the errors, as mentioned in the column “GST Portal Validation Errors” in each sheet.
5. After making corrections in a sheet, click the Validate Sheet button to validate the sheet. Similarly, make corrections in all sheets and click the Validate Sheet button in each sheet.
6. From the tab you are on, go to the Home tab by either clicking the Go Home button or clicking the Home tab to generate summary. Follow steps mentioned in the following hyperlinks to generate and upload the JSON file: Generate JSON File to upload and Upload the generated JSON File on GST Portal.
(Republished with amendment till 12.06.2019 in FAQs)
(Republished with amendments)
****
Disclaimer: The contents of this article are for information purposes only and does not constitute an advice or a legal opinion and are personal views of the author. It is based upon relevant law and/or facts available at that point of time and prepared with due accuracy & reliability. Readers are requested to check and refer relevant provisions of statute, latest judicial pronouncements, circulars, clarifications etc before acting on the basis of the above write up. The possibility of other views on the subject matter cannot be ruled out. By the use of the said information, you agree that Author / TaxGuru is not responsible or liable in any manner for the authenticity, accuracy, completeness, errors or any kind of omissions in this piece of information for any action taken thereof. This is not any kind of advertisement or solicitation of work by a professional.


While submitting GSTR 9A we are getting “Error! Invalid summary payload”
Please reply
I have uploaded the jason file on gst portal all thing ok but while I am validating the return with OTP it shows Error! Invalid summary payload. Any suggestion to resolve the same
I HAVE FIELD 15 GSTR-9 . FILE THE SAME –YOUR PROBLEMS WILL BE SOLVED — THIS IS GOOD FORM –WRONG ITC WILL STOP — READ ARTICLE OF TAXGURU — tax practitioners and CA WILL GOOD FEES
Im facing run time error – subscription out of range. Any Sulutions for the same?
Sir if the annual return is not completed and finalized yet, while using offline utility. Would it be possible that i can prepare other client annual return in same offline utility without altering previous client data ?
In Tab 18-HSN Inward supplies of GSTR 9, do we need to disclose hsn wise details of all the purchases or only taxable purchases??
Please reply