A. Form GSTR-7 – FAQ
Q.1 What is Form GSTR-7?
Ans: Form GSTR-7 is a return which is required to be filed by the persons who deduct tax at the time of making/crediting payment to suppliers towards the inward supplies received. Tax deductor has a legal obligation:
- To declare his TDS liability for a given period (monthly) in Form GSTR-7;
- Furnish details of the TDS deducted under three major heads viz., Central tax, State/UT tax and Integrated tax in accordance with that return;
- File correct and complete return within stipulated time frame, given the fact that the TDS credit will be available to the counter party taxpayer (supplier) upon filing of TDS return in Form GSTR-7 by the Deductor (i.e., person liable to deduct TDS); and
- Issue TDS certificate to the deductee.
Q.2 Who needs to file Form GSTR-7?
Ans: As per section 51 of the CGST Act, following persons/entities/establishments are required to deduct TDS.
1. a department or establishment of the Central Government or State Government;
2. local authority;
3. Governmental agencies; and
4. such persons or category of persons as may be notified by the Government on the recommendations of the Council.
Q.3 By when do I need to file the Form GSTR-7?
Ans: The due date for filing Form GSTR-7 is 10th day of the succeeding month.
Q.4 From where can I as Deductor file Form GSTR-7?
Ans: Form GSTR-7 can be accessed on the GST Portal, post login in the Returns Dashboard by the taxpayer.
The path is Services > Returns > Returns Dashboard.
Q.5 Is there any Offline Tool for filing Form GSTR-7?
Ans: Yes. GSTR 7 return can be filed through offline mode also.
Q.6 Can the date of filing of Form GSTR-7 be extended?
Ans: Yes, date of filing of Form GSTR-7 can be extended by Government through notification.
Pre-conditions of Filing Form GSTR-7
Q.7 What are the pre-conditions for filing Form GSTR-7?
Ans: Pre-conditions for filing of Form GSTR-7 are:
- Tax Deductor should be registered as Tax Deductor and should have a valid/active GSTIN.
- Tax Deductor should have valid User ID and password.
- Tax Deductor should have active & non-expired/ revoked digital signature (DSC) in case return is filed through DSC.
- Tax Deductor has made payment or credited the amount to the supplier’s account.
Nil Form GSTR-7
Q.8 Do I need to file Form GSTR-7 even if no TDS is deducted in the tax period?
Ans: It is not mandatory to file nil return, in such case.
Entering Details in Tables of Form GSTR-7
Q.9 How can I discharge my TDS liability?
Ans: TDS liability can be discharged through Electronic Cash Ledger only at the time of filing return.
Q.10 Can the deductee take action on the TDS credit declared by me?
Ans: The deductee can accept/ reject the TDS details auto-populated to TDS and TCS Credit received table of his/her return. Taking action by deductee is mandatory for crediting the amount of TDS to cash ledger.
Q.11 When TDS amount will be credited to deductee’s Electronic Cash Ledger?
Ans: TDS amount will be credited to deductee’s Electronic Cash Ledger only after his/ her accepting of TDS and TCS credit received (which is auto populated on filing of returns by the deductor) and filing of this relevant form.
Q.12 What will happen if the TDS credit entry is rejected by the deductee?
Ans: TDS credit entries rejected by the deductee will be auto-populated into Table 4 of Form GSTR-7 and the relevant details will be required to be amended by the deductor in Form GSTR-7 of next tax period. Post correction of such details in Form GSTR-7, the data will automatically flow to concerned GSTIN (supplier) for accepting or rejecting it. This process will be repeated until TDS details are accepted by counter-party.
Q.13 What will happen if the TDS credit entry is rejected by the deductee?
Ans: The TDS credit entries rejected by the deductee will be auto-populated into Table 4 of Form GSTR-7 of next tax period of the deductor and the relevant details will be required to be amended by the deductor. Post correction of such details in Form GSTR-7 by the deductor, the data will automatically flow to TDS/TCS credit form of the deductee, for accepting or rejecting the same. This process will be repeated until TDS details are accepted by the deductee.
Note: If details are auto populated in table 4 under ‘rejected by deductee’ tab interest will be levied on differential amount, if TDS amount is increased.
Q.14 I made no deductions during the tax period, however there is a rejected record in that tax period, do I need to file the return?
Ans: No, it is not necessary to file return for a tax period in which you have not made any deductions, even if there are rejected records in that month. The record will be auto-drafted in the subsequent tax period for which you intend to file the return, wherein you would be able to amend the rejected records in Table-4 of Form GSTR-7.
For example: Let us assume that the deductor doesn’t have any TDS deductions for the month of April, 2020, but there is a rejected record in that tax period. In such case, it is not necessary to file Form GSTR-7 for April, 2020 by the deductor.
In case the deductor has tax liability for the month of May, 2020, then in that tax period, the deductor can take action on such rejected records and file Form GSTR-7 for May 2020.
Filing & Paying Late Fee
Q.15 Is there any late fee or interest levied on filing of GSTR-7 return beyond the due date?
Ans: Yes, late fee and interest are charged on filing of Form GSTR-7 beyond the due date. However, Form GSTR-7 need not be filed, if you have not deducted tax at source in a particular tax period.
For example: Let us assume that the deductor doesn’t have any TDS deductions for the month of April, 2020, in such case it is not necessary to file Form GSTR-7 for April 2020.
Q.16 How can I offset my liabilities?
Ans: You can offset the liabilities by clicking the table 5 &6. Payment of Tax tiles.
- If available cash balance in Electronic Cash Ledger is less than the amount required to offset the liabilities, then additional amount of cash payment will be required. You may create challan for that additional amount of cash required directly by clicking on the CREATE CHALLAN button at the bottom of page.
- If available cash balance in Electronic Cash Ledger is more than/equal to the amount required to offset the liabilities, no additional cash is required for offsetting liability.
Previewing & Signing Form GSTR-7
Q.17 What are the modes of signing Form GSTR-7?
Ans: You can file Form GSTR-7 using DSC, or EVC.
Digital Signature Certificate (DSC)
Digital Signature Certificates (DSC) are the digital equivalent (that is electronic format) of physical or paper certificates. A digital certificate can be presented electronically to prove one’s identity, to access information or services on the Internet or to sign certain documents digitally. In India, DSC are issued by authorized Certifying Authorities.
The GST Portal accepts only PAN based Class II and III DSC.
To obtain a DSC, please contact any one of the authorised DSC-issuing Certifying Authorities: http://www.cca.gov.in/cca/?q=licensed_ca.html
Electronic Verification Code (EVC)
The Electronic Verification Code (EVC) authenticates the identity of the user at the GST Portal by generating an OTP. The OTP is sent to the mobile phone number of the registered mobile phone of Authorized Signatory filled in part A of the Registration Application.
Q.18 Can I preview the Form GSTR-7 before filing?
Ans: Yes, you can see the preview of Form GSTR-7 by clicking on ‘Preview Draft GSTR 7’ before filing on the GST Portal.
Post Filing of Form GSTR-7
Q.19 What happens after Form GSTR-7 is filed?
Ans: After Form GSTR-7 is filed:
- ARN is generated on successful filing of Form GSTR-7 Return.
- SMS and email are sent to the applicant/TDS deductor on his/her registered mobile and email id.
- The details provided in Table 3 and Table 4 are sent to the deductee, the counter-party for action (Accept/Reject).
- The return will become available in the Dashboard of tax officer for view.
B. Manual > GSTR-7
1. How can I create, submit and file details in Form GSTR-7?
To create, submit and file details in Form GSTR-7, perform following steps:
A. Login and Navigate to Form GSTR-7 page
B. Enter details in various tiles
C. Preview Form GSTR-7
D: Payment of Tax
E. File Form GSTR-7 with DSC/ EVC
F. View Debit entries in Electronic Cash Ledger for tax payment
G. Download Filed Return
A. Login and Navigate to Form GSTR-7 page
1. Access the www.gst.gov.in URL. The GST Home page is displayed.
2. Login to the GST Portal with valid credentials.
3. Click the Services > Returns > Returns Dashboard command.
Alternatively, you can also click the Returns Dashboard link on the Dashboard.

4. The File Returns page is displayed. Select the Financial Year & Return Filing Period (Month) for which you want to file the return from the drop-down list.
5. Click the SEARCH button.
6. The File Returns page is displayed. In the GSTR-7 tile, click the PREPARE ONLINE button if you want to prepare the return by making entries on the GST Portal.

7. The GSTR-7 – Return for Tax Deducted at Source Return page is displayed.

B. Enter details in various tiles
Click on the tile names to know more and enter related details:
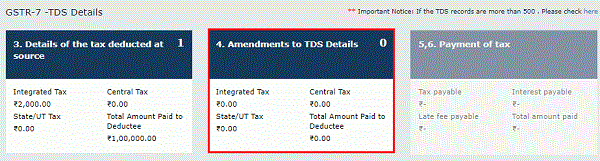
8 (a) 3. Details of the tax deducted at source: To add details of the tax deducted at source
8 (b) 4. Amendments to TDS Details: To amend details of the tax deducted at source in respect of any earlier tax period
8(a) 3. Details of the tax deducted at source
8.1. Click the 3. Details of the tax deducted at source tile to add details of the tax deducted at source.

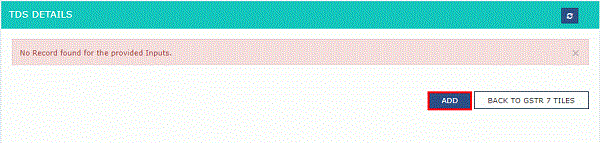
8.2. Click the ADD button.
 8.3. In the GSTIN of Deductee field, enter the GSTIN of Deductee.
8.4. Enter the amount paid to deductee on which tax has been deducted.
8.5 (a). If deductor and deductee are having different State-code, then you need to enter the details for Integrated Tax and total tax amount should be equal to 2% of the amount shown as “Total amount paid to deductee on which tax is deducted”. If POS lies in the State of recipient, then no TDS as IGST shall be deducted, as the tax on the invoice will be CGST and SGST/UTGST.

8.5 (b) If deductor and deductee both are having same State-code, then GST Portal will allow entry of all the 3 taxes, IGST/CGST/SGST.
Note: If Deductor and deductee are located in SEZ, then the IGST should be levied irrespective of place of supply.
At least one tax column should be entered out of three tax columns (Integrated Tax, Central Tax and State/UT Tax) and total tax amount should be equal to 2% of the amount shown as “Total amount paid to deductee on which tax is deducted”.

8.6. Click the SAVE button.
8.7. You will be directed to the previous page and a message is displayed that TDS details added successfully. You need to give separate entries of TDS details for each of the deductee.
8.8. Here, you can also edit/delete the added details (under Actions column). Click the BACK TO GSTR 7 Dashboard button to go back to the Form GSTR-7 Dashboard page

8.9. You will be directed to the GSTR-7 Dashboard landing page and the 3. Details of the tax deducted at source box in Form GSTR-7 will reflect the number of TDS entries added along with total tax amount and total amount paid to Deductee.

8(b) 4. Amendments to TDS Details
8.1. Click the 4. Amendments to TDS Details box to amend details of the tax deducted at source in respect of any earlier tax period and also to modify TDS details rejected by deductee.
8.2 (a) Uploaded By Deductor Tab:
8.2 (b) Rejected By Deductee Tab:
8.2 (a) Uploaded By Deductor Tab:
8.2. Select the Financial Year and Month from the drop-down list.
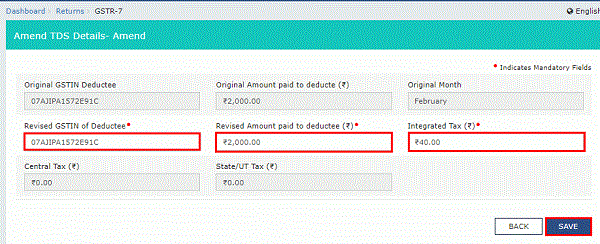
8.3. In the Please Enter GSTIN field, enter the GSTIN of the Deductee of previous tax period which needs to be amended.
8.4. Click the AMEND TDS DETAILS button.

8.5. Make amendments to the details as required. Click the SAVE button.
8.6. You will be directed to the previous page and a message is displayed that TDSA details added successfully.
Here, you can also edit/delete the amended details (under Actions column). Click the BACK TO GSTR 7 DASHBOARD button to go back to the Form GSTR-7 Dashboard page.

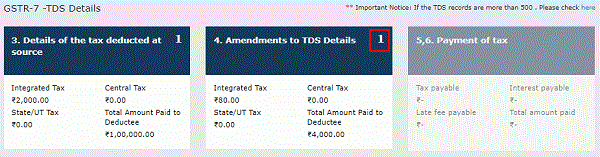
8.7. You will be directed to the GSTR-7 Dashboard page and the 4. Amendments to TDS Details tile in Form GSTR-7 will reflect the sum of number of TDSA entries added by the deductor on his own & modified in respect of the rejected details by deductee, along with total tax amount and total amount paid to deductee.
8.2 (b) Rejected By Deductee Tab:
8.2. Select the Rejected By Deductee tab.

8.3. Click the EDIT button to edit the details.

8.4. Edit the details. Deductor can amend the GSTIN of Deductee, Revised amount paid to deductee and all tax columns. Click the SAVE button.

8.5. Once the details are edited, the status is changed to modified. Click the BACK TO GSTR 7 DASHBOARD button to go back to the Form GSTR-7 Dashboard page.
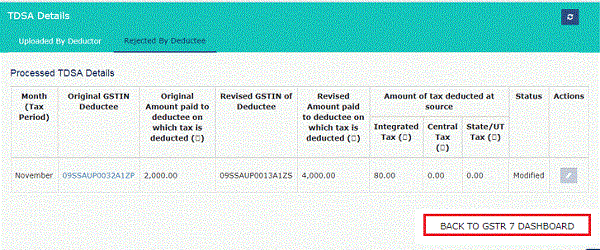
8.6. You will be directed to the GSTR-7 Dashboard page and the 4. Amendments to TDS Details tile in Form GSTR-7 will reflect the sum of number of TDS entries added & modified the details rejected by deductee, along with total tax amount and total amount paid to deductee.

C. Preview Form GSTR-7
9. Once you have entered all the details, click the PREVIEW button. This button will download the draft summary page of your Form GSTR-7 for your review. It is recommended that you download this Summary page and review the summary of entries made in different sections carefully. The PDF file generated would bear watermark of draft as the details are yet to be submitted.

10. The downloaded PDF is displayed.

D. Payment of Tax
11. Click the PROCEED TO FILE button

12. A message is displayed on top page of the screen that ‘Proceed to file’ request has been received. Please check the status after sometime. Click the Refresh button.

13. Once the status of Form GSTR-7 is Ready to File, 5,6. Payment of Tax tile gets enabled. Click the 5,6. Payment of Tax box.

14.1. The cash balance available in the electronic cash ledger as on date are shown in below table.

14.2 (a). Scenario 1: If available cash balance in Electronic Cash Ledger is less than the amount required to offset the liabilities
i. If available cash balance in Electronic Cash Ledger is less than the amount required to offset the liabilities, available cash balance is shown to be as utilized from the Electronic Cash Ledger. You may create challan for the additional cash directly by clicking on the CREATE CHALLAN button.

ii. The Create Challan page is displayed.
Note: In the Tax Liability Details grid, the Total Challan Amount field and Total Challan Amount (In Words) fields are auto-populated with total amount of payment to be made. You cannot edit this amount.
iii. Select the Payment Modes as E-Payment/ Over the Counter/ NEFT/RTGS.
iv. Click the GENERATE CHALLAN button.

v. The Challan is generated.

Note:
In case of Net Banking: You will be directed to the Net Banking page of the selected Bank. The payment amount is shown at the Bank’s website.
In case of successful payment, you will be re-directed to the GST Portal where the transaction status will be displayed.
In case of Over the Counter:
Take a print out of the Challan and visit the selected Bank. Pay using Cash/ Cheque/ Demand Draft within the Challan’s validity period. Status of the payment will be updated on the GST Portal after confirmation from the Bank.
In case of NEFT/ RTGS:
Take a print out of the Challan and visit the selected Bank. Mandate form will be generated simultaneously. Pay using Cheque or through your account with the selected Bank/ Branch. You can also pay using the account debit facility. The transaction will be processed by the Bank and RBI shall confirm the same within <2 hours>. Status of the payment will be updated on the GST Portal after confirmation from the Bank.
Click here to refer the FAQs and User Manual on Making Payment.
14.2 (b). Scenario 2: If available cash balance in Electronic cash ledger is more than the amount required to offset the liabilities
i. If available cash balance in Electronic Cash Ledger is more than the amount required to offset the liabilities, no additional cash is required for paying liability.
15. Click the PREVIEW DRAFT GSTR7 button to view the summary page of Form GSTR-7 for your review. It is recommended that you download this Summary page and review the summary of entries made in different sections carefully before making payments.

16. The summary page of Form GSTR-7 is displayed.

E. File Form GSTR-7 with DSC/ EVC
17. Select the Declaration checkbox.
18. Select the Authorized Signatory from the drop-down list.
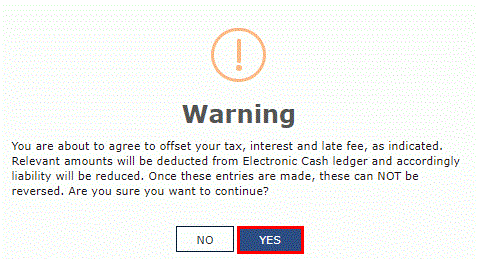
19. Click the FILE GSTR7 button.

20. Click the YES button.
21. The Submit Application page is displayed. Click the SUBMIT WITH DSC or SUBMIT WITH EVC button.

22.1. SUBMIT WITH DSC:
a. Select the certificate and click the SIGN button.
22.2. SUBMIT WITH EVC:
a. Enter the OTP sent on email and mobile number of the Authorized Signatory registered at the GST Portal and click theVALIDATE OTP button.

23. The success message is displayed and ARN is displayed. Status of the GSTR-7 return changes to “Filed”. Click the BACK button.

F. View Debit entries in Electronic Cash Ledger for tax payment
24. Click the Debit entries in electronic cash ledger for TDS/interest payment tile.
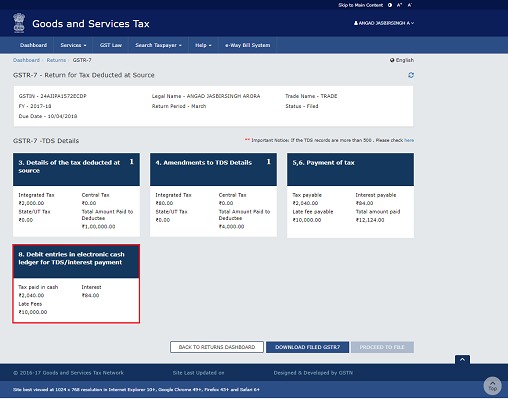
25. The entries in Electronic Cash Ledger for tax payment is displayed. Click the BACK TO GSTR 7 TILES button.

G. Download Filed Return
26. Click the DOWNLOAD FILED GSTR7 button to download the filed return.

27. The PDF file generated would now bear watermark of final Form GSTR-7.

(Republished with amendments)
****
Disclaimer: The contents of this article are for information purposes only and does not constitute an advice or a legal opinion and are personal views of the author. It is based upon relevant law and/or facts available at that point of time and prepared with due accuracy & reliability. Readers are requested to check and refer relevant provisions of statute, latest judicial pronouncements, circulars, clarifications etc before acting on the basis of the above write up. The possibility of other views on the subject matter cannot be ruled out. By the use of the said information, you agree that Author / TaxGuru is not responsible or liable in any manner for the authenticity, accuracy, completeness, errors or any kind of omissions in this piece of information for any action taken thereof. This is not any kind of advertisement or solicitation of work by a professional.


Would you please clarify how to enter the details of Tax deducted from unregistered suppliers in Form GSTR -7 and oblige ?
sir thanks it is requested that kindly provide any dummy of gst portal for practice which will be more helpful
sir thank you for the detailed explanation. but as government office, the contractor bills will be sent to treasury and the gst will be deducted by treasury and payment will be made to contractor for the balance amount directly by treasury. there will not be any payment of chalan by government organsations for the tds made by them. seems the article is silent about how to fill the chalan details or how to take credit for the tds confirmed by the treasury. pls clarify