ICEGATE
Directorate General of Systems and Data Management
CENTRAL BOARD OF INDIRECT TAXES & CUSTOMS
Advisory No: 03/2023 Date: 25th March, 2023
Category: Customs – Issued by: ICEGATE
Advisory for Importers to avail benefit of IGCR Rules (Import of Goods at Concessional Rate of duty)
IGCR module is developed by ICEGATE, CBIC to provide a digital service to importers to avail benefits under the IGCR Rules (Import of Goods at Concessional Rate of Duty).
The broad provisions are as under:
i. Available post log in on ICEGATE for importers in their existing account, registered with valid DSC.
ii. Provision of declaration of advance intimation of Import of Goods at concessional rate of duty.
iii. Generation of a unique IIN for a Financial Year with facility to amend as and when required.
iv. A continuity Bond of IGCR Bond Type is created or amended by the Importer.
v. Bond Management Module
vi. Multiple Details are auto populated in the monthly statement.
vii. Interface of details entered by the user provided to the jurisdictional Customs officer
2. This advisory is a complete step-by-step guide for the user to declare an advance intimation of goods to be imported, access continuity bond management module, file monthly return statements.
Page Contents
- A. Access IGCR Module
- B. Submit Prior Intimation Request by Importer
- B. 1 New Prior Intimation:
- B.2 Data Entry using Webform:
- C. BOND/ BG Details
- C. 1 Create Fresh Continuity Bond
- C. 2 Top Up/Amend Existing Continuity Bond
- C.3 View Bond Utilization Details
- D. Monthly Return Statement
- D. 1 File Monthly return through webform
- D.2 File Monthly return through Excel Upload Utility
- E. Declare Short/non-Receipt of Imported goods (IGCR 2)
A. Access IGCR Module
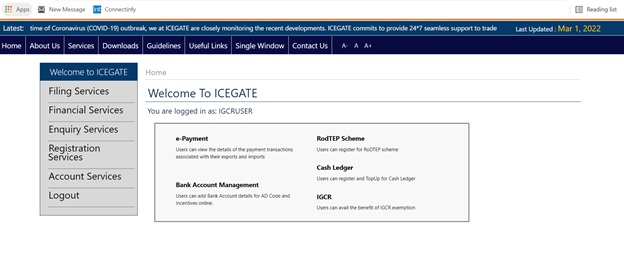
Step 1. The user logs in ICEGATE portal with valid ICEGATE ID and password.
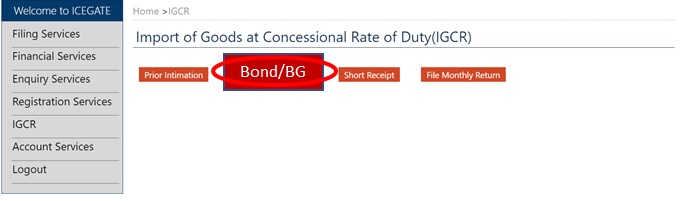
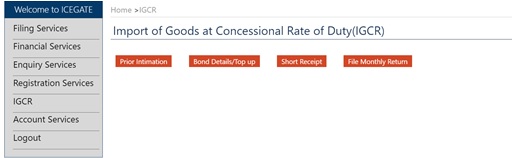
Step 2. Click on IGCR on the left panel to view the home screen of IGCR module as shown below. The user is given 4 options as follows.
a. Prior Intimation- Select this to declare the details of goods intended to be imported or manufactured, job workers (if any) and details of manufacturing unit of Importer or Job worker.
b. Bond Details/ Top up- Select this to request for a fresh continuity bond or top up the already created bond. Bond Balance is also displayed to the user.
c. Short Receipt- Select this to declare the short or non- receipt of any imported goods in the premises of Importer.
d. File Monthly Return- Select this to declare and submit the monthly return statement by the users.
B. Submit Prior Intimation Request by Importer
Step 1: User can access the IGCR module as explained in Part A of the document. User can select Prior Intimation on the home screen of the module to submit an intimation of the intended import or view his previous intimations.

Step 2: A dashboard will be displayed to the user with all the previous IGCR Identification Numbers (IINs) created by him.

B. 1 New Prior Intimation:
Step 1: User can click on “New Prior Intimation” on the right side as shown to declare the details of the new import to be done by the user.

Step 2. Prior Intimation Request form with eight tabs is displayed to the user.
a. Details of Importer – Details of the Importer
b. Goods to be Imported – Details of the goods intended to be imported
c. Notification details and Intended Purpose – Details of Notification benefit to be availed
d. Goods to be manufactured – Details of the goods intended to be manufactured
e. Manufacturing facilities to be used by Job Worker – Details of Job workers if any
f. Manufacturing facilities in case of Unit Transfer – Details in case of Unit Transfer
g. Manufacturing facilities to be used by Importer – Details of manufacturing facilities
h. Details of End User Reciepient – Details of end use recipient
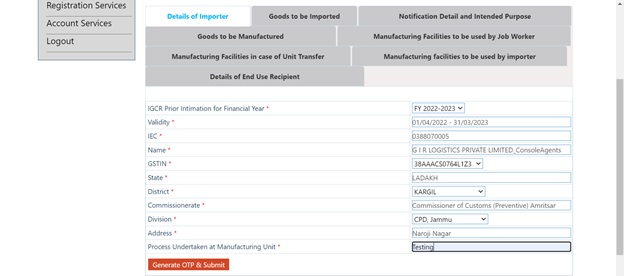
Step 3. User needs to enter the following details in the Details of Importer tab.
a. Prior Intimation for Financial Year – User needs to select the FY for filing.
b. IEC – This will be entered by the system as per the login details
c. Validity – User will select IIN valid from date from the drop down
d. Name – This will be entered by the system as per the login details
e. GSTIN – User can select from the drop down of GSTINs available in the system
f. State – This will be entered by the system as per the GSTIN details
g. District – This will be entered by the system as per the GSTIN details
h. Commissionerate – This will be entered by the system as per the above details
i. Division – This will be entered by the system as per the above details
j. Address – Address of the premises of the Importer/manufacturer
k. Process undertaken at Manufacturing Unit of the Importer
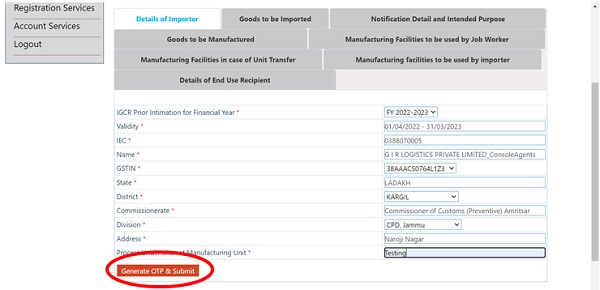
Step 4: Once the user clicks on “Generate OTP and Submit”, a confirmation will be asked from the user as described below.

Step 5: User will be asked for OTP based authentication. The OTP will be sent to the registered ICEGATE email id and mobile number. In case the OTP is not received, user can click on “Resent OTP”. User will click on “Verify and Submit” after entering the valid OTP.

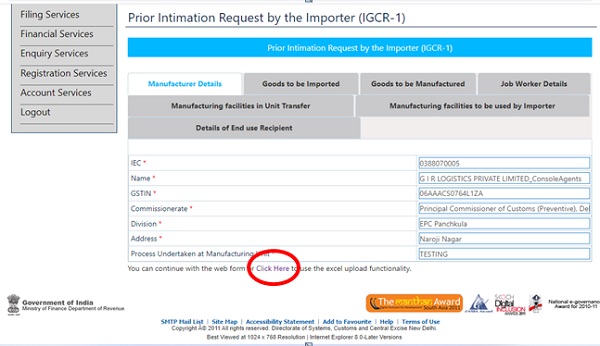
Step 6: After OTP validation is completed, IIN will be generated by the system and shown to the user as below.

Step 7: Details of the Importer screen will be shown to the user. User can proceed ahead to enter the other details of the webform like Goods to be Imported, Goods to be manufactured, Job Worker Details. In case the data to be entered by the user is more than 200 records or otherwise for convenience, user has an option to use the upload functionality provided by the system to enter or update the data. For that user needs to click on “Click here” button on the bottom of the page as shown below.
B.2 Data Entry using Webform:
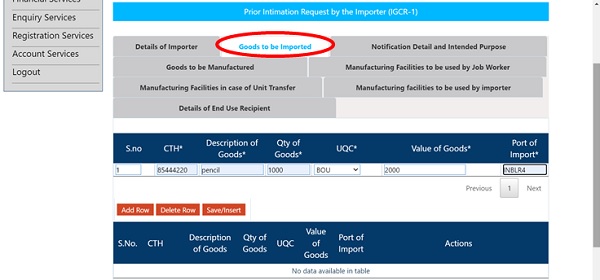
Step 1: User needs to enter the following information in the Goods to be imported tab. All these details will be corresponding to the goods intended to be imported by the importer.
a. CTH
b. Description of Goods
c. Quantity of Goods –
d. UQC
e. Value of Goods
f. Port of Import
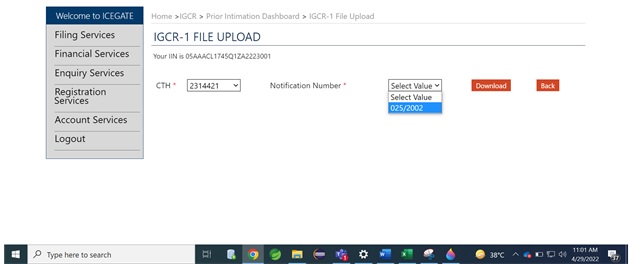
Step 2: User needs to enter the following information in Notification Detail and Intended Purpose tab.
CTH – CTH of the Goods to be manufactured
b. Notification Number
c. S. No. in the Notification
d. Type of Intended Purpose
e. Goods Description Details
f. SAC Code– Service Accounting Code which is optional field and relevant only for the service providers.

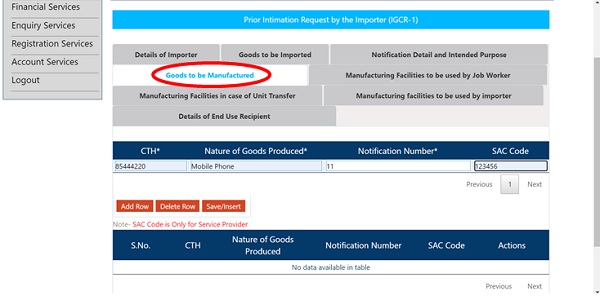
Step 3: User needs to enter the following information in Goods to be manufactured tab.
a. CTH – CTH of the Goods to be manufactured
b. Nature of goods produced
c. Notification Number
d. SAC Code – Service Accounting Code which is optional field and relevant only for the service providers.
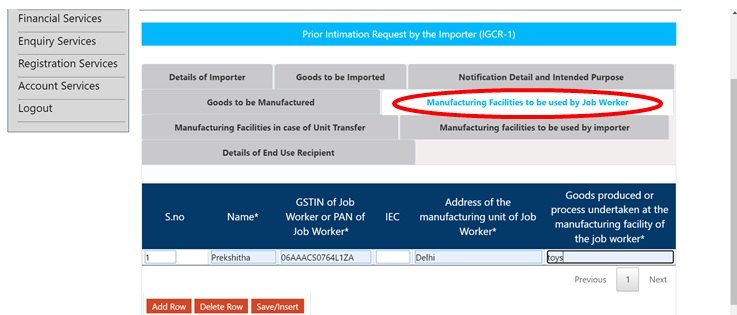
Step 4: User needs to provide the following details in the Manufacturing Facilities to be used by Job Worker details section.
a. GSTIN
b. Name
c. Address of the manufacturing unit of Job Worker
d. Process undertaken at Unit of the Job Worker
e. Goods produced or process undertaken at the Manufacturing faciltiy of the job worker
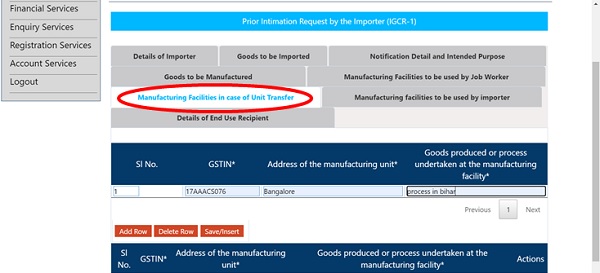
Step 5: User needs to provide the following details in the Manufacturing facilities in Unit transfer details section.
a. GSTIN
b. Address of the Manufacturing Unit
c. Goods produced or process undertaken at the Manufacturing faciltiy
Step 6: User needs to provide the following details in the details of Manufacturing facilities to be used by Importes details section.
a. GSTIN
b. Address of the manufacturing unit
c. Goods produced or process undertaken at the Manufacturing faciltiy of the importer

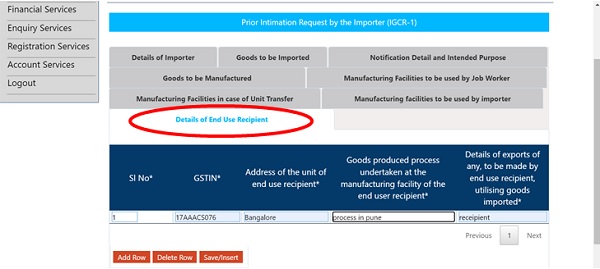
Step 7: User needs to provide the following details in the details of Manufacturing facilities to be used by Details of End Use Recipient section.
a. GSTIN
b. Address of the unit of end use recipient
c. Goods produced or process undertaken at the Manufacturing faciltiy of the end use recipient
d. Details of exports, if any.
B. 3 Data Entry using Upload Facility
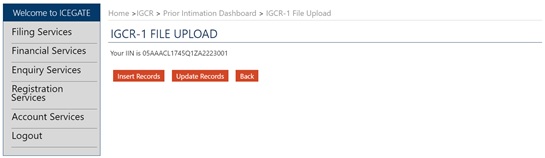
Step 1: After submitting the Manufacturing Details and generation of IIN by the system, user can choose to enter or edit the data using the upload functionality.

Step 2: User will be redirected to the below page and can click on Insert Records or Update Records as required.
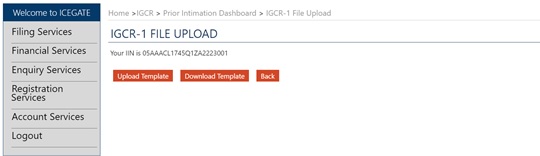
Step 3 Insert Records: User can click on “Download Template” to download the excel sheet template in which the data can be entered by the users.
Step 4: A sample template is attached as below, will be downloaded. User can enter the required data.
| CTH | DESCRIPTION OF GOODS | QTY OF GOODS | UQC | VALUE OF GOODS | NOTIFICATION NUMBER | PORT OF IMPORT |
–
NATURE_OF_GOODS_PRODUCED |
NOTIFICATION_NUMBER |
SAC_CODE |
Step 5: After saving the required file, user can click on “Upload Template” button. The following page will appear for the user. User will upload the saved file and click on “Submit”.
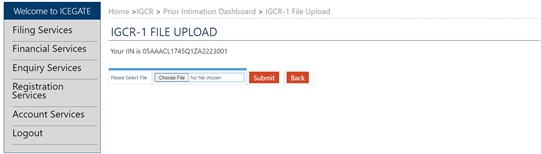
Step 6: User will be asked for an OTP based authentication before the final submit. OTP will be sent to the registered Email ID and Mobile Number. User can also click on “Resent OTP” in case the OTP is not received by the user. User will click on “Verify and Submit” after entering the required OTP.

Step 7: Updating existing records
User will click on “Update Records” button on the utility page in order to update or delete the existing records.

Step 8: User will click on “Download template” in order to download the saved file.

Step 9: User will enter the CTH and Notification Number and click on Download for which the records will be included in the template.
Step 10: User will click on “Upload Template” on the File Upload utility.

Step 11: There will be two options available to the user.
a. Update – In order to update the existing records in the saved file
b. Delete- In order to delete the existing records in the saved file

Step 12: After clicking on Submit, user will be directed for OTP based authentication as below.

C. BOND/ BG Details
User can access the IGCR module as explained in Part A of the document. User can select Bond/BG Details on the home screen of the module to submit a request for a fresh continuity bond or top up the existing continuity bond or view balance of the bond or provide BG details.
C. 1 Create Fresh Continuity Bond
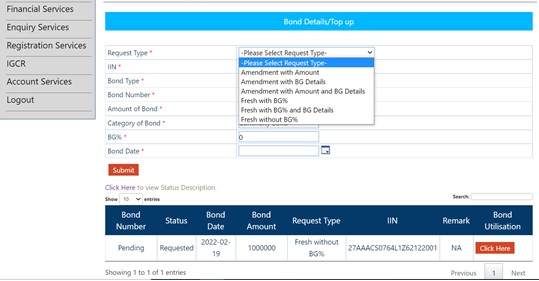
Step 1: User is required to fill the following information to create a new request for a fresh Continuity Bond.
a. Request Type – User can select the following options.
a.1 Fresh without BG%- BG% field will be disabled for the user because the BG% is zero
a.2 Fresh with BG%- User can enter the BG%. This is used in case the user doesnot have BG details at the time of request submission. User can submit the BG details later on by selecting Amendment with BG details in the request type.
a.3 Fresh with BG% and BG details- User can enter the BG % in the field provided. Along with this, user will provide details of the Bank guarantee as provided below –
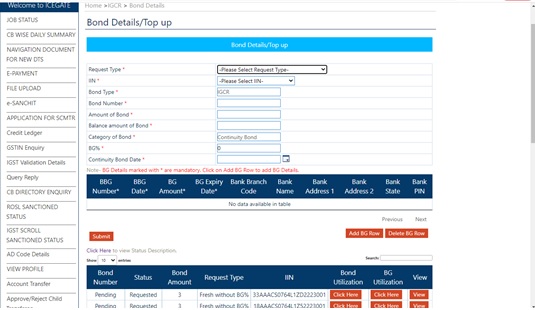
b. IIN – User to select the IGCR Identification Number (IIN) created after declaring prior Intimation request.
c. Bond Type – IGCR will be selected automatically
d. Continuity Bond Number – This will be NA in case of a fresh bond request
e. Amount of Bond – To be entered by the user
f. Balance Amount of Bond – To be auto populated based on bond number
g. Category of Bond – Continuity Bond will be selected automatically
h. BG – Bank Guarantee percentage Involved
i. Continuity Bond Date – Current date can be entered by the user
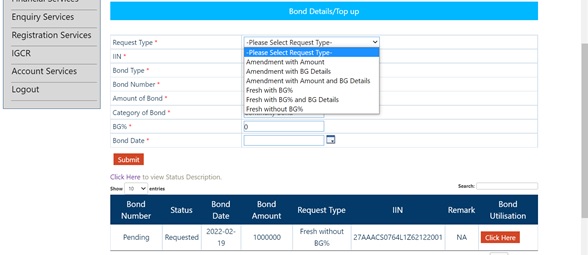
C. 2 Top Up/Amend Existing Continuity Bond
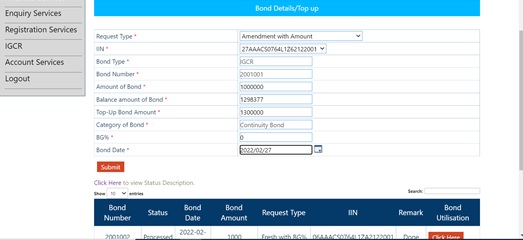
Step 1. User is required to fill details in the following fields to amend an existing bond.
a. Request Type – User can select the following options.
a.1 Amendment with Amount- To be selected in case of Bond Top Up Requests.
a.2 Amendment with BG details- To be selected in case of providing only BG details
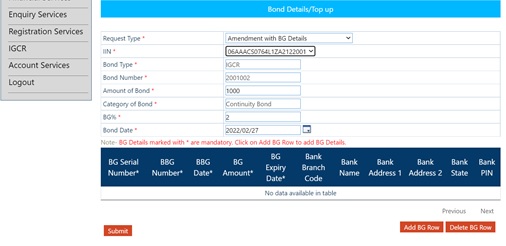
a.3 Amendment with Amount and BG Details- To be selected in case of Bond Top Up and providing BG details

b. IIN – User to select the IGCR Identification Number (IIN) created after declaring prior Intimation request.
c. Bond Type – IGCR will be selected automatically
d. Bond Number – This will be pre-filled by system
e. Amount of Bond – The original amount of the bond when it was created
f. Balance amount of Bond – The balance of the bond after utilization
g. Top Up Bond Amount – The amount to be added to the balance amount of Bond. Please note that the top up
bond amount cannot be less than amount of bond.
h. Category of bond – Continuity Bond will be selected automatically
i. BG – Bank Guarantee percentage involved
j. Continuity Bond Date – Current date can be selected by the user
Step 2: Subsequently, the physical copy of the bond and bank guarantee, wherever applicable will be submitted by the importer to the jurisdictional customs officer. The Bond format is shared in Annexure A and Adding BG/Bond Amendment format is shared in Annexure B of Circular No. 04/2022-Customs.
Upon acceptance, the jurisdictional customs officer shall approve the bond request on the IGCR module at ICEGATE. The user can view the status of requests as explained in the next section.
C.3 View Bond Utilization Details
Users can view the status of the Bonds created or amended with BG details, wherever applicable in a dashboard available on the screen.

The explanation of the Bond Status is given as below.
a. Requested- New Request initiated by the user (Fresh or Amendment request)
b. Processed – Bond Request is processed by Customs and is pending with Customs Officer to Accept or Reject.
c. Processed with Error – Bond request is processed by Customs with an error. Error Descriptions are mentioned as below:
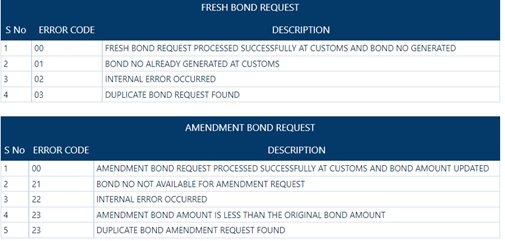
d. Accepted – Bond request is processed by Customs and accepted by Customs officer.
e. Rejected – Bond request is rejected by Customs Officer.
D. Monthly Return Statement
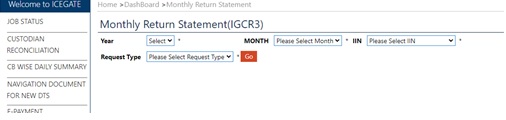
Step 1: User can access the IGCR module as explained in Part A of the document. User can select “File Monthly Return” on the home screen of the module to submit the utilization of the imported goods in a particular month.
Step 2: User can select the Financial Year and Month and IIN for which the utilization details are to be submitted. User can select from the following options in Request Type Drop Down.
a. Web Form – In case the number of records are less than 200 and the user intends to enter the data in a webform
b. Upload Excel – In case the number of records are more than 200 or the user intends to enter the data in an excel form.
Please note that user needs to submit the return statement for a month latest by 10th of the following month. User cannot proceed to declare the utilization of a month without submitting the details of the previous month.
D. 1 File Monthly return through webform
Step 1:In case the user selects, Web Form as Request Type in the above screen, the following webpage will appear for the user. User is required to provide information in the following four tabs.
a) Goods Imported: Details of goods actually imported by the importer.
b) JW and Unit Transfer Details: Details of goods shared/received for/from job work
c) Re-export: Details of goods re-exported
d) Home Consumption: Details of goods cleared in domestic market after payment of duty
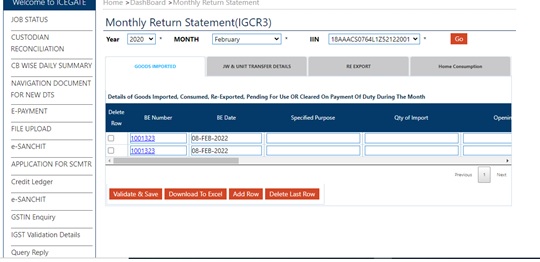
Step 2: User needs to enter the following information in the Goods Imported Tab.
a. BE Number – As per the details of the imported goods
b. BE Date – As per the details of the imported goods
c. Specified Purpose – As per the details of the imported goods
d. Quantity of Import – Quantity of goods actually imported
e. Opening Balance – Opening Balance of the quantity of goods for the month selected.
f. Date of clearance – Date of import
g. Value of Goods – In INR
h. Duty foregone – Amount of duty involved (BCD, Cess, Other Customs Duty, IGST)
i. Quantity Received – To be entered by the user
j. Date of receipt of Goods – Date of receipt of goods in the premises of the Importer
k. Quantity not received – Quantity of goods not received in the premises of the Importer. This should also be declared in IGCR 2 form, as explained in section E of the document.
l. Quantity used for Intended purpose – As per user
m. Goods Re exported – Quantity of goods to be re-exported. This should be declared in Step 6 of the section.
n. Goods cleared on payment of Duty – Quantity of goods cleared for Home Consumption. This should be declared in Step 7 of the section.
o. Quantity pending in stock at Importer’s premises – This will be added to the closing balance of the month.
p. Quantity pending in stock at job worker’s premises – This will be added to the closing balance of the month.
(Note- In case the BE details are not provided in the dashboard, user can manually enter the previous months’ BE details by clicking on Add Row)
Step 3. User needs to enter the following information in JW and unit transfer section.
Details of Job Worker – Select name from the drop-down. List of Job workers’ names entered in the prior intimation is displayed for the user to select. Address and GSTIN are pre-populated as per the information provided in prior intimation.
b. BE Number – As per the details of the imported goods
c. BE Date – As per the details of the imported goods
d. port of Import – As per the details of the imported goods
e. Invoice Number – As per the details of the imported goods
f. Item Number – As per the details of the imported goods
g. Quantity sent for Job Work – Quantity involved to be entered by the user
h. Delivery challan/ e-way bill – Delivery details to be entered by the user
i. Date of sending the goods for Job work
j. Date of receipt of goods from Job Work – Must be within six months of sending the goods for job work
k. Quantity used for intended purpose and removed directly from the JW premises
l. Quantity used for intended purpose and received back at the importer’s premises
m. Quantity used for intermediate product and received back at importer’s premises
n. Quantity received at the importer’s premises from the JW without processing
(Note- The sum of quantity declared in k,l,m,n fields should sum up to Quantity of goods sent for Job work)
Step 4: User is required to enter the following information in re-export section

BE Number – As per the details of the imported goods
b. BE Date – As per the details of the imported goods
c. port of Import – As per the details of the imported goods
d. Invoice Number – As per the details of the imported goods
e. Item Number – As per the details of the imported goods
f. Quantity re-exported – Quantity of goods involved in Re-export
g. SB Number – As per the details of the corresponding export
h. SB Date – As per the details of the corresponding export
i. Port of Export – As per the details of the corresponding export
Step 5: User is required to enter the following information in Home Consumption section.
BE Number – As per the details of the imported goods
b. BE Date – As per the details of the imported goods
c. port of Import – As per the details of the imported goods
d. Invoice Number – As per the details of the imported goods
e. Item Number – As per the details of the imported goods
f. Quantity cleared – Quantity of goods involved in Home Consumption
g. Amount paid – Amount of duty paid for the goods involved
h. Capital goods cleared after depreciation – User can select Yes or No option
i. Date of Clearance – Date of clearance of goods for home consumption
j. Remarks – Any relevant information
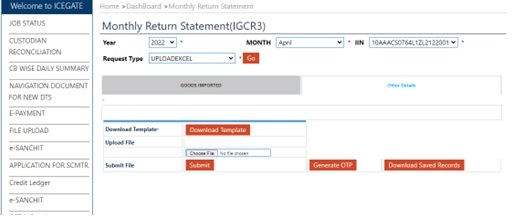
D.2 File Monthly return through Excel Upload Utility
Step 1: There are two tabs in this utility, Goods Imported and Other Details. Only once the user has entered the details in the goods imported tab, user can proceed ahead to add data in “Other Details” tab.
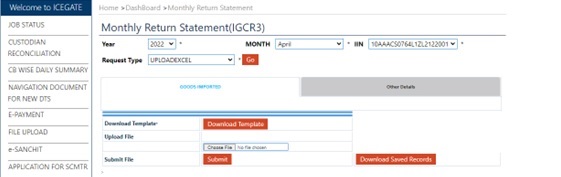
Step 2: In the Goods Imported tab, user will click on “Download Template” option in order to download the excel in which the data can be entered.
A sample Excel is provided as attached below for reference. Please note only dummy data is entered in the following excel.
User can select the following options in the ACTION column as highlighted in the excel sheet attached.
1. No Action – In case no action is required in the record. (Option can used in case user wants to update the saved data)
2. Update – In order to update the available record
3. Delete – In order to delete the available record
4. Insert – In order to add the available record
BE Number |
BE Date (DD-MMM-YY) |
Port Code |
Invoice Number |
Item Number |
Description of goods |
Specified Purpose |
Quantity of Imported Goods |
open Qty |
Date Of Clearance (DD-MMM-YY) |
Value Of Goods |
BCD |
IGST |
Comp Cess |
Other Duty |
Quantity Received |
Date of Goods Receipt (DD-MMM-YY) |
Qty Not Received |
Qty Used For Intended Purpose |
Qty Re-Exported |
Qty Cleared On Duty Payment |
Qty Pending At Importer Premises |
Qty Pending At JW Premises |
Action |
8110494 |
01-APR-2022 |
INBLR4 |
1 |
43 |
Lining Fabric-10 Polyester 79 MTR |
Import |
10000 |
10000 |
12-Apr-22 |
0 |
3.3 |
0 |
0.2 |
10 |
14-Apr-22 |
0.0 |
10 |
10.76 |
20 |
5000 |
2000.2 |
Insert |
|
8110494 |
01-APR-2022 |
INBLR4 |
1 |
44 |
Lining Fabric-10 Polyester 79 MTR |
Import |
10000 |
10000 |
13-Apr-22 |
0 |
2.6 |
0 |
0.1 |
10 |
15-Apr-22 |
0.0 |
10 |
10.76 |
20 |
5000 |
2000.2 |
Insert |
|
8110494 |
01-APR-2022 |
INBLR4 |
1 |
45 |
Lining Fabric-10 Polyester 79 MTR |
Import |
10000 |
10000 |
14-Apr-22 |
0 |
199.8 |
0 |
10.0 |
10 |
16-Apr-22 |
0.0 |
10.1 |
10.76 |
20 |
5000 |
2000.2 |
Insert |
|
8110494 |
01-APR-2022 |
INBLR4 |
1 |
46 |
Lining Fabric-10 Polyester 79 MTR |
Import |
10000 |
10000 |
15-Apr-22 |
0 |
682.6 |
0 |
0.0 |
10 |
17-Apr-22 |
0.0 |
10.89 |
10.76 |
20 |
5000 |
2000.2 |
Insert |
|
Note- It is important to select a particular action as per above for every row, otherwise data will not be submitted to the system.
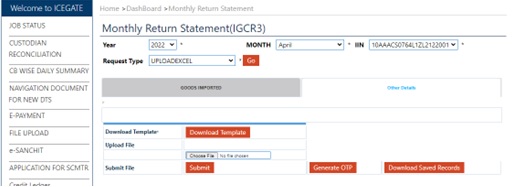
Step 3: Once the data is entered, user can click on “Upload File” option and upload the excel file.
Step 4: User will click on Submit button to process the data in the system.
Step 5: User can click on “Download Saved Records” to download the data that is uploaded and saved by the user. In case of any further changes, user can again make changes, upload the file and submit the data for processing.
Step 6: User needs to select the Other Details tab to enter the data once the Goods Imported data is submitted.
Step7: In the Other Details tab, user will click on “Download Template” option in order to download the excel in which the data can be entered.
A sample Excel is provided as attached below for reference. Please note only dummy data is entered in the following excel.
User can select the following options in the ACTION column as highlighted in the excel sheet attached.
1. No Action – In case no action is required in the record. (Option can used in case user wants to update the saved data)
2. Update – In order to update the available record
3. Delete – In order to delete the available record
4. Insert – In order to add the available record
Step 8: User will click on Submit button to process the data in the system.
Step 9: User can click on “Download Saved Records” to download the data that is uploaded and saved by the user. In case of any further changes, user can again make changes, upload the file and submit the data for processing
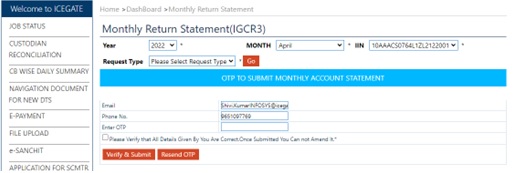
Step10: User can click on “Generate OTP” button to authenticate the user before final submission of the monthly return.
Step 11: User will enter the OTP sent on the registered email id and mobile number and click on “Verify and submit”. User also has an option to resent the OTP.
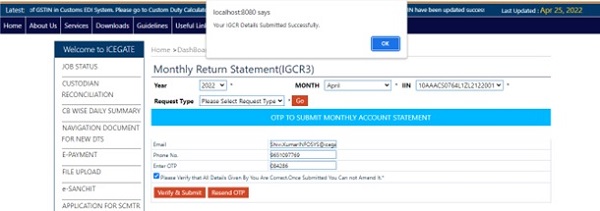
The following message will be displayed to the user for final submission of the return for a month.
E. Declare Short/non-Receipt of Imported goods (IGCR 2)
Step 1: User can access the IGCR module as explained in Part A of the document. User can select “Short Receipt” on the home screen of the module to submit the details of the imported goods which were not received in the importer’s premises.

Step 2: In case the user has received less quantity of goods, user needs to fill this form with the following fields.
a. IIN – IGCR Identification Number created for the Import request.
b. BE Number – As per the Imported goods details
c. BE Date – As per the Imported goods details
d. Port of Import – As per the Imported goods details
e. Invoice Number – As per the Imported goods details
f. Item Number – As per the Imported goods details
g. Qty not received – Quantity of imported goods not received in premises
h. Amount paid – Amount of Duty paid for the quantity not received


We require consultancy service to gat IGCR benefits.
we are manufacturer cum exporter of garments located at BLR SOUTH 560100.