Article discusses What is GSTR-6, Who, where and when needs to file GSTR-6 and is it mandatory to file it, Is it mandatory to take action on all invoices auto populated in GSTR-6, What actions can I take on invoice data auto populated in GSTR-6, What happens if GSTR 6 is filed before GSTR-1 and then GSTR-1 and GSTR-5 are filed etc.
Q.1 What is Form GSTR-6?
Ans: Form GSTR-6 is a monthly return to be filed by all the Input Service Distributors (ISD) for distribution of credit (ITC) amongst its units.
Q.2 Who needs to file Form GSTR-6 and is it mandatory to file this form?
Ans: Only those persons who are registered as Input Service Distributor (ISD) need to file Form GSTR-6. It is a mandatory return, to be filed on monthly basis. A ‘Nil’ return must be filed in case of no ITC being available for distribution or no ITC is being distributed during the month.
Q.3 By when do I need to file Form GSTR-6?
Ans: ISD Returns for month M can only be filed on or before the 13th of month M+1 or the extended date, if any.
Q.4 From where can I as a taxpayer file Form GSTR-6?
Ans: Form GSTR-6 can be accessed on the GST Portal, post login in the Returns Dashboard by the taxpayer.
The path is Services > Returns > Returns Dashboard.
Q.5 Form GSTR-6 comprises of which tables?
Ans: Form GSTR-6 comprises of following tables:
Form GSTR-6 Invoice Details:
1. Table 3: To enter details of input tax credit received for distribution.
2. Table 6B: To enter details of debit or credit notes received.
3. Table 6A: To make amendments to information furnished in earlier returns in Table 3.
4. Table 6C: To make amendments to debit or credit notes received.
Form GSTR-6 ITC Distribution:
5. Table 4: To view details of ITC available and eligible and ineligible ITC distributed.
6. Table 5, 8: To enter details of distribution of input tax credit for ISD invoices and ISD Credit notes.
7. Table 9: To enter details of ITC available and eligible and ineligible ITC redistributed.
Q.6 Can I file my ISD return if my counterparties have not filed Form GSTR-1/5?
Ans: Yes, you can file your Form GSTR-6 return even if your counterparties have not filed their respective Form GSTR-1 or Form GSTR-5.
Q.7 Is there any Offline Tool for filing Form GSTR-6?
Ans: Yes, there is an offline tool for filing Form GSTR-6.
Q.8 Is there any late fee in case of delayed filing of Form GSTR-6?
Ans: Yes, there is a late fee prescribed in Law.
Q.9 Is there an Electronic Credit Ledger available for ISD Registrations?
Ans: No, there is no Electronic Credit Ledger maintained for ISD Registrants, since ISD has to only distribute credit available during a tax period.
Q.10 As an ISD, am I liable to pay tax on a reverse charge basis? OR Is reverse charge applicable to ISDs?
Ans: No. Reverse charge liability is not applicable for an ISD person.
Q.11 How do I allocate credit to my other units in the Form GSTR 6?
Ans: Using Table 5 and Table 8 of the Form GSTR-6, both eligible and ineligible ITC can be distributed to the units.
Q.12 Can I amend the credit allocated to the units in Form GSTR 6 of earlier tax periods? If yes, how?
Ans: You can distribute the credit through ISD invoice and provide the details in Table 5 and Table 8 of the Form GSTR-6, indicating both eligible and ineligible distribution to the units.
Q.13 Can the date of filing of Form GSTR-6 be extended?
Ans: Yes, date of filing of Form GSTR-6 can be extended by Government through notification.
Q.14 What are the pre-conditions for filing Form GSTR-6?
Ans: Pre-conditions for filing of Form GSTR-6 are:
- Recipient should be Registered as an ISD and should have an active GSTIN.
- Recipient should have valid login credentials (i.e., User ID and password).
- Recipient should have valid and non-expired/ unrevoked Digital Signature Certificate (DSC which is mandatory for companies, LLPs and FLLPs).
- Recipient should have with him an active mobile number which is indicated in his registration details furnished to GST Portal at the time of registration or amendment thereof for authentication through EVC.
- Recipient will have an option to file Form GSTR-6 for cancelled GSTINs for the period in which it was active.
Q.15 What happens after Form GSTR-6 is filed?
Ans: After Form GSTR-6 is filed:
- ARN is generated on successful filing of the Form GSTR-6 Return.
- An SMS and an email are sent to the applicant on his registered mobile and email id
Q.16 What are the modes of signing Form GSTR-6?
Ans: You can file Form GSTR-6 using DSC, or EVC.
(a) Digital Signature Certificate (DSC)
Digital Signature Certificates (DSC) are the digital equivalent (that is electronic format) of physical or paper certificates. A digital certificate can be presented electronically to prove one’s identity, to access information or services on the Internet or to sign certain documents digitally. In India, DSC are issued by authorized Certifying Authorities.
The GST Portal accepts only PAN based Class II and III DSC.
To obtain a DSC, please contact any one of the authorised DSC-issuing Certifying Authorities: http://www.cca.gov.in/cca/?q=licensed_ca.html
(b) Electronic Verification Code (EVC)
The Electronic Verification Code (EVC) authenticates the identity of the user at the GST Portal by generating an OTP. The OTP is sent to the mobile phone number of the registered mobile phone of Authorized Signatory filled in part A of the Registration Application.
Q.17 Can I preview Form GSTR-6 before submitting?
Ans: Yes, you can preview Form GSTR-6 before submitting on the GST Portal.
Q.18 I have credit note in CGST & SGST, with no Input Tax Credit available in CGST & SGST, but credit in IGST is available. Hence, credit available for distribution in CGST & SGST is negative, what will be the implications?
Ans: If the reversal of Input Tax Credit exceeds the credit available under any of the major head, during a tax period, then sum under such head will become negative. The excess reversal, over available input tax credit is added to the liability. Consequentially the total credit available for distribution will be reduced accordingly.
Total credit available i.e. IGST+CGST+SGST will always be equal to total credit to be distributed (IGST+CGST+SGST), including the liability due to negative credit. Hence, total credit available for distribution will be sum of –
I. Inward supplies received during the month (net of credit/debit notes and amendments of invoices and credit/debit notes).
II. Receipt of credit notes will reduce the ITC available for distribution while receipt of debit notes will increase the same.
III. Availability of ITC, due to issue of ISD credit notes to its units.
IV. Availability and distribution of Cess will always be the same as it is not cross utilised with any of the major heads.
For example:-
i. Credit available in IGST – 1,08,000 INR
ii. Negative credit available in CGST & SGST – 43,200 INR each (Amount of credit note is more than credit available in CGST & SGST)
iii. Total credit available for distribution – [Sum of IGST=1,08,000, CGST= -43200 & SGST= -43200] = 21600 INR
iv. Total input tax credit available for distribution i.e. 21600 INR only will be bifurcated to the eligible and ineligible credit.
Q.19 Which State code is to be selected as place of supply (PoS) in case of transportation of goods outside India, by a registered taxpayer on behalf of a registered recipient?
Ans: In case of supply of services (by a registered taxpayer) by way of transportation or courier of goods to a place outside India, the place of supply is the foreign country outside India (being destination of such goods).
For reporting such transactions, where POS lies in foreign country, the supplier of services (the registered taxpayer) needs to select State code as ‘96-Foreign Country’ from the list of codes.
The registered recipient of services will then be entitled to ITC, though POS lies outside the State of his registration, in case State code 96 is mentioned by of the supplier of services (the registered taxpayer) in their statement of outward supplies.
Illustration – Supplier of goods ‘A’ is registered in State ‘X’ in India who has got an order for supply from a foreign country ‘F’. Supplier ‘A’ asked another taxpayer ‘B’ registered in the same State ‘X’ to supply services (couriers etc.) for transportation of goods to the foreign country. Taxpayer ‘B’ will issue invoice in the name of ‘A’ and mention POS as state code 96. Though, both the taxpayers are located in the same State but by virtue of POS as 96, the supply will be taxable under IGST and ITC will be available to taxpayer ‘A’ under IGST head.
Q.20 What would be the type of supply when the State Code is selected as ‘96-Foreign Country’?
Ans: Supplies with Place of Supply selected as state code ‘96-Foreign Country’ will always be inter-State supply.
Q.21 In which tables of Form GSTR-6 the State Code as ‘96-Foreign Country’ will be available for selection from the dropdowns?
Ans: The state code ’96-Foreign Country’ will be available for selection in the existing list of Place of Supply (POS) drop-down in following tables of Form GSTR-6:
i. B2B (Table 3)
ii. B2B Amendments (Table 6A)
Q.22 What is the difference between Form GSTR-6 before and after delinking of Debit/ Credit Note?
Ans:
| S. No. | Form GSTR-6 before delinking of Debit/ Credit Note | Form GSTR-6 after delinking of Debit/ Credit Note |
| 1 | While entering the Debit/ Credit note details, original invoice number and original invoice date were mandatory to be entered. | While entering the Debit/ Credit note details or amendment in debit/ credit note details, ISD is not required to enter original invoice number and original invoice date. |
| 2 | POS field was not available. | Entering POS is mandatory. |
| 3 | Supply type was determined based on Original invoice details. | Supply type is determined on the basis of GSTIN of supplier and POS. |
| 4 | Suppliers were issuing one debit/credit note for each invoice. | Supplier can issue one Debit/ Credit note for multiple invoices. |
| 5 | Pre-GST checkbox was available. | Pre-GST checkbox has been removed. |
Q.23 I have already saved Debit/ Credit note details online before delinking of Debit/ Credit Note but have not filed the returns. What will happen to the saved Debit/ Credit note?
Ans: If you have saved Debit/ Credit Note details before delinking of Debit/ Credit Note, it will be saved in old format only until you edit and again save the same.
Post delinking of Debit/ Credit Note, you can edit the saved Debit/ Credit note in post delinking format only (Original Invoice Number and Date will not be available and entering POS is mandatory).
Note: In case you are filing the return without editing the saved record, it will be filed in old format only.
Q.24 I have generated the JSON file from old excel utility before delinking of Debit/ Credit Note but have not uploaded on GST Portal. Can I upload the same after delinking of Debit/ Credit Note?
Ans: No, you cannot upload the JSON file generated before delinking of Debit/ Credit Note. You need to update the details manually in new offline excel utility again and then generate the new JSON file to upload it onto the GST Portal.
Q.25 I have already filed Form GSTR-6 for a particular tax period before delinking of Debit/ Credit Note. Do I need to file Form GSTR-6 again for that tax period post delinking of Debit/ Credit Note?
Ans: If you have already filed Form GSTR-6 for a particular tax period before delinking of Debit/ Credit Note, there is no need to file Form GSTR-6 again for that tax period.
Page Contents
Manual > Form GSTR-6
How can I create, submit and file details in Form GSTR-6?
To create, submit and file details in Form GSTR-6, perform following steps:
1. Login and Navigate to Form GSTR-6 page
2. Generate Form GSTR-6 Summary
3. Enter details in various tiles
4. Preview Form GSTR-6
5. Acknowledge and Submit Form GSTR-6 to freeze data
6. Offset Late fee
7. File Form GSTR-6 with DSC/ EVC
8. View Form GSTR-6 Status
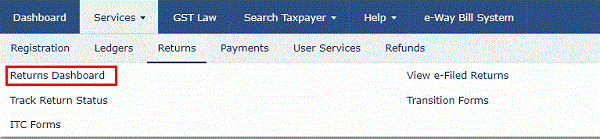
1. Login and Navigate to Form GSTR-6 page
1. Access the www.gst.gov.in URL. The GST Home page is displayed.
2. Login to the GST Portal with valid credentials.
3. Click the Services > Returns > Returns Dashboard command.
Alternatively, you can also click the Returns Dashboard link on the Dashboard.
4. The File Returns page is displayed. Select the Financial Year & Return Filing Period (Month) for which you want to file the return from the drop-down list.
5. Click the SEARCH button.

6. The File Returns page is displayed. This page displays the due date of filing the returns, which the taxpayer is required to file using separate tiles.
In the GSTR6 tile, click the PREPARE ONLINE button if you want to prepare the return by making entries on the GST Portal directly.

Note: The due date for filing Form GSTR-6 is 13th of every month.
2. Generate Form GSTR-6 Summary
Scroll down to the bottom of the Form GSTR-6 – Return for Input Service Distributor page and click the GENERATE GSTR6 SUMMARY button. The Details of auto drafted supplies of goods or services page is displayed.
Note:
- The Status should reflect as ‘Not Filed’. In case the Status is ‘Filed’, Form GSTR-6 for the same month/tax period cannot be filed.
- User needs to explicitly hit on the GENERATE GSTR6 SUMMARY button at the bottom of the page, then only auto drafted items (data/ invoices uploaded by the supplier) will be visible.

A confirmation message is displayed at the top of the page. You can check the status in some time.

3. Enter Details in various tiles
There are three sub-headings representing Tables to enter relevant details. Click on the tile names to know and enter related details:
Form GSTR-6 Invoice Details:
3 – Input tax credit received for distribution: To enter details of input tax credit received for distribution
6B – Debit Notes/ Credit Notes Received: To enter details of debit or credit notes received
6A – Amendment of information furnished in earlier returns in Table 3: To make amendments to information furnished in earlier returns in Table 3
6C – Amendment of Debit Notes/Credit Notes received: To make amendments to debit or credit notes received
Form GSTR-6 ITC Distribution:
4 – Total ITC available and Eligible ITC/Ineligible ITC distributed: To view details of ITC available and eligible and ineligible ITC distributed
5, 8 – Distribution of input tax credit (ISD Invoices & ISD Credit notes): To enter details of distribution of input tax credit for ISD invoices and ISD Credit notes
9 – Redistribution of ITC distributed in earlier returns – To enter details of ITC available and eligible and ineligible ITC redistributed
Form GSTR-6 Other Details:
10 – Late Fee: To view and offset the late fee
3 – Input tax credit received for distribution
1. To view or edit details of input tax credit received for distribution, click the 3-Input tax credit received for distribution tile.
You can either edit, accept, delete or keep the invoices in pending state, which are added by the supplier.
- Modify Invoices added by Supplier
- Accept Invoices added by Supplier
- Reject Invoices added by Supplier
- Keep Pending Invoices added by Supplier
- Add missing invoice details not added by Supplier
Note: You can change status of the invoice from accept, reject, pending any number of times till submission for Form GSTR-6.
Modify Invoices added by Supplier:
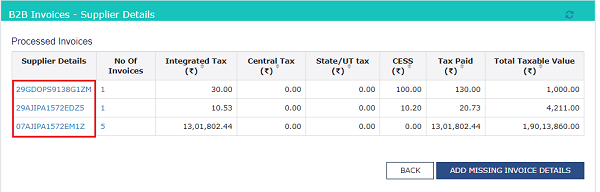
2. Click the Supplier’s GSTIN link under Supplier Details column and you will see a list of invoice line items under the “Uploaded by Supplier” tab.
3. Click the Edit button.

4. Edit the invoice details and click the SAVE button.
5. You will be directed to the previous page and a message is displayed that invoice is modified and status of the invoice changes to MODIFIED. Invoices marked as Modified would reflect in supplier Form GSTR-1/5 upon filing of Form GSTR-6 for acceptance, rejection or keep pending the modifications made by you.

Accept Invoices added by Supplier:
2. Click the Supplier’s GSTIN link under Supplier Details column and you will see a list of invoice line items under the “Uploaded by Supplier” tab.

3. Select the checkbox for the invoice and click the ACCEPT button.
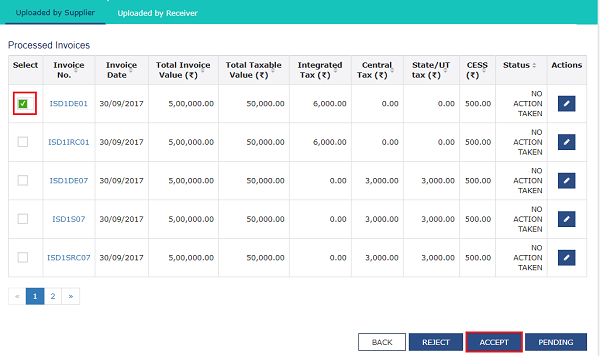
A success message is displayed that the invoice is accepted and status changes to ACCEPTED.
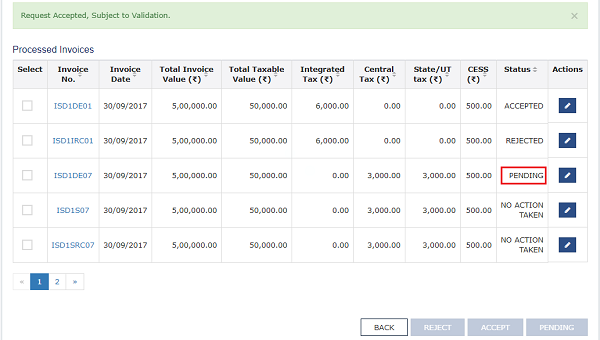
Reject Invoices added by Supplier:
2. Click the Supplier’s GSTIN link under Supplier Details column and you will see a list of invoice line items under the “Uploaded by Supplier” tab.

3. Select the checkbox for the invoice and click the REJECT button.

A success message is displayed that the invoice is rejected and status changes to REJECTED.

Pending Invoices added by Supplier:
2. Click the Supplier’s GSTIN link under Supplier Details column and you will see a list of invoice line items under the “Uploaded by Supplier” tab.

3. Select the checkbox for the invoice and click the PENDING button.
 A success message is displayed that the invoice is in pending state and status changes to PENDING. You can take action on this invoice in next tax periods
Add missing invoice details not added by Supplier:
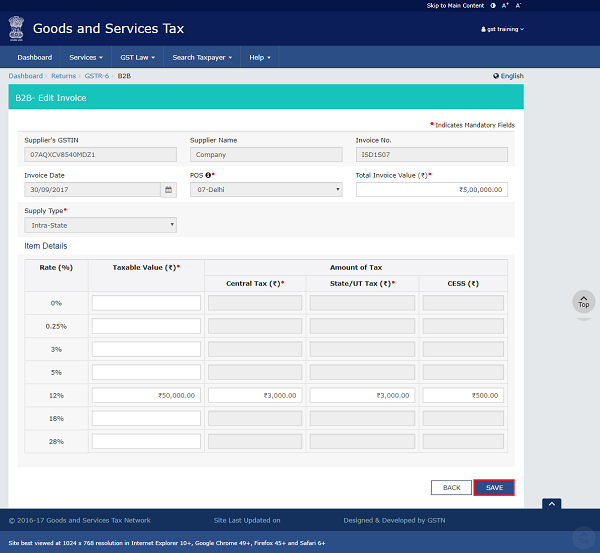
2. In case, some invoices have been missed by the registered suppliers, you can add them here. Click the ADD MISSING INVOICE DETAILS button to add the missing invoices.
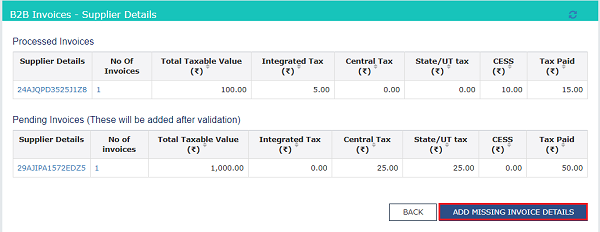
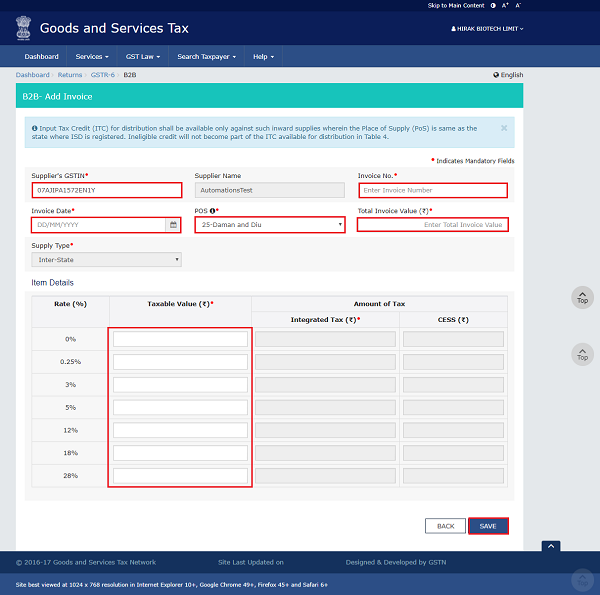
3. The B2B-Add Invoice page is displayed. In the Supplier’s GSTIN field, enter the GSTIN of the supplier who supplied the goods or services. As you enter the supplier’s GSTIN, Supplier’s name is auto-populated and screen is expanded below displaying the item-details.
4. In the Invoice No. field, enter the invoice number.
5. In the Invoice Date field, select the date on which the invoice was generated using the calendar.
6. In the POS field, select the place of supply where the supplies were delivered. Based on the state selected in POS, Supply Type field is auto-populated.
Note: GST Portal would determine whether it is an Interstate or Intrastate transaction based on the state where GSTIN of Supplier is registered and state that has been selected in POS field.
7. In the Total Invoice Value field, enter the total value of invoice for which the goods or services are received.
8. Tax amounts shall be auto populated based amount taxable amount entered in Taxable value field against the rates. Cess is user input. However, taxpayer can edit the tax columns.
In case of Intra-State transaction:
In case the POS (place of supply) of the goods/ services is the same state as that of the supplier, the transaction is an Intra-State transaction.
Note- fields for Central Tax, State/UT Tax and Cess field only will appear for Intra-state supply.
a) In the Taxable Value field against the rates, enter the taxable value of the goods or services.
b) In the Cess field, enter the cess amount.
Note: The Amount of Tax fields are auto-populated based on the values entered in Taxable Value fields respectively. However, the taxpayer can edit the tax amount.

In case of Inter-State transaction:
In case the Place of Supply (POS) is different from the state of the supplier, transaction becomes an Inter-State transaction.
Notice, fields for Integrated Tax and Cess will appear.
a) In the Taxable Value field against the rates, enter the taxable value of the goods or services.
b) In the Cess field, enter the cess amount.
Note: The Amount of Tax fields are auto-populated based on the values entered in Taxable Value fields respectively. However, the taxpayer can edit the tax amount.
You will be directed to the previous page and a message is displayed that invoice is added.
8. Click the Supplier’s GSTIN link under Supplier Details column.

11. Click the Uploaded by Receiver tab. The missing invoice is added.
Here, you can also edit/delete the added invoices (under Actions) till the Form GSTR-6 is submitted.
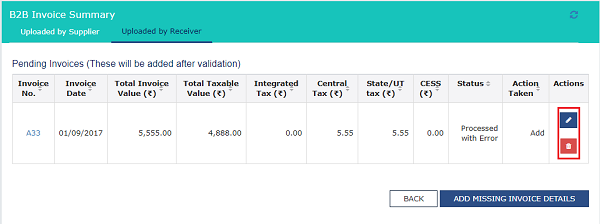
12. Click the BACK button twice to go back to the Form GSTR-6 landing page.
The 3-Input tax credit received for distribution tile in Form GSTR-6 will reflect the number of invoices added. Please click the refresh button ( ![]() ) on the top of the screen to ensure quick updating of the summary on the tile.
) on the top of the screen to ensure quick updating of the summary on the tile.
Once the missing invoice is added, this gets reflected in Form GSTR-1/5 of the supplier for action on the invoices.
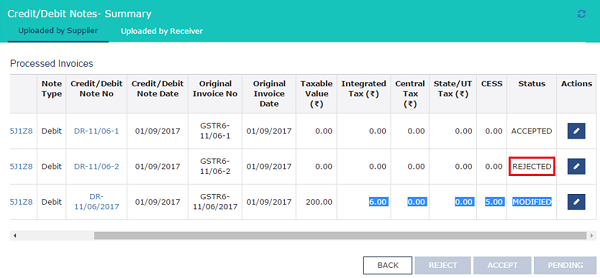
6B – Debit Notes/ Credit Notes Received
1. To view or edit details of debit or credit notes received, click the 6B – Debit Notes/ Credit Notes Received tile.
You can either edit, accept, delete or keep the invoices in pending state, which are added by the supplier.
- Modify Invoices added by Supplier
- Accept Invoices added by Supplier
- Reject Invoices added by Supplier
- Keep Pending Invoices added by Supplier
- Add missing invoice details not added by Supplier
Note: You can change status of the invoice from accept, reject, pending any number of times till submission.
Modify Invoices added by Supplier:
2. Click the Supplier’s GSTIN link under Supplier Details column and you will see a list of invoice line items under the “Uploaded by Supplier” tab.
3. Click the Edit button.

4. Edit the invoice details and click the SAVE button.

5. You will be directed to the previous page and a message is displayed that invoice is modified and status changes to MODIFIED. Invoices marked as Modified would reflect in supplier GSTR-1/5 upon filing of Form GSTR-6 for acceptance, rejection or keep pending the modifications made by you.

Accept Invoices added by Supplier:
2. Click the Supplier’s GSTIN link under Supplier Details column and you will see a list of invoice line items under the “Uploaded by Supplier” tab.

3. Select the checkbox for the invoice and click the ACCEPT button.

A success message is displayed that the invoice is accepted and status changes to ACCEPTED.

Reject Invoices added by Supplier:
2. Click the Supplier’s GSTIN link under Supplier Details column and you will see a list of invoice line items under the “Uploaded by Supplier” tab.
3. Select the checkbox for the invoice and click the REJECT button.
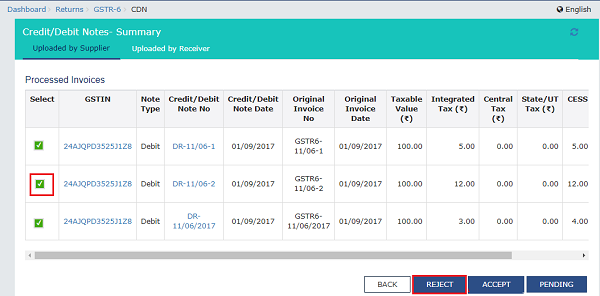
A success message is displayed that the invoice is rejected and status changes to REJECTED.
Pending Invoices added by Supplier:
2. Click the Supplier’s GSTIN link under Supplier Details column and you will see a list of invoice line items under the “Uploaded by Supplier” tab.
3. Select the checkbox for the invoice and click the PENDING button.
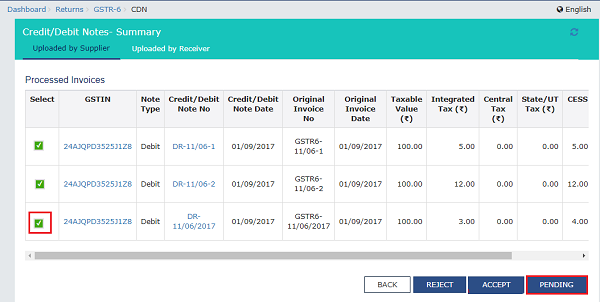
A success message is displayed that the invoice is in pending state and status changes to PENDING. You can take action on this invoice in next tax periods.

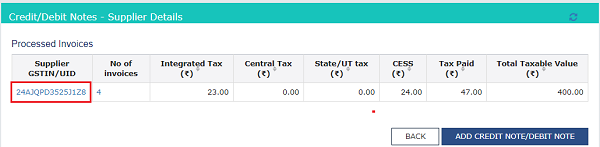
Add missing invoice details not added by Supplier:
2. In case, some invoices have been missed by the registered suppliers, you can add them here. Click the ADD MISSING INVOICE DETAILS button to add the missing invoices.

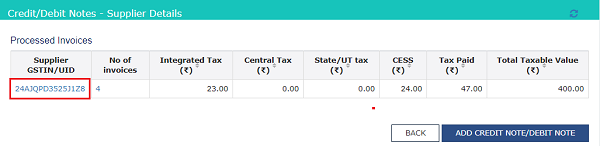
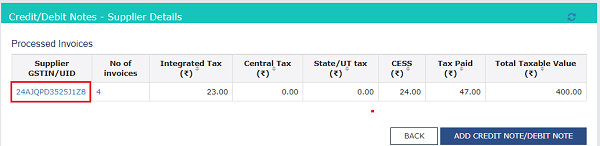
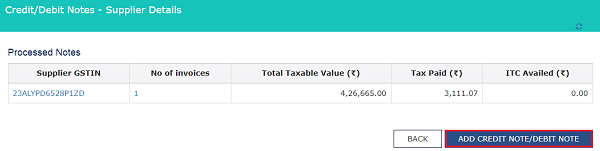
3. In the Credit/Debit Notes – Supplier Details page, click the ADD CREDIT NOTE/DEBIT NOTE button to add a new invoice.
4. In the Supplier GSTIN field, enter the name of the supplier.
5. From the Note Type drop-down list, select whether the details added are for a Debit or Credit Note or Refund voucher.
6. In the Note Value field, enter the value of the note or refund voucher.
7. In the Debit/Credit Note No. field, enter the debit or credit note number or refund voucher number
Note: A Debit or Credit Note number should be unique for a given Financial Year (FY).
8. In the Debit/Credit Note Date field, select the date on which the debit or credit Note was issued using the calendar.
Note: The date should be before the end date of the tax period. Debit / credit note date cannot be earlier than original invoice date.
9. In the Original Invoice No. field, enter the invoice number of the earlier filed invoice (original invoice) on which the Debit or Credit Note is being issued or the number of advance receipt against which the refund voucher is issued.
10. In the Original Invoice Date field, select the original invoice date using the calendar.
11. From the Supply Type drop-down list, select whether the note or voucher is added for an invoice of Inter-state or Intra-state transaction.
12. From the Reason for Issuing Note drop-down list, select the reason on account of which the debit or credit note is issued.
In case of Intra-State transaction:
In case the POS (place of supply) of the goods/ services is the same state as that of the supplier, the transaction is an Intra-State transaction.
Notice, fields for Central Tax and State/UT Tax appear.
a) In the Taxable Value field against the rates, enter the taxable value of the goods or services.
b) In the Amount of Tax field against the rates, enter the amount of tax of the goods or services.
c) In the Cess field, enter the cess amount.
d) Click the SAVE button to save the note details.

In case of Inter-State transaction:
In case Place of Supply (POS) is different from the state of the supplier, transaction becomes an Inter-State transaction. The supplier has to select the inter-state supply type for adding missing credit/debit notes related to such supplies.
Notice, fields for Integrated Tax appear.
a) In the Taxable Value field against the rates, enter the taxable value of the goods or services.
b) In the Amount of Tax field against the rates, enter the amount of tax of the goods or services.
c) In the Cess field, enter the cess amount.
d) Click the SAVE button to save the note details.

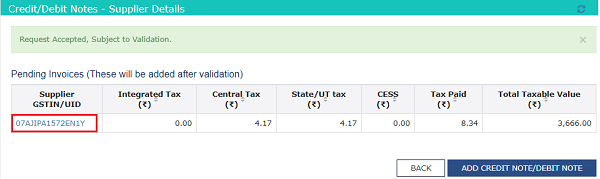
You will be directed to the previous page and a message is displayed that invoice is added.
8. Click the Supplier’s GSTIN link under Supplier Details column.
11. Click the Uploaded by Receiver tab. The missing invoice is added.
Here, you can also edit/delete the added invoices (under Actions) till the Form GSTR-6 is submitted.

12. Click the BACK button to go back to the Form GSTR-6 landing page.
The 6B – Debit Notes/ Credit Notes Received tile in Form GSTR-6 will reflect the number of invoices added. Please click the refresh button (![]() ) on the top of the screen to ensure quick updating of the summary on the tile.
) on the top of the screen to ensure quick updating of the summary on the tile.
Once the missing invoice is added, this gets reflected in Form GSTR-1/5 of the supplier for action on the invoices.
6A – Amendment of information furnished in earlier returns in Table 3
1. To make amendments to information furnished in earlier returns in Table 3, click the 6A – Amendment of information furnished in earlier returns in Table 3 tile.
2. Select the Financial Year from the drop-down list.
3. In the GSTIN field, enter the GSTIN of the supplier.
4. In the Original Invoice No. field, enter the invoice number which you want to amend from the earlier tax period.
5. Click the AMEND INVOICE button.
 6. Make amendments to the details as required. Click the SAVE button.
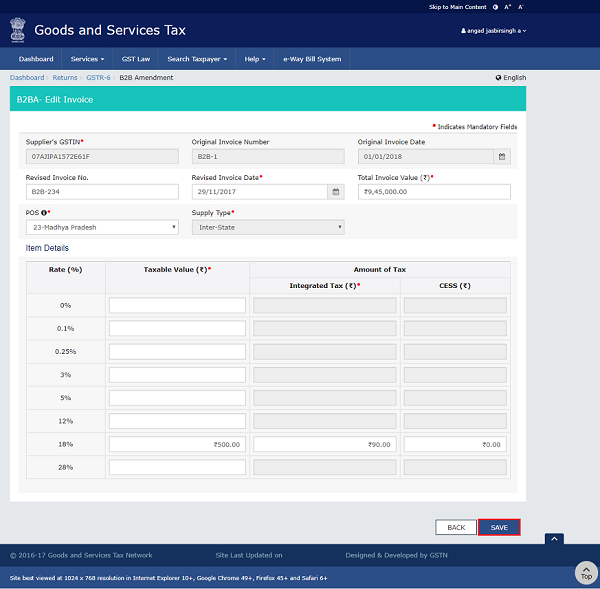
You will be directed to the previous page and a message is displayed that “Request accepted, Subject to validation” successfully.
Note:
a. The status of the amended invoice is shown as Processed and will be visible in “Uploaded by Taxpayer” section.
b. If invoices are amended and uploaded by supplier, then those details are displayed in “Uploaded by supplier” tab.
c. Here, you can also edit/delete the amended invoices (under Actions).
7. Click the BACK button.
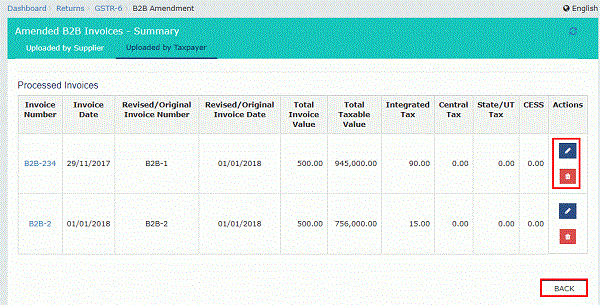
You will be directed to the previous page and the 6A – Amendment of information furnished in earlier returns in Table 3 tile will reflect the number of such invoices amended.

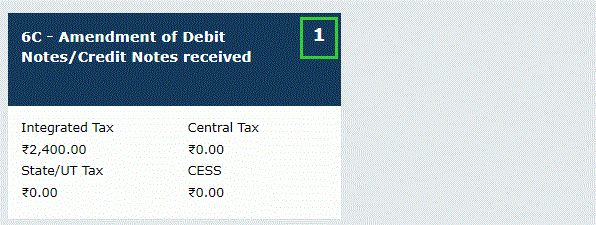
6C – Amendment of Debit Notes/Credit Notes received
1. To make amendments to debit or credit notes received, click the 6C – Amendment of Debit Notes/Credit Notes received tile.
2. Select the Financial Year from the drop-down list.
3. In the GSTIN field, enter the GSTIN of the supplier.
4. In the Original Note No. field, enter the note number which you want to amend from earlier tax period.
5. Click the AMEND TAXPAYER DETAILS button.

6. Make amendments to the details as required. Click the SAVE TAXPAYER DETAILS button.

You will be directed to the previous page and a message is displayed that “Request accepted, subject to validation”.
Note:
a. The status of the amended credit/debit note is shown as Processed and will be visible in “Uploaded by Taxpayer” section.
b. If credit/debit note are amended and uploaded by supplier, then those details are displayed in “Uploaded by supplier” tab.
c. Here, you can also edit/delete the amended credit/debit note (under Actions).
7. Click the BACK button.
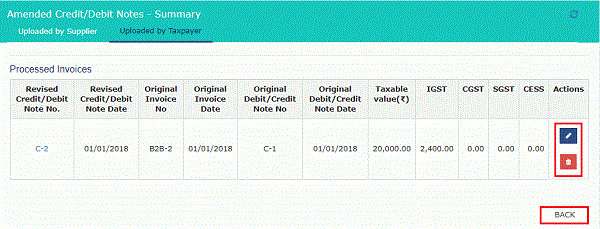
You will be directed to the previous page and the 6C – Amendment of Debit Notes/Credit Notes received tile will reflect the number of such invoices amended.
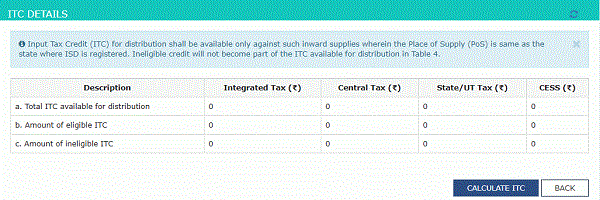
4 – Total ITC available and Eligible ITC/Ineligible ITC distributed
1. To view details of Total ITC available and Eligible ITC/Ineligible ITC distributed, click the 4 – Total ITC available and Eligible ITC/Ineligible ITC distributed tile.
2. Click the CALCULATE ITC button.
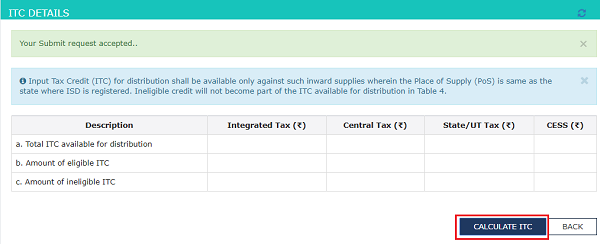
The Total ITC available for distribution, Amount of Eligible ITC and Amount of ineligible ITC is displayed.
5, 8 – Distribution of input tax credit (ISD Invoices & ISD Credit notes)
1. To view or edit details of distribution of input tax credit for ISD invoices and ISD Credit notes, click the 5, 8 – Distribution of input tax credit (ISD Invoices & ISD Credit notes) tile.
2. Click the ADD DOCUMENT button.

3. Select the Eligibility of ITC from the drop-down list.
4. Select the Unit Type from the drop-down list.
In case of Registered unit type:
In case of Un-registered unit type:
(A) In case of Registered unit type:
5. Enter the GSTIN of registered recipient.
6. Select the ISD Document Type from the drop-down list.
a. In case of ISD Invoice:
7. In the ISD Invoice Number field, enter the ISD invoice number.
8. Select the ISD Invoice Date using the calendar.
9. In the ISD Credit Distribution section, enter the Integrated Tax, Central Tax, State/UT Tax and Cess.
10. Click the SAVE button.
i. If the recipient unit is within State, the distributed credit is CGST and SGST and the following entry screen will appear in which the details have to be entered.
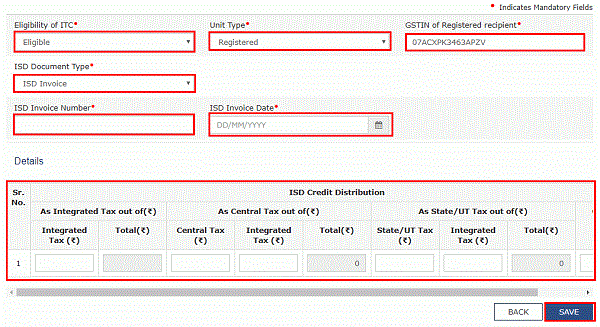
ii. If the recipient unit belongs to another State, the distributed credit is IGST and the following screen is displayed in which the details have to be furnished.

iii. In a case where the receiving unit is located in SEZ, then distribution of Input tax credit on account of IGST/CGST/SGST/UTGST wil be distributed as IGST only irrespective of the SEZ State code.
b. In case of ISD Credit Note:
7. In the ISD Credit Note Number field, enter the ISD credit note number.
8. Select the ISD Credit Note Date using the calendar.
9. In the ISD Invoice Number field, enter the ISD invoice number.
10. Select the ISD Invoice Date using the calendar.
11. In the ISD Credit Distribution section, enter the Integrated Tax and Cess.
12. Click the SAVE button.
i. If the recipient unit is within State, the following entry screen will appear in which the details have to be entered.
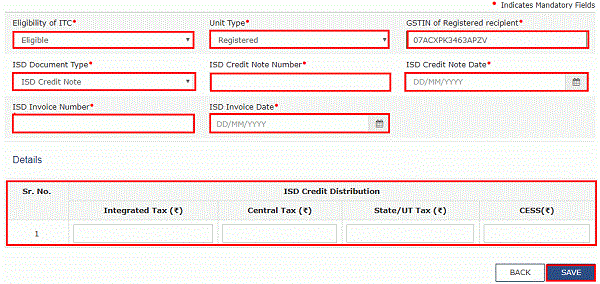 ii. If the recipient unit belongs to another State, the following screen is displayed in which the details have to be furnished.
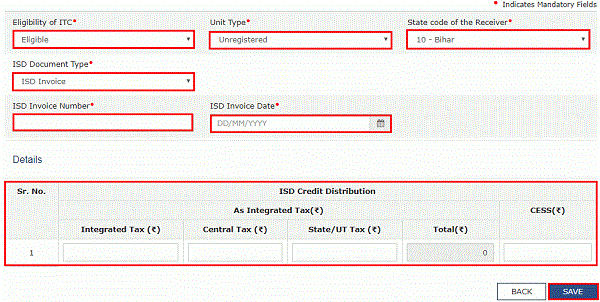
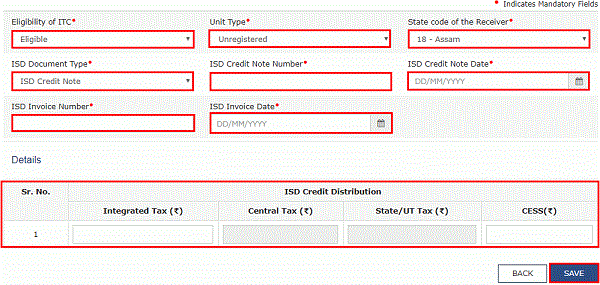
(B) In case of Un-registered unit type:
5. Enter the State Code of the receiver.
6. Select the ISD Document Type from the drop-down list.
a. In case of ISD Invoice:
7. In the ISD Invoice Number field, enter the ISD invoice number.
8. Select the ISD Invoice Date using the calendar.
9. In the ISD Credit Distribution section, enter the Integrated Tax, Central Tax, State/UT Tax and Cess.
10. Click the SAVE button.
i. If the recipient unit is within State, the distributed credit is CGST and SGST and the following entry screen will appear in which the details have to be entered. It can be IGST also if the credit to be distributed is of IGST.
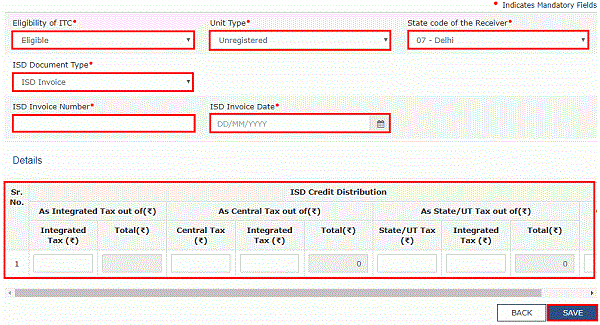 ii. If the recipient unit belongs to another State, the distributed credit is IGST and the following screen is displayed in which the details have to be furnished.
 b. In case of ISD Credit Note:
7. In the ISD Credit Note Number field, enter the ISD credit note number.
8. Select the ISD Credit Note Date using the calendar.
9. In the ISD Invoice Number field, enter the ISD invoice number.
10. Select the ISD Invoice Date using the calendar.
11. In the ISD Credit Distribution section, enter the Integrated Tax and Cess.
12. Click the SAVE button.
i. If the recipient unit is within State, the following entry screen will appear in which the details have to be entered.
 ii. If the recipient unit belongs to another State, the following screen is displayed in which the details have to be furnished.
You will be directed to the previous page and invoice is added under Processed Invoices under Eligible ITC tab.
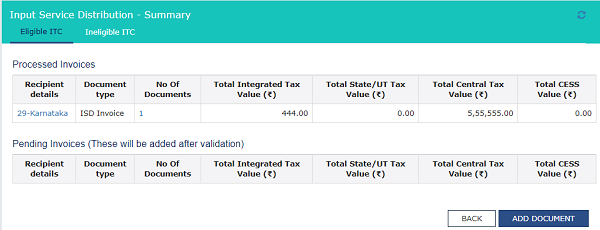
Similarly, you need to add the details for Ineligible ITC and this will be reflected under Ineligible ITC tab.
9 – Redistribution of ITC distributed in earlier returns
In case the ITC was earlier distributed to a wrong recipient and taxpayer wants to redistribute it afresh:
1. To enter details of ITC available and eligible and ineligible ITC redistributed, click the 9 – Redistribution of ITC distributed in earlier returns tile.
2. Select the Financial Year from the drop-down list.
3. In the Enter Invoice No. field, enter the invoice number/Credit note number which you want to amend.
4. Click the AMEND INVOICE button.
 5. Make amendments to the details as required. Click the SAVE button.

You will be directed to the previous page and a message is displayed that “Request accepted, subject to validation” successfully.
Note:
a. The status of the amended invoice is Processed.
b. Here, you can also edit/delete the amended invoices (under Actions).
6. Click the BACK button.

You will be directed to the previous page and the 9 – Redistribution of ITC distributed in earlier returns tile will reflect the number of such invoices amended.

4. Preview Form GSTR-6
Once you have entered all the details, click the PREVIEW button. This button will download the draft Summary page of your Form GSTR-6 for your review. It is recommended that you download this Summary page and review the summary of entries made in different sections with patience before submitting the Form GSTR-6. The PDF file generated would bear watermark of draft as the details are yet to be submitted.
Note: The submit button will freeze the invoices uploaded in the Form GSTR-6 for that particular month.
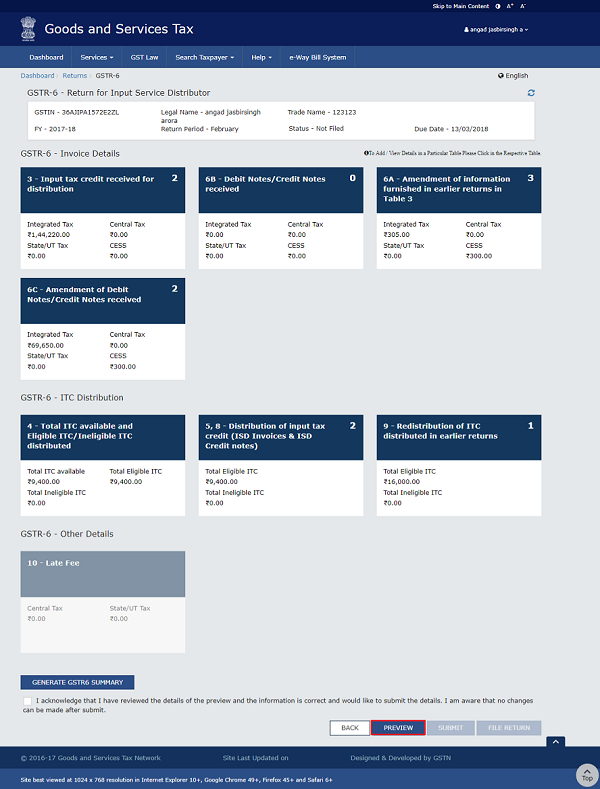
The PDF is downloaded.

5. Acknowledge and Submit Form GSTR-6 to freeze data
1. Select the acknowledgement checkbox stating that you have reviewed the details of preview and the information furnished is correct and you are aware that no changes can be made after submit. Once you click the acknowledgement, the SUBMIT button will be enabled.
2. Click the SUBMIT button in the landing page to submit Form GSTR-6.
Note:
- The submit button will freeze the invoices uploaded in the Form GSTR-6 for that particular month. You will be not able to upload any further invoices for that month. In case you have missed adding any invoice, you can upload those invoices in the next month or you can wait for supplier to add it in supplier GSTR-1/5.

3. Click the PROCEED button.
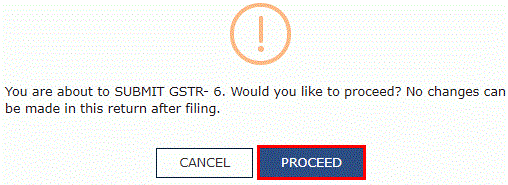
4. A success message is displayed at the top of the page. Once you submit the data, data is frozen and you cannot change any fields. Refresh the page.
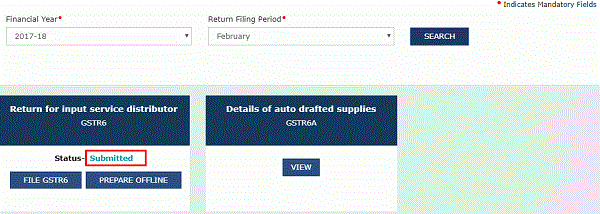
5. Refresh the page and the status of Form GSTR-6 changes to Submitted after the submission of Form GSTR-6.
Note: Status is changes to Submitted for Form GSTR-6 in Returns Dashboard as well.
6. Click the PREVIEW button again, to download the submitted Form GSTR-6 in PDF format.

The PDF file generated would now bear watermark of final Form GSTR-6.

6. Offset Late Fee
1. Once you submit Form GSTR-6, 10 – Late Fee tile gets enabled. To view details of late fee, click the 10 – Late Fee tile.
2. Click the OFFSET LATEFEE button.
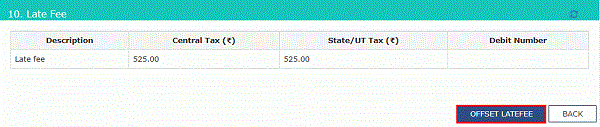
Late fee is offset and debit number is displayed.

7. File Form GSTR-6 with DSC/ EVC
1. Click the FILE RETURN button.
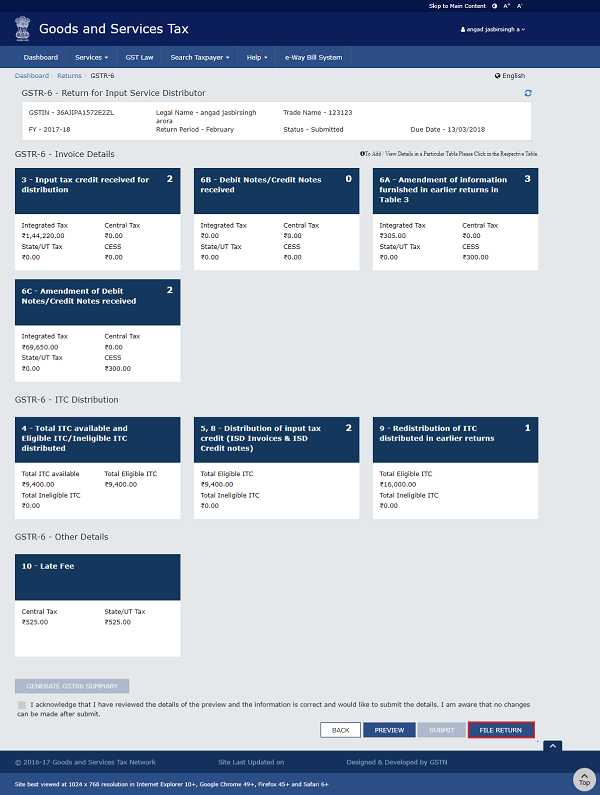
2. The Returns Filing for GSTR6 page is displayed. Select the Declaration checkbox.
3. In the Authorised Signatory drop-down list, select the authorized signatory. This will enable the two buttons – FILE WITH DSC or FILE WITH EVC.
4. Click the FILE WITH DSC or FILE WITH EVC button to file Table 6A of FORM GSTR1.
Note: On filing of the GSTR6, notification through e-mail and SMS is sent to the Authorized Signatory.
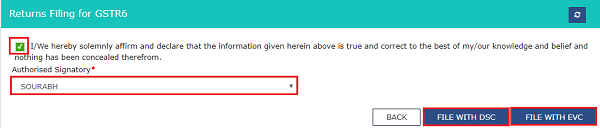
FILE WITH DSC:
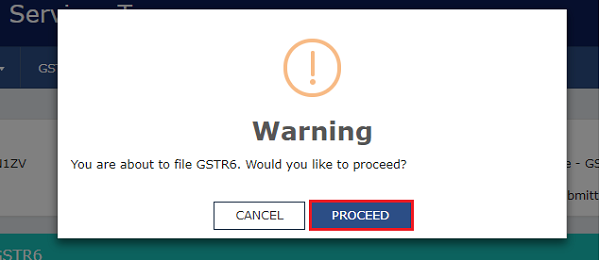
a. Click the PROCEED button.
b. Select the certificate and click the SIGN button.
FILE WITH EVC:
a. Enter the OTP sent on email and mobile number of the Authorized Signatory registered at the GST Portal and click the VERIFY button.

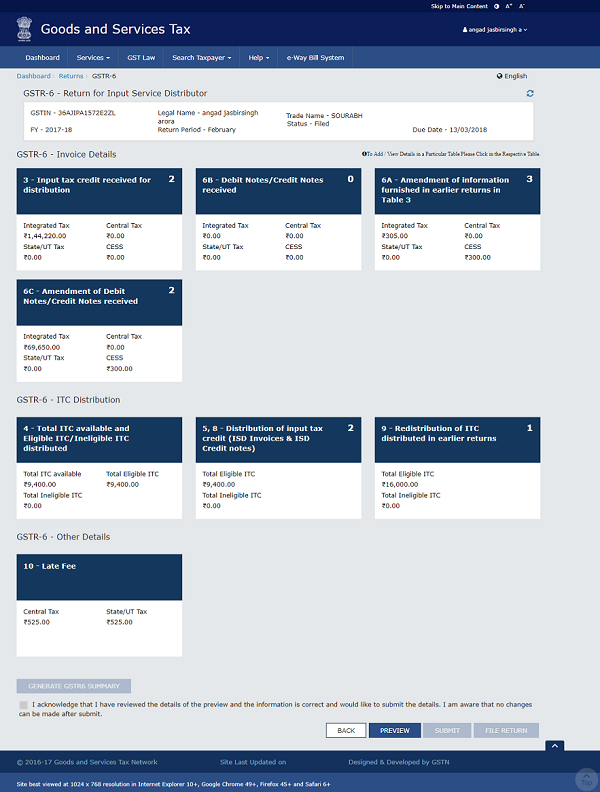
4. The success message is displayed.Refresh the page.
The status of Form GSTR-6 changes to Filed.
Note: On filing of the Form GSTR-6, notification through e-mail and SMS is sent to the Authorized Signatory.
5. Scroll down the page and click the Back button.
8. View Form GSTR-6 Status
1. The File Returns page is displayed. Select the Financial Year & Return Filing Period (Month) for which you want to view the return from the drop-down list.
2. Click the SEARCH button.

Status of the Form GSTR-6 return changes to “Filed”.
(Republished with amendments)
****
Disclaimer: The contents of this article are for information purposes only and does not constitute an advice or a legal opinion and are personal views of the author. It is based upon relevant law and/or facts available at that point of time and prepared with due accuracy & reliability. Readers are requested to check and refer relevant provisions of statute, latest judicial pronouncements, circulars, clarifications etc before acting on the basis of the above write up. The possibility of other views on the subject matter cannot be ruled out. By the use of the said information, you agree that Author / TaxGuru is not responsible or liable in any manner for the authenticity, accuracy, completeness, errors or any kind of omissions in this piece of information for any action taken thereof. This is not any kind of advertisement or solicitation of work by a professional.


in case of ISD, if any invoice has been wrongly uploaded on ISD data instead of GSTR 1 of group company, can it be amended from ISD database
GSTR6- Supplier uploaded invoice in input tax credit received for distribution but i unable to accept it due to hided options. so how will i take the action? either can i upload it at add missing invoice? Please guide me.
Good