Goods and Service Tax (GST)!! Currently this word brings happiness on the face of Government because of good centralised collection of the taxes and on the other hand this brings tension on the face of the tax payers because of lots of monthly compliances, professional fees, etc etc. If in such scenario someone comes and told you that GST Registration is Completely Free of Cost!! Sounds fussy right? But it is really not, you can actually get yourself registered with GST absolutely free of cost and that to by sitting at your home. Now you will ask how? So here I am coming with this article which will give you clear idea about the in depth step wise process of GST registration that to without incurring any cost from your pocket. So, let’s get started…
What is Mean by Free of Cost GST Registration?
We usually heard the statement like “GST registration cost took me approximately Rs. 2,000 to 3,000”. What it is exactly means? Is this registration cost charged by Government to allot GSTIN?
The answer is “No”. Government is not charging a single penny for allotting GSTIN. Whatever charges we used to hear from various people are the professional fees which we used to pay to the GST practitioners for providing this service of GST registration.
Currently, Government had designed the GST registration process in very user friendly way. Anybody who have a little bit knowledge of handling computer and internet technology can easily complete the GST registration by their own.
I am not saying do not take professional help, rather do take professional help if you are facing issues or you are not updated with the latest technologies so that you will not commit any mistakes. But for others who are technically sound can save their money by obtaining their GST Registration Number at absolutely free of cost by completing that process by their own.
And this article will definitely help you complete that process by your own. Since I am covering each and every step with the relevant screenshots.
GST Registration Process alongwith Screenshots:
Before starting please keep in mind that the same Registration process has to follow for Normal Taxpayer/ Composition/ Casual Taxable Person/ Input Service Distributor (ISD)/ SEZ Developer/ SEZ Unit.
Step 1: Go to https://www.gst.gov.in.
Step 2: Click the Services > Registration > New Registration option.

Step 3: After clicking on New Registration button, following window will appear on the screen:

You have to fill all the requisite details and click on the proceed button.
Following are some of the guidelines to fill the requisite details:
- In the I am a drop down list, select the Taxpayer as the type of taxpayer to be registered.
- In the State/UT and District drop down list, select the state for which registration is required and district.
- In the Legal Name of the Business (As mentioned in PAN)field, enter the legal name of your business/ entity as mentioned in the PAN database.
- In the Permanent Account Number (PAN) field, enter PAN of your business or PAN of the Proprietor.
- In the Email Address field, enter the email address of the Primary Authorized Signatory.
- In the Mobile Number field, enter the valid Indian mobile number of the Primary Authorized Signatory.
Step 4: Once you clicked on the Proceed button, two different One Time Password (OTP) will be sent on your email address and mobile number. Please keep in mind that the OTPs will be valid only for 10 minutes so you have to be really quick.
Step 5: Once you are done with this authentication process of Part A, the system generated Temporary Reference Number (TRN) is displayed.

Click on Proceed to move further towards Part B of the Application.
Notes:
Whenever you want to access your saved application you can used your TRN. But keep in mind that the TRN is valid only for 15 Days, so you have to complete your entire application within that time limit.
Step 6: Once you clicked on the proceed button while moving towards Part B of the application, system will be asked us to put Temporary Reference Number (TRN) and the captcha text following by OTP verification.
Step 7: After completing this above process, “My Saved Application” page is displayed. Under the Action column, click the Edit icon to fill the details under Part B of the application form.

Step 8: The Registration Application form with various tabs is displayed. On the top of the page, there are ten tabs as Business Details, Promoter/ Partners, Authorized Signatory, Authorized Representative, Principal Place of Business, Additional Places of Business, Goods and Services, State Specific Information, Aadhaar Authentication and Verification. Click each tab to enter the details.
Note: Details to be entered in Bank Accounts tab has been made optional and non-mandatory w.e.f. 27th Dec 2018. You can now enter the Bank Accounts details by filing an Amendment application only. Post grant of GSTIN, when you login for the first time on the GST Portal, you will be prompted to file a non-core amendment application to enter Bank Accounts details.

Step 9: Fill all the requisites details one by one in all the above mentioned 10 tabs.
a) Business Details
 Following are some of the guidelines to fill the requisite details:
- In the Trade Name field, enter the trade name of your business.
Note: Trade name of the business is different from the legal name of the business.
- In the Constitution of Business drop-down list, select the type of constitution of your business. This will be validated with the CBDT Database for a match with the PAN entered in Part A of the form.
- In the District and Sector/ Circle / Ward / Charge/ Unit drop-down list, select the district and sector/circle/ward/charge/unit number of your business.
- In the Commissionerate Code, Division Code and Range Code drop-down list, select the appropriate choice.
Note: In case you don’t know the Center Jurisdiction, click the link to know about your Center Jurisdiction.
- Select the Date of commencement of Business using the calendar.
- Select the Date on which liability to register arises using the calendar.
b) Promoter/ Partners tab:

Following are some of the guidelines to fill the requisite details:
- In the Personal Information section, enter the personal details of the stakeholder like name, date of birth, address, mobile number, email address and gender.
- In the Identity Information section, enter the official information of the stakeholder.
- In the Designation / Status field, enter the designation of the stakeholder.
- In the Director Identification Number(DIN) field, enter the DIN of the stakeholder issued by Ministry of Corporate Affairs. This number is not mandatory in case of proprietorship.
Note: DIN number is mandatory in case of:
-
- Private Limited Company
- Public Limited Company
- Public Sector Undertaking
- Unlimited Company
- Foreign Company registered in India
- In case you are a citizen of India, select Yes or else select No. In case of NO, In the Passport Number field, enter the passport number.
- In the Permanent Account Number (PAN) field, enter the PAN of the stakeholder.
- In the Aadhaar Number field, enter the Aadhar number of the stakeholder.
Note:
If you provide your Aadhaar here, (other than companies / LLP) you can file your returns etc. using e-Sign based on Aadhaar without requirement of Digital Signature, if you are also the authorized signatory.
- In the Residential Address in India section, enter the address details of the stakeholder. Based on the State selected, select the district and enter the corresponding pin code.
- In the Document Upload section, click the Choose file button. Navigate and upload the photograph of the stakeholder.
Note: You can upload PDF or JPEG files with maximum file size for upload of as 1 MB.
- In case the promoter or partner is also the authorized signatory, select the Also Authorized Signatory as Yes and details will be auto-populated in the Authorized Signatory tab.
c) Authorized Signatory:
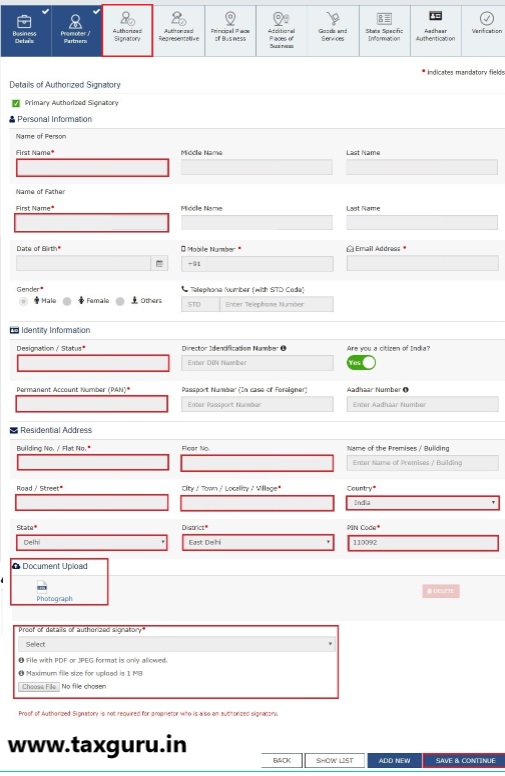
Following are some of the guidelines to fill the requisite details:
- In case you are the Primary Authorized Signatory, select the checkbox for Primary Authorized Signatory.
- In the Personal Information section, enter the personal details of the authorized signatory like name, date of birth, mobile number, email address and gender.
- In the Identity Information section, enter the official information of the stakeholder.
i. In the Designation / Status field, enter the designation of the authorized signatory.
ii. In the Director Identification Number(DIN) field, enter the DIN of the authorized signatory issued by Ministry of Corporate Affairs. This number is not mandatory in case of proprietorship.
Note: DIN number is mandatory in case of:
-
- Private Limited Company
- Public Limited Company
- Public Sector Undertaking
- Unlimited Company
- Foreign Company registered in India
iii. In case you are a citizen of India, select Yes or else select No.
a. In case of NO
b. In the Passport Number field, enter the passport number.
iv. In the Permanent Account Number (PAN) field, enter the PAN of the authorized signatory.
v. In the Aadhaar Number field, enter the Aadhar number of the authorized signatory.
Note:
If you provide your Aadhaar here, (other than companies / LLP) you can file your returns etc. using e-Sign based on Aadhaar without requirement of Digital Signature.
-
- In the Residential Address in India section, enter the address details of the authorized signatory. Based on the State selected, select the district and enter the corresponding pin code
- In the Document Upload section, click the Choose file button. Navigate and select the Proof of Appointment and photograph of the authorized signatory.
Note:
You can upload PDF or JPEG files with maximum file size for upload of as 1 MB for Proof of appointment of Authorized Signatory and 100 KB as photograph of the authorized signatory.
d) Authorized Representative:

Following are some of the guidelines to fill the requisite details:
- Select Do you have any Authorized Representative using the radio button.
(i) In case of GST Practitioner
a. In the Enrolment ID field, enter the enrolment ID of the authorized representative.
b. Click the SEARCH button.
Note: All details of the authorized representative will be auto-populated from the GST Portal.
(ii) In case of Other
a. In the Name of Person section, enter the name, designation, mobile number and email address of the authorized representative.
(e) Principal Place of Business tab:
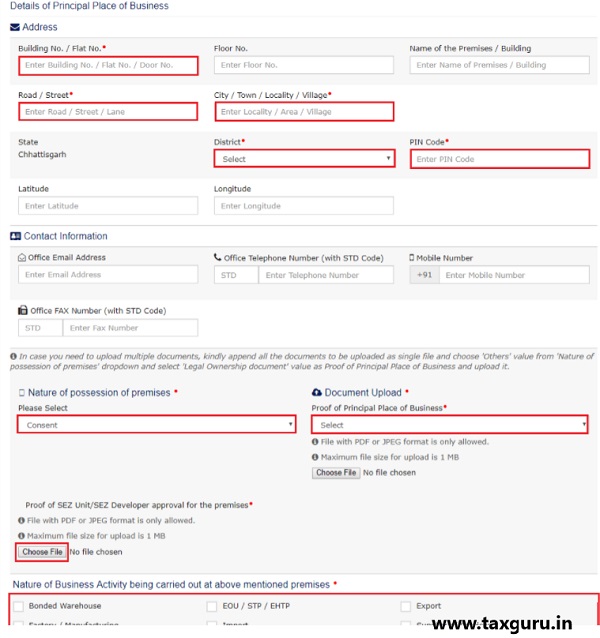
Following are some of the guidelines to fill the requisite details:
- In the Address section, enter the address details of the principal place of business. Based on the State selected, select the district and enter the corresponding pin code.
- In the Contact Information section, enter the official contact details like Email address, telephone number (with STD Code), mobile number field and fax number (with STD Code).
- In the Nature of Possession of Premises drop-down list, select the nature of possession of premises.
Note: In case you need to upload multiple documents, kindly append all the documents to be uploaded as single file and choose ‘Others’ value from ‘Nature of possession of business’ drop-down and select ‘Legal Ownership document’ value as Proof of Principal Place of Business and upload it.
- In the Document Upload section, click the Choose file button. Navigate and select the proof of Principal Place of Business document.
Note:
-
- You can upload PDF or JPEG files with maximum file size for upload of as 1 MB.
- You can upload these documents for the proof of Principal Place of Business.
- For Own premises – Any document in support of the ownership of the premises like Latest Property Tax Receipt or Municipal Khata copy or copy of Electricity Bill.
- For Rented or Leased premises – A copy of the valid Rent / Lease Agreement with any document in support of the ownership of the premises of the Lessor like Latest Property Tax Receipt or Municipal Khata copy or copy of Electricity Bill.
- For premises not covered above – A copy of the Consent Letter with any document in support of the ownership of the premises of the Consenter like Municipal Khata copy or Electricity Bill copy. For shared properties also, the same documents may be uploaded.
- In the Proof of SEZ Unit/SEZ Developer approval for the premises section, click the Choose File button to upload the proof of SEZ unit or SEZ developer approval for the premises.
Note:
-
- You can upload PDF or JPEG files with maximum file size for upload of as 1 MB.
- This attachment section is mandatory only if you have selected SEZ unit / Developer in ‘Reason to Obtain Registration’ in Business Details tab.
- Please read the instructions specified on the form for uploading any documents.
- Select the checkbox for Nature of Business activities being carried out at above mentioned premises.
- In case you have additional place of business, select Yesfor Have Additional Place of Business.
f) Goods and Services tab:
Following are some of the guidelines to fill the requisite details:
- In case you deal with Goods or Commodities, you need to mention the HSN Code in the Goods tab. In case you deal with services, you need to mention the Service Classification Code in the Services tab. You can add maximum 5 goods and 5 services. In case, you have more than 5 goods or services, you must add the top 5 goods or services you are dealing with.
- In case you know the HSN Code:
Let us take an example that you need to add the HSN Code 6105. To add the HSN Code, perform the following steps:
In the Search HSN Chapter by Name or Code field, enter the first four digits 6105 from the HSN Code. HSN Code is successfully added.
- In case you do not know the HSN Code:
Let us take an example where the dealer deals with cotton textile.
In the Search HSN Chapter by Name or Code field, type cotton; related HSN Chapter list is displayed. From the displayed list, scroll and select the appropriate option (in this case 5208). HSN Code is successfully added.
g) State Specific Information:
Following are some of the guidelines to fill the requisite details:
- In the Professional Tax Employee Code (EC) No. field, enter professions tax E.C number.
- In the Professional Tax Registration Certificate (RC) No. field, enter professions tax R.C number.
- In the State Excise License No. field, enter state excise license number.
- In the Name of the person in whose name Excise License is held field, enter the name of the person in whose name excise license is held.
h) Aadhaar Authentication tab:
Following are some of the guidelines to fill the requisite details:
a) Select Yes, in case, you want to opt for Aadhaar authentication of Promoters/ Partners, Authorized Signatories. Or else, select No.
Note:
- Once you have opted “Yes” for Aadhaar authentication while registering on the GST Portal and registration application is submitted, an authentication link will be shared on mobile numbers and e-mail IDs of the Authorized Signatories mentioned in the registration application. Authentication link will also be shared to Promoters and Partners as well, in case of Proprietor, Partnership and HUF as Constitution of Business, as per current implementation.
- If you have opted “Yes” for Aadhaar authentication, while registering on the GST Portal and your Aadhaar authentication has been successfully validated, your application will be deemed approved within 3 Working days. The registration application submitted by you will not be marked for mandatory site visit. If Tax Official raises SCN within 3 working days, then you will have 7 working days to reply to it. Tax Official can take further action on that reply within 7 working days. If Tax Official doesn’t take any action in 7 working days, then application will get deemed approved after 7 working days.
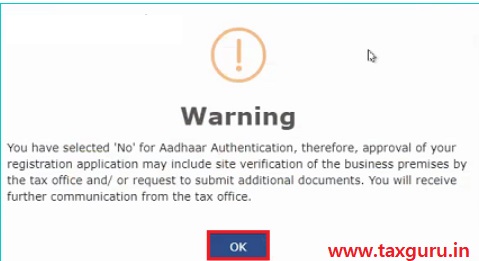
- In case, you have opted “No” for Aadhaar authentication, while registering on the GST Portal, Registration application will not be deemed approved within 3 Working days. Registration will be marked for mandatory site visit and approval thereafter by the Tax Official. Registration application will get deemed approved after 21 calendar days, if Tax Official doesn’t take any action. If Tax Official raises SCN within 21 calendar days, then you will have 7 working days to reply to it. Tax Official can take further action on that reply within 7 working days. If Tax Official doesn’t take any action within 7 working days, then application will get deemed approved after 7 working days.

Note: In case, you have selected No, below screen will appear and Registration application will not be deemed approved within 3 Working days. Click OK
i) Verification Tab
Following are some of the guidelines to fill the requisite details:
- Select the Verification
- In the Name of Authorized Signatorydrop-down list, select the name of authorized signatory.
- In the Placefield, enter the place where the form is filed.
- After filling the enrolment application, you need to digitally sign the application using Digital Signature Certificate (DSC)/ E-Signature or EVC.
Digitally signing using DSC is mandatory in case of LLP and Companies.
The Enrolment Application can be electronically signed using E-Signature only if the authorized signatory has an Aadhar number and same is mentioned in the Authorized signatory tab page of the Enrolment Application. This is because E-Signature is an Aadhar based electronic verification service.
In Case of DSC:
Click the SUBMIT WITH DSC button.
Note: In case, your DSC is not registered, you will need to register DSC.
Note:
- Make sure your DSC dongle is inserted in your laptop/ desktop.
- Make sure emSigner (from eMudra) is running on your laptop/ desktop with administrator permissions.
To check if the emSigner is running on your laptop/ desktop, perform the following steps:
1. Click the item tray.
2. Double click the emSigner icon.
3. Click the Hide Service button to minimize the dialog box.
4. Select the certificate and click the SIGN button.
5. Enter the PIN (dongle password) for the attached DSC.
In Case of E-Signature:
- Click the SUBMIT WITH E-SIGNATURE
- In the Please select Service Provideroption, select the appropriate Service Provider.
Note: C-DAC and NSDL are e-sign Service Providers (Both are free of cost).
- Select the checkbox for declaration.
Note: OTP will be sent to your e-mail address and mobile phone number registered with Aadhaar.
In Case of EVC:
- Click the SUBMIT WITH EVC
- Enter the OTP sent to email and mobile number of the Authorized Signatory registered at the GST Portal and click the VALIDATEOTP button.
Step 10: Once the above process of validation and submission is done, the success message is displayed. You will receive the acknowledgement in next 15 minutes on your registered e-mail address and mobile phone number. Application Reference Number (ARN) receipt is sent on your e-mail address and mobile phone number.

You can track the status of your application using the Services > Registration > Track Application Status.
So here is the entire GST registration process. I have tried to mentioned each and every small points as well for your clarity. I hope this article will help you in getting your GST registration number at the earliest and that to free of cost!!!


How can I find the following for state of Delhi?
1. Professional Tax Employee Code (EC) No.
2. Professional Tax Registration Certificate (RC) No.
3. State Excise License No.
4. Name of the person in whose name Excise Licence is held
Hello my contact number is 9891115824 can someone please help me. I have filled almost completely but I am stuck at a point please drop you number I will call you or please call me on this number.
Thank you
I registered my gst from some person he fill his phone no and email id and asking every month for money for return fill quater annual even I myself can fill return monthly and he is not changing number and email id now what I to do plz 🙏 help me
Sir Mera GST Application Number ARN AA1001210264734 Hain Aur humko Apply Karne Ka 25 din ho Gaya hain
Only gst
Thank you very much for explaining in detail GST Registration process.
I need help in filling the form as I do not know what to fill in certain areas. I got the temperary number though. Can anyone help