Introduction
Users who have already registered in e-Filing portal can use this functionality to generate ITDREIN (Income Tax Department Reporting Entity Identification Number) and upload certain forms in e-Filing portal using the generated ITDREIN.
ITDREIN is the Unique ID issued by ITD which will be communicated by ITD after the registration of the reporting entity with ITD. The ITDREIN is a 16-character identification number in the format XXXXXXXXXX.YZNNN where
| ITDREIN component | Description |
| XXXXXXXXXX | PAN or TAN of the reporting entity |
| Y | Code of Form Code |
| Z | Code of Reporting Entity Category for the Form Code |
| NNN | Code of sequence number. |
ITDREIN Services
The below table provides the services available for ITDREIN Users.
| S.N | Services |
| 1 | Upload and View Form 61 |
| 2 | Upload and View Form 61A |
Steps to Generate ITDREIN
Step 1 – Login to e-Filing portal using User ID, e-Fiing Password and DOB/DOI.

Step 2 –Go to My Account → Manage ITDREIN.

Step 3 – To generate new ITDREIN click on the button “Generate New ITDREIN”.

Step 4 – A Pop up with Form Type and Reporting Entity Category is displayed. Select the Form Type and Reporting Entity Category from the dropdown.

Step 5 – Based on the Form Type and Reporting Entity Category selected, the ITDREIN will be generated and the user will be able to upload and view the corresponding Form.
Step 6 – Click Generate ITDREIN button
Step 7 – Success Message is displayed as shown below. User receives a confirmation e-mail on successful generation of ITDREIN to the registered Email ID. An SMS is also sent to the registered Mobile number.

Step 8 – On Successful Generation of ITDREIN, the screen is displayed as shown.

Steps to Add Authorised Person
Step 1 – Login to e-Filing portal using User ID, e-Filing Password and DOB.

Step 2 –Go to My Account → Manage ITDREIN.

Step 3 –To add Authorised Person for the generated ITDREIN, click on the link provided in the ITDREIN Column.

Step 4 –Click on the button Add Authorised Person.

Step 5 –A Pop up with Authorised Person details appears as shown below.

Notes:
1. If the Form Type is FORM 61A user needs to select “Authorised Person Type” from the drop down.
2. Under “Authorised Person Type” for “Designated Director”, the facility to “Upload” and “View” Form 61A shall be available.
3. For “Principal Officer”, the option to “View” Form 61A shall only be available.
4. The details of “Authorised Person” cannot be edited further.
5. This field is not available for “Form 61”.
Step 6 – Enter all the details and Click on Add Authorised Person button. Success Message is displayed as shown below

Step 7 – User receives a confirmation e-mail on successful Addition of Authorised Person to the registered Email ID. An SMS is also sent to the registered Mobile number
Step 8 – Authorised Person receives a confirmation e-mail with an activation link to the Authorised Person’s Email ID. An SMS along with OTP (One time Password) is sent to the Authorised Person’s Mobile Number.
In order to activate the account, the user should click on the Activation link, enter the Mobile PIN, Password and Confirm Password and click on Activate Button. On success, the user account is activated and the database is updated.

Step 9: After the Authorised person is activated, Authorised person can view the details as below.

Steps to Upload Forms (i) Upload Form 61
Step 1 – Login to e-Filing portal using ITDREIN, Authorised Person PAN and Password.

Step 2 – Based on the Form Type and Reporting Entity Category selected during registration, the ITDREIN user will be able to upload and view the corresponding Form.
Step 3 – Go to e-File → Upload Form 61

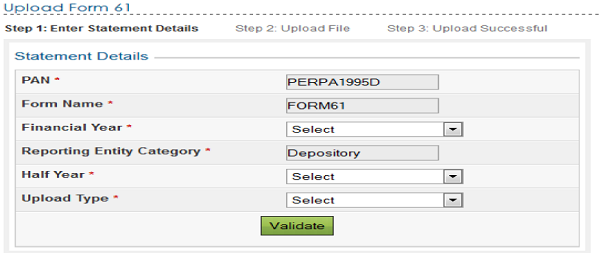
Step 4 – Enter the following details and click on Validate.

In Upload Type shall be provided – a) Original Form
Step 5 – On successful validation upload the corresponding ZIP file, generate the Signature file using DSC Management Utility and Click on Upload.

Step 6 – On successful upload user records are captured in the e-Filing system and the below success message must be displayed along with the Transaction ID.

Step 7 – Once uploaded the status of the statement shall be “Uploaded”. The uploaded file shall be processed and validated. Upon validation the status shall be either “Accepted” or “Rejected” which will reflect within 24 hours from the time of upload. In case if “Rejected”, the rejection reason shall be available by clicking on “Transaction No.” post login under My Account à View Form 61.

(ii) Upload Form 61A
Step 1 – Login to e-Filing portal using User ID (ITDREIN), Authorised Person PAN, and Password.

Step 2 – Go to e-File → Upload Form 61A.

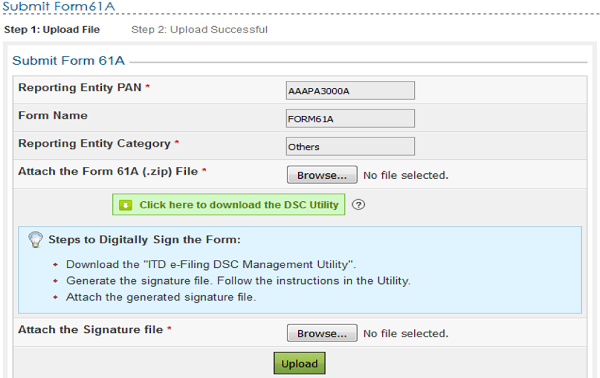
Step 3 – The upload screen will have the below details.
Reporting Entity PAN
Form Name
Reporting Entity Category
Attach the Form 61A (.zip) File along with the Signature file and click on “Upload”.

Step 4 – On successful validation, the success message shall be displayed as follows.

Steps to View Forms (i) View Form 61
Step 1 – Login to e-Filing portal using ITDREIN, Authorised Person PAN and Password.

Step 2 – Based on the Form Type and Reporting Entity Category selected during registration, the ITDREIN user will be able to upload and view the corresponding Form.
Step 3 – Go to My Account – View Form 61

Step 5 – The below details are displayed to the user
I PAN
I Financial Year
I Form Name
I Half Year/Quarter
I Status (Accepted / Rejected)

Step 6 – User can see the below details by clicking on “Transaction No”
√ ZIP file (In case of Acceptance)
√ Acknowledgement Number (In case of Acceptance)
√ Receipt
√ Rejection Reason (In case of rejection)

(ii) View Form 61A
Step 1 – Login to e-Filing portal using User ID (ITDREIN), Authorised Person PAN, and Password.

Step 2 – Go to My Account à View Form 61A.

Step 3 – The user has to select the Assessment Year, Filing Status and click on “View Details”.

Step 4 – The Filing Status field will have the below details.
Uploaded
Accepted
Rejected

Step 4 – This status will initially be displayed as “Uploaded”. When User selects filing status as “Uploaded” the following screen is displayed with Transaction Details.

Step 4 –If the Uploaded Form is processed then Filing status shall be updated based on the validation done on the uploaded file and displayed as Accepted/Rejected. When the status is “Accepted” then the following screen is displayed to the user.

Note: The updated status can be checked by the user after 24Hours of upload.
Step 5 – By clicking on “Transaction No”, the below details shall be displayed. The uploaded file can be downloaded by clicking on the link “ZIP”.

Step 6 – If the status is “Rejected” then the following screen is displayed to the user.

Step 7 – By clicking on “Transaction No”, the error description is displayed on the screen.

Steps to De-activate Authorised Person
Step 1 – Login to e-Filing portal using User ID, e-Filing Password and DOB. Step 2 – Go to My Account àManage ITDREIN.
Step 3 – Click on the ITDREIN under which the “Authorised Person” to be De-activated.

Step 4 – Click on the De-activate link to de-activate the Authorised Person.

Step 5 –After clicking on the de-activate link, a Success Message for De-activating will be displayed and the Date of De-activation will be recorded.

Step 6: To add another Authorised Person for the generated ITDREIN, click on Add Authorised person as appearing below the table and follow the process as mentioned in “Steps to add Authorized person” section above
Annexure 1:
List of Form Codes and Form Types
| Form Code | Form Type |
| Z | 61 |
| A | 61A |
List of Reporting Entity Category Code for Form 61 and Form 61A
| Code | Reporting Entity Category | Reporting Entity Description |
| B | Banking company | Banking company |
| C | Co-operative bank | Co-operative bank |
| D | Depository | Depository, participant, custodian of securities or any other person registered under sub-section (1A) of section 12 of the Securities and Exchange Board of India Act, 1992 |
| G | Government | Government or Inspector-General appointed under section 3 of the Registration Act, 1908 or Registrar or Sub-Registrar appointed under section 6 of that Act |
| I | Insurer | Insurer |
| M | Mutual Fund | Mutual Fund |
| N | NBFC/Nidhi | Non-banking financial company, Nidhi referred to in section 406 of the Companies Act, 2013 (18 of 2013); |
| P | Post Office | Post Office/Post master/ Post Master General |
| R | Reserve Bank of India | Reserve Bank of India |
| S | Securities market intermediary | Stock broker, sub-broker, share transfer agent, banker to an issue, trustee of a trust deed, registrar to issue, merchant banker, underwriter, portfolio manager, investment adviser and such other intermediaries registered under sub-section (1) section 12 of the Securities and Exchange Board of India Act, 1992 |
| Z | Others | Others |


What to do a person having agriculture income has been wrongly registered as banking company on compliance portal???
can I have form 61A as word editable?
very helpful sir thnx so much for yr support
For creation of ITDREIN, Only 2 form types are showing – Form 15CC & FormV. for Form 61A, Which Catagory should i choose? Help me for the issue.
Thank you in advance.
SFT Registration ke liye samjh mai nahi aa raha hai plz help kariye toda bataiye ki User ID or Password kaise banau…. ….incometaxindia.gov.in per kaha login karu jise user ID or password ban jaye ………..
Help in connection to generation of .zip file., as the utility generates only xml file.
And also there is an error appearing on screen saying, “the registered DSC is either expired or invalid.”
I have registered the DSC on site but still it is showing this error.
Kindly help in this regard.
dear sir
kindly help out for how to file itdrein sale of preferential debentures is that compulsory.
Very helpful Article containing all the steps with snapshots in such a nice manner. Thanks
Pls clarify whether, After generation of ITDREIN and after submission of preliminary response to SFT, is the link to e-file Form 61A is generated based on the preliminary response? i have submitted a no/ not applicable response with respect to an assessee, but i do not find a link Upload Form 61A in the e-file tab. then does it mean that if there are no reportable transactions, submission of preliminary response is sufficient?
Sir,
How to change Authorised person details from Principal officer to Designated Director?
Please any one give a format of Excel file for Form61A preparation file with accepted format in SFT reparation utility.The Template downloaded from SFT some fields syntax not properly identifiable.
Sit we are a dealer in aircel prepaid cards and recharge coupon vendor. is it possible for us to file the form 61A. a message has come from IT department to our mail.
please guide us. with how to make the entry according to our bank account or our daily cash sales details
How to register the DSC for form 61A
please guide on that
You have not mention how to generate .zip file. Please guide a there is a JAVA utility of ITD that only generates .XML file only.