How can I file “Nil” GSTR-3B return?
‘Nil’ return may be filed by you for a particular tax period, if you have not made any outward supply (commonly known as sale) and have NOT received any inward supply (commonly known as purchase) of any goods/ services and do not have any tax liability for that particular tax period.
To file GSTR-3B Nil return, perform the following steps:
1. Login and Navigate to GSTR-3B – Monthly Return page
2. Preview Draft GSTR-3B
3. File GSTR-3B
4. Download Filed Return
Login and Navigate to GSTR-3B – Monthly Return page
1. Access the www.gst.gov.in URL. The GST Home page is displayed.
2. Login to the GST Portal with valid credentials.
3. Click the Services > Returns > Returns Dashboard command.
4. The File Returns page is displayed. Select the Financial Year& Return Filing Period (Month) for which you want to file the return from the drop-down list.
5. Click the SEARCH button.
6. The File Returns page is displayed. This page displays the due date of filing the returns, which the taxpayer is required to file using separate tiles.
In the GSTR-3B tile, click the PREPARE ONLINE button.
Note: The due date for filing GSTR-3B is displayed on this page.
7. A list of questions is displayed. You need to answer the questions to show the relevant sections applicable to you. Select Yesfor option A ‘Do you want to file Nil return?’.
Note: All other options will get disabled once you select ‘Yes’ in question A.
8. Click the NEXT button.
 The GSTR-3B – Filing of Tax page is displayed.
Preview Draft GSTR-3B
1. Click the PREVIEW DRAFT GSTR-3B button to view the summary page of GSTR-3B for your review.
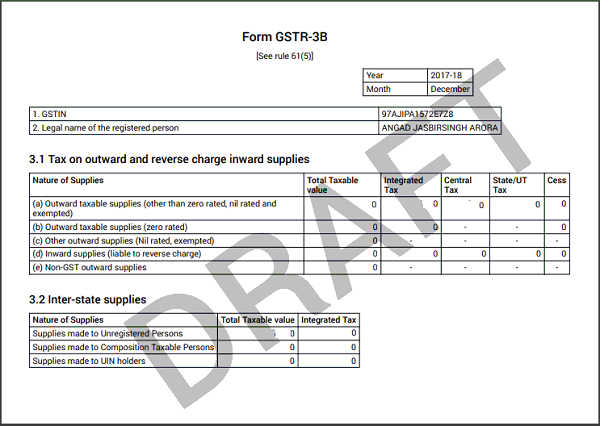
2. This button will download the draft Summary page of your GSTR-3B for your review. All entries will be zeroes. Since, no payment is involved, therefore, table 6.1 will not be there. The PDF file generated would bear watermark of ‘draft’as the details are yet to be filed.
File GSTR-3B
1. Select the checkbox for declaration.
2. From the Authorised Signatory drop-down list, select the authorized signatory.
3. Click the FILE GSTR-3B WITH DSC or FILE GSTR-3B WITH EVC button.
4. Click the PROCEED button.
FILE GSTR-3B WITH DSC:
a. Select the certificate and click the SIGN button.
FILE GSTR-3B WITH EVC:
b. Enter the OTP sent on email and mobile number of the Authorized Signatory registered at the GST Portal and click the VERIFY button.
5. The success message is displayed. Click the OK button.
The status of GSTR-3B is changed to Filed.
Download Filed Return
1. Click the DOWNLOAD FILED GSTR-3B button to download the filed return.
The PDF file generated would now bear watermark of final Form GSTR-6.
2. Click the Back button.
3. The File Returns page is displayed. Select the Financial Year& Return Filing Period (Month) for which you want to view the return from the drop-down list.
3. Click the SEARCH button.
Status of the GSTR-3B return changes to “Filed”. You can click the VIEW GSTR3B button to view the GSTR-3B return.


