Statement of Financial Transaction (SFT) Report Generation Utility User Guide
1 Introduction
1.1 Intended Audience
The principal officer and the technical personnel of the reporting entity who would be using the Utility are the users of this document.
1.2 Legal Framework
Section 285BA of the Income Tax requires specified reporting persons to furnish statement of financial transaction. Rule 114E of the Income Tax Rules, 1962 specifies that the statement of financial transaction required to be furnished under sub-section (1) of section 285BA of the Act shall be furnished in Form No. 61A.
1.3 Related Resources
The reporting entity may refer to following resources released by the Directorate of Systems:
| Systems Notification(s) | Notifications issued by the Directorate of Systems specifying the procedures, data structures and standards for ensuring secure capture and transmission of data, evolving and implementing appropriate security, archival and retrieval policies |
| User Manual for ITDREIN Registration and Upload | User Manual to explain steps in registration of filer and upload of SFT (Form 61A) |
| SFT Report Generation Utility | Java utility to assist the filer in preparation of SFT (Form 61A) in XML file |
| SFT Report Generation Utility User Guide | User Guide to explain steps in using the Java utility to assist the filer in preparation of SFT (Form 61A) in XML file |
| SFT Quick Reference Guide | One page document with steps for preparation of SFT |
The developers who want to develop program to generate XML may refer to the following:
| Form 61A Schema | XSD file which contains the schema in which SFT (Form 61A) needs to be prepared and uploaded/submitted |
| Form 61A Schema Guide | Guide to assist the filer in understanding the Form 61A Schema |
2 Overview of the Utility
Report Generation Utility is a desktop utility based on java. The utility enables user to generate validated Form 61A XML Reports which is to be submitted to ITD.
2.1 Key Features
Report Generation Utility has following features:
- Preparation of SFT by importing CSV and data entry
- Validation of data
- Assist in correction of errors
- Enable saving and import draft XML file
- Generation of SFT in XML format
2.2 Toolbar and Messages
The utility contains Toolbars, messages and buttons. The Report Generation Utility toolbar has a list of pre-arranged command buttons. These buttons in the toolbar are action interfaces that allow the user to perform utility functions.
![]()
The utility displays following types of messages:
| Message Type | Symbol | Description | Example |
| Information | Informs about the results of a command. | File saved successfully | |
| Option | Informs the user about multiple options. User can choose to proceed or cancel. | Any data present in the form will be erased. Do you wish to continue? |
3 Deploying the Utility
3.1 Downloading the Utility
The Report Generation Utility is available on the e-filing website home page under forms (other than ITR) tab on of the e-filing portal. The Utility can be downloaded as follows:
1. Go to e-filing portal at https://incometaxindiaefiling.gov.in/
2. Click on the Forms (other than ITR) tab under the Downloads
3. Click on the Download link against Form 61A to download the Utility. It allows the user to save the file in the location selected by the user.
3.2 Prerequisites for the utility
The Utility requires Java Runtime Environment (JRE) and Unzip software.
1. Operating System
- Windows 7.1 and above
2. Java Runtime Environment (JRE)
- It allows the user to run Java supported programs. Report Generation Utility requires JRE to run on Windows based operating system.
- Download and install JRE version 8 Update 101 or later from
https://java.com/en/download/
3. Unzip software
- It allows the user to extract the zipped/compressed file.
- Use tools like WinZip or WinRAR to extract the downloaded Report Generation Utility
3.3 Deploying the utility
Once the JRE version 1.8 Update 101 or later is installed, the utility can be deployed on user machine by extracting the downloaded file to the folder using tools like WinZip or WinRAR.
3.4 Running the utility
After the JRE version and utility is installed, the Report Generation Validation Utility can be run as follows:
1. Go to the folder where the contents of the Utility have been extracted.
2. Click on jar file. It displays the General Instructions window.
Caution: The system console window should remain open throughout the operation of the utility. If this window is closed either accidentally or intentionally, data could be lost.
4 Preparation of SFT
Form 61A has four parts. Part A contains statement details, which is common to all transaction types. Other three parts relate to report level information (depending on transaction type), which are as follows:
- Part B (Person Based Reporting)
- Part C (Account Based Reporting)
- Part D (Immovable Property Transaction Reporting)
Reporting person/entity is required to furnish separate Form 61 A for each transaction type. Instructions and validation requirement for Form 61A is given in Annexure A.
4.1 Selecting the Transaction Type
1. Open Form 61A utility. Select the SFT code from the Drop down on the Instructions page

Figure 1: Selection of Transaction Type
2. Utility will ask permission to proceed, click on OK to continue
Caution: The selection of transaction type (SFT code) will reset the utility and erase the data.
Note: The utility shows the relevant parts for submitting report details after selection of the transaction type.
Note: The Frequently Asked Questions (FAQs) are given in Annexure A
4.2 Capturing Statement Details
User needs to click on ‘Statement (Part A)’ and fill statement details consisting of Reporting Entity Details, Statements Details and Principal Officer Details. User needs to enter all mandatory fields.
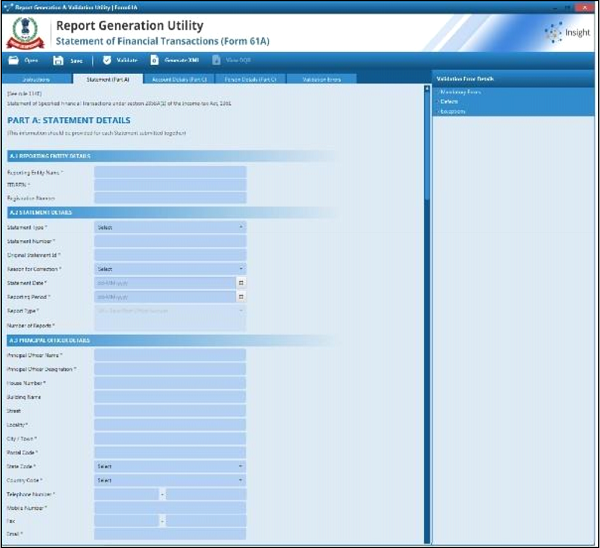
Figure 2: Statement Details (Part A)
Report details can be captured by importing CSV files or manual data entry.
4.3 Capturing Report Details by Importing CSV
User can use Coma Separated Values (CSV) file to capture report details.
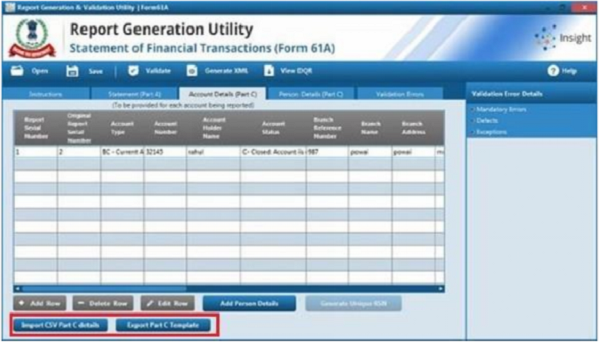
Figure 3: Capturing Report Details by Importing CSV
1. Click on Export CSV button to download CSV Template
2. Save the CSV at desired location
3. Open the CSV file and fill the details by data entry or pasting values.
4. Click on Import CSV button
5. Select the pre saved CSV from file system and then click on Open button to upload
6. CSV imported successfully dialog box will be displayed. Click on OK button to complete the import
Caution: CSV Data in incorrect format will not be uploaded in the utility.
Note: In case of Account Based Reporting) for accounts with single account holder, user will enter one record row for each account. For Accounts with more than one account holder, user needs to enter mult ple record rows for each accountwhere Account detail (inc uding Report serial Number”) wil be repeated for each account holder The utility will automatically create reports with unique Report serial Number from the CSV data.
4.4 Capturing Report Details by Data Entry
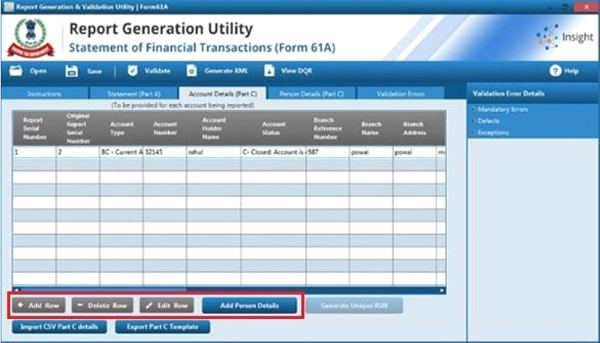
Figure 4: Capturing Report Details by Data Entry
1. Click on Add Row button to add a new information record
2. Click on Delete Row button to delete the selected information record
3. Click on Edit Row button to edit the selected information record
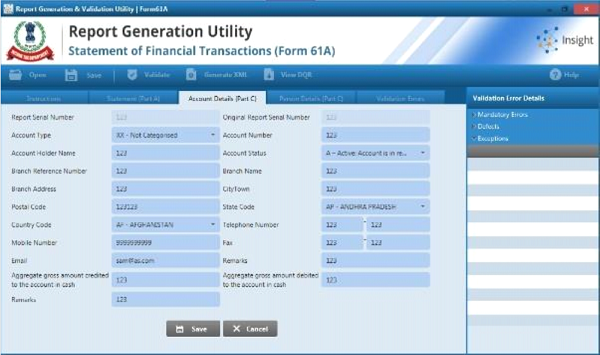
Figure 5: Editing Report Details
4. Fill the details and click on Save button to save the details
5 Validation of SFT
The utility allows the user to validate the information and identify errors before submission. The errors have been classified in following categories:
| Mandatory Errors | Mandatory Schema level errors need to be resolved by user for successful generation of XML report. |
| Defects | Defects can be Statement level defects or Report level Defects. Statement Defects are those which render the Statement (Part A) defective. Such Statements will be rejected and the reporting entity needs to resubmit the statement. Report defects are those which render a particular report(s) (Part B/C/D) as defective in the statement. A statement may have multiple reports and only reports with defects would be rejected. The reporting entity needs to correct and submit the reports again in the corrected statement. |
| Exceptions | Exceptions do not result in the statement/report being rejected. The exceptions should be reviewed by the reporting person/entities and if any information is available, the reporting entity may provide the information. If any defect is noticed, the reporting entity needs to rectify the defect by submitting a correction statement. |
The explanation of various types of validation errors is given in Annexure C.
5.1 Validating data
1. Click on Validate button on the tool bar
2. Utility will display validation errors on Validation Tab
3. Click on Validation row to see details of Validation errors on the right window pane of screen
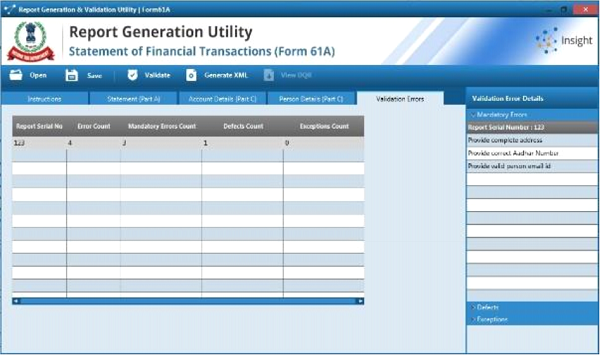
Figure 6: Viewing Validation Error Details
5.2 Correcting the Errors
1. Click on any particular validation error from list, utility will show the field highlighted in red, where corrections can be made
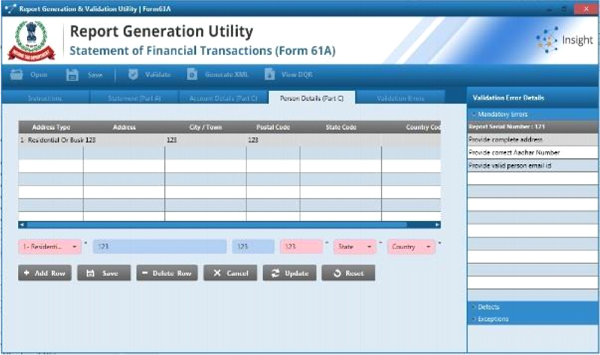
Figure 7: Correction of Errors
2. Fix the errors and then click on Validate button again to check whether error has been
3. If there are no validation errors, “Validation Successful´dialog box is displayed to the
6 Generation of SFT
1. Click on Generate XML button on the toolbar
2. If there are no validation errors, Utility will display Form Validation Successful dialog box, click on OK button.
3. Give the desired path where user wants to save XML on machine and click on save button
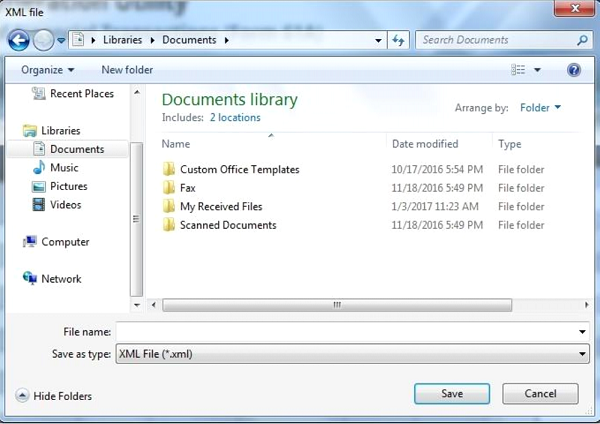
Figure 8: Generation and Saving of SFT XML File
Note: User should use click on Validate Button before generating XML to resolve any errors
Note: The XML Report generated from utility needs to be submitted through e-Filing Portal (https://incometaxindiaefil ing.gov.in/)
7 Other Features of the Utility
7.1 Exporting SFT Data in CSV file
The utility allows user to export SFT data in CSV file
1. Click on Export CSV button to export SFT Data in CSV
2. Save the CSV at desired location
7.2 Saving Draft XML File
The utility allows user to save filled information as draft which can be later viewed and edited.
1. Click on Save button in toolbar
2. File window will be displayed to select the folder where file needs to be saved.
3. Give desired path to save draft XML file
7.3 Opening Saved XML File
The utility allows user to open, view and edit the saved draft and XML.
1. Click on Open button in toolbar
2. Select the desired saved file from machine and click on Open button
3. The information in the saved XL file will be loaded
7.4 Preparation of NIL Statement
Utility allows user to generate SFT (XML) with no financial transactions in it. This functionality is useful when Reporting Entity has no financial transaction to report.
1. Fill required information in Statement (Part A) and select ND (No Data) from Statement Type drop down field.
2. Save XML to desired location on machine.
7.5 Preparation of Correction Statement
In an event, if user needs to send correction statement for a previously submitted statement, User can generate a correction statement.
Steps for correction in previously submitted information:-
1. Open existing XML which need to be corrected
2. Select CB- Correction statement containing correction for previously submitted information selection from Statement Type dropdown list
3. Mention the statement ID of the original Statement which is being corrected in the element ‘Original Statement ID.
4. Mention the Report Serial Number of the original report which is being corrected in the element ‘Original Report Serial Number’. Only reports which are to be corrected /revised/deleted should be retained and other reports may be deleted.
Annexure A – Frequently Asked Questions (FAQs)
Deploying the Utility
1. How to install the utility on a windows platform?
The downloaded zip file has to be extracted using WinZip or WinRAR tools. For more details refer section 3.4 of the user guide.
2. Whether the utility needs any other software to be installed?
Yes. Report Generation Utility requires JRE to run on Windows based operating system. Download and install JRE version 1.8 Update 101 or later. For more details, refer section 3.2 of the user guide.
3. How to run the utility?
Click on RGU-Form61A-v1 .jar file to run the utility. For more details, refer section 3.4 of the user guide.
Preparation of SFT
4. How to capture data in the utility?
Data can be captured by importing CSV or data entry.
5. What date format should be used while filling CSV?
User should use DD-MM-YYYY format while entering data in CSV. If date is entered in incorrect format then CSV will not be imported successfully.
6. Can data be saved before the report is complete?
Yes. Save the data using Save button in the tool bar. The data is saved with a draft extension. To retrieve the data in the utility, use the Open button from the tool bar.
7. What data format should be used while entering data in CSV?
Data format to be used for various fields is described in Form 61A or Annexure B of the user guide.
8. How to capture information for more than account holders?
For Accounts with more than one account holder, user needs to enter multiple record rows for each account, where Account detail (including “Report serial Number”) will be repeated for each account holder. The utility will automatically create reports with unique Report serial Number from the CSV data.
9. How to view information importing CSV?
After successful CSV import, data is visible in the relevant tab of the utility.
Validation of SFT
10. What are various types of validation errors?
The errors have been classified as mandatory errors, defects and exceptions. . For more details refer Annexure B of the user guide.
11. What are mandatory errors?
Mandatory errors need to be resolved by user for successful generation of XML report. These are generally schema level errors. For resolving these type of errors, the data filled should be as per the Form 61A schema validation
12. What are defects?
Defects can be Statement level defects or Report level Defects. Statement Defects are those which render the Statement (Part A) defective. Such Statements will be rejected and the reporting entity needs to resubmit the statement. Report defects are those which render a particular report(s) (Part B/C/D) as defective in the statement. A statement may have multiple reports and only reports with defects would be rejected. The reporting entity needs to correct and submit the reports again in the corrected statement.
13. What are exceptions?
Exceptions do not result in the statement/report being rejected. The exceptions should be reviewed by the reporting person/entities and if any information is available, the reporting entity may provide the information. If any defect is noticed, the reporting entity needs to rectify the defect by submitting a correction statement.
14. How to identify validation errors?
When user clicks on validate button, validation summary is displayed in Validation Error tab. On selecting a particular Row on the validation error screen, error details are displayed on screen on the right side. On selecting the error, user is directed towards the erroneous field on the screen.
15. How to rectify validation errors?
User can navigate to erroneous fields via Validation Error Details screen on the right side of the screen. Erroneous fields are highlighted in Red and are editable for user to correct.
Generation of SFT
16. Whether any validations are required before generation of XML?
Validations have to be performed before generating an XML file. User is not allowed to generate XML Report with invalid data. In Form 61A utility validations are of 3 types – Mandatory, Defects and Exceptions. It is required to resolve any Mandatory Errors before generation of XML report.
17. Where generated XML files should be submitted?
The XML Report generated from utility needs to be submitted through e-Filing Portal (https://incometaxindiaefiling .gov. in/)
18. What is the extension of generated file?
Generated XML file should have ‘.xm ’ extension.
Other Features
19. Can data be saved before the report is complete?
Yes. User can save the data using Save button in the tool bar. To retrieve the data in the utility, use the Open button from the tool bar
20. How to load an existing XML file?
Select the saved XML file using the Open button from the tool bar.
Annexure B – Form 61A & Annexure C-–Explanation of Validation Errors


The file we export is not in correct order. Please suggest a solution for it.