National Informatics Centre
GePP – GST e -Invoice Preparing and Printing Tool
1. Introduction
1.1 Background
The GST Council has approved introduction of ‘E-invoicing’ or ‘electronic invoicing’ in a phased manner for reporting of business to business (B2B) invoices to GST System.
Since there was no standard for e-invoice existing in the country, standard for the same has been finalized after consultation with trade/industry bodies after keeping the draft in public place. Having a standard is a must to ensure complete inter-operability of e-invoices across the entire GST ecosystem so that e-invoices generated by one software can be read by any other software, thereby eliminating the need of fresh data entry – which is a norm and standard expectation today. The machine readability and uniform interpretation is the key objective. This is also important for reporting the details to GST System as part of Return. Apart from the GST System, adoption of a standard will also ensure that an e-invoice shared by a seller with his buyer or bank or agent or any other player in the whole business eco-system can be read by machines and obviate and hence eliminate data entry errors.
E-invoicing in India will be a big move, due to the volume of business transactions undertaken every day, as well as the plethora of different, non-standardized formats used in invoice generation. The main objective is to enable interoperability across the entire GST eco-system i.e.an e-invoice generated by one software should be capable of being read by any other software. Basically, through machine readability, an invoice can be uniformly interpreted.
1.2 Purpose and Intended Audience
This document aims to explain the operational procedure on how to use E-Invoice Form based offline tool to generate the e-invoices. It is expected that the document will also be useful for the taxpayers, tax consultants and the software companies to adopt the designed standard.
This document aims to explain the operational procedure on how to use offline tool to generate the single e-invoices. This document is intended for registered taxpayers under GST, who are the main stakeholders of e-invoice system under GST.
1.3 Scope
The scope of this document covers:
- What is E-invoice
- Using Single Invoice Upload tool
- Bulk EWB Generation
1.4 URL or Web site address
https://einvoice1.gst.gov.in
- What is E-invoice?
E-Invoicing is a process in which all the invoices created by accounting software will be authenticated electronically by GSTN for further use (like return preparation, E-way bill creation).
There are lots of myths or misconception about e-invoice. E-Invoice does not mean generation /creation of invoice from central portal or tax department because practically it is not possible it will create unnecessary restrictions on trade and industry and different industry have different business requirement, which cannot be met out by software.
E-Invoice is a submission of already generated Invoices from accounting software to GST Portal and we all are aware that there are hundreds of accounting & billing software, which generate invoices, but they all use their own formats to store information electronically and data in such different-different formats cannot understand by the GST System, hence it was not possible to submit the data from accounting software to GST System.
So, need was felt to issue a standard format (Schema) in which data will be shared with other systems, although from user prospective it’s same as earlier, there would not any change in print or electronically creation of invoice. Only standard schema needs to be implemented by all the accounting and billing software so that it can generate JSON of each invoice in such format which can be uploaded on GST Portal for further authentication and approval.
2.1 Benefits on E-Invoicing System
The major benefits of e-Way Bill system are as follows:
- Standardization: One time reporting on B2B invoice data in the form it is generated to reduce reporting in multiple formats (one for GSTR-1 and the other for e-way bill).
- Automation: Auto-generation of Sales and Purchase Registers (ANX-1 and ANX-2). To generate Sales and purchase register (ANX-1 and ANX-2) from this data to keep the Return (RET-1 etc.) ready for filing under New Return. e-Way bill can also be generated using e-Invoice data
- Seamless Reconciliation: Reconciliation and data verification between suppliers and recipient will be seamless and thus provide better control over input tax credit computation and claim.
- Lesser Compliance: Reduction in overall compliance burden. Substantial reduction in input credit verification issues as same data will get reported to tax department as well to buyer in his inward supply (purchase) register.
- Elimination of fake invoices: Reduction of tax evasion, System level matching of input credit and output tax.
- Information Availability: Near real-time availability of information to all the relevant participants in the supply chain.
- On receipt of information through GST System as buyer can do reconciliation with his Purchase Order and accept/reject in time under New Return
- Environment friendly: The need of the paper form of the multiple copies of way bill is eliminated. Hence, the tons of paper are saved per day.
- Officials saved of monotonous work collecting and matching the manual work with the returns of the taxpayers.
2.2 Objective
E-invoicing in India will be a big move, due to the volume of business transactions undertaken every day, as well as the plethora of different, non-standardized formats used in invoice generation. The main objective is to enable interoperability across the entire GST eco-system i.e. an e-invoice generated by one software should be capable of being read by any other software. Basically, through machine readability, an invoice can be uniformly interpreted.
In addition to the above, this new system of e-invoicing aims to make invoice reporting an integral part of a business process and remove the tedious task of invoice-compilation at the end of a return period. Claiming fictitious Input Tax Credit (ITC) by raising fake invoices is also one of the biggest challenges currently faced by tax authorities. The e-invoice system will help to curb the actions of unscrupulous taxpayers and reduce the number of fraud cases as the tax authorities will have access to data in real-time.
2.3 Stakeholders
The objective behind introducing e-invoice is to effectively address the expectations and concerns of the stakeholders by leveraging the use of ITC (Input Tax Credit).
3. Form based Method of IRN Generation
The sheet number of invoices raised by large businesses can be staggering and tedious for the taxpayer to generate Invoice Reference Number (IRN). Form based IRN generation facility is provided by the Invoice Registration Portal (IRP) where invoices can be entered using simple and user friendly form based and uploaded in the Invoice Portal. Generation of IRN is the responsibility of the supplier who will be required to report the same to Invoice Registration Portal (IRP) for authentication, After successful verification, the portal will generate a unique Invoice reference number (IRN) and return a digitally signed e-invoice and a QR code.
The e-invoice system being implemented by tax departments across the globe consists of two important parts namely,
a) Generation of invoice in a standard format so that invoice generated on one system can be read by another system.
b) Reporting of e-invoice to a central system
3.1 Process to Generate Invoice reference number
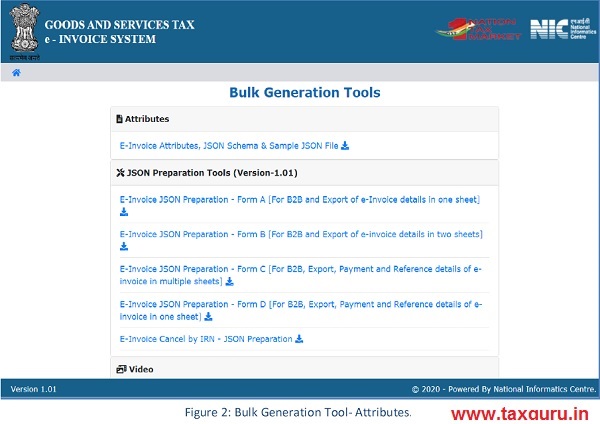
The e-invoice system provides a provision of offline method to generate the multiple Invoice reference number in one-go by the tax payers.
In order to download this tool, visit the trial e-invoice portal. Go to Help> Tools > Bulk Generation
Tools option provided in E-Invoice portal as shown below. Please make sure you are using 2010, or higher version of MS office.

E-invoicing system will display Form based Tool. Download this tool.
3.2 Main Menu
The main menu lists the options available to a user to operate on the e-Invoice Form based tool. There are two sets of menus available. One is the ‘e-Invoice’Menu and the other is the ‘Masters’menu. The guidelines consist of step-by-step procedure for entering the e-Invoices and generating IRN.
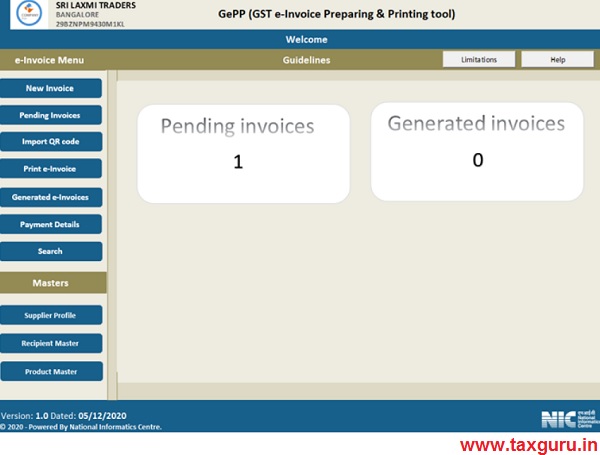
The options under e-Invoice menu are explained below :
New Invoice: The user can enter the invoice details using this option.
Pending Invoices: These are the invoices for which IRNs have not been generated. Import QR code: The QR code file generated can be imported and updated in the tool. Print e-Invoice: This option may be used to print the e-Invoice
Generated e-Invoices: This contains all the e-Invoices for which IRNs have been generated so far and acts like a repository of all IRNs.
Payment details: This option can be used to update the payment details for all the invoices including for which IRNs have been generated.
Search: This option is used to search e-Invoices based on some criteria.
The Master menu consists of options to update the Seller profile, Recipient information and product information.
Important: It is mandatory to first update the Seller details, Recipient and Product master before entering the invoices
Limitations:

Help:

Process of generating IRN using GePP

3.3. Seller Profile
This is one time entry form for entering the seller details. Details entered here will be used for preparation of JSON file. If more than one business address exists then separate Tools may be used. You may also upload your business logo which will be printed on the invoice as required in the ‘Supplier Profile’ sheet.

3.4. Recipient Master
You may enter the details of your clients using this option. Details of the recipient such as GSTIN, Tradename and address details may be entered using this option. This master will help you in quickly entering the purchaser details in the invoice entry form. That is, a list of the recipients will be shown so that you can select the purchaser and the other details are automatically populated.

3.5. Product Master
You may enter the details of your product using this option. Details of the products such as HSN code, description, units, price and tax rates can be entered. This master will help you in quickly entering the product details in the invoice entry form. That is, a list of the products will be shown so that you can select the product and the other details are automatically populated.

3.6. New Invoice
This is the main form and is used to enter the Invoice details. When user selects the ‘New E-invoice’ system displays the New E-Invoice entry form which is used to generate the new e-invoice (ENV). Before initiating a new E-Invoice generation, the user should have the Invoice in his hand. Firstly, the document details can be entered.
- Category can be B2B/ SEZ / Exports
- The document type can be Tax Invoice/Credit Note/ Debit Note as per the business requirements
- Document No. should be unique for all the documents of the financial year
- Document Date should be less than or equal to current date.

Depending upon the type of Category selected, the system will show the sub-Category of transactions. The user may refer the below table to know the sub – categories used:
| Category | Reverse Charge | Igst on Intra | Sub category |
| B2B | Yes | Yes | – |
| SEZ | Yes | Not Applicable | SEZWP/SEZWOP |
| EXPORT | Not Applicable | Not Applicable | EXPWP/EXPWOP |
| Deemed EXPORT | Not Applicable | Not Applicable | – |
Next is the Bill To Details. The recipient details may be auto populated if the user has already entered the consignor details in Recipient Master. You can enter first 3 characters of the Purchaser name and the list is shown. Now select the purchaser, the other details are auto populated. All the other fields like GSTIN, State etc. are auto populated after selection. However, the system allows the user to edit the auto populated details. If the Recipient master is not created by the user, the system will allow him to manually enter the Name, GSTIN and Address details.
Transaction type can be selected as
1) Regular
2) Bill From-Dispatch from
3) Bill to-Ship To
4) Combination and details may be entered accordingly.
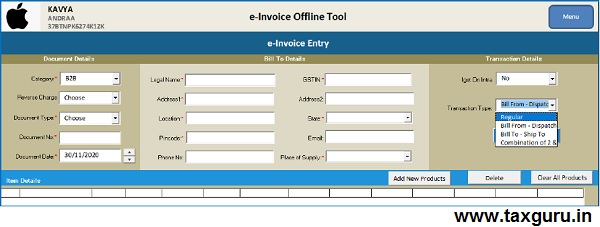
Transaction Type “Regular”: System will select by default option as “Regular”. Transaction Type “Bill From-Dispatch from”: Once select this option, System will display the Dispatch details form and the user may fill the mandatory fields and submit.

Transaction Type “Bill To- Ship To”: System will display the shipping details form which may be filled

Transaction Type “Combination if 2&3”: Once select this option, System will display the Dispatch &Shipping details form, then need to fill all the mandatory fields and submit.
Next , you may click on the Add new product tab.

Next, enter the SI No and Products details. In the Product name, enter first 3 letters and the list is displayed from the Product master. Select the product and other details like description, HSN, Unit, Tax rate etc. are auto filled from the master. These may be changed if required. All the validations are performed.

The user can add multiple products by clicking on Add New Product button.
- For one invoice only 10 items can be added.
- Serial Number must be unique
- System will automatically show the CGST and SGST tax rate for intra-state movement
and IGST tax rate for inter-state movement based on the Consignor state and POS - All the totals are automatically calculated and displayed.

3.7 Payment details:
User can enter the payment details for which the balance amount will be calculated automatically.
The payment details may also be updated at a later point of time as when the payments are received.

3.8 E-Waybill details
- E-way Bill can be generated for document types of Invoice only.
- If e-Way bill is required, the details may be entered as given beow:
- Distance is mandatory.
- User needs to Enter Transporter ID, Transporter name and Transporter mode.
- If only Transporter Id is provided, then only Part-A is generated. If mode of transportation is “Road”, then the Vehicle number and vehicle type should be entered. If mode of transportation is Ship, Air, Rail, then the transport document number and date should be entered.
- If supplier and buyer pin code is same then Distance is allowed only 0 to 100km.
- The distance of transportation is validated against the auto-calculated PIN-PIN distance stored in the system. The allowed distance for transportation should be between +/- 10 % of auto-calculated PIN-PIN distance. If the auto-calculated distance is less than 100 KMs, then the allowed distance for transportation should be between 1 and +10 % of auto-calculated PIN-PIN distance.
- If the PIN-PIN distance is not available in the system, the passed value of distance will be taken for generation of e-way bill and distance value cannot be more than 4000.

- On completion of entry of data , click on ڇSubmitto see the preview of e-Invoice. You may confirm the entry or edit if required.

- On Confirmation, the Invoice details are available in the ‘Pending Invoices’͘ You may complete entering all the invoices. A maximum of 10 invoices can be entered and kept pending for IRN generation. Next, click on ‘Pending Invoices’
3.9 Pending Invoices:
This contains the invoices for which IRNs have not been generated. There can be only 10 invoices kept pending. After which, you need to generate IRNs. Click on ‘Validate’ to validate the data and click on ‘Prepare JSON’. The JSON file will be generated in the same folder where the tool is copied. If any errors are identified, correct the errors and re-validate it. The JSON file prepared will contain all the invoice details.


The JSON file thus generated shall be uploaded in the e-Invoice Portal. If you have already registered in the e-Invoice Portal, then login to the system using your credentials. Otherwise, you may complete the registration process and login to the system.
The JSON file cannot be more than 2MB. The system then generates the IRN for all these requests one-by-one and shows the result in table. A summary of the contents of the JSON file will be displayed. Otherwise it shows error details. The table details can be downloaded into user’s system for further use and action͘
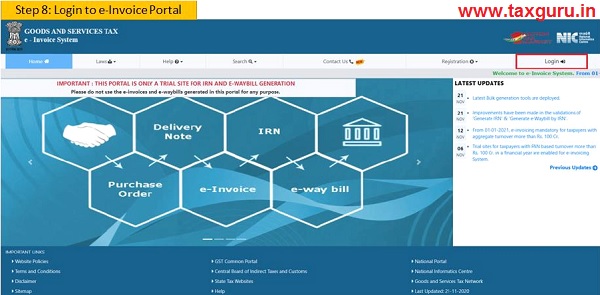
3.10 Login To E-Invoice Portal:
Now, login to the e-Invoice portal and click on login button then enter your username, password and captcha. Click on the submit button for your successful Login.
3.11 Generating Bulk IRN
Next, select the option Bulk Upload. On clicking this option, the following screen will be displayed.
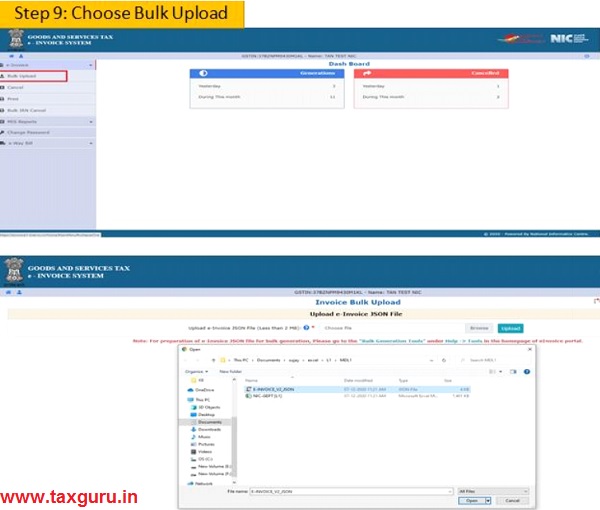
On click of ‘Browse’ button, the system will request to select the JSON file. User has to upload the IRN request file (maximum allowed file size for upload is 2 MB) to the e-invoice system. After IRN request file is uploaded the system processes the JSON file and generates the e-invoices and displays the 64 character length Invoice reference number for each request.
Once JSON is uploaded successfully, the IRNs are generated. Then, user can download the response file which is an Excel file.

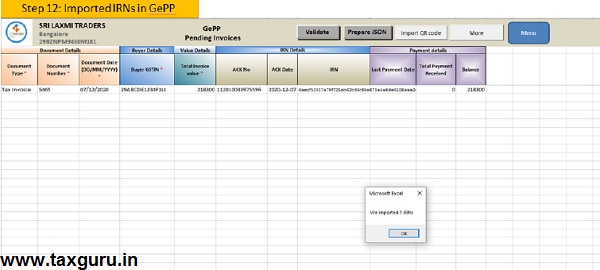
3.12 IMPORT IRNs
The e-Invoice Tool has a facility where-in the IRNs generated may be imported in the tool. This will help in updating the details and printing the e-Invoice from the tool itself.

Once imported successfully, ACK No, ACK Date and IRN will auto populate from the E-Invoice details file. Please ref below Image.
There are other options under ‘More ‘such as ‘Print’, ‘Push To History’ and ‘Hide/Unhide’ columns. Print – User can take complete print copy of this e-invoice.
Details Brief – All columns are displayed to see the details.
Hide/Unhide columns – Use can choose the required options to display in columns as shown below.

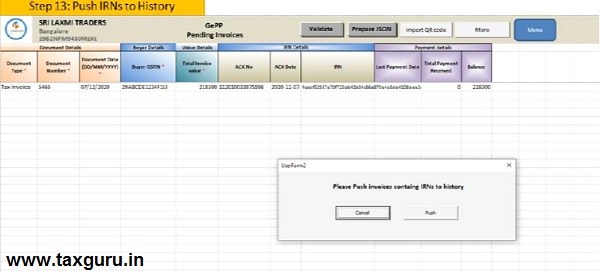
- Push To History option: This will transfer all details to IRN Generated sheet. Once push Invoices containing IRNs to history, All the details like Doc type, Doc No, Doc date, IRN No etc. will be displayed in the Invoice with IRN sheet.
3.13 Print E-invoice
Print E-invoice– If the IRN is present in the Invoice, then those Invoices has to be pushed to history by using a menu push history. Once it is done all details will be stored in the print E-invoice sheet. Now User can take the complete print copy of the selected e-invoice.
Note: Please select the e-Invoice which has to be pushed and then click on the Push to history button.


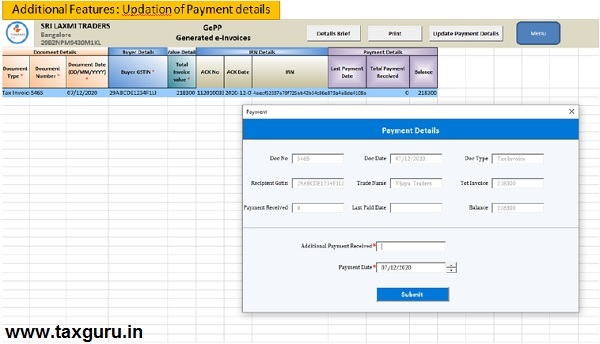
3.14 Update Payment Details
- This option used to updating of payment details
3.15 Search
This option may be used to query Invoices based on Document No., Document Date, particular month etc.

List of Abbreviations
| Abbreviation | Full Form |
| IRP | Invoice Registration Portal |
| IRN | Invoice Reference Number |
| GSTIN | Goods and Services Tax Identification No |
| B2B | Business To Business |
| SEZ | Special Economic Zone |
| ITC | Input Tax Credit |
| EWB | e-Way Bill |
| GSP | Goods and Services Tax Suvidha Provider |
| GST | Goods and Services Tax |
| QR Code | Quick Response Code |
| NIC | National Informatics Centre |
(Republic with Amendments)