Hello, readers here am going to write about GST Registration process for a Partnership firm of My friends Mr Hari and Mr Satish and their Firm name is ‘HS &C0.’
Mr Hari is Authorised signatory.
Documents required :
1. PAN Card of HS & Co., and Both partners
2. Aadhar cards of both Partners
3. Passport size photo of both Partners
4. Mobile No. and Email IDs of Both the partners
5. Partnership Deed
6. Rental agreement if the office premises is rented.
7. Electricity Bill of Office (Latest)
8. No objection certificate from the Owner of the office premises
9. The authorisation letter for appointing Mr Hari as authorised signatory from other partners
10. Bank Statement (Latest)
Step by Step approach :
Step 1 – Go to GST Website
- Access the https://www.gst.gov.in/ URL. Then GST Home page is displayed
- Click the Services > Registration > New Registration option.

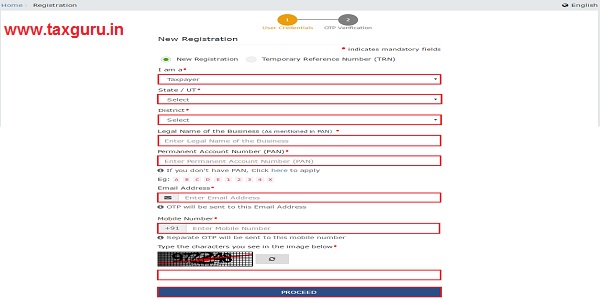
The New Registration page is displayed. Select the New Registration option.
Step 2 – Generate TRN Number :
Fill the Details as follows:
- I am a – Taxpayer
- State/UT and District – select the state for which registration is required and district.
- Legal Name of the Business (As mentioned in PAN) – enter the legal name of entity i,e, HS &C0. as per PAN Database
- Permanent Account Number (PAN) – enter PAN of HS&Co.
- Enter the email address & Mobile Number of Mr Hari (Authorized Signatory)
- Enter the captcha text and click the PROCEED button
- On clicking proceed, GST Portal displays all the GSTINs / Provisional ID’s / UINs / GSTP IDs mapped to the same PAN across India. Click the PROCEED button
- The OTP Verification page is displayed.
- Enter the OTP you received on your mobile number and E-Mail ID. OTP is valid only for 10 minutes.
- OTP sent to the mobile number and email address are different.
- Click the PROCEED button.
- The system generated a Temporary Reference Number (TRN) is displayed.
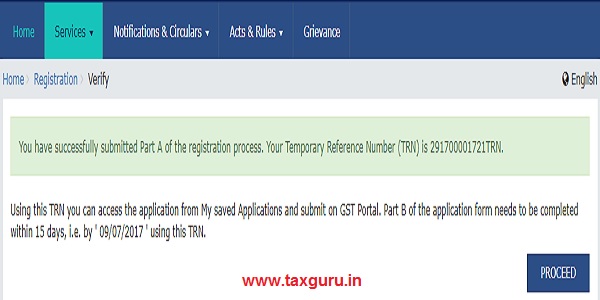
- Click the PROCEED button.
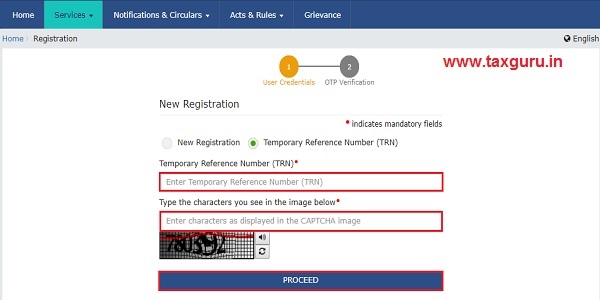
- You can also click Services > Registration > New Registration option and select the Temporary Reference Number (TRN) radio button to log in using the TRN.
- In the Temporary Reference Number (TRN) field, enter the TRN generated
- Enter the captcha text as shown on the screen and
- Click the PROCEED button
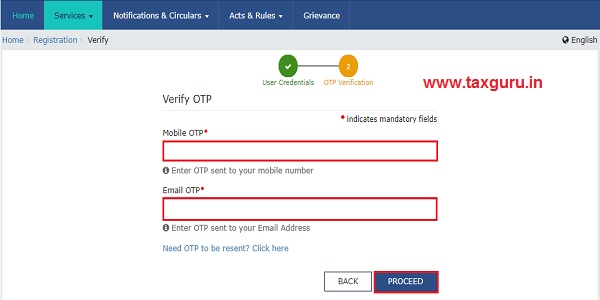
- The Verify OTP page is displayed. You will receive the same Mobile OTP and Email OTP.
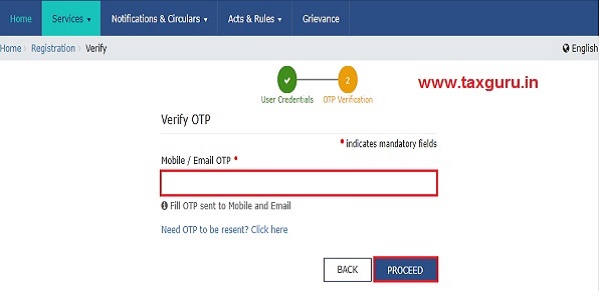
- Enter the OTP
- Click the PROCEED button.
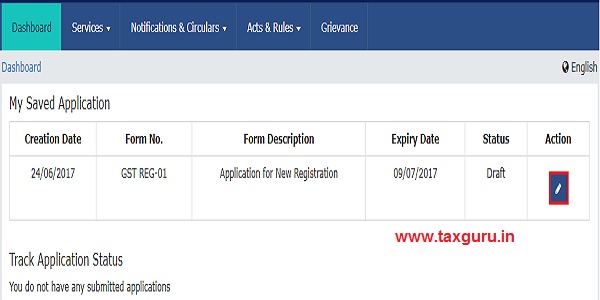
- The My Saved Application page is displayed. Under the Action column, click the Edit icon (icon in blue square with white pen)
Step 2 – Fill the Registration Application
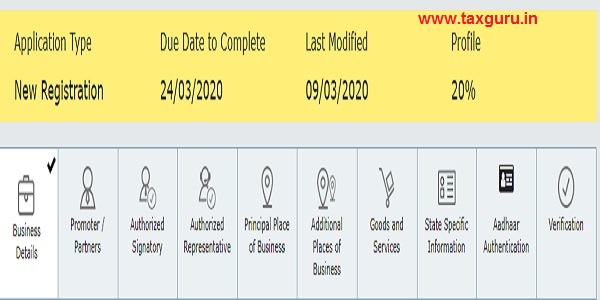
- The Registration Application form with various tabs is displayed. On the top of the page, there are ten tabs
Tab 1 – Business Details :
- This tab is selected by default.
- Trade Name field, enter the trade name of your business i,e, HS&Co.
- Provide the other details as required
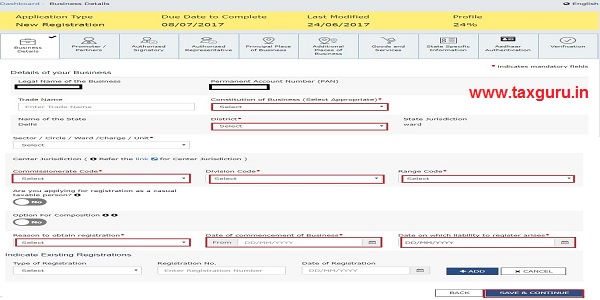
- Click the SAVE & CONTINUE button
- You will notice a blue tick on the Business Details section indicating the completion of the tab information and notice the Profile indicating the percentage completion of the application form

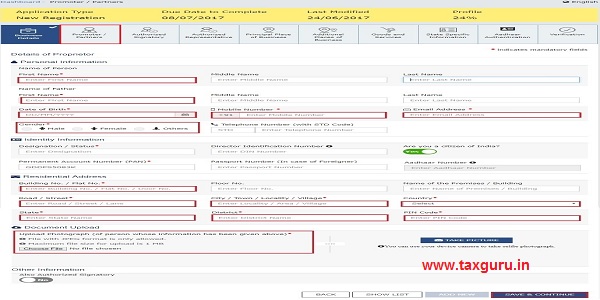
Tab 2 Promoter/ Partners tab:
- Here we have to provide All partners details i,e Details of Mr Hari and Mr Satish
- First, we will add details of Mr Hari who is Authorised signatory
- In the Personal Information section, enter the personal details of the partner like name, date of birth, address, mobile number, email address and gender.
- Here the FIRST NAME, MIDDLE NAME and LAST NAME should be entered as per PAN Database other the application will be sent back for correction
- In the Identity Information section, enter the official information of the stakeholder.
- If you provide partners Aadhaar here, you can file your returns etc. using e-Sign based on Aadhaar without the requirement of Digital Signature, if you are also the authorized signatory.
- In the Residential Address in India section, enter the address details of the stakeholder. Based on the State selected, select the district and enter the corresponding pin code.
- In the Document Upload section, click the Choose file button. Navigate and upload the photograph of the Partner.
- You can upload PDF or JPEG files with maximum file size for upload of as 1 MB.
- As Mr Hari is also the authorized signatory, select the Also Authorized Signatory as Yes and details will be auto-populated in the Authorized Signatory tab.
- Click on ADD NEW
- Provide details of Mr Satish and select the Also Authorized Signatory as No because he is not Authorised, signatory
- Click the SAVE & CONTINUE button
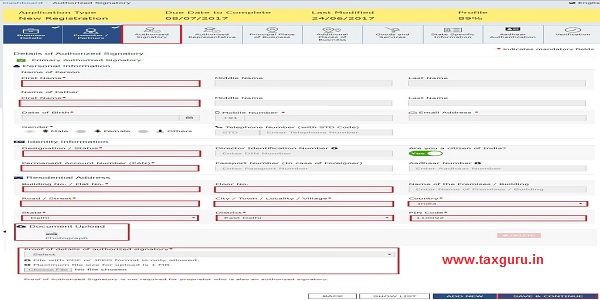
Tab 3 Authorized Signatory tab:
- This tab page displays automatically the details of Mr Hari who is the authorized signatory and select the checkbox for Primary Authorized Signatory.
- Here we have to attach Authorisation letter from Mr Satish to Mr Hari to act as Authorised signatory.
- Click the SAVE & CONTINUE button.
Tab 4 Authorized Representative tab:
- Don’t Select Do you have any Authorized Representative using the radio button as HS&Co. is not appointing any person as such.
- Click the SAVE & CONTINUE button.
Tab 5 Principal Place of Business tab:
- In the Address section, enter the address details of the principal place of business as mentioned in Partnership deed and it should match with Electricity Bill and Rental agreement or NOC from the owner of the Property.
- In the Contact Information section, enter contact details like Email address, mobile number.
- In the Nature of Possession of Premises drop-down list, select the nature of possession of premises that is whether the office building is owned or rented. Here we have to note that owned property means Property should b registered in the name of Partnership firm Name i,e, SH&Co. and not in the name of Partners. If it is in the name of Partners you can select Nature of possession as Rented or Consent.
- In the Document Upload section, click the Choose file button. Navigate and select the Proof of Principal Place of Business document.
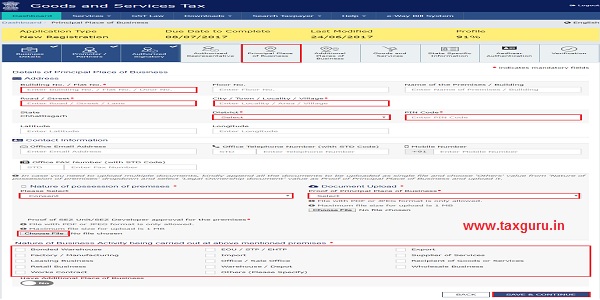
- Here If the Premises is Rented we have to attach the Rental agreement along with the NOC from Owner and EB. If the Premises is in the name of one of the partners and it is taken with the consent of the Partner then NOC From Partner along with the EB Can be uploaded. Maximum file size for upload of as 1 MB.
- Select the checkbox for Nature of Business activities being carried out at above-mentioned premises Eg. Office/Sales Office.
- In case you have an additional place of business, select Yes for Have Additional Place of Business otherwise no.
- Click the SAVE & CONTINUE button.
Tab 6 Additional Places of Business tab:
- If you have given yes in the previous Tab regarding Additional place of business Enter the number of additional places of business and click the ADD NEW button otherwise Click the SAVE & CONTINUE button to proceed to next Tab.
Tab 7 Goods and Services tab:
- Here we have to provide the details about our Products or Services
- If we are selling goods we have to select the HSN Code tab and if we are providing services we have to select the SAC Code tab
- We must add the top 5 goods or services you are dealing with from the Codes available under the Drown down list of respective tabs.
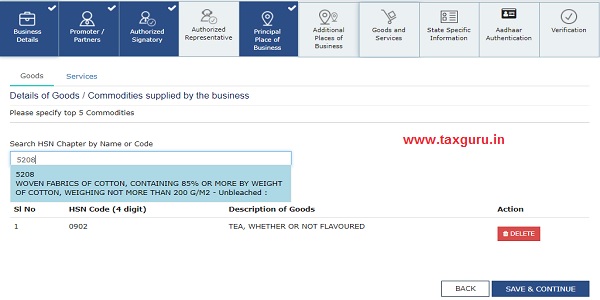
After adding the details Click the SAVE & CONTINUE button to proceed to the next Tab.
Tab 8 State Specific Information tab:
- Provide the Details like Professional Tax Employee Code (EC) No. & Professional Tax Registration Certificate (RC) No. & State Excise License No. if the firm is registered under the respective areas
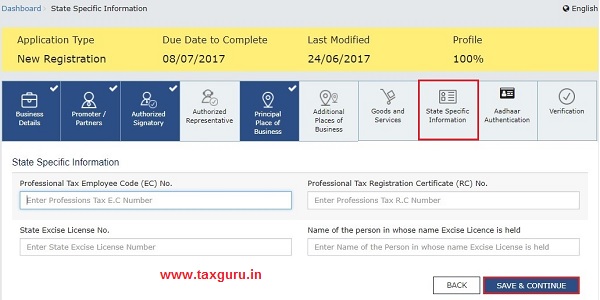
Click the SAVE & CONTINUE button to proceed to the next Tab.
Tab 9 Aadhaar Authentication tab:
This tab is recently added and it is advisable to Select Yes, to opt for Aadhaar authentication of Authorized Signatories to get the GST Registration at the earliest.
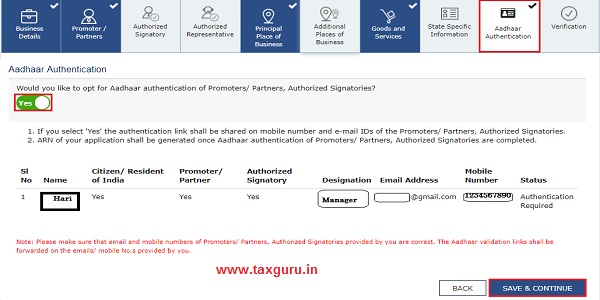
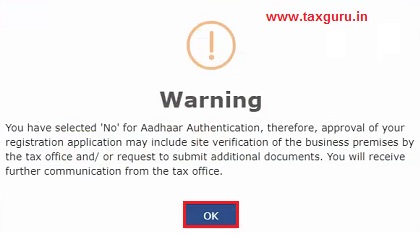
- In case, you have selected No, below screen will appear and Registration application will not be deemed approved within 3 Working days.
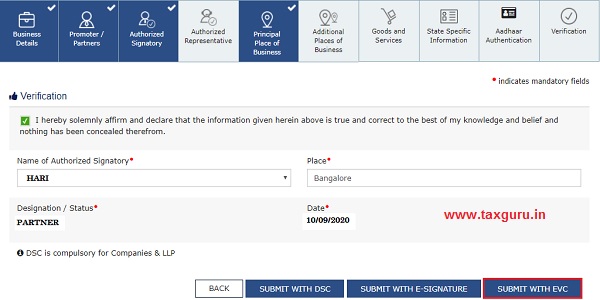
 Tab 10 Verification tab:
- Select the Verification checkbox.
- In the Name of Authorized Signatory drop-down list, select the name of the authorized signatory i,e Hari which will be coming automatically.
- In the Place field, enter the place where the form is filed.
- Click on Submit with EVC and then OTP will be sent to the Mobile Number and Email id of the Authorised signatory that is of Mr HARI.
- Enter the OTP or EVC and Click on Validate OTP
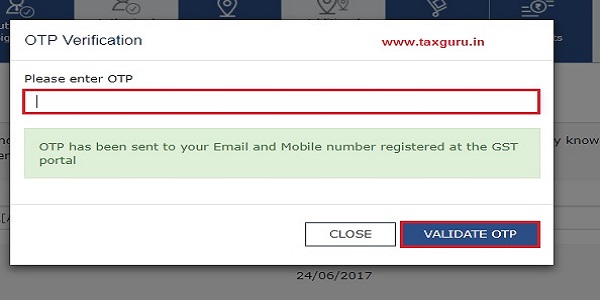
- Then the system will show the following message of success.

Aadhar authentication and ARN Number Generation :
- ARN Number will be sent to The Mobile no. and EMail id of the authorised signatory. Once the ARN is received means then only the application is considered as submitted and it will be sent to the Department for further process and Aadhar authentication is compulsory to get the ARN Number.
- After some time of the application is submitted, Aadhar authentication link will be sent to the Authorised signatory Contact details and click on the link to do the Aadhar authentication.
- Click on the link to do the Authentication and it will be shown as below
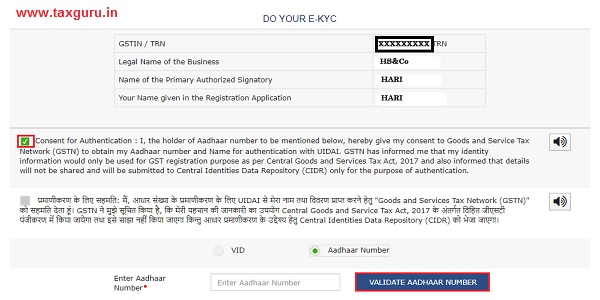
- Enter the Aadhar number and click on VALIDATE AADHAR NUMBER
- Then OTP will be sent to the mobile number which is linked with the Aadhar number provided above.
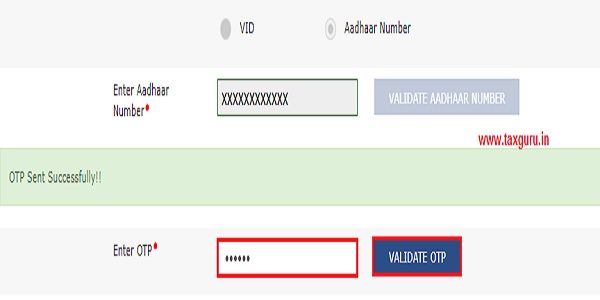
- Enter the OTP and click on Validate OTP
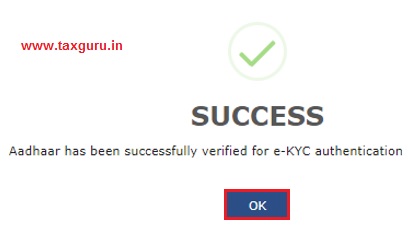
- A success message is displayed when Aadhaar is successfully verified for e-KYC authentication. Click OK
- After some time ARN will be sent to Authorised signatory.
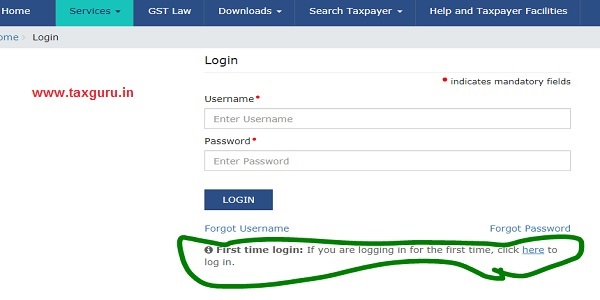
New Login Credentials: User name & Password
- Within 3 Days of Successfully submission of the Registration application and all the information provided in the application is correct GST Number which is a user ID and Password will be sent to Authorised Signatory.
- Once the Login Credentials received immediately go to GST Login portal and click on Here provided under First-time login option as shown below and change the username and Password which is compulsory.
Bank account details:
- Now login to your GST Account using your new Login Details. In the next slide, the system will ask for providing the Bank account details.
- Provide the bank account details, Attach the Bank Statement and submit it using EVC.
GSTIN Registration Certificate:
- Once the bank account details are provided then you can download the GST Certificate immediately which is available at Downloads.

Author Bio


SIR,
In my knowledge it is not necessary to submit details of all partners at the time of GST registration.Only the details of managing partner & autorized signatory is needed for this.A partnership can have up to 100 partners.It is not practical to enter the details in onlune application.Only partnership deed is sufficient to prove the identity of partners
If suppose the Premises is Rented by one of the partners and rental agreement is providing by the premises owner, is it acceptable one?
How do you fill in details of partners in registration form – if both the partners of the firm are corporate (Company). There is no specific column to fill in the information of partner separately and their authorised signatories separately
Step by Step explanation is very user friendly, it was very helpful
Is it compulsory to enter of all the partners details? incase of having 4 partners in a Firm and Aadhar Authentication require of them.
Very Helpful ! appreciate the Details and the screenshots given.
Do we have to provide personal banking details for Authorized Signatory as without gst certificate bank would not open current account with the name of partnership firm. Plz advise