“Learn how to efficiently file Form GSTR-4 (Annual Return) using the offline utility tool. Gain insights into the step-by-step process, from downloading the utility to uploading the JSON file on the GST Portal. Author: Dhara D. Khakharia.”
Manual of Form GSTR-4 (Annual Return) Offline Utility
Form GSTR-4 (Annual Return) Offline Utility Overview
Form GSTR-4 (Annual Return) Offline utility is an Excel based tool to facilitate the preparation of annual return creation in Form GSTR-4. Form GSTR-4 (Annual Return) is a yearly return to be filed once, for each financial year, by the taxpayers who have opted for composition scheme during the financial year, or were in Composition scheme for any period during the said financial year, from 1st April, 2019 onwards. Such taxpayers are required to furnish details regarding summary of outward supplies, Inward supplies, import of services and supplies attracting reverse charge etc. in this form.
Once return is prepared using offline utility, it can be uploaded on GST Portal by generating a JSON file.
Also Read- Form GSTR-4 (Annual Return) Offline Utility- FAQs
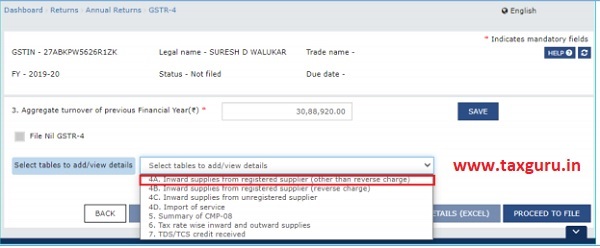
Details for following Tables of Form GSTR-4 (Annual Return) can be entered by taxpayer using the offline Tool:
- Table 4A. B2B: To add details of inward supplies received from a registered supplier (other than reverse charge).
- Table 4B. B2BRC: To add details of inward supplies received from a registered supplier (for liabilities attracted on reverse charge basis)
- Table 4C. URP: To add details of inward supplies received from an unregistered supplier
- Table 4D. IMPS: To add details of import of service
- Table 6. Inward /Outward Supplies: To enter tax rate wise details of outward supplies during the financial year (in Row 12 to 16)
Once return is prepared using offline utility, it is to be uploaded on GST Portal by creating a JSON file and then you can make payment of late fees, if any, sign it through DSC or verify through EVC and file it.
Downloading Form GSTR-4 (Annual Return) Offline Tool and Uploading Form GSTR-4 details
Downloading of json file from portal is not mandatory to prepare Form GSTR-4 in offline tool.
Page Contents
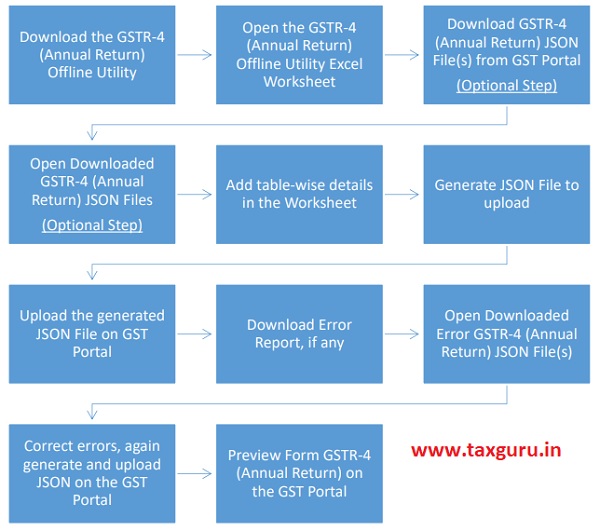
- Steps To Prepare Form GSTR-4 (Annual Return) using offline utility-
- A. Download Form GSTR-4 (Annual Return) Offline Utility
- B. Open the Form GSTR-4 (Annual Return) Offline Utility Excel Worksheet
- C. Download Form GSTR-4 (Annual Return) JSON File(s) from the GST Portal
- D. Open Downloaded Form GSTR-4 (Annual Return) JSON File(s)
- E. Add table-wise details in the Worksheets
- F. Generate JSON File to upload
- G. Upload the generated JSON File on GST Portal
- H. Preview Form GSTR-4 (Annual Return) on the GST Portal
- I. Download Error Report, if any
- J. Open Downloaded Error Form GSTR-4 (Annual Return) JSON File(s)
- K. Compute Liabilities and Pay Late Fees (If any)
- L. File Form GSTR-4 (Annual Return) with DSC/EVC
- M. Download Filed Return
Steps To Prepare Form GSTR-4 (Annual Return) using offline utility-
A. Download Form GSTR-4 (Annual Return) Offline Utility
To download the Form GSTR-4 (Annual Return) Offline Utility, perform following steps:
Downloading the Form GSTR-4 (Annual Return) Offline utility is a one-time activity. However, the utility may get updated in future. So, always use the latest version available on the GST Portal.
1. Access the www.gst.gov.in URL. The GST Home page is displayed. Click the Downloads > Offline Tools > GSTR-4 (Annual) offline tool option.
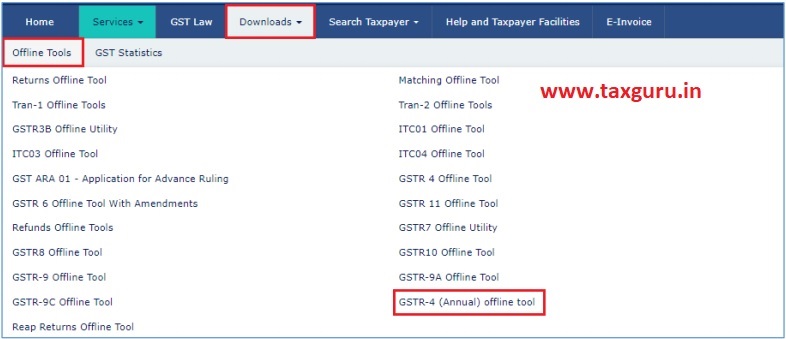
You can download the Form GSTR-4 (Annual Return) Offline Utility from the Portal without logging in to the GST Portal.
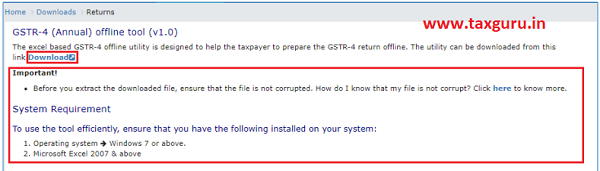
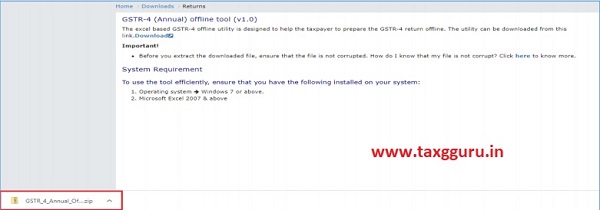
2. Form GSTR-4 (Annual) Offline tool page is displayed. Click the Download Make sure you carefully read important message and System Requirement details displayed on the page.
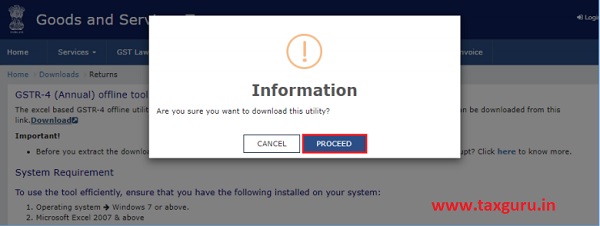
3. An Information popup opens. Click PROCEED.
4. Zipped Form GSTR-4 Offline Utility folder gets downloaded.
Go back to the Main Menu
B. Open the Form GSTR-4 (Annual Return) Offline Utility Excel Worksheet
To open the downloaded Form GSTR-4 (Annual Return) Offline Utility Excel Worksheet, perform following steps:
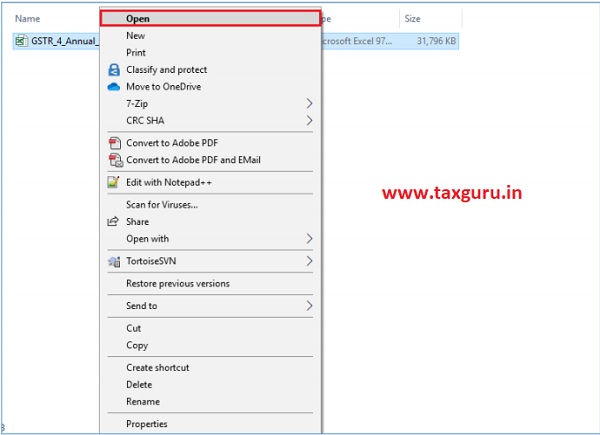
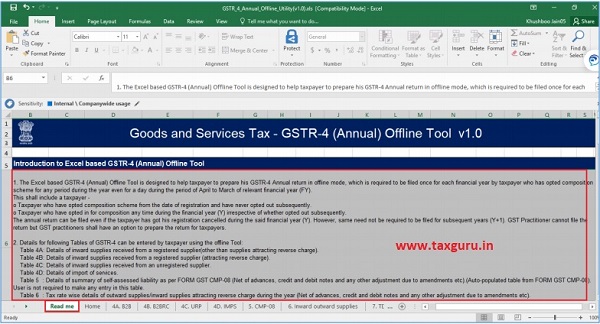
1. Extract the files from the downloaded zipped folder GSTR_4_Annual_Offline_Utility.zip and you will see GSTR_4_Annual_Offline_Utility excel file in the unzipped folder. Right-click and click Open.
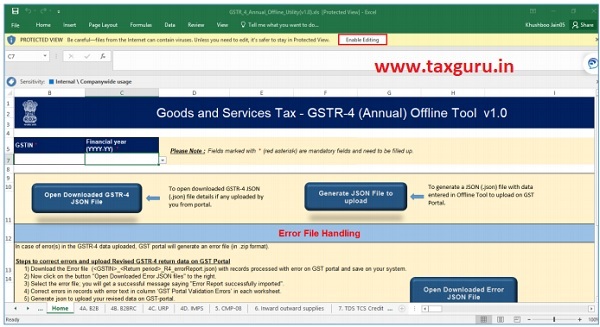
2. Click Enable Editing.
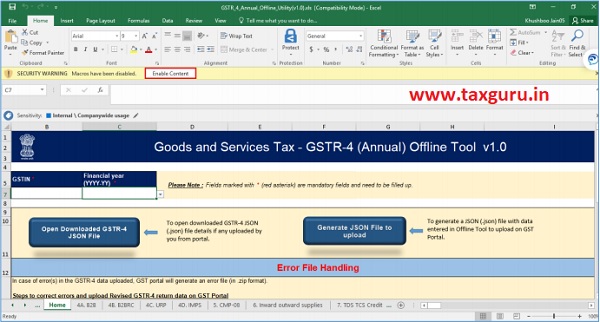
3. Click Enable Content.
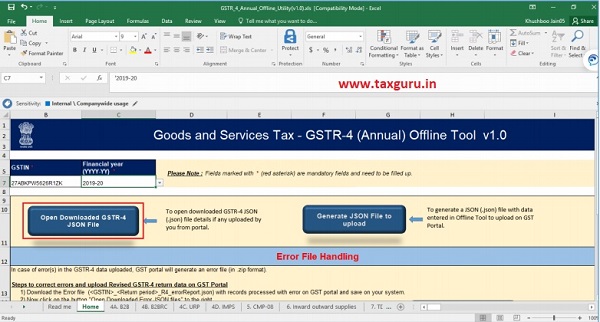
Note: The Home sheet is the main page of the utility. It is used to perform following functions:
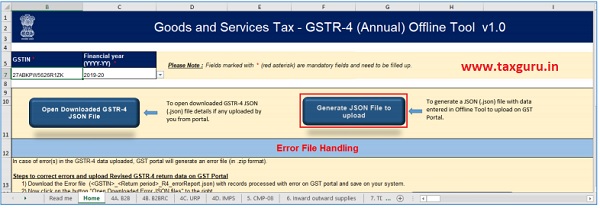
A. Enter mandatory details— GSTIN and Financial Year — Without entering these details, you will not be able to validate the data which you have entered in various worksheets and also you will not be able to create or import the JSON file into the offline utility.
B. Import and open JSON File downloaded from GST portal using Open Downloaded GSTR-4 JSON File Taxpayer can proceed directly also to prepare return in offline tool.
C. Enter details in worksheet-tab
D. Generate JSON file, for upload of Form GSTR-4 details prepared offline on GST portal, using Generate JSON File to upload
E. Import and open Error JSON File downloaded from GST portal using Open Downloaded Error JSON File button, if required.
4. Then, click the Read Me tab to display it. It contains introduction and help instructions. Scroll down to read all the instructions carefully. Once you have completed your reading, you can now proceed to enter details in the worksheet.
Go back to the Main Menu
C. Download Form GSTR-4 (Annual Return) JSON File(s) from the GST Portal
To download the generated JSON File from the GST Portal, if some information has been filled up online, perform following steps:
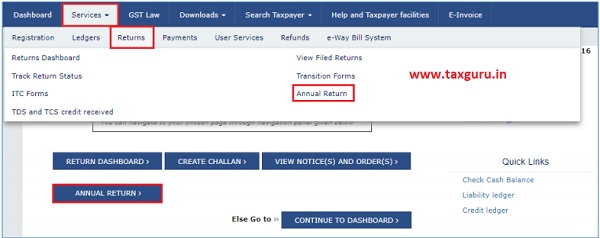
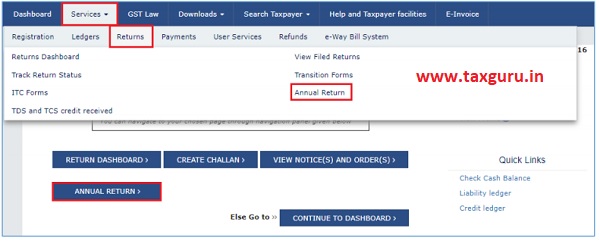
1. Access the www. gst.gov.in URL. The GST Home page is displayed. Login to the portal with valid credentials. Dashboard page is displayed. Click the Services > Returns > Annual Return command. Alternatively, you can also click the Annual Return link on the Dashboard.
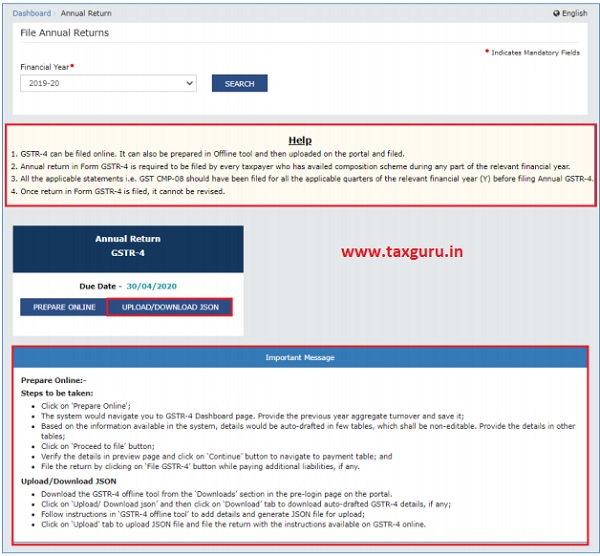
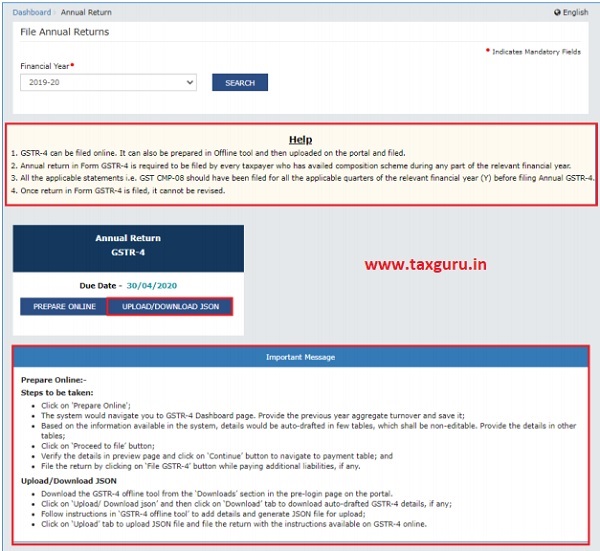
2. The File Annual Returns page is displayed. Select the Financial Year for which you want to file the return from the drop-down list. Click the SEARCH

3. The Form GSTR-4 (Annual Return) tile is displayed, with an Important Message box on the bottom. In the Form GSTR-4 (Annual Return) tile, click the UPLOAD/DOWNLOAD JSON
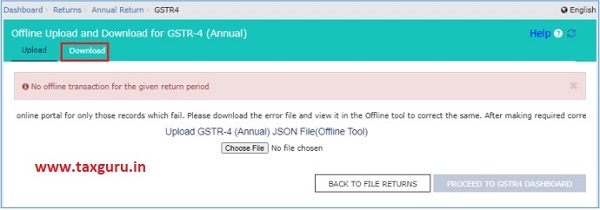
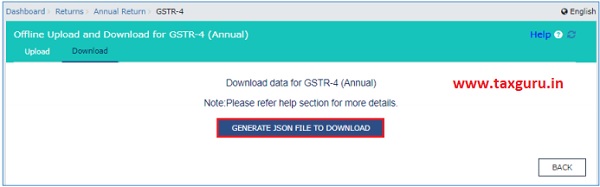
4. The Upload section of the Offline Upload and Download for Form GSTR-4 (Annual) page is displayed, by default. Click the Download
5. Click the GENERATE JSON FILE TO DOWNLOAD
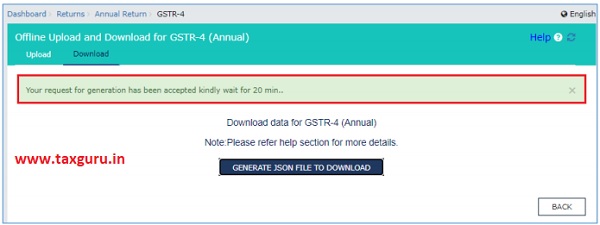
6. A message is displayed that “Your request for generation has been accepted kindly wait for 20 min”.
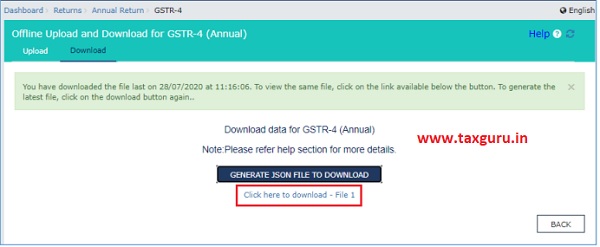
7. Once the JSON file is downloaded, click the “Click here to download – File 1” link.
8. The generated JSON file is downloaded. Generated JSON file contains the details of table 4A, 4B, 4C and 4D, if already filled up. Data so downloaded can be edited and can be used to prepare details of Form GSTR-4 (Annual Return) for upload on the GST Portal. Tables 5 & 7 are not editable.
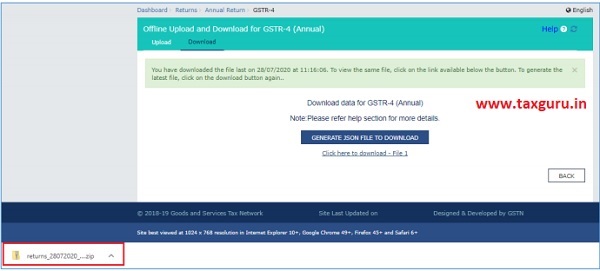
9. Unzip the downloaded file which contain the generated JSON file.

Go back to the Main Menu
D. Open Downloaded Form GSTR-4 (Annual Return) JSON File(s)
Open the downloaded Form GSTR-4 (Annual Return) JSON File, to prepare details of Form GSTR-4 (Annual Return) in the Offline Tool, perform following steps:
1. Go to the Home tab and enter your GSTIN and Financial Year (select from the drop-down list) for which you want to file Form GSTR-4 (Annual Return).

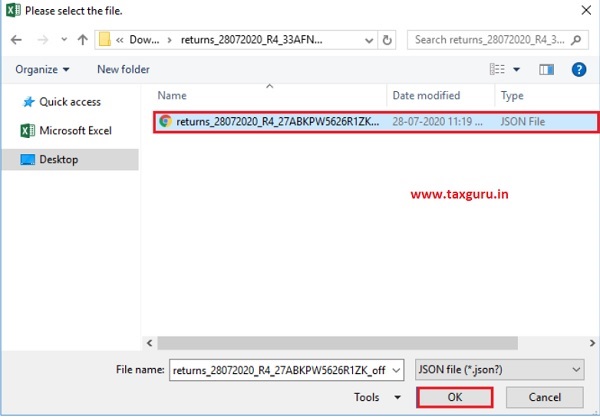
2. Click the Open Downloaded Form GSTR-4 JSON File
3. Select the downloaded JSON (. JSON) file and click on OK to proceed.
4. Success message is displayed. Click the OK button to proceed.
Go back to the Main Menu
E. Add table-wise details in the Worksheets
To add table-wise details in the Worksheet, perform following steps:
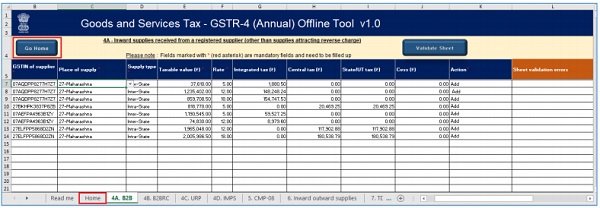
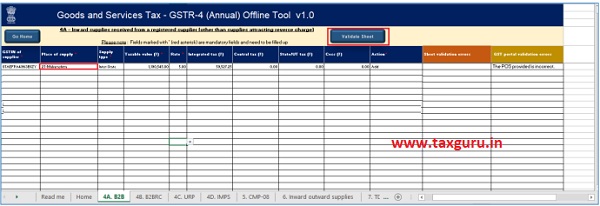
1. Go to the B2B tab and enter details of inward supplies received from a registered supplier (other than reverse charge). Under Action column, select Add for each row with data to add the on the GST Portal.
Note: Please note that Delete option is meant for deleting data on the GST portal. These details will be updated GSTIN wise for Table 4A.
Note: Inward supplies attracting reverse charge, are not to be provided in table 4A and the same are required be provided in table 4B.
Note: The table below provides the worksheet name, table name and detailed description for this worksheet.

2. Once the details are entered, click the Validate Sheet In case of unsuccessful validation, click here to know more.
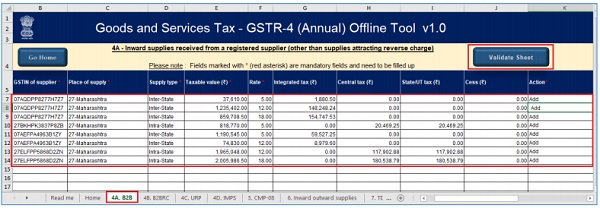
3. A popup Message box appears “Sheet successfully validated”. Click OK.
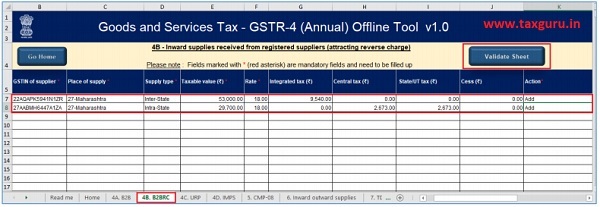
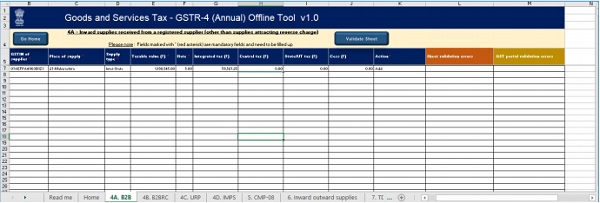
4. Go to the B2BRC tab and enter the details of inward supplies received from a registered supplier (reverse charge). Under Action column, select Add for each row with data to add the on the GST Portal.
Note: Please note that Delete option is meant for deleting data on the GST portal. These details will be updated GSTIN wise for Table 4B.
Note: Inward supplies other than those attracting reverse charge, are not to be provided in table 4B and the same need be provided in table 4A.
Note: The table below provides the worksheet name, table name and detailed description for this worksheet.

5. Once the details are entered, click the Validate Sheet button.
In case of unsuccessful validation, click here to know more.
6. A popup Message box appears “Sheet Successfully Validated.” Click OK.
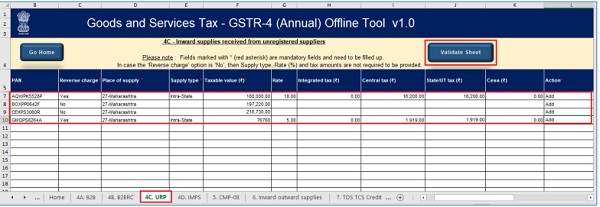
7. Go to URP tab and enter the details of inward supplies received from an unregistered supplier. Under Action column, select Add for each row with data to add the on the GST Portal.
Note: Please note that Delete option is meant for deleting data on the GST portal. These details will be updated PAN wise for Table 4C.
Note: The record can also be added without providing the PAN details, if same is not available
Note: The table below provides the worksheet name, table name and detailed description for this worksheet.

8. Once the details are entered, click the Validate Sheet button. In case of unsuccessful validation, click here to know more.
9. A popup Message box appears “Sheet Successfully Validated.”. Click OK.
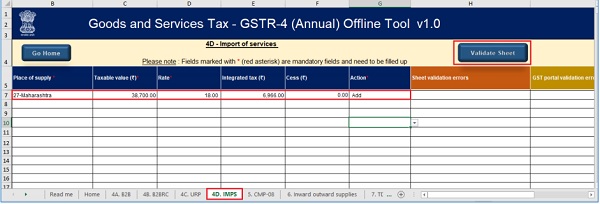
10. Go to the IMPS tab and enter the details of import of service.
Note: The table below provides the worksheet name, table name and detailed description for this worksheet.

11. Once the details are entered, click the Validate Sheet button.
In case of unsuccessful validation, click here to know more.
12. A popup Message box appears “Sheet Successfully Validated.” Click OK.
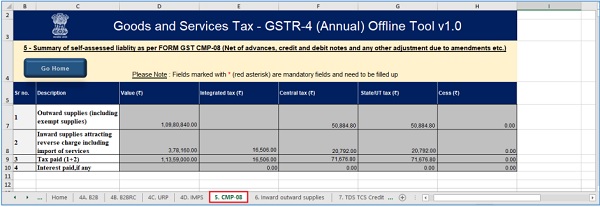
13. Go to the CMP-08 tab and view auto-drafted details provided in filed Form CMP-08 for the financial year, if JSON file is downloaded from the portal. The data is non-editable.
Note: The table below provides the worksheet name, table name and detailed description for this worksheet. Data will be available in the table if JSON file is downloaded from the portal.

–
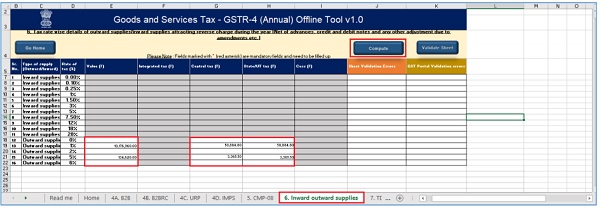
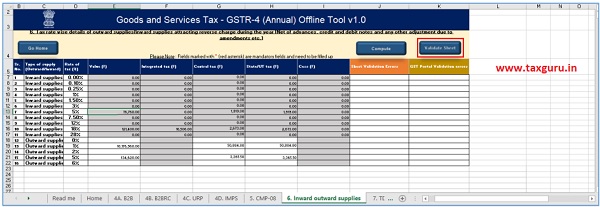
14. Go to the 6 Inward outward supplies tab and enter tax rate wise details of outward supplies during the financial year.
Note: The table below provides the worksheet name, table name and detailed description for this worksheet.

15. Once the details are entered, click the Compute button.
Note: You can declare your outward supplies in the user input cells in row 12 -16. Once you click on ‘Compute’ button, Table 4B, 4C and 4D data will be auto-populated in Table 6 with inward supplies attracting reverse charge (rate wise) in row 1-11.
16. Click Ok button.
17. Inward Supplies table is auto-populated with details from Table 4B, 4C and 4D.
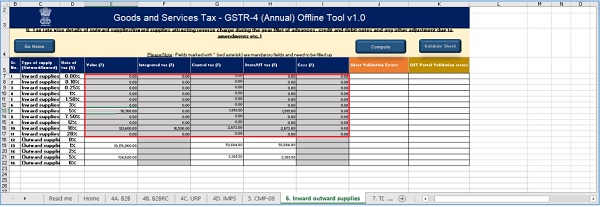
18. Once the details are reviewed, click the Validate Sheet button. In case of unsuccessful validation, click here to know more.
19. A popup Message box appears “Sheet Successfully Validated.” Click OK.
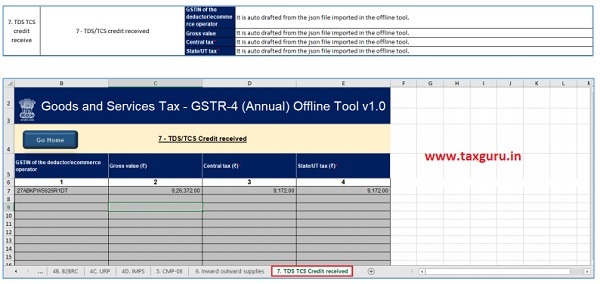
Go to the TDS TCS Credit received tab and view details related to TDS/TCS credit received.
Note: Amount of TDS and TCS are auto-drafted based on the Returns/ Statements filed by TDS and TCS taxpayers. The values in Table 7, TDS and TCS credit received will be populated based on the amount accepted and credited to Electronic cash ledger during that financial year. Details provided in Table 7 cannot be edited.
Note: The table below provides the worksheet name, table name and detailed description for this worksheet. The data in this table will be available if JSON file is downloaded from the portal and TDS/TCS credit is available.
21. In case of unsuccessful validation, error-intimation popup will appear and the cells with error will be highlighted. Close the popup by clicking OK.
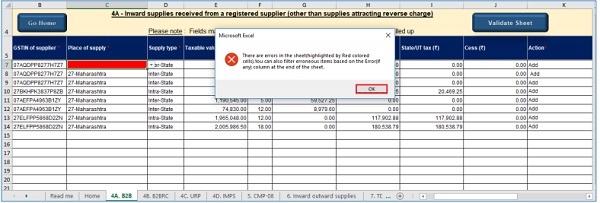
22. The comment box for each cell, that has errors, will show the error message. The user can read the error description of each cell and correct the errors as mentioned in the description box.
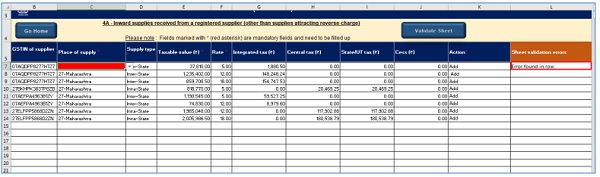
23. Alternatively, click the Review ribbon-tab > Show All Comments link to view the comments for fields with errors.
24. After you have corrected all the errors, again click the Validate Sheet button.

25. A popup Message box appears “Sheet Successfully Validated.” Click OK.
Go back to the Main Menu
F. Generate JSON File to upload
To generate JSON File to upload, perform following steps:
1. From the tab you are on, go to the ‘Home’ sheet by either clicking the ‘Go Home’ button or clicking the ‘Home’ Sheet.
2. Click the Generate JSON File to upload
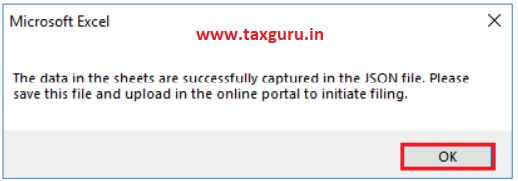
3. A success message is displayed that “data in the sheets are successfully captured in the JSON file. Please save this file and upload in the online portal to initiate filing.” Click OK.
4. A Save As pop-up window appears. Select the location where you want to save the JSON file, enter the file name and click the SAVE button.

5. The JSON file is saved at the selected location. Go back to the Main Menu
G. Upload the generated JSON File on GST Portal
To upload the generated JSON File on the GST Portal, perform following steps:
1. Access the www.gst.gov.in URL. The GST Home page is displayed. Login to the portal with valid credentials. Dashboard page is displayed. Click the Services > Returns > Annual Return command. Alternatively, you can also click the Annual Return link on the Dashboard.
2. The File Annual Returns page is displayed. Select the Financial Year for which you want to file the return from the drop-down list. Click the SEARCH button.

3. The Form GSTR-4 (Annual Return) tile is displayed, with an Important Message box on the bottom. In the Form GSTR-4 (Annual Return) tile, click the UPLOAD/DOWNLOAD JSON
4. The Upload section of the Offline Upload and Download for Form GSTR-4 (Annual) page is displayed, by default. Click the Choose File section.
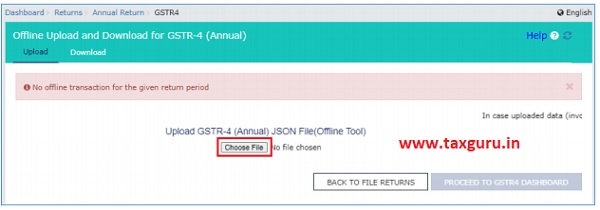
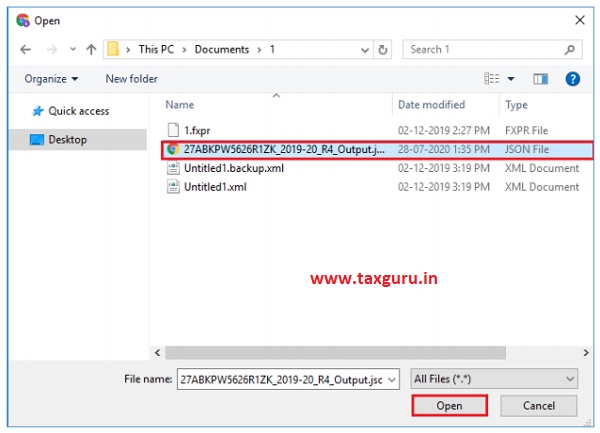
10. Browse and navigate the JSON file to be uploaded from your computer. Click the Open button.
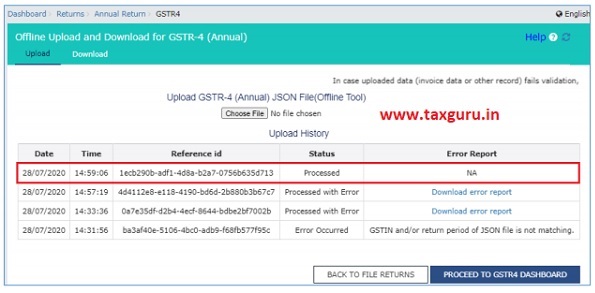
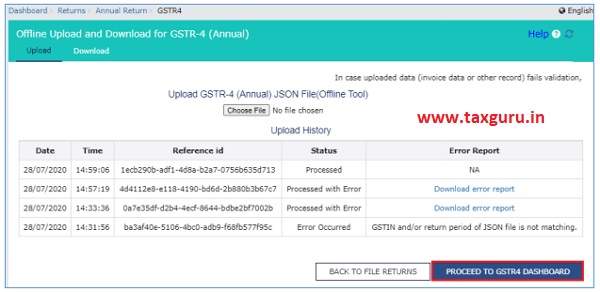
11. The Upload section page is displayed. A green message appears confirming successful upload and asking you to wait while the GST Portal validates the uploaded data. And, below the message, is the Upload History table showing Status of the JSON file uploaded so far.
Note: In case, some details exist from previous upload, it will be updated with latest uploaded details. These details will be updated GSTIN wise for Table 4A and 4B and PAN wise for Table 4C.
12. In case, there was some error in data uploaded, like invalid GSTIN etc. then the Upload History table will show the Status of the JSON file as “Processed with Error”. Rectify the error and upload the JSON file again by following the steps mentioned in the hyperlink to download error report, if any: Download Error Report, If any
Go back to the Main Menu
H. Preview Form GSTR-4 (Annual Return) on the GST Portal
To preview Form GSTR-4 (Annual Return) on the GST Portal, perform following steps:
1. Click the PROCEED TO GSTR4 DASHBOARD button or navigate to Services > Returns > Annual Return > Select the Financial Year > SEARCH > PREPARE ONLINE.
2. The Form GSTR-4 Annual Return page is displayed.
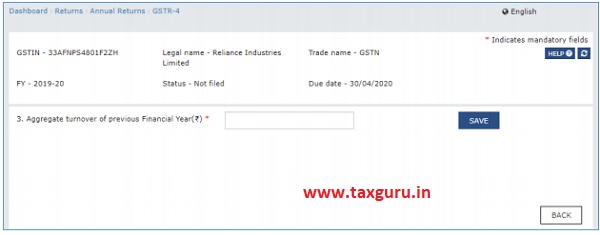
3. The details you had successfully uploaded on the portal using the Offline Utility would be displayed in Table 4 to 7.
For knowing how to proceed to file and file the Form GSTR-4 Return online, please follow the steps mentioned in the following hyperlink: Form GSTR-4 (Annual Return) Online Manual
Go back to the Main Menu
I. Download Error Report, if any
To download the Error report, if any, while uploading Form GSTR-4 (Annual Return) JSON File, for correcting entries that failed validation on the GST portal, perform following steps:
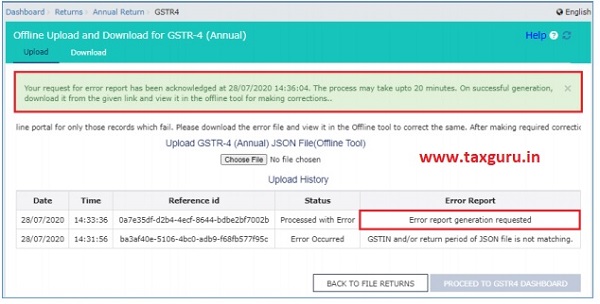
1. Error Report will contain only those entries that failed validation checks on the GST Portal. The successfully-validated entries can be previewed online. Click Generate error report hyperlink.
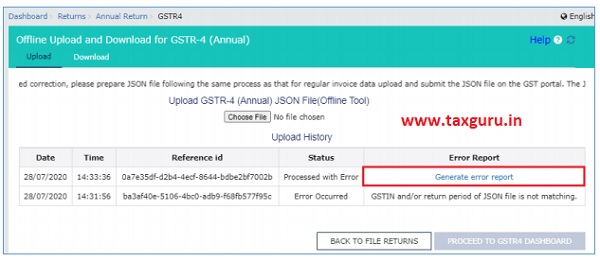
2. A confirmation-message is displayed and Columns Status and Error Report change as shown.
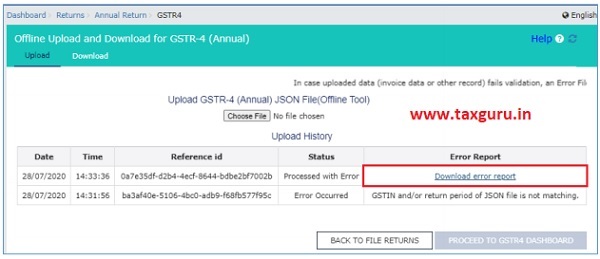
3. Once the error report is generated, Download error report link is displayed in the Column Error Report. Click the Download error report link to download the zipped error report.
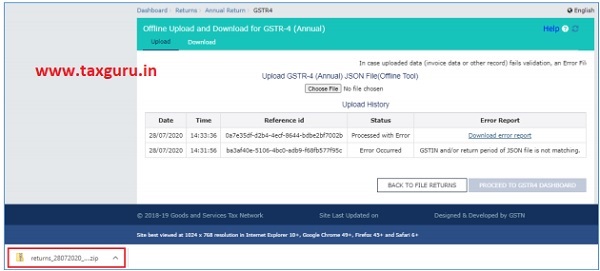
4. The error JSON File is downloaded on your machine. Error Report will contain only those entries that failed validation checks on the GST portal. Unzip the file.
5. Import the JSON file into the offline utility and make updates as necessary, as explained below.
Go back to the Main Menu
J. Open Downloaded Error Form GSTR-4 (Annual Return) JSON File(s)
To open the downloaded Error Form GSTR-4 (Annual Return) JSON File, for correcting entries that failed validation on the GST portal, perform following steps:
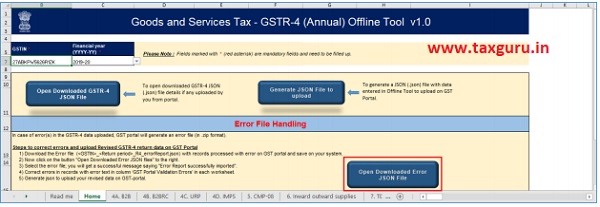
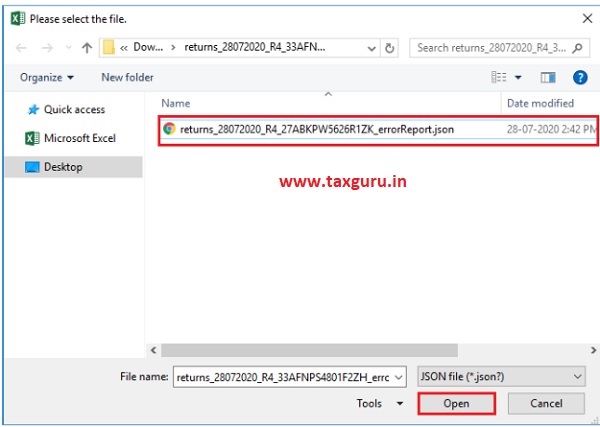
1. Open Form GSTR-4 Offline Utility and go to the Home Under the section Error File Handling, click the Open Downloaded Error JSON File button.
2. A file dialog box will open. Navigate to extracted error file. Select the file and click the OK
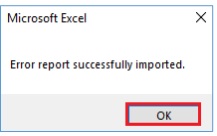
3. Success message will be displayed. Click the OK button to proceed.
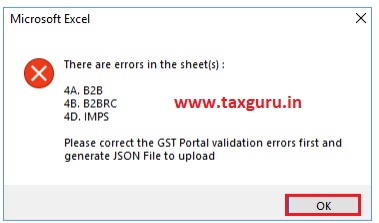
4. The message displays the name of the sheets where error is present. Click OK.
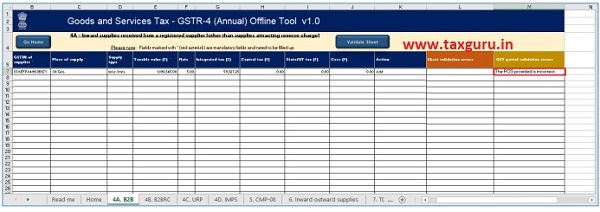
5. Navigate to individual Correct the errors, as mentioned in the column “GST Portal Validation Errors” in each sheet.
6. After making corrections in a sheet, click the Validate Sheet button to validate the sheet. Similarly, make corrections in all sheets and click the Validate Sheet button in each sheet.
7. Error is rectified and GST portal validation errors column is blank now.
8. From the tab you are on, go to the Home tab by either clicking the Go Home button or clicking the Home tab to generate summary. Follow steps mentioned in the following hyperlinks to generate and upload the JSON file: Generate JSON File to upload and Upload the generated JSON File on GST Portal.


